
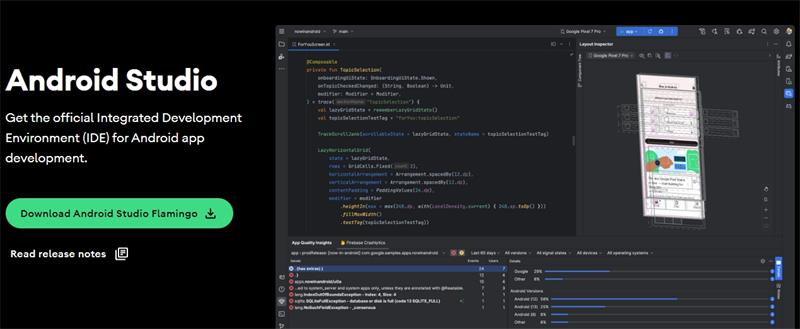
3 Easy Solutions to Hard Reset Nokia C12 | Dr.fone
3 Solutions to Hard Reset Nokia C12 Phone Using PC
Find here 3 easy ways to hard reset Android using ADK or Android Device Manager from your PC. Also, do not forget to back up Android to PC before starting.
There are several cases when someone wants to know about how to hard reset an Android phone using PC. Such cases usually arise when your device is not accessible or stolen. It also involves situations when you forget the password or the unlock pattern of your device, or maybe your phone has frozen and is non-responsive. In such situations, it is very important to know how to reset Android phones to factory settings from the computer.
Factory reset will delete all your user data from internal storage. Thus it is also very important to back up all your internal data of the Nokia C12 device before you hard reset Android via PC. Moreover, a hard reset should be your last option at hand to revive your Android device. Hence, in this article for all the users out there, we have picked up the solution on how to factory reset Android Phone using PC.
You must ensure that all the steps are followed in sync so that the hard reset Android via PC is successful.

Part 1: Back up Android before hard reset
Since factory reset involves removing all data, adjusted settings and logged accounts from the Nokia C12 device; therefore, it is very important to back up all the data before moving on with the factory reset process. So, in this section, we will show you how to first back up your Android device using the Phone Backup . This is an easy-to-use and very convenient Android backup software that can be used to back up an Android device.
![]()
Flexiblely Back up and Restore Android Data
- Back up Android data to the computer with one click.
- Preview and restore the backup to any Android device or iOS device.
- Supports 8000+ Android devices.
- There is no data lost during backup, export, or restoration.
3,981,454 people have downloaded it
Let’s have a look at the easy process to back up Android before the factory reset it.
Step 1: After installation completes, connect your Android device via data cable and go to “My Backup”. Then, this tool will automatically detect your device.
Step 2: You can now see the file types that will be backed up, such as Contacts, Messages, Calendars, Videos, etc.

Step 3: Click on “Backup pow” to proceed with the process. The backup process will start, keeping connected the Nokia C12 device during the phone backup process.

Step 4: Within a few minutes, your whole device will be backed up. You can click “View Backups” to view all data that is backed up.


Phone Backup is one of the handiest and easy-to-use features within Wondershare Dr.Fone. Users can select their opted files manually to restore. This tool supports 8000+ Android devices worldwide. Users will feel safe and secure using this revolutionary software.
 safe & secure
Part 2: Hard Reset Android using Dr.Fone - Screen Unlock (Android)
Dr.Fone - Screen Unlock (Android) is a user-friendly software tool that helps you unlock your Android device if you forget the passcode, pattern lock, PIN, or face/fingerprint lock. It supports various Android devices, allows you to bypass lock screens without data loss, and provides step-by-step instructions for easy unlocking. It also helps with FRP unlock and works on both Windows and Mac systems.
Step 1: Launch Dr.Fone - Screen Unlock on your computer and select “Screen Unlock” from the main interface. After that , you need to connect your Android phone to the computer using a USB cable.

Step 2: Choose “Android” > click “Unlock Android Screen” if you want to remove the lock screen. Choose your device brand. The hard reset methods vary for different device brands, so make sure that you choose the correct device brand.

Step 3: Put the Android phone into Specific mode with the help of Dr.Fone. And then, Dr.Fone will factory reset your Android phone within a few minutes. Now you can access your Android phone without a password!

safe & secure
In this process, we will learn how to hard reset Android phone to factory settings from a computer using SDK. This involves removing all data from the Nokia C12 device using a PC.
Follow the given steps to know how to hard reset an Android phone using PC.
Pre-Requirements
• PC that runs on Windows (Linux/Mac installer is also available)
• You have to download Android ADB tools on your computer. Android ADB Download: https://developer.android.com/studio
• A USB Cable to connect your Nokia C12 with your computer.
Steps to hard reset Android using SDK
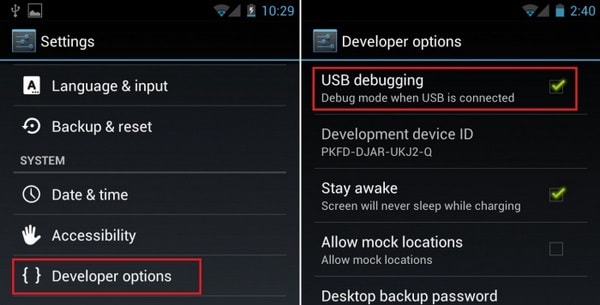
Step 1: Enable USB Debugging in the Android settings. Open Settings>Developer options>USB Debugging. If developer options can’t be found on the Nokia C12 device, then please go to Settings > General > About phone > Common > Software info (tap on it 5-8 times).

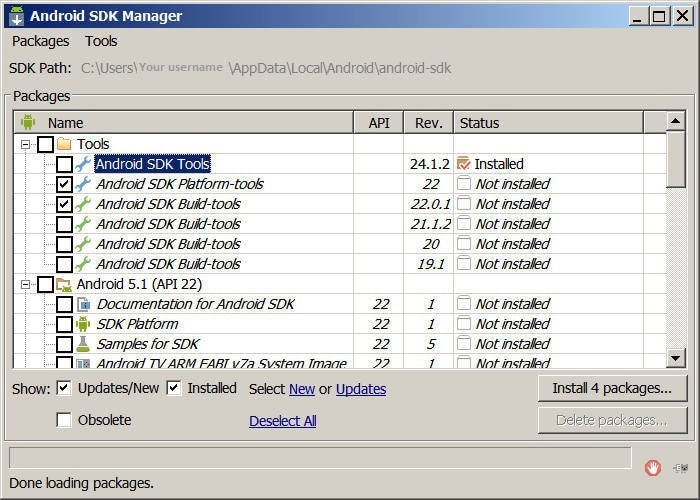
Step 2: Install Android SDK Tools. Ensure that Platform-tools and USB drivers are selected in the SDK manager window.
Step 3: Ensure that the drivers for your Android are installed on your PC or at least the Generic drivers are present
Step 4: Connect the Nokia C12 device to the PC using a USB cable. Ensure that the Nokia C12 device is recognized in the Windows Device Manager.
Step 5: Open the command prompt in Windows and go to C:\Users\Your username\AppData\Local\Android\android-sdk\platform-tools
Step 6: Type ADB reboot recovery and the Nokia C12 device will restart. The recovery menu must appear after this
Step 7: The device can be disconnected now. Now, you can remove the password or simply Factory Reset the Nokia C12 device.
Now, you have successfully reset your device using a PC.
Although the first process is the easiest, in certain cases, you might have to look for other options too. Kindly follow the steps thoroughly and format your device with ease.
Part 4: Hard reset Android using Android Device Manager (Find My Device)
When someone loses their phone, or it is stolen, the two questions that commonly arise are: how to locate the phone? And if it is not possible, how to remotely wipe the phone’s data? People can use the Android Device Manager (also referred to as “Find My Device”) and do the exact two things. The best thing about this is that it doesn’t need to be installed as it is inbuilt on all Android Devices.
Let us look at the following steps to know how to reset Android phones to factory settings from the computer.
Requirements for Android Device Manager to Work:
• It must be activated in the Nokia C12 device administrator settings. Go to settings > Security > Device administrators and check whether ADM is enabled as a device administrator or not.
• The location of the Nokia C12 device must be ON
• The device must be signed in to a Google account
• The device must have an active internet connection
• The device should not be switched off
• Even if the Nokia C12 device is without SIM, the Google account must be active
Steps to use ADM to wipe or locate any Android Device:
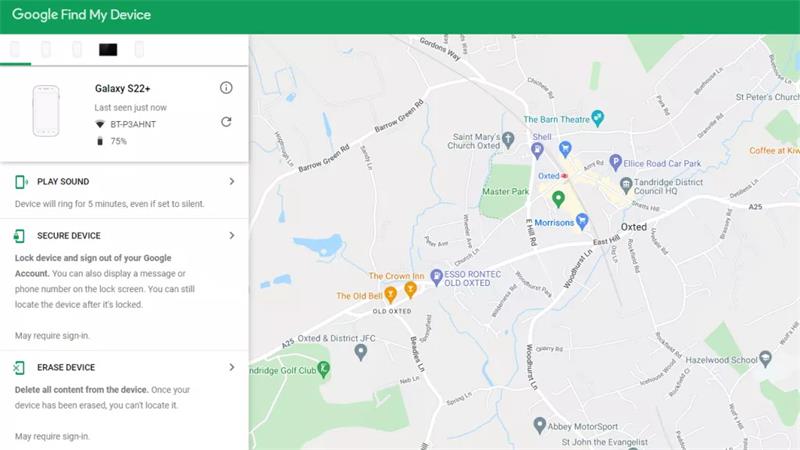
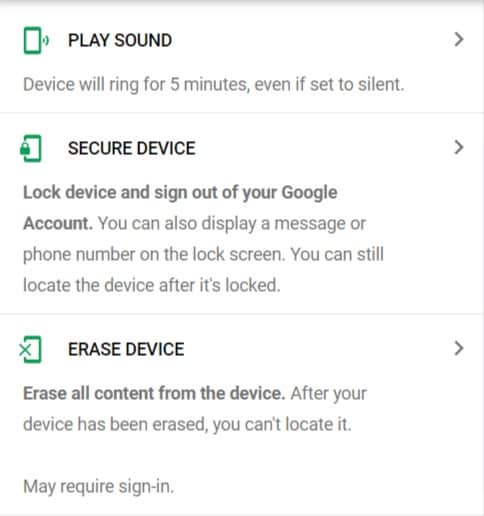
Step 1: Directly go to the Android Device Manager website , and log in to your account. You will get three options: “Play Sound”, “Secure Device” and “Erase Device”.
Step 2: Click on the “Play Sound” option will make it raise the alarm, notifying of the location, you can easily locate your Android phone if it is nearby.
Step 3: Click “Secure Device”, you can remotely lock your device with a new passcode, display a custom message on the lock screen, and even track the Nokia C12 device’s location in real-time. It also gives you the option to add a contact number, so anyone who finds your device can reach out to you.
Step 4: Select “Erase Device” to reset your device. Once you select this option, the interface will take over and complete the job. Congratulations! You have successfully used the Android Device Manager (ADM) to reset your Android smartphone.
The Bottom Line
So these were the third different methods through which you can hard reset your Android device. Resetting the Nokia C12 device involves removing every data from the Nokia C12 device. The phone gets back to the same state as it was out of the box. Hence, most importantly, do not forget to back up data using Phone Backup and restore beforehand so that you do not end up losing anything important.
How do I reset my Nokia C12 Phone without technical knowledge?
Resetting a Nokia C12 smartphone to factory settings could be necessary. You will probably need to do a hard reset if you want to unlock your smartphone or sell it to someone else. The majority of Nokia C12 devices may be quickly reset simply by pushing the volume and power buttons together. However, hard resetting a Nokia C12 sometimes is a whole other situation and may be much more difficult. That myth will be dispelled for you by us!
If the Nokia C12 device is functioning properly, hard resetting a Nokia C12 tablet without volume buttons won’t be too difficult and can be completed in a matter of taps. However, if the apparatus is broken, it may be an issue. Let’s have a look at all the possibilities.
Part 1: 4 Easy solutions to hard reset your Nokia C12
1. From recovery mode to delete all data
It’s not particularly difficult to reset a Nokia C12 smartphone or tablet, especially if it has a home button. You can only do a hard reset on a Nokia C12 tablet without volume buttons after entering recovery mode. Follow the procedures outlined below to learn how to reset a Nokia C12 tablet without volume buttons.
Step 1: First, press the power off and home buttons.
Press the power button repeatedly until the Power off, Restart, and other choices are shown. Now, choose “Power Off” and hold it down while tapping your phone’s home button.
At the same time, the Nokia C12 device.
Step 2: Verify the safe mode bootup.
The screen for restarting in safe mode will now show up. To switch to safe mode, select “Yes.”
Step 3: Switch to recovery mode
Your device’s power and home buttons must be pressed and held simultaneously until a new screen shows. Release the two buttons once it appears, then press the power button one more. Press and hold the home button for a moment. With that, recovery mode will start, and a new set of choices will show up on the screen.
Step 4: Select “Factory Reset” and navigate
Navigate down to the “Wipe data/factory reset” option using the home button. To choose the choice, press the power button.
2. Use the factory reset code to wipe data in Nokia C12
Step 1: Press the Volume Up + Power Keys at the same time as turning off your smartphone and removing the SIM card.
Step 2: The Nokia C12 logo will appear when the phone boots. Keep none of the keys.
Step 3: Scroll down to the Wipe Data / Factory Reset option using the volume down key.
Step 4: If you want to say “OK” and reset, press the Power Key.
To delete all user data, click “Yes.”
Step 5: The factory data reset process will begin on the phone.
After formatting is finished, click “Reboot System Now.”
3. Google Find My Device
Finding My Device:
Go to www.google.com/android/find on your computer’s web browser and sign in with the same Google Account you used on your phone.
When your phone is located, Find My Device will provide specific location information.
Do any of the following:
- If you’ve merely lost your phone, click Play sound to make it ring.
- If you’re using Find My Device for the first time, select Set up secure & erase to configure remote locking and erasing for your phone.
- To lock your phone and log out of your Google Account, click Secure device.
- If you wish to completely delete everything on your phone, choose Erase device.
The removal of all data from your phone’s storage, including applications, app data, and settings, will result from remotely wiping it. Personal information is one type of data that might not be completely removed. After doing this, you won’t be able to access your phone remotely.
4. Dr.Fone - Data Eraser
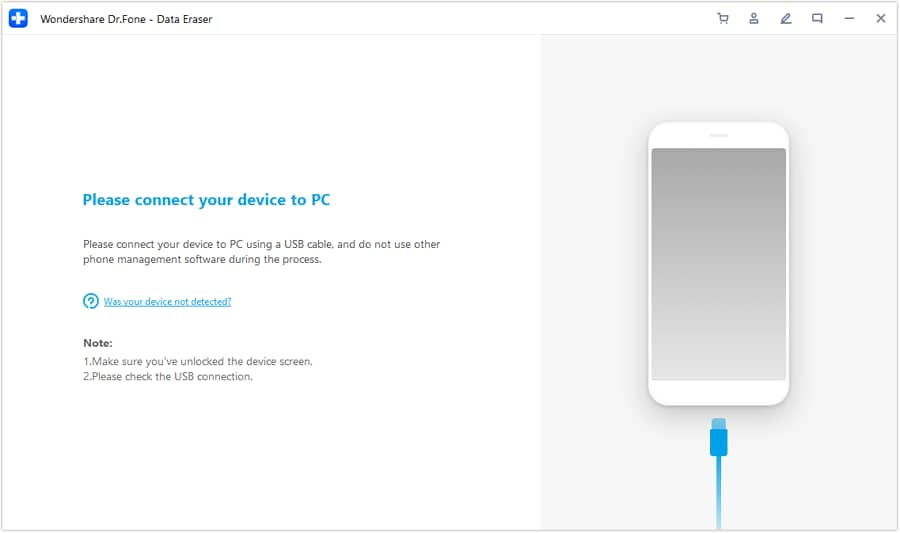
Step 1: Connect your Nokia C12 phone to the desktop. Get Dr.Fone running on your PC. Choose “Data Eraser” from the list of tools.
Utilize a USB cord to link your Nokia C12 phone to the PC. Make sure USB debugging is enabled on your phone. On your phone, there will be a pop-up window requesting you to authorize USB debugging if the Nokia C12 OS version is higher than 4.2.2. Click “OK” to move forward.
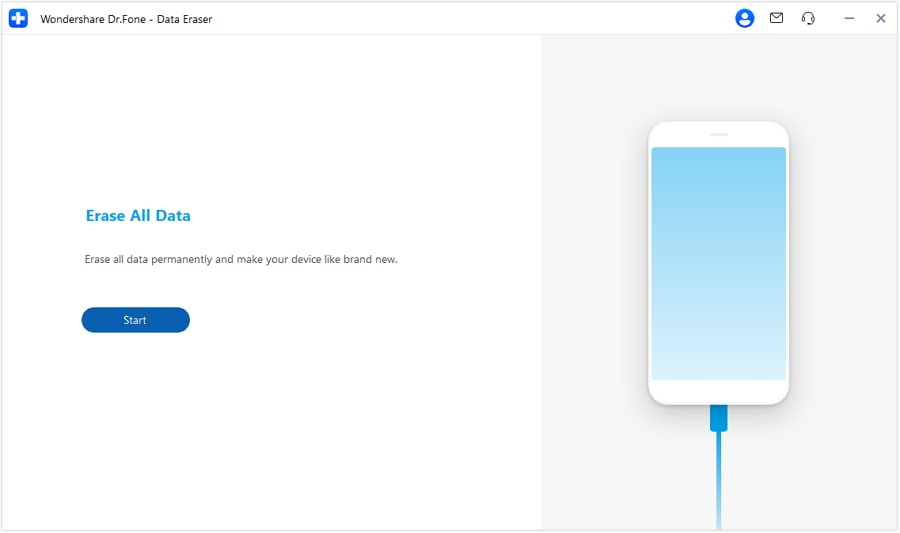
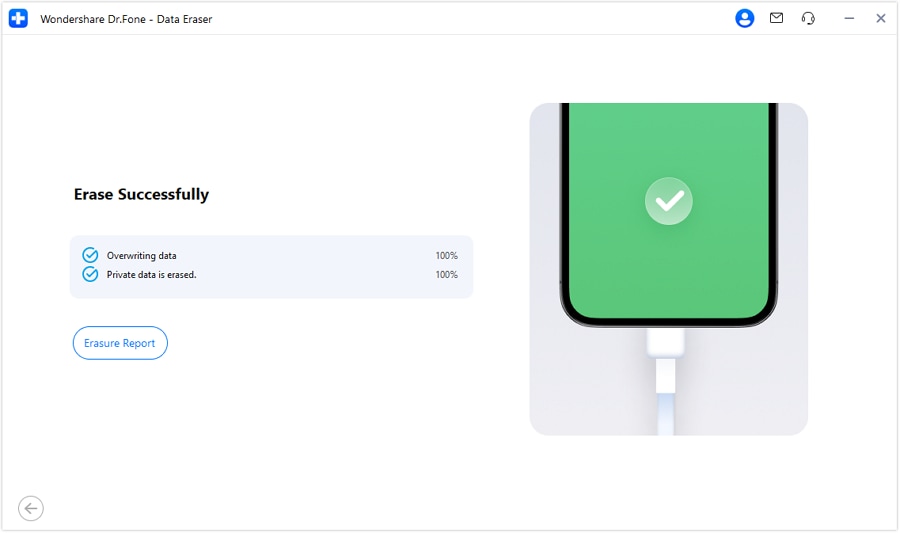
Step 2: Start erasing your Nokia C12 phone
Your Nokia C12 smartphone will then be immediately detected and connected by Dr.Fone. To begin wiping all of your data, click the “Erase All Data” option.
Make sure you have all the necessary data backed up before continuing because all wiped data cannot be recovered. After that, enter “000000” to verify your action.
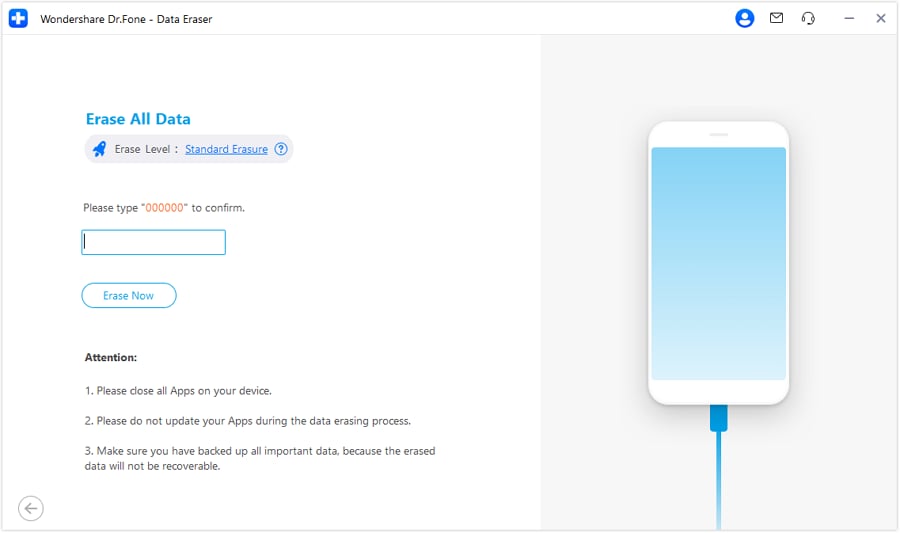
The data on your Nokia C12 phone will then begin to be deleted by Dr. Fone. The entire process only requires a few minutes. Do not turn off the phone or launch any other phone management programs on the PC.
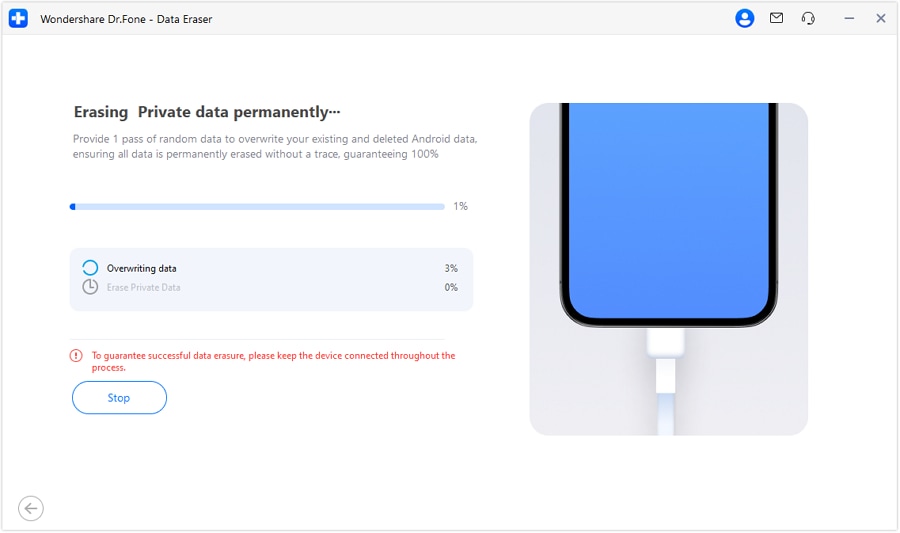
Step 3. Reset the factory data on your phone.
Dr.Fone will prompt you to tap on Factory Data Reset or Erase All Data on the phone once all app data, photographs, and other private data have been entirely removed. You may use this to entirely erase all of the phone’s settings.
safe & secure
Part 2: FAQs
1. Is there any simple tool to have my Nokia C12 backup? (Dr.Fone - Phone Backup)
Yes, there are very few simple tools available that you can use to back up your Nokia C12 phone. One such tool is Dr.Fone - Phone backup which is super simple to use and extremely beginner friendly and how you recover all of your lost data from your Nokia C12 phone.

2. Do these solutions damage my Nokia C12?
Unfortunately, many of the solutions that you used to recover or back up your Nokia C12 phone damage the quality of the information and also the hardware or software of your Nokia C12 mobile however the best solution to this problem is using Dr.Fone - Phone backup which is a supplied tool which does not cause any problem during or after its usage and help you recover all kind of lost data.
The Bottom Line
Now that you know how to reset a Nokia C12 phone that is locked and how to use Nokia C12 hard reset code to reset Nokia C12, it is time to implement resolution though you can try, and among the ways given above, the best solution is to go with the Wondershare Dr.Fone - Phone Backup. It is a great tool that will immediately help you recover all of your lost information from your Nokia C12 phone without causing any harm to your device.

safe & secure
4 Easy Ways for Your Nokia C12 Hard Reset
Nokia C12 is a popular smartphone brand that has a wide range of models. If you are a Nokia C12 user, you might have to hard reset your phone for various reasons. A hard reset is a process that erases all data and settings from your phone, and it is the last resort to fix any software-related issues. If you are looking for ways to hard reset your Nokia C12 phone, you are in the right place. In this guide, we will discuss four easy ways to hard reset your Nokia C12 phone.
If your Nokia C12 phone is very slow or hangs, and you cannot fix it even working with memory and other stuff, then you can solve this issue using Nokia C12 hard reset. This also works if you have forgotten your PIN or password or you want to bypass the screen lock. So, how to hard reset a Nokia C12 phone?
Part 1: 4 easy ways to hard reset your Nokia C12
Hard reset Nokia C12 is an excellent solution for bypassing screen lock and recovering locked Nokia C12 phone. It is also an option to format your Nokia C12 phone if you are handing over or selling your phone and want to keep your data secure. So, what are the tools or techniques for Nokia C12 hard reset?
1. Google Find My Device (data loss)
Google Find My Device is your best bet if you want to reset your Nokia C12 phone hard remotely. So, here is the step-by-step guide for this method.
Launch Google Find My Device on your computer and sign in with your Google credentials.
You can choose three options, i.e., Play sound, Secure device, and Erase device.
Click the Erase Device link.
In the Erase all data menu, click the Erase option.
2. Gmail account
If you opt for a Nokia C12 hard reset because of screen lock or phone locking issues, then your other option is to use the Gmail account to unlock it. If you are wondering how to use a Gmail account for unlocking, here is the step-by-step guide.
- Power On your Nokia C12 Android phone.
- When you attempt your phone incorrectly multiple times, you will see the Forgot pattern option.
- Click the Forgot pattern option.
- Fill in your Google Account credentials to log in.
- Now, unlock your device and choose a new password.
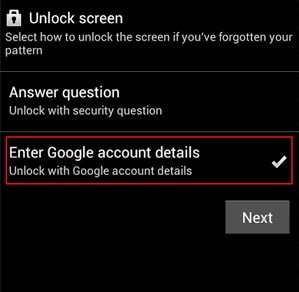
Google security questions or your device company Security questions will help you to reset your phone password without data loss.
- When you attempt a wrong password multiple times, you will see options for recovering passwords.
- Click on the Forgot pattern option.
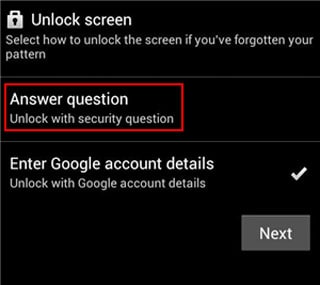
- Click on the “Answer question”.
- Answer the security questions correctly to unlock your phones and choose a new password or pattern lock.
4. Use Dr.Fone - Data Eraser
If the reason for hard resetting your phone is any issue with the deleting data of the phone, second-hand phone for sale, then your phone need to data erasing. Since it is a complicated technical procedure for a layman, we recommend using Dr.Fone - Data Eraser because of its ease of use and efficiency. You can erase all types of data using this software. Let us see how it works.
- Connect Your Android Phone
Launch Dr.Fone on your computer. Select “Data Eraser” among all the tools to resolve the Nokia C12 hard reset.
Connect your Android phone to the computer using a USB cable. Make sure you have enabled USB debugging on your phone. If the Android os version is above 4.2.2, there will be a pop-up message on your phone asking you to allow USB debugging. Tap on “OK” to continue.
- Start Erasing Your Android Phone
Then Dr.Fone will automatically recognize and connect your Android device. Click on the “Erase All Data” button to start erasing all your data.
Since all the erased data are not recoverable, make sure you have backed up all the needed data before you proceed. Then key in “000000” into the box to confirm your operation.
Type in “000000” to confirm and move on. Since you may lose your data in system repair and in case of a Nokia C12 hard reset, your phone’s memory is wiped, it is always important to keep a backup of your phone data. More on this in the next section.
Then Dr.Fone will start erasing all data on your Android phone. The whole process takes only a few minutes. Please don’t disconnect the phone or open any other phone management software on the computer.
- Perform Factory Data Reset on Your Phone
After all app data, photos, and all other private data have been completely erased, Dr.Fone will ask you to tap on Factory Data Reset or Erase All Data on the phone. This will help you completely wipe all the settings on the phone.
Now your Android phone has been completely wiped and it’s like a brand new one.
safe & secure
The best thing you can do to keep your data secure, even in case of unwanted crashes and accidents, is to periodically back up your phone and computer. So, you might ask what the best way to back up my phone is. We recommend Dr.Fone - Phone Backup because it is part of your phone’s comprehensive suite of solutions and works efficiently without any technical input from you.
The Bottom Line
In the current digital age, part of our life depends on our gadgets, so keeping them updated and tuned in is the best strategy to function without unwanted bumps. Obviously, it takes some pre-planning like periodic data backup, memory refresh, optimum charging, and so on. Dr.Fone is a comprehensive suite of applications that help you maintain your devices and fix them in case of an accident. This article discusses the Dr.Fone - Data Eraser for Nokia C12 hard reset.
- Title: 3 Easy Solutions to Hard Reset Nokia C12 | Dr.fone
- Author: Nova
- Created at : 2024-07-17 15:14:01
- Updated at : 2024-07-18 15:14:01
- Link: https://phone-solutions.techidaily.com/3-easy-solutions-to-hard-reset-nokia-c12-drfone-by-drfone-reset-android-reset-android/
- License: This work is licensed under CC BY-NC-SA 4.0.