
Can I recover my data if my iPhone 13 mini screen turns black? | Stellar
Can I recover my data if my iPhone screen turns black?
Yes, you can recover your iPhone data when its screen turns black and is not accessible.
However, the recovery option would depend, if your computer is trusted by the iPhone or not.
If the computer is not trusted, you can recover lost/deleted data from either the iTunes backup or iCloud backup.
Steps, when your computer is trusted by iPhone
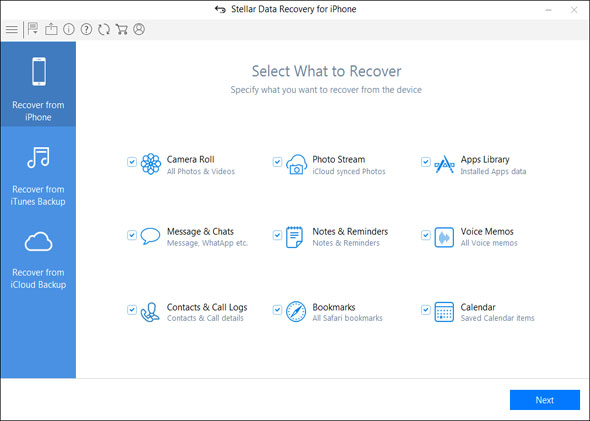
• Download and launch the trial* version of Stellar Data Recovery for iPhone on your PC or Mac
• Connect your iPhone to the PC or Mac
• Select Recover from iPhone or Recover from iTunes

• Follow the simple onscreen instructions
Steps, when your computer is NOT trusted by iPhone
• Download and launch the trial* version of Stellar Data Recovery for iPhone on your PC or Mac
Note: You don’t necessarily need to connect your iOS device for recovering deleted data. Connect it only when you want to save the recovered data in iPhone.
• Select Recover from iCloud
• Follow the simple onscreen instructions
*The trial software scans the media and shows preview of all the recoverable files. Once you are able to ascertain the effectiveness, you can save the recoverable files by activating the software.
Stellar Data Recovery for iPhone® Stellar Data Recovery for iPhone® is the best DIY software to recover missing or accidentally deleted Contacts, Messages, Calendar, Photos, Videos, Call History etc directly from iPhone or iPad.
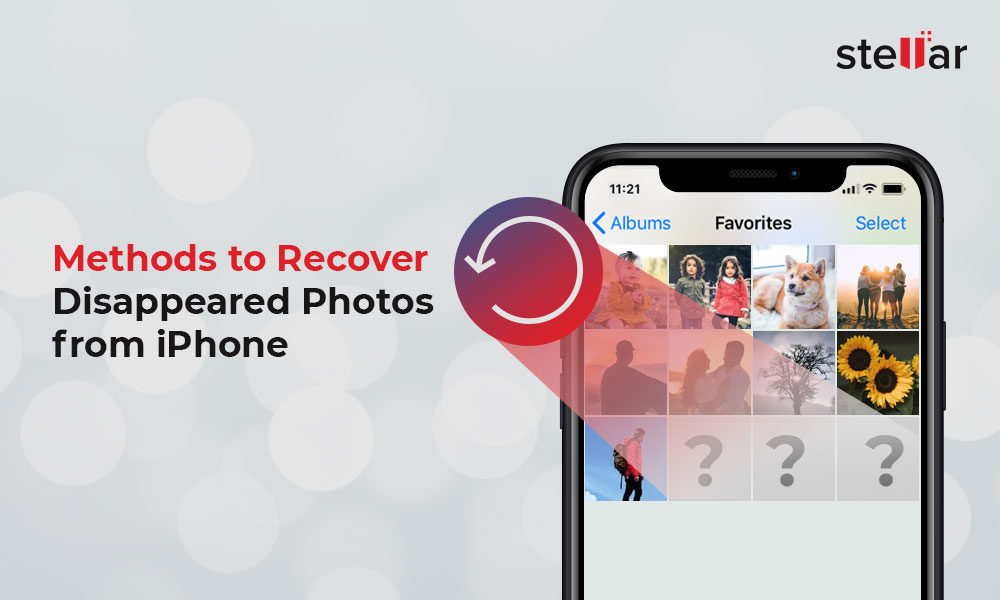
Solved: Photos Disappeared from iPhone Suddenly
‘I noticed that over 500 old photos from iPhone 11 have disappeared and now only the recently shot pictures are showing! I lost almost all of my best memories saved in my phone. I am sure I did not delete them. Where did the pictures disappeared from iPhone? How do I get back photos missing from iPhone? Please help.’
Photos suddenly disappearing from iPhone or random photos missing from Camera Roll or Gallery is a common complaint. Usually, photos get disappeared after iOS update, iPhone reset/restore, or when the device storage is full. You may also lose pictures after installing any new software, or jailbreaking. Sometimes, running an iPhone cleaning software without checking what it is deleting on your iOS device can also result in loss of photos.
The situation is stressful, even more when you don’t have any copies or backup of lost photos.
So how to recover the missing or lost photos on iPhone? This post shares the effective methods to get back the missing photos from Camera Roll, Gallery, or iCloud on your iPhone.
In any such sudden photo loss situation, the best solution is to use a secure photo recovery tool for iPhone that can recover photos lost due to any reason. Besides, there are free methods that might restore disappeared photos from iPhone, which you should try once.
Method 1: Restart your iPhone
If your photos suddenly disappeared from iPhone, first restart the iOS device. Then open the Photo app, Camera Roll, or Photo Stream to see if the missing photos are showing or not.
You can check here the steps to restart your iPhone model .

Method 2: Restore photos from Recently Deleted folder on iPhone
You might have accidentally deleted the photos on iPhone. Check and recover the photos from the ‘Recently Deleted’ folder of your Photos app.
Steps to recover photos on iPhone from ‘Recently Deleted’:
- On your iPhone, click to follow Photos > Albums.
- Scroll down to Utilities and click Recently Deleted.
- Look for your missing photo, tap on it and choose Recover. If there are multiple photos, click on ‘Select’ followed by ‘Recover’.
Note: Photos deleted on iPhone stay in your ‘Recently Deleted’ folder only for 30 days, after which they are permanently removed from the iOS device.

Method 3: Unhide photos on iPhone
Photos disappeared from iPhone can be in the hidden folder in Photos app. Simply, check the Hidden folder on your device and unhide the required photos.
- Open Photos app on iPhone.
- Click on Albums.
- Under Utilities click on Hidden folder. In case you don’t see the ‘Hidden’ folder, go to ‘Settings’ of your iPhone. Click on ‘Photos’ and toggle on ‘Hidden Album’.
- If you see the disappeared photos, select and click on the ‘Share’ button (the arrow icon).
- Next, tap Unhide to move the pictures to their original location on iPhone.
Method 4: Enable iCloud Photos
iCloud Photos store images in iCloud and syncs them to your iPhone, iPad, iCloud.com, iPod touch, Mac, and Apple TV. This means that any changes done to pictures library on one device will show up on your other iOS devices as well. If the photos are disappearing from iPhone only, may be the iCloud Photo is not synced or turned on. So enable iCloud Photos to get back the disappeared pictures on iPhone.
Steps to enable iCloud Photos on iPhone:
- Turn on Wi-Fi of your iPhone.
- On iPhone, navigate to Settings.
- Click on your name and tap iCloud > Photos.
- Toggle on iCloud Photos.
Now check if the missing photos are showing up on iPhone or not.
Method 5: Recover iPhone photos from iTunes backup
If you have created iTunes backup, restore the disappeared photos on iPhone from it. However, this will replace your existing iPhone data with iTunes backup data.
Steps to recover photos from iTunes:
- Connect your iPhone to computer.
- Launch iTunes.
- Select your iPhone under the device list and click on Summary.
- Click Restore Backup.
- In the Restore from Backup box, select the backup date that contains your photos.
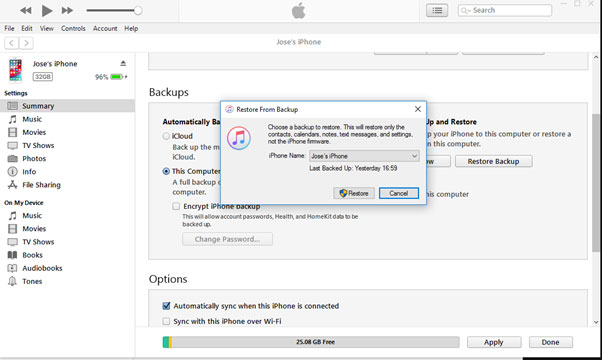
- Click Restore. Wait until the process finishes and your iPhone restarts. All your disappeared photos will be recovered on iPhone.
Method 6: Restore photos from iCloud Backup
You can restore the previous iCloud backup that has the missing photos. However, like iTunes, this method will also replace the current data on your iPhone.
Steps to recover disappeared photos from iCloud:
- On your iPhone, go to Settings > General > Reset.
- Click on Erase all Contents and Settings. In the dialog box, choose Erase Now.
- On the Apps & Data screen, click Restore from iCloud Backup. Enter your Apple ID. In case you have forgot your Apple ID, click here to know how to recover it.

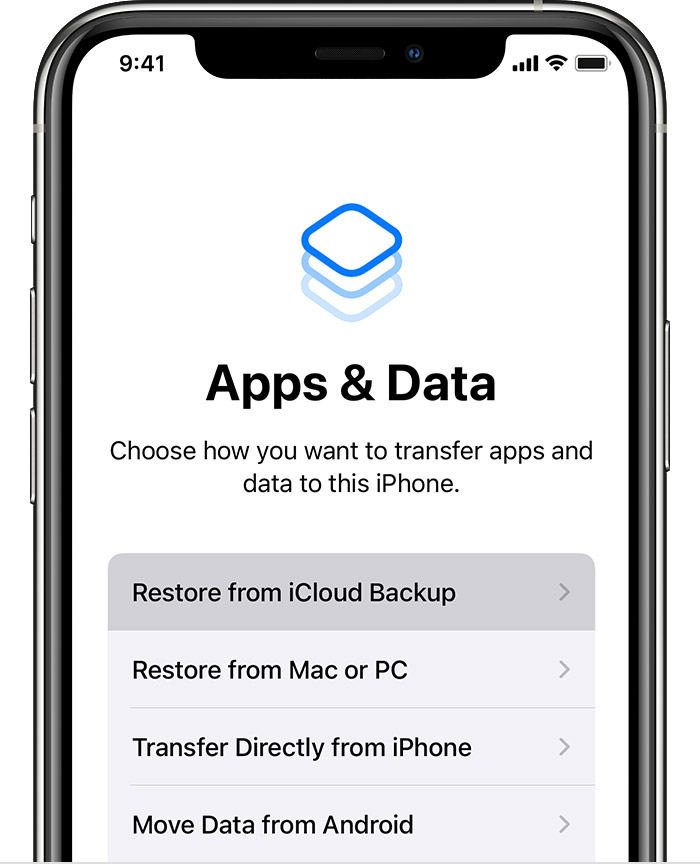
- Select the recent backup and click Restore. The lost photos should now appear on iPhone.
Method 7: Recover lost photos with an iPhone data recovery software
The advanced iPhone recovery software — Stellar Data Recovery for iPhone, can restore photos lost, deleted, or missing due to any reason. Whether your photos disappeared from iPhone after update, due to low storage, or any other reason, the software can recover in all situations.
The biggest advantage of using the software is that it doesn’t remove your existing iPhone data. Further, the software shows the preview of the recoverable photos. Hence, its easy to select and recover only the required disappeared pictures from Camera Roll, iCloud Photo Library, Gallery, or those shared on chat messages, etc. Stellar Data Recovery for iPhone is compatible with the latest iPhone 14/13/12/11, iPad, and iPod touch. The software supports recovery from the latest iOS 16 and older versions.
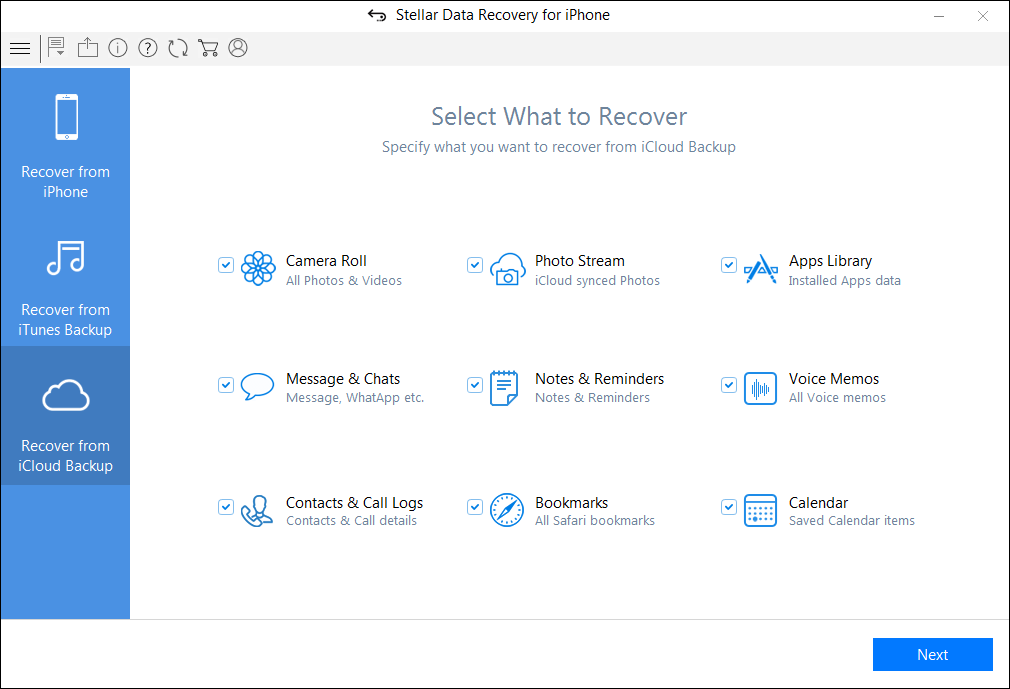
Quick steps to recover disappeared photos from iPhone:
- Download Stellar Data Recovery for iPhone on PC or Mac.
- Connect your iPhone to computer.
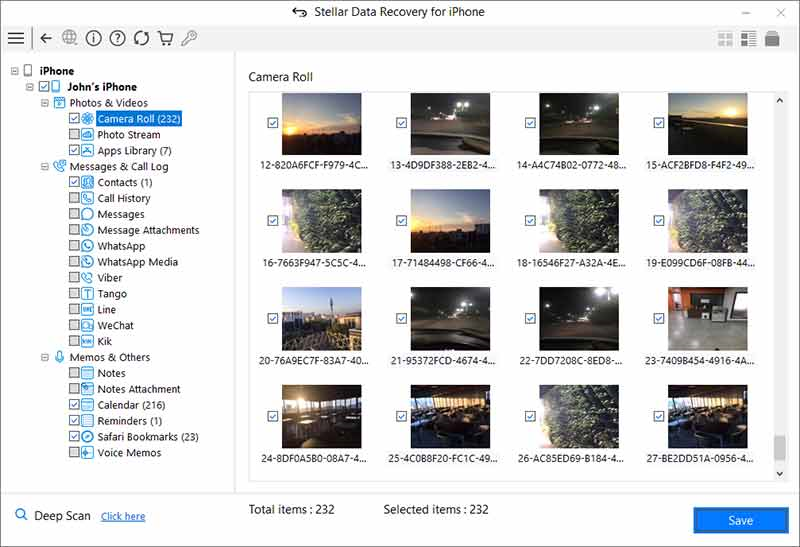
- Launch the software and select Recover from iPhone option from the left panel.
- Select the Camera Roll or Photo Stream from where the photos have disappeared and click Next to the start the scanning process.
- Now preview the recoverable photos, select them, and click Save to restore on iPhone or computer.
Note: You can also recover the lost photos from backup by choosing Recover from iCloud backup or Recover from iTunes backup , options in the software.
## **Conclusion**When you find suddenly photos disappearing from iPhone try any of the above 7 methods to get back the lost pictures. However, of all we recommend solutions Stellar Data Recovery for iPhone software is quick and easy to use. It is also of great help when you don’t want to recover from iCloud or iTunes backup that removes the existing data on iPhone.
How to fix ‘Unable to load Video: An Error Occurred’
Summary: Are you facing ‘unable to load video’ error message while trying to play videos on iPhone or iPad? No worries. This post guides you how to fix the error and watch your videos on the iOS device without any issue.
‘I am frequently facing ‘unable to load video’ error message ever since iOS 16 update. Its annoying as I cannot watch videos on iPhone. How to fix the issue?’
‘Since I upgraded to iPhone14 Pro from iPhone 11, I have problem playing a few videos. It states ‘error loading video’. I even bought more iCloud storage but no luck. Please help.’
Videos not loading on iPhone or show ‘Unable to load video, an error occurred’ message is a persistent issue faced by iPhone users, even after successive iOS upgrades, irrespective of the iPhone model.
As the annoying error stops you from watching your favorite videos on iPhone, you want to fix it soon. But before that its’ important to understand what could be the cause of this ‘unable to load video’ error, to troubleshoot the problem accordingly.
Why iPhone shows unable to load videos error?
There is no single reason for video loading error. Usually, videos saved in iCloud would display unable to load error on iPhone, if the Internet is off or you have slow connection.
Another common reason behind videos not loading on iPhone is that the ‘optimize storage’ option is enabled on your iOS device. Apple offers this feature to save space on your iOS device and stores the full resolution videos to iCloud. However, this often results in the video loading problem on the device.
Its’ also possible that your iPhone has insufficient space, which prevents videos from loading. There could also be a bug that can be fixed with iPhone update.
Right 9 ways to Fix ‘Unable to load Video, an error occurred’ on iPhone, iPad

Method 1: Restart iPhone
Restart, also called soft reset can fix error in loading video on iPhone or iPad. Close all the applications and restart your iPhone or iPad.
Method 2: Turn on Internet of the iOS device
If you are watching YouTube, Netflix, or other online videos, ensure cellular data of your device is turned on. In case you are facing the error ‘unable to load video: an error occurred’ while loading a higher quality version of the video on iPhone, try by switching to uninterrupted Wi-Fi connection. Note that high speed Internet is necessary for streaming videos on iOS device.
Method 3: Update your iOS device
You can update the device to fix ‘unable to load video’ error on iPhone or iPad. To update your iPhone or iPad follow the given steps. Before that make sure Wi-Fi is turned on.
- Go to Settings > General > Software Update.
- Click Download and Install followed by Install Now.
Method 4: Turn off the Optimize Storage option
When ‘optimize storage’ option is enabled on your iOS device, all the full-resolution high quality videos and photos get saved in iCloud while only the compressed space-saving versions are on your iPhone.
Thus, when you try to open a video on the iOS device, it takes time eventually to load it from iCloud. While sometimes, the video may not load at all. Try to fix unable to load video on iPhone by turning off this feature. Here are steps to disable optimize storage’ option:
- Open Settings. Click on your name.
- Tap on iCloud > Photos.
- Below Optimize iPhone Storage, tap on Download and Keep Originals option.

Figure: Disable Optimise iPhone Storage Option
Wait until the iPhone downloads all the videos from iCloud. You should now be able to open videos without loading error.
Method 5: Update the app that shows video load error on iPhone
If the video loading issue error pops up in a particular app like YouTube, Instagram, then update the application. If the update doesn’t help, you can reinstall the app also. This should fix videos not loading error or buffering issues. App update are available in App Store. To update any iPhone app follow the given steps:
- Open the App Store.
- Now click on your profile icon on top.

Figure: Update app in App Store
- Scroll to find your app and click on the Update button next to it. You can also click on Update All on top.

Method 6: Create free space on your iPhone
High quality videos may not load and show error if there is no space on your iPhone. Check your iOS device, if it has enough free space. Its’ essential to have 2GB free space available in the device to play high quality and large size videos.
You can check the available space on your iPhone or iPad by navigating to: Settings > General > iPhone Storage.

Figure: iPhone storage screen
On the top right, you will see the amount of space used on your iOS device. If the space is less, remove the useless videos, photos, apps and other data on your iPhone or iPad.
Method 7: Access video from iCloud.com
If the videos don’t load on iPhone and show error, try to access them via iCloud.com on your computer by following the below steps:
- Open iCloud.com and enter Apple ID credentials to sign in.
- Click on the Photos or iCloud Drive app where the video is saved.
- Find your video and click on it to open.
There’s also the options in icloud.com to share the video via email or download to save it on your computer.
Method 8: Repair video not loading on iPhone
If you face ‘unable to load video’ an error occurred in Camera Roll videos of iPhone, the file may have corrupted.
Copy or transfer the problem video to your PC or Mac. Download and install a video repair software—Stellar Repair for Video . It can fix file corruption in the error throwing iPhone video. The software is compatible with MP4, MOV, HEVC, video files formats used in iPhone and iPad.
The software also offers a free trail wherein you can repair the corrupt video and watch its preview.
Method 9: Restore iPhone to factory settings
If ‘unable to load video’ error is perpetual on your iPhone or iPad, in spite of trying the above methods, then factory reset can be your last bet.
As all know, factory reset will delete everything on your iOS device , make sure you create the latest backup of the iPhone in iCloud or iTunes.
Follow the below steps to factory reset iPhone and fix unable to load video error:
- Open Settings > General > Reset.
- Click on Erase All Content and Settings.
- Enter Apple passcode. Click on Erase iPhone and follow the prompts.
Now check if the video error problem is resolved or not.
Wrapping Up & FAQ
Usually one of the methods shared in this post fixes the error – ‘unable to load video‘, an error occurred’ on iPhone. However, unfortunately if none works and you cannot play videos on iPhone, contact Apple support .
FAQ
- Why does my iPhone say ‘an error occurred while loading a higher quality version of this photo’?
High quality photos/videos require more storage space to open. Less free storage is one of the for the media file loading error.
Hence, delete some useless photos, videos, or apps to free up space. Now you can open the high quality photo/video smoothly without any error.
2. Why my iPhone videos not playing on PC?
Your iPhone videos may not play on Windows PC due to many reasons— the media player doesn’t support videos file format; virus in your PC; or the video has turned corrupt during transfer. However, you can fix the problem and play iPhone videos on Windows .
3. Why I cannot view my video in icloud.com?
In iCloud.com, select the Photos app and click Photos. In the side bar, you will see the thumbnails of all your photos and videos. Find your video and click on it to view.
How to fix error 1015 while restoring iPhone
Summary: Error 1015 appears during iPhone restore through iTunes. If you are getting this error, its probably due to attempts of jailbreak or iPhone downgrade. This post shares 7 ways to fix iPhone restore error 1015 on iPhone 7, 8, XS, XR, SE, 11, 12, and above models.
Are you receiving iPhone error 1015 during restore with iTunes as below?
Case 1: _I have an old iPhone 3G stuck in Recovery Mode. I am trying to restore it through iTunes. But at the end of the restore, I get unknown error 1015. How can I fix error 1015 on my own?
_
Case 2: I tried to restore my iPhone in iTunes. It won’t finish because of this error 1015 code. I have the latest software. I’ve restarted and updated my iPhone too. Still the same error message appears.
Have you used tools like TinyUmbrella to restore firmware that Apple no longer supports?
Did you try to jailbreak your iPhone by using applications like Redsn0w or Pwnage?
If yes, that’s the reason behind the problem. The error 1015 is typically caused by attempts of jailbreak or downgrade on the iOS device. Such activities are a violation of the iOS end-user software license agreement. They can make your iPhone vulnerable to malware and prone to errors like 1015.
Naturally, Apple wouldn’t encourage jailbreak or downgrading to an older iOS version. Thus, you are bound to face problems when trying the unauthorized iOS modifications on your iPhone or iPad.
Thus, the probable reasons for the iPhone restore error 1015 are:
- Downgrade of iOS
- Jailbreak
- Outdated software
- Third-party tools on your computer
This post shares all the possible solutions to fix iPhone restore error 1015.
You can apply these solutions on all iPhones including 3G, 4, 5, 6, 6s, 7, 8, X and above models using any iOS version.
1. I****nstall the latest version of iTunes
Make sure your computer has the latest iTunes before restoring iPhone using iTunes.
On Windows PC, update iTunes by following Help > Check for Updates in the top menu bar of iTunes.
On Mac, go to App Store > Updates > click Install, if you see any iTunes updates.
2. Update iOS
iOS updates usually fix error 1015 which appears while restoring iPhone with iTunes.
On your iPhone, go to Settings > General > Software Update and tap Download and Install.
3. Update Windows or macOS
System update ensures smooth and error-free performance of your computer.
If you are using Windows PC, follow Start > Settings > Update & Security > Windows Update.
On Mac, click on Apple icon and select S****oftware Update and click on updates available.
4. Uninstall third-party software on PC/ Mac
Third-party software often create conflict among programs while performing iPhone restore or update with iTunes. You may not receive the error 1015, after uninstalling such programs.
On Windows computer go to Start > All apps. Find the third-party software and right-click on it. Choose Uninstall.
On Mac, in the Finder window, go to Applications. Find and select the third-party software. In the top menu bar, go to File and select Move to Trash. Next, click on Empty Trash.
5. Put your iPhone in Recovery Mode and restore
Before you put your iPhone on Recovery Mode, ensure you are using the latest version of iTunes. Next, follow the below steps to restore iPhone using the Recovery Mode.
- Connect your iPhone to computer
- Open iTunes
- Force restart your iPhone while it is still connected to the computer, until you see the iTunes logo (To force restart use home and/or volume button depending on your iPhone version)

- On your computer, you will receive a dialog box asking to either Update or Restore.

- Click Update
After the Update process completes, you can restore your iPhone from iTunes or iCloud backup without facing the error 1015.
Note: If you are unable to enter Recovery Mode on your iPhone due to jailbreak, you may use programs like RecBoot, which are used to enter and exit the Recovery Mode on iPhone, iPad or iPod touch.

6. Delete the IPSW file on your computer
Files with .ipsw extensions on your computer are backups and temporary files of your iOS updates. Many iPhone users who were receiving error 1015 while restoring iPhone were able to fix the problem by deleting these files on their PC or Mac.
Deleting these backup files doesn’t impact your iTunes or iPhone function.
Note: You can get rid of the old IPSW files and keep the most recent ones.
Location of .IPSW files on your computer:
On Windows XP: C:\Documents and Settings\[username]\Application Data\Apple Computer\iTunes\iPhone Software Update
On Windows Vista/7: C:\Users\[username]\AppData\Roaming\Apple Computer\iTunes\iPhone Software Updates
On Mac OS X: ~/Library/iTunes/iPhone Software Updates
7. Restore your iPhone into DFU Mode
When no other method is helpful, choose to put your iPhone in DFU (Device Firmware Update) mode. Whether you are receiving the iPhone error 1015 due to jailbreaking your iOS device or not, the DFU mode solution is your last resort to fix error 1015.
As in Recovery Mode, bringing your iOS device to DFU mode will lead to loss of iPhone data. Thus, before you attempt this, make sure you have iCloud or iTunes backup.
Steps to DFU mode for iPhone 7, 6s and below users:
- Connect your iPhone to computer (even if your iPhone is off)
- For 8 seconds, press and hold the Sleep button and Home button (iPhone 6s and below users) or the volume down button (iPhone 7). Next, release the Sleep button but continue to hold the Home button or the volume down button until iTunes shows message _‘iTunes has detected an iPhone in recovery mode._’

- Leave the Home button or volume down button. The iPhone screen turns black indicating the device has entered DFU mode
- Next, you can restore your iPhone using iTunes
Steps to DFU mode for iPhone X, 8, or 8 Plus users
- Connect your iPhone to computer (even if your iPhone is off)
- Quickly press and release the volume up button, quickly press and release the volume down button, and press and hold the side button until your iPhone screen turns black
- Press and hold the volume down button while continue holding the side button for 5 seconds
- Release the side button and continue holding the volume down button until your iPhone shows up in iTunes.
- Next, release the volume button. Your iPhone is in DFU mode
Now restore iPhone with iTunes. You can exit DFU Mode by force restarting your iPhone.
| Unable to restore iPhone from iTunes after Recovery Mode or DFU Mode?
If after putting your iOS device to Recovery or DFU mode you are unable to restore iPhone, download Stellar Data Recovery for iPhone The DIY software for Mac and PC can easily restore the data from iPhone, iCloud, and iTunes.


|
| — |
To Sum Up
Naturally, the error code 1015 is annoying when you quickly want to restore your iPhone using iTunes.
The error usually appears when your software is not updated, you have attempted jailbreak or downgraded your iPhone’s iOS.
The post shares 7 different ways you can try to fix the problem. Begin with the simpler troubleshooting such as updating your iOS, Windows/ macOS and iTunes. Uninstalling third-party security software or deleting the IPSW files on your computer has also worked for many in resolving the error 1015.
In case these methods don’t work, then go for the tougher solutions like bringing iPhone to Recovery Mode or DFU Mode which lead to iPhone data loss. They are the harsher solutions to the problem, but assure you don’t receive error 1015 while restoring from iTunes. But make sure you have iCloud and iTunes backup before attempting these two methods. Else you would need an iPhone data recovery software such as Stellar Data Recovery for iPhone to restore your lost iPhone data. The software is quick and efficient way to get back lost data in cases of jailbreak, downgrade of iOS and restore errors.
- Title: Can I recover my data if my iPhone 13 mini screen turns black? | Stellar
- Author: Nova
- Created at : 2024-07-17 16:25:51
- Updated at : 2024-07-18 16:25:51
- Link: https://phone-solutions.techidaily.com/can-i-recover-my-data-if-my-iphone-13-mini-screen-turns-black-stellar-by-stellar-data-recovery-ios-iphone-data-recovery/
- License: This work is licensed under CC BY-NC-SA 4.0.