
:max_bytes(150000):strip_icc():format(webp)/GettyImages-14050070541-0fc96b82fdc54287bf3bbce3ba323342.jpg)
Easy Steps to Make Excel 2019 Hyperlinks Working | Stellar
Easy Steps to Make Excel Hyperlinks Working
Summary: This blog discusses why hyperlinks won’t work in Excel and solutions to fix it. If nothing works, try using Stellar Repair for Excel software to recover your workbook with hyperlinks and all the data intact.

Hyperlinks in your Excel file could be references to a file’s location on the computer or a location within the same worksheet. Or, hyperlinks might be pointing to a URL. Sometimes, the hyperlinks won’t work and any of the following errors may pop up on your screen on clicking a hyperlink:
‘Cannot open the specified file.’

‘This operation has been canceled due to restrictions in effect on this computer. Please contact your system administrator.’

Causes of ‘hyperlinks not working in Excel’ problem, and solutions thereof
Here are some of the possible causes behind the ‘hyperlinks not working’ issue and solutions to fix it:
Cause 1 – Change in the name of the hyperlinked file
If the file name that appears in the hyperlink text is different than the actual file name, it will prevent the hyperlink from working.
Solution – Link to the renamed file
Ensure that the links in the Excel file are updated and points to the renamed file. For this, right-click the hyperlink and select ‘Edit the hyperlink’. Next, in the hyperlink address, replace the current filename with the renamed one in the hyperlink address.
Cause 2 – File name has a pound (#) sign
When you create a hyperlink for a file in Excel, you cannot use a pound character (#) in the file name that appears in the hyperlink. That is because the pound sign is not accepted in hyperlinks and may lead to the ‘Cannot open the specified file’ error.
Note: While you can use a pound character in a file name, it cannot be used in hyperlinks in an MS Office document.
Solution – Rename the file name and remove the pound sign
Open the file that contains the ‘#’ sign and rename it by following these steps.
- Right-click the cell containing the hyperlink that is not working, and click Edit Hyperlink.
- From the Address box, copy the address of the file you are linking to.
- Go to the location where the file is stored, right-click on the file, and click Rename.
- Remove the ‘#’ character from the name of the file.
- Go back to the Excel file, right-click on the problematic hyperlink, and choose Edit Hyperlink. Next, browse and select the renamed file.
- The renamed file without the pound sign will be added in the Address box.
- Click OK.
Now try opening the hyperlink.
Cause 3 – Sudden system shutdown causes abrupt closing of Excel
There may be a discrepancy in the data in hyperlinks when a system shut down suddenly, without properly closing the Excel file. And so, when trying to open a link, it won’t open.
Solution – Enable the option to save hyperlinks
There is an inbuilt option in Excel to update hyperlinks every time the workbook is saved. Follow these steps to enable that option:
Note: The steps may vary based on the Excel version you are using.
For Excel 2013, 2016, or 2019:
- Open Excel Workbook -> Go to File->Options->Advanced
- Scroll down to find the General tab and click on Web Options
- Web Options Window pops-up
- In the Web Options Window, go to Files Tab and select the ‘Update Links on save‘ checkbox
- Click on OK button and your option is saved
The steps are also explained in the image below:

For Excel 2007:
- Click the Office button
- Select Excel Options, then follow Step 1) to Step 5), as mentioned above and get the Excel Hyperlinks to work again.
Still unable to open hyperlinks in Excel?
If you fail to make Excel hyperlinks work using the above-discussed solutions, use an Excel repair tool to fix the hyperlinks issue. Download the Stellar Repair for Excel to repair an XLS/XLSX file and restore the hyperlinks.

See the working of the tool here:
The tool recovers all components of the Excel file including tables, charts, chart sheets, cell comments, images, formulas, and more. You can repair multiple worksheets and fix all dysfunctional Excel hyperlinks across multiple worksheets in a single workbook. Click on the workbook, select all worksheets and start repairing
Conclusion
Carefully read the possible causes behind the ‘Excel Hyperlinks not working’ issue to understand what resulted in the issue in the first place. If nothing helps, use Stellar Repair for Excel to restore the hyperlinks and save the result in a new Excel file, without interfering with worksheet properties and cell formatting.
How to Fix the #Value! Error in Excel?
Summary: #Value! is a common error that occurs when using formulas in Excel. It can be due to an issue with the cells you are referencing or use of formulas in the wrong type or format. This blog will discuss some cases when this error may occur and the solutions to fix the issue. You’ll also find about an Excel repair software that can help fix the error if it has occurred due to corruption in Excel file.
You may experience the #Value! error in Excel when trying to enter invalid data type into the formulas. Sometimes, it appears when a value is not the expected type or when dates are given a text value. This Excel error may occur due to several reasons. However, the exact cause of this error is difficult to find. Below, we will be discussing some cases where you may get this error and the solutions to resolve the issues.
Case 1: Wrong Argument Data Type in Formulas
Sometimes, Excel throws the “#Value!” error if it recognizes incompatible arguments in the formulas.
For example: The Date function in the sheet expects only numerical values as arguments. In the below image you can see that when the formula’s string value is used in the month (January), it resulted in the #VALUE! error.

Solution
To fix the issue,
- Double-click the formula to verify the type of arguments.

- Correct the argument in the cell (B2).
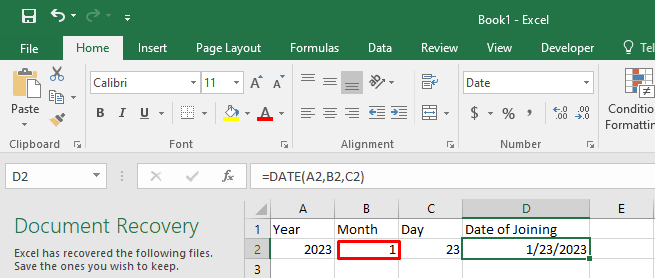
The formula will work as expected.
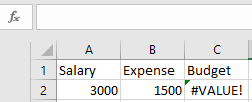
Case 2: Using the Basic Subtraction Formula
Users often experience the #Value! error, when using the basic subtraction formula in Excel.
Solution
Check the formula and the type of values in the cell. If these are correct and the error persists, then follow these steps:

- Go to the Start button on Windows, type Control Panel, and double-click on it.
- Click Clock and Region > Region.

- On the Format tab, click Additional Settings.
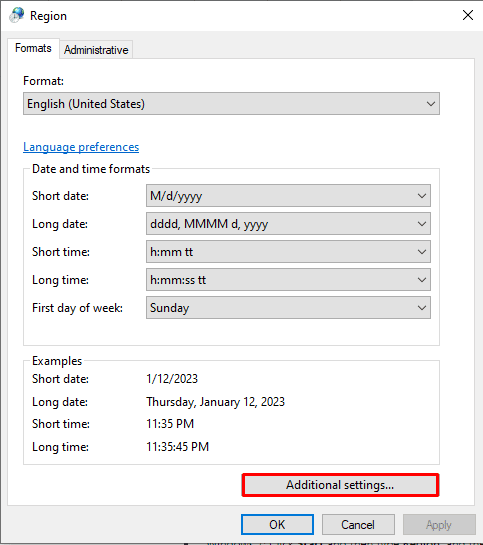
- In the Customized Format window, search for List Separator.
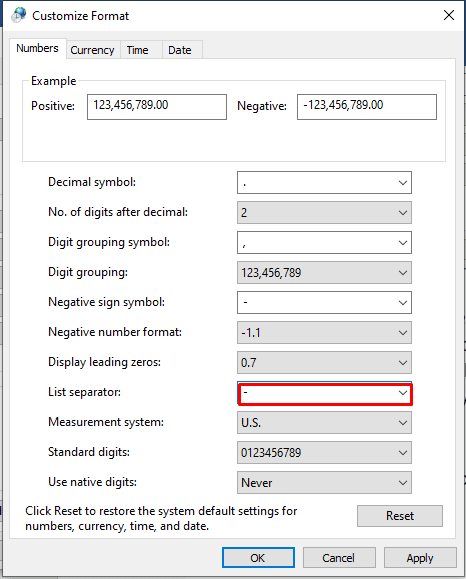
- Check if the List Separator is set to minus (-). Change it to comma (,).
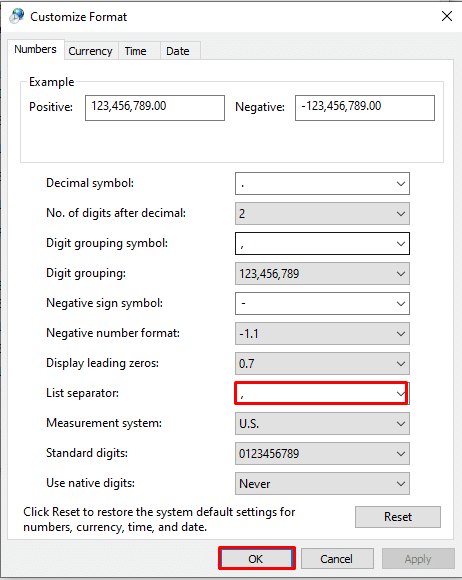
- Click OK.
- Now, open the Excel file and again try to use the formula.
Case 3: Wrong Text Value
The #Value! error can also occur due to the formula’s wrong value.
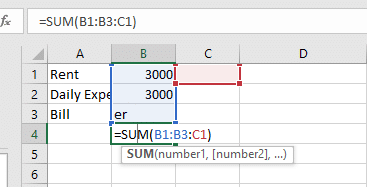
For example: If you are using the formula to add values in cells and Excel recognizes the unexpected text value, you may get a #Value error.

Solution
To fix the issue, you can correct the value or use the SUM function. It is recommended to use functions instead of operations to reduce the errors. In Excel, the formulas with math operators may not able to calculate the text in the cells. The SUM function automatically ignores the text value(er), calculates everything as numbers, and displays the result without the #Value! error.
Case 4: Blank Space in Cells
You may get the #Value! error if your formula refers to other cells with space or hidden space. Sometimes, spaces that make a cell display blank but actually they are not blank.

Solution
You can either delete the space or replace the blank space. Here’s how:
1. Delete the Blank Space
First, check if a cell is blank or not. To do this,
- Select the cell that looks blank.
- Press F2.

The blank cell won’t show space.
Then, press the Backspace key to delete the space. It will fix the error.

2. Replace Blank Space
You can also use the “Find and Select” option to replace the blank space in Excel. Here are the steps:
- Open the Excel file that shows #Value! error.
- On the Home tab, click Find & Select > Replace.

- In the Find what field, type a single space and delete everything in the “Replace with” field.
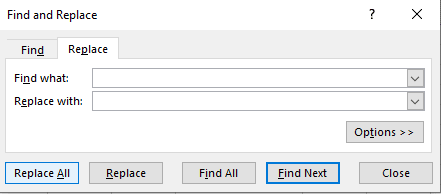
- Click Replace All > OK.

Case 4: Problem with Network Connection
Many users have reported experiencing errors when using Excel online due to problems with the network connection.
Solution
Check your Internet connection and see if it is working properly.
Case 5: Wrong Formula Format
If you enter the wrong formula with a missing parenthesis or comma, then Excel can throw the #Value! error. The error can also occur if the application finds a special character within a cell.
Solution
Correct the formula and use the ISTEXT function to find the cells with issues.
Case 6: Corruption in the Excel File
If none of the above works, then it indicates the Excel file is corrupt. The formulas in the Excel file do not work due to corruption.
Solution
You can use the Open and Repair utility in Excel if you are getting the error due to corruption in Excel file. In case the utility fails or the Excel file is severely corrupt, you can use a third-party Excel repair software, such as Stellar Repair for Excel. It is a powerful tool to repair corrupted or damaged Excel files and recover all its data, with 100% integrity. The tool supports Excel 2019, 2016, and older versions.
Closure
There are several reasons that can trigger Excel to throw the #Value! error. It can occur if there is an incorrect argument data type in formulas or blank space, text, or special characters within a cell. This blog discussed the possible scenarios when this error occurs. You can apply the solutions mentioned above to fix the error. If the #Value! error occurs due to corruption in the Excel file, then you can use Stellar Repair for Excel . It is a reliable tool that helps in fixing corruption-related errors in Excel.
[Error Solved] Excel file is not in recognizable format
Summary: Microsoft’s Excel is one of the most widely used spreadsheet tools, however, it isn’t entirely free of errors. There are in fact quite a large number of problems that can crop up in this user-friendly application which can put all work to halt. One such error occurs when Excel does not recognize the file format of .xls or .xlsx file and the error message says “Excel file is not in recognizable format” error. Let us explore this annoying error in detail.

Figure: Error message
From a small shop to the global industry giants, everyone relies on Microsoft Excel to complete their work. Quite a few businesses not only use Excel for their inventory tracking purposes but also to manage task lists and timesheets for their employees and project management charts. With high programming proficiency, one can create macros in excel which help in automating a lot of things. You can create quite a few variations, such as pie charts, bar charts, line graphs, area charts, and many more to showcase the data both in a tabular column as well as in a pictorial representation.
While Excel enjoys wild popularity, thanks to its powerful design and features, it doesn’t mean that Excel is all free of errors. There are actually repetition a few errors that one can encounter. One you might have come across is the error stating “Excel file is not in a recognizable format”.
What is this error all about?
The “Excel file in unrecognizable format error” occurs when the Excel file you are trying to load is corrupted. Microsoft has ensured that the workbook will be recoverable when the file is imported into excel but there are times when the automatic recovery does not happen. That’s where the challenge really lies. In such cases, getting to the root of the issue becomes necessary to be able to solve it.
Reasons behind the error
- One of the main reasons for the error is that the file must have got corrupted while being transferred from one machine to another.
- Another reason can be that the latest service pack might not be in use on your system.
- There could be MS Excel version change.
- Corruption of the file due to virus infection, extremely large databases, or multiple locks on the file at the same time can also trigger this error.
If you have ever faced this error, you do not need to panic. We have a couple of solutions listed for you when you face the Excel file in an unrecognizable format error.
How do you go about fixing this?
Solution 1: Use MOC.exe file to convert the workbook and then open it in Excel:
- Right-click on .XLS (you can use any .XLS files in your system).
- A new dialogue will appear. Here, click on “Choose another app” to select it.

Figure: choose another app
- You will now be presented with a number of applications which the OS thinks the file format will be compatible with.
- You do not have to choose any of the prepopulated apps from the list.

Figure: Look for another app
- Navigate using the Look for another app on this PC to the path “C:\Program Files\Microsoft Office\OfficeVersion”
- You will see a file name MOC.exe
- Choose that and complete your export.
- Try opening the workbook in Excel and the error should now be resolved.
Solution 2: Opening the file from within the Excel:
- Open a new Excel workbook.
- Press “Alt + F” or alternatively, go to the menu.
- Once you are in the menu, go to Options.
- You will be able to see a number of tabs on the left side of the options.
- Under the ‘Formulas’ tab, ensure that the calculation is in Manual mode – this setting is in the automatic mode, by default.

Figure: Manual option
- Click OK and save the changes to the workbook.
- Now, browse for the file which was corrupted.
- Click on the file and then select the option “Open and Repair”. You will find it in the drop down Menu.

Figure: Open and Repair
- Once the file has been imported, click on “Repair” to recover the data from the selected workbook.

Figure: Repair option
Solution 3: Use automated Excel repair software
If none of the above mentioned manual methods works to eliminate the ‘Excel file in unrecognizable format’ error, it means your Excel file has been severely corrupted and needs professional assistance. In such a scenario, quickly download reliable and competent software Stellar Repair for Excel. Backed by powerful scanning and repair algorithms, this product guarantees up to 100% Excel file repair regardless of the amount of damage in it.
- Download, install and launch Stellar Repair for Excel.
- Allow the software to scan the corrupted Excel file.
- All recoverable data will be listed in a tree-view list. You can select and preview any item from here.
- Select and recover individual or entire data from the file and save as a new Excel.
This method is currently the easiest and most convenient to resolve miscellaneous Excel errors.
Wrapping it up
Excel is one of the most powerful tools which can easily reduce your workload by more than 75% if used in a proper way. However, if you face complex errors like “Excel file is not in recognizable format”, you can use the methods mentioned above to get rid of it and resume your working in MS Excel. Remember, if the manual solutions don’t work, you can always rely on a proficient software like Stellar Repair for Excel to complete the job with finesse.
How to Repair Excel Document on a Flash Drive
Summary: Microsoft Excel files are stored on flash drives if they need to be transferred between systems or if they need to be backed up. But sometimes unforeseen issues can corrupt the Excel sheets stored on flash drives. When that happens, it can be an arduous task to repair Excel documents on a flash drive. Through this post let us try to understand the reasons why Excel sheets stored on flash drives can get corrupted and how users can resolve them easily.
In this digital age, we all work with computers, files, and documents. Flash drives or USBs are common ways of storing data in an external place. Be it for a meeting or for a party playlist, these devices come handy when one wants to transfer data or access the files stored elsewhere.
You may need to access your data from another location. That’s when a USB flash drive might come in handy. And, that’s exactly why Excel sheets too end up on flash drives; either that or for backup purposes. However, there are many instances where an Excel file stored in a USB gets corrupted when one tries to access the file. The error message you get while trying to open the Excel file would be a great clue for figuring out the exact reason behind corruption.
This blog will provide insights into what are the reasons for the corruption of a USB and how the users can repair Excel on flash drive that has been corrupted.
Reasons for USB inaccessibility
Sometimes flash drives or USBs can become unresponsive due to numerous reasons. There are two types of corruption – logical and physical. Physical corruptions occur due to broken stems and connectors, broken circuits, NAND gate, not recognised, RAW, need to format, not accessible, and dead drives (no power supply).
One of the main reasons behind such an error could be that the USB drive has been infected by some virus. This can affect any file – not only the ones which are there in the USB drive but also the ones which are there in the PC/Laptop where you connect the USB drive. It is recommended that you scan the USB drive with reliable antivirus software to detect viruses.
There can be various other reasons that may make your USB corrupt or unresponsive. But there are very slim chances that you will be able to recover a flash drive that has physical damage. However, you can try to run the check disk on the USB drive to fix the drive. We will be discussing this as you read on.
Recovery Methods for Corrupted Flash Drives
There are 3 tried and tested recovery methods. Try them and see which one works out for you.
- Restoring Excel Files from Windows backup
To bring back your old Excel files, fixing up the corrupt file is your best option. Importantly note that this method would work only if your system’s Windows backup option has been enabled.
Step-by-step process for restoring your older Excel files:
- Connect your USB drive
- Go to “My Computer”->USB Drive->Check if the file exists
- Right click on the excel file and click on the restore previous versions

- You will now see a list of older versions which were created
- Select one the backups and click on “restore”
- Using Command Line to Recover Excel Files
In case you are looking to repair Excel on flash drive, you can also resolve it by using the command line. Just follow the below steps to see if you can recover the excel files.
- Connect your USB Flash drive
- Open “Run” (press Windows+R) and then open “cmd”

- Type “attrib -h -r -s /s /d (USB Drive Letter):\*.*” where the (USB Drive Letter) is the drive letter you can find using “My Computer”
- Once this has been completed, Windows will start repairing your files
- After the process gets over, try accessing the excel file to see if the data has been recovered
- Running a “Check Disk” on flash drives
Follow the below steps while the USB flash drive has been plugged into your computer:
- Open “Run” and then open “cmd”
- Type in “chkdsk /X /f (USB Drive Letter)” where the “(USB Drive Letter)” is the letter of the corrupted USB Drive. You can get this letter easily from the “My Computer”.

It will now check your disk to and correct any corrupted records.
What if none of these methods works?
In case none of the above methods works to repair Excel document on a flash drive, then you would need a professional Excel repair software such as Stellar Repair for Excel to restore your files. Such software not only help repair corrupted Excel files on flash drives but also help in recovering the data stored within them in their original format.
Stellar Repair for Excel resolves corruption problems in Excel files and recovers all formulas, charts, cell formatting, and more from them. It can repair multiple Excel files in one go. Equipped with a fully interactive GUI, working with this product is extremely easy.

To sum it up
Although flash drives are quite popularly used, they are not the most reliable of storage devices. These drives can fail anytime without warning. Thus, always back up your data on other more robust devices instead of flash drives. We hope that with the above tried and tested methods you will easily be able to repair Excel document on flash drive if need be. For any queries that you have, feel free to leave a comment below!
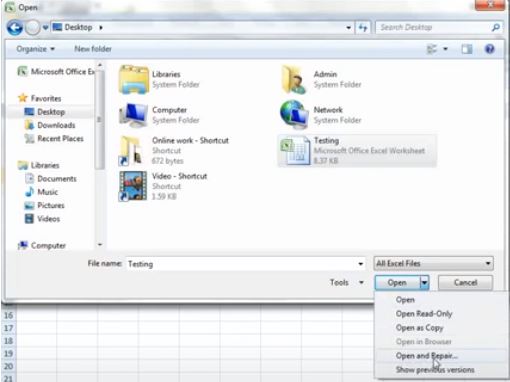
Recover Corrupted Excel File 2007, 2010 | Easy Methods
There are several reasons that can cause Microsoft Excel workbooks to turn corrupt, such as virus attack, bad sectors on a drive on which Excel file is saved, system shutdown without properly closing the Excel application, etc.
Corruption in an Excel workbook can result in data loss or render the workbook inaccessible. Fortunately, Excel automatically starts recovery upon opening a corrupted Excel file. But, if it fails, you can manually repair the file or extract data from the corrupt file.
Quick Solution: Performing 2007, 2010 Excel repair or recovery process manually can be time-consuming. Also, manual workarounds to recover corrupt Excel workbook does not guarantee recovering the complete workbook data. Use Stellar Repair for Excel software to repair single or multiple Excel (XLS/XLSX) files in 3 simple steps. The software also helps recover the Excel file, keeping the data intact.
.jpg)
How to Fix Microsoft Excel 2010 & 2007 Files Corruption?
Microsoft Excel comes with an inbuilt repair utility, called ‘Open and Repair’, that helps fix and recover corrupted Excel files.
Steps to Repair MS Excel 2010 Files Manually
The detailed steps to open and repair Excel 2010 are as follows:
- Open Microsoft Excel 2010 and click File from the main menu.
- Next, click Open.
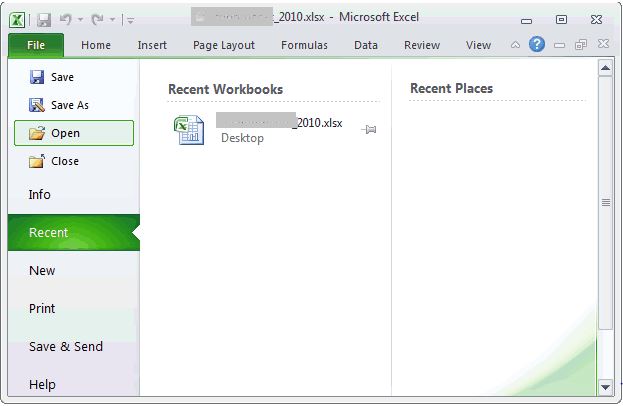
- Browse the corrupt Excel 2010 file on your computer and select it in the Open dialog.
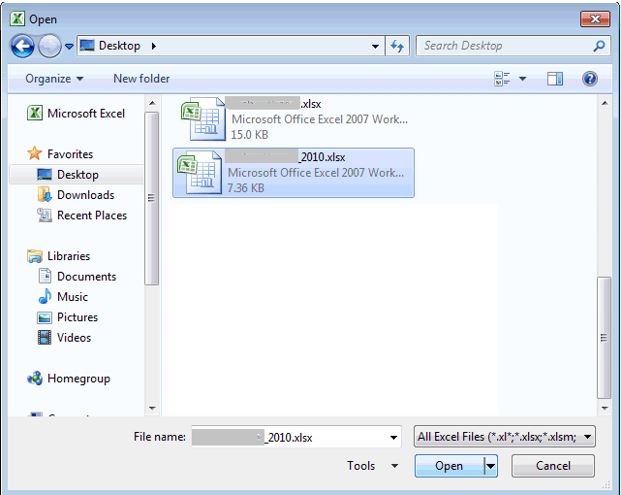
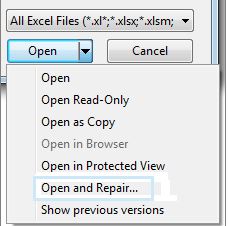
- Click the arrow next to the Open button and choose Open and Repair.
- Click Repair when prompted to recover data to the maximum.
- If Excel fails to repair, click Extract Data to extract values and formulas in the corrupt file.
- Excel prompts to ‘Convert to Values’ or ‘Recover Formulas’.
- Click Yes if it prompts the following error:
“The document file name caused a serious error the last time it was opened. Would you like to continue opening it?
- When Excel opens the last saved file, save it.
Once you’re able to access the last saved 2010 Excel file, try extracting the file contents.
Save Excel 2010 File in HTML Format
If you can open the Excel file, choose the HTML format to save it in filtered form. After that, close the Excel file as you have your data in the HTML file. The steps to save an Excel file in HTML format are as follows:
- Open Microsoft Excel 2010, click Save As, and then choose Web Page in the ‘Save as’ type drop-down list.
- Select the “Enable Entire Workbook” option, and then click the Save button.
- Close the Excel file and reopen your Microsoft Excel application. Browse the HTML file that you have saved.
- Click File from the main menu, and select Save As in the list.
- Type-in a different name, choose Microsoft Excel Workbook in the ‘Save as’ type drop-down menu, and then click the Save button.
With this, you would be able to access the data in the corrupt Excel file.
If the inbuilt tool fails to repair Excel 2010 file, a few methods can help you recover data from corrupted or lost workbook manually.
Steps to Repair Excel 2007 Files Manually
Follow these steps to repair a corrupted 2007 Excel file by using the inbuilt Microsoft Excel repair tool:
- Open Microsoft Excel 2007, click the Office button, and then select Open.
- In the Open dialog box that pops-up, browse and select the corrupt Excel 2007 file. Click the arrow next to the Open button and choose Open and Repair.
- Click Repair when prompted to recover as much data as you can from Excel 2007 file.

- If a repair fails, follow steps 1 till 3, and then click Extract Data to extract values and formulas from the corrupt file.
- In the window that appears, click Convert to Values or Recover Formulas to extract workbook data.

Note: The built-in Microsoft Excel 2007 repair tool may fail to resolve Excel corruption issue. Also, choosing to extract data from the workbook involves data loss risk. Using a professional Excel repair tool, however, can resolve all types of Excel file corruption errors and restore all its data.
Methods to Recover Data from Corrupt Excel 2010 & 2007 Files
If the ‘Open and Repair’ feature fails in getting your Excel 2010, 2007 file repaired, you can try retrieving the file contents by following some manual methods. However, the methods may vary depending on whether you can open a workbook or not.
Method 1 – Move Corrupt Excel File to another System
Move the corrupt Excel file to any other computer and try opening it in MS Excel 2010/2007. Doing so, may help you resolves disk or network-related errors leading to Excel file corruption.
Method 2 – Revert Unsaved Excel File to its Last Saved Version
If an Excel file turns corrupt while working on it but before saving any changes, try reverting it to its last saved version. To do so, perform the following:
- Open your Excel application, click the Office button, and then click Open from the menu.
- Browse the corrupt Excel file, click Yes when prompted to revert to its last saved version.
What if Nothing Works?
If you fail to recover a corrupt Excel 2007/2010 file, perform Excel file recovery with Stellar Excel repair software. The software is specially designed to help users fix their corrupted XLS/XLSX files quickly and easily without any technical assistance. It also helps restore all the file data to its original form.

Points to Remember
- Close all the MS Excel instances before using the software
- If the sheet you are repairing contains engineering formulas, please include ‘Analysis TooPak’ manually from Tools > Add-Ins
If you know the corrupt Excel 2007 or 2010 file location, click Browse to choose the file. Otherwise, click Search. Follow the below steps to recover data from corrupt Excel 2007/2010 file by using Stellar Excel repair tool:
- Click the Repair button to scan the file.
- Once the scanning process is complete, the software shows a preview of recoverable Excel file items.
- To save the repaired file, click the Save File option on File menu.

- In ‘Save File’ dialog box, choose to recover Excel 2007 & 2010 data to either the Default or New location. Click OK.
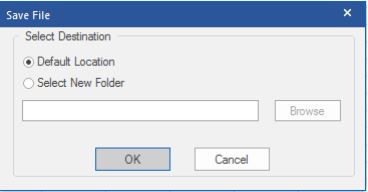
The repaired Excel file gets saved at the specified location.
Preventive Measures to Avoid Losing Excel File Data
The above-discussed methods might help salvage your data. But, it is recommended that you must take some preventive measures to avoid losing the data. One such important measure is backing up a copy of your workbook automatically. Doing so, will help you get back data in case the workbook is accidentally deleted or corrupted.
Steps to Create Backup Copy Automatically
You can automatically create an Excel backup copy by following these steps:
- Click Save As from the main menu of your Excel application.
- Browse to the location where the corrupt Excel 2010/2007 file is saved.

- In ‘Save As’ dialog box, click the arrow next to Tools button (given at the bottom left corner) and choose General Options.

- In ‘General Options’ box, check Always create backup checkbox, and then click OK.
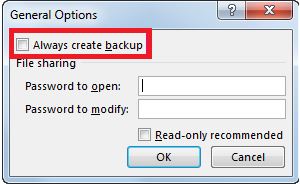
With this, you instructed MS Excel to create a backup of every Excel file you create or open for work.
Conclusion
This article outlined the typical reasons resulting in a corrupt Excel 2010 or 2007 file, such as virus infection, bad sectors on drive, etc. It explained how to fix a corrupted Excel file by using the inbuilt MS ‘Open and Repair’ tool. The article also discussed methods to recover Excel files in MS Office 2010 & 2007 when the Microsoft Excel repair tool fails. Further, it explained how using a professional repair tool such as Stellar Repair for Excel can come in handy when the manual methods to repair and recover Excel 2007 and 2010 file fails. But, keep in mind, a workbook may get corrupt again. And so, make sure to automatically backup your workbook to avoid losing its data.
‘Unable to Save Excel Workbook’ Issue [Fix 2024]
Summary: You may unable to save your Excel Workbooks due to several reasons. Many users have reported this issue on the Tech Forums. This blog will discuss a few instances when users cannot save their Excel files. It lists the causes behind the issue and their possible solutions. It also mentions the Stellar Repair for Excel to fix the saving error if it is due to corruption in the Excel file.
It is easy to work with Microsoft Excel but sometimes, the application may create issues thereby hampering the smooth functioning of the workbook. One such issue is “unable to Save Excel Workbook”.
Let’s take a look at the issue of Unable to Save Excel Workbook
Instance 1:
In an organization, users connected to one of the servers (Windows 2008 R2) using Citrix – a Terminal Server configured with Windows 2008 R2 –and accessed their data through a File Server, also configured with Windows 2008R2. Since the connectivity to Shared Drive was established through a Terminal server, any conflict amongst the server configuration may create conflict in shared file.
This issue was discussed at length at one of the Tech Forums , where the users were unable to access their workbooks stored on the shared drive. The File menu did not work. As a result, the users were forced to save the workbook by creating quick access shortcuts or locally on the desktop. In many cases, the saving option was ruled out completely.
Instance 2:
A similar problem was reported, wherein the users received an error when saving an Excel workbook after inserting a chart in an existing workbook (previously saved) or copying values from an existing workbook. A system is configured with Windows 7 and Microsoft Office 10 configuration. The issue arises when the user is unable to save the changes after editing in a saved spreadsheet. The following message displays on the screen:

Figure: Unable to Save Excel WorkBook Issue
Further, if the user clicks ‘Continue’, the following error message is received:
“Excel encountered errors during save. However, Excel was able to minimally save your file to <**filename.xlsx**>”.
Note: This issue impacts build Version 1707 (Build 8326.2086) and later, and also only occurs with files that are stored locally, such as on the desktop. This problem does not occur if you manually enter values or insert a chart in a newly created workbook.
Plausible reasons for the ‘Unable to save Excel workbook’ Issue
- The issue was detected in Microsoft Office Professional Plus 2010 32-bit, Service Pack 14.0.6029.1000.
- Excel version on the user system may or may not match with Excel version on File server.
- The issue of ‘Unable to Save Excel Workbook’ impacts only the Build Version 1707 (Build 8326.2086) and later.
- In case of Issue 2, the problem surfaces when the user adds files, tables or charts in the locally saved excel files, such as on the desktop.
Methods to fix the ‘Unable to Save Excel Workbook’ Issue
There may be an issue with the Build version or the Registry Values settings may not be appropriate, which does not allow the Excel workbooks to save.
But, before starting to resolve the issue, verify the following:
- The location where the file is to be saved may not have enough space to save the Excel file: Check the available space and save again. You may also use the option of ‘Save As’ to save the file at a new location.
- Excel file may be a shared one where edits are not allowed by a specific user: There are restrictions attached to documents and other files shared over the network. Check for these restrictions.
- Antivirus may interrupt in during file saving: Antivirus in the system may not allow saving of the files. Request the system administrator to uninstall the antivirus and reinstall after saving.
- The file is not saved within 218 characters: If the file is not saved due to the naming issue, then check the character length and try again.
- Differences in Windows versions of the local system and those on network drive may cause excel not saved issues. Check that all the systems have the same configuration and are updated to the recently available versions.
- Excel spreadsheet is corrupt: If none of the above factors have not caused hindrance in saving the file, then there may be a probability of corruption in the Excel spreadsheet .
Once verified, look for a healthy and restorable backup. If backup is missing, resolve the issue of “Unable to open Excel File” with manual settings on local system or through a reliable Excel repair software.
Method 1: Modify Registry Entries
If multiple users are unable to access their workbooks stored on the shared drive and facing unable to save Excel file problem (see Instance 1 above), then follow the below steps:
- Go to ‘Registry Entry’. To do this, type ‘regedit’ in the Start Search box, and press ENTER

Figure: Edit Registry
- You are prompted for the administrator password or for a confirmation, type the password, or click Continue
- Locate the following registry subkey, and right-click it: HKEY_LOCAL_MACHINE\System\CurrentControlSet\Services\CSC

Figure: CSC Location
- Point the cursor to New, and click Key

Figure: Create new key
- Type ‘File Parameters’ in the available box

Figure: File parameters
- Right-click Parameters, point the cursor to New, and click DWORD (32-bit) Value

Figure: File parameter (DWORD – 32 bit) value
- Type ‘FormatDatabase’, and press ‘ENTER’. Right-click ‘FormatDatabase’, and click ‘Modify’

Figure: Modify format database
- In the Value data box, type ‘1’, and click ‘OK’

Figure: Value data
- Exit ‘Registry Editor’
- Restart the system and verify if the files can be saved now
Method 2: Try Google Uploads
If the user is unable to save the changes after editing in a locally saved spreadsheet (see Instance 2 above), then follow these steps:
- Upload the unsaved Excel file to Google Docs. Ensure that the file gets converted to Google Sheets format.
- Check if all the formulae are active and working.
- Make changes to the Google Sheet and verify that all the changes are working fine.
- Use the Google Sheets export feature to download the file in Excel format.
Method 3: Resolve manually with Open and Repair
If the Excel file is found to have corruption, try out the Excel Open and Repair utility:
- Open a blank Excel File. Go to File and Click Open.
- Go to Computers and click Browse.
- Access the Location and Folder and click the arrow icon beside Open followed by Open and Repair.

Figure: Illustrates Steps to use ‘Open and Repair’ method
The Open and Repair utility is not competitive enough and may not fix corruption in severely corrupted files. Hence, if you are unable to save Excel workbook after applying the manual methods, then you can search for a useful software-based repair utility.
Method 4: Excel File Repair Software
Specifically meant to resolve Excel file corruption. Stellar Repair for Excel helps you to repair every single object including charts, tables, their formatting, shared formulae and rules and more.
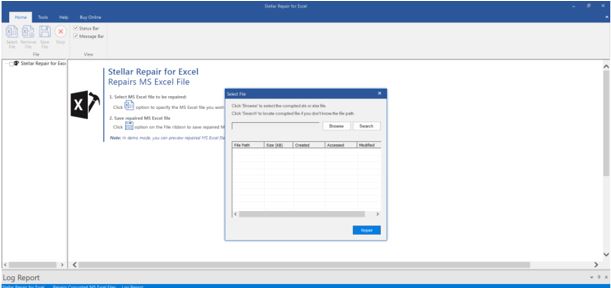
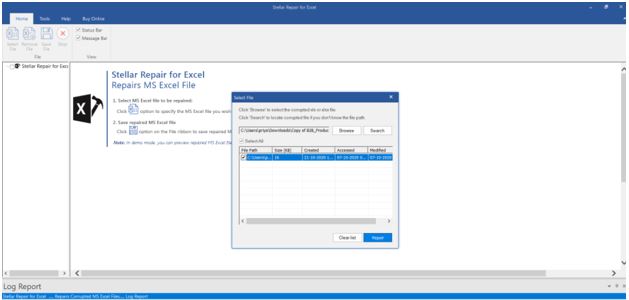
- Install and Open the software and select the corrupt Excel File. You can also click the Find option if the file location is not known.
- Click Scan and allow the software to scan and repair the corrupt Excel file.
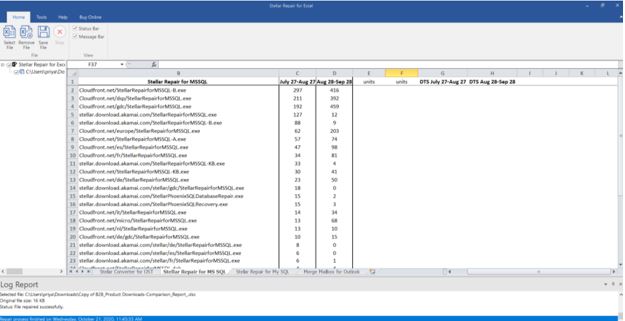
- Once repaired, the software displays the fixed file components to verify its content.
- Click Save to save the file data in a blank new file as ‘Recovered_abc.xls’, where abc.xls is the name of the original file.
See the working of the software which has been declared as a tool that provides 100% integrity and precision.
The Excel repair software takes care to save the repaired data in a new file to minimize the chances of further corruption.
Conclusion
‘Unable to save Excel file’ is a generic problem that may appear due to various reasons. In this blog post, we presented some of the actual instances reported by users on community forums.
Windows updates, the Build versions, the Service Packs of the local systems and those on the network drive must be either similar or in sync with each other. Any deviation may cause issues in accessing or saving the Microsoft files, as reported in Instance 1 is caused where user is unable to save Microsoft Excel file on the Network Drive. In case, the user is unable to save the file on network drive then the problem lies with the Registry value.
Another case is when the users receive an error while saving an Excel workbook after they insert a chart in an existing workbook or copying values from an existing workbook. This issue is known to affect build Version 1707 (Build 8326.2086) and later, and only occurs with locally stored files.
When a user is unable to save a specific Excel file, then the problem can be resolved using the manual methods or the software based utility. The mode of repair depends upon the level of corruption in Excel file.
Hence, it is suggested to analyze the nature of the problem and decide an appropriate resolution method.
Fix Cannot Paste the Data Error in Microsoft Excel
When copying and pasting the cell contents or attributes from one workbook to another, you can encounter the “Cannot paste the data” error. The error indicates that the values you are trying to paste do not match the cell format (Currency, Date, Text, etc.) used in the column. The error can occur if you are attempting to paste information into a merged cell. You can also get this error if the data you are trying to paste contains more columns than the destination worksheet can accept or if the copy area and paste area aren’t the same size.
Why you cannot Paste the Data in Microsoft Excel?
You can experience the “Excel cannot paste the data” error due to one of the following reasons:
- Locked cells
- Data size limitation
- Formatting issues
- The file size is too large
- Overloaded clipboard
- Data type mismatch
- Invalid range
- Lack of permissions
- Excel file is corrupted
- Compatibility issues
- While pasting the merged cells
Methods to Fix MS Excel Cannot Paste the Data Error
The “Microsoft Excel cannot paste the data” error usually appears when copying and pasting data within the spreadsheet. It primarily affects the copy-and-paste feature within the Excel file. However, the impact of this error may vary with the data you are working with. When this error occurs, first try restarting the Excel application. Ensure that you’ve saved all your important data before restarting the application to prevent data loss. If, after performing this basic step, you still face the issue, then try the following troubleshooting methods.
Method 1: Check and Unlock Cells in Excel
You can get the Excel cannot paste the data error if the cells you are trying to paste in the Excel file are locked. You can check and unlock the specific cells in the Excel file using the below steps:
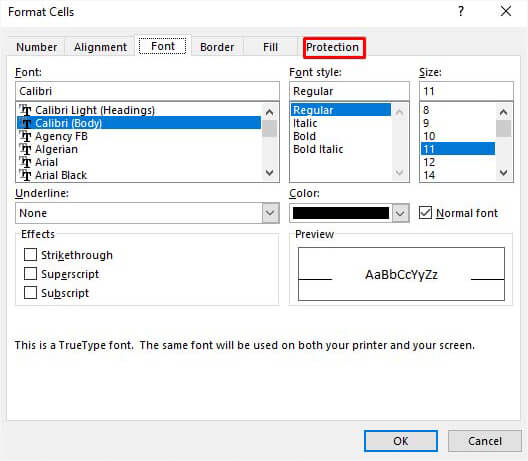
- Go to the Home tab in your Excel file and click Format Cell Font popup launcher.

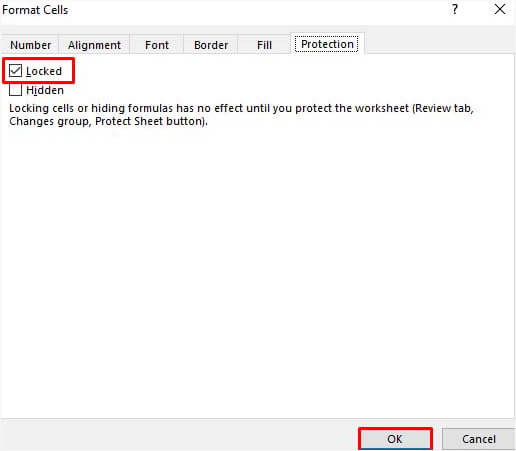
- In the Format Cells dialog box, click Protection.
- Under the Protection option, unselect the locked field and then click OK.
Method 2: Check and Fix the Cell Format
Sometimes, you can get the “Cannot paste the data” error in Excel if there is an issue with the formatting of the cells in the column (in which you are trying to paste the data). You can check whether the cell formats of the columns of the source file (from where you are copying data) match the destination file (in which you are pasting the cell data). If not, then change the cell format. Here’s how to do so:
- In the Excel file, click on the affected column heading (whose cells you need to modify).
- Navigate to the Home tab and click the General dropdown menu.

- Click on the desired cell format that matches the values you are trying to paste into the column.
Method 3: Check Copy and Paste Area Size
The “data cannot be pasted” issue can also occur if Excel detects the copy area of the range of cells is not of the same size and shape as that of the paste area. So, make sure the size of the range of cells for the paste area is same as the copied area. To ensure this, you can try the following:
- Use Upper-left Cell
You can select the upper-left cell instead of the complete range to paste.
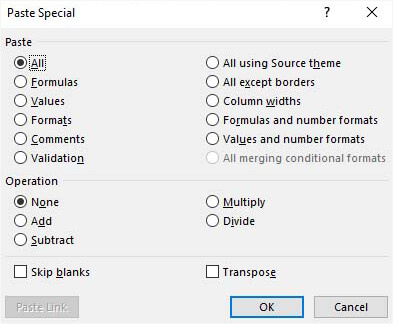
Use Paste Special Option
You can use the Paste Special option to paste the data. To use this option, go to Home > Paste Special.
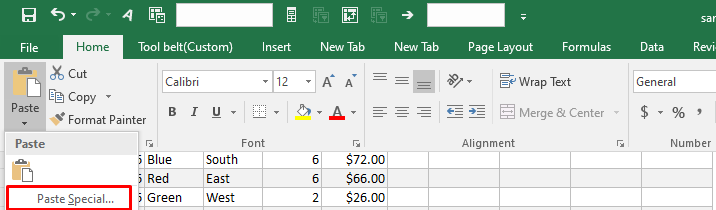
- You can choose from the different options, such as paste all, formulas, operations, Transpose, skip blanks, etc. to take control over how the data is pasted.
Method 4: Check and Unmerge Cells
The merged cells in the workbook can create discrepancies when copying and pasting data. These can create mismatch between the source and destination cell areas, resulting in errors. Make sure you are not pasting the data copied from merged cells. You can check and unmerge the cells using the below steps:
- Open the Excel file (in which you are copying data) and go to the Home tab.
- Click Merge & Center > Unmerge Cells.

Method 5: Unselect the Excel DDE (Dynamic Data Exchange) Option
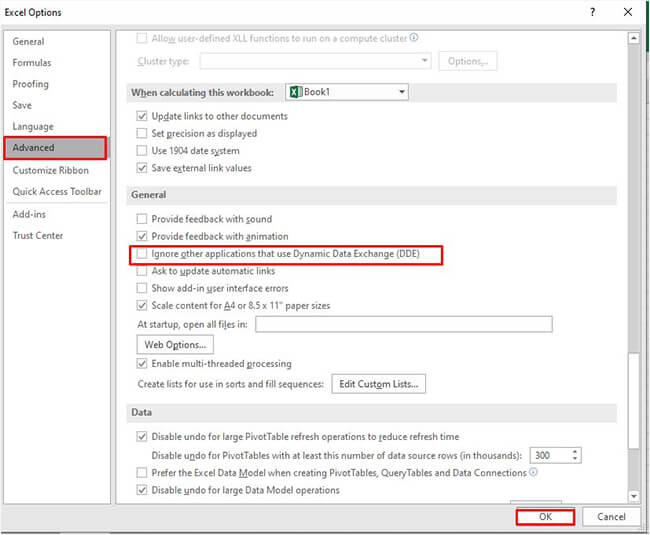
Sometimes, you can get the Excel cannot paste the data error while copying and pasting data from Excel file to external data sources or applications. It usually appears if you have established DDE links between them. To resolve this, you can uncheck the “Ignore other applications that use Dynamic Data Exchange (DDE)” option. Follow the below steps to do so:
- Open your Excel file.
- Go to File > Options.
In Excel Options, click Advanced and unselect “Ignore other applications that use Dynamic Data Exchange (DDE). Click OK.
Here are some additional solutions you can try to fix the “Cannot paste the data” error in Excel
Check the Excel File Format
Sometimes, the copy and paste error can occur if you try to move data from an older version of Excel file (XLS) into a newer version file (XLSX) or vice versa. You can try to change or convert the file format to resolve the issue.
Clear Clipboard
Too many items on the clipboard can prevent you from copying and pasting the data. You can empty your clipboard by deleting all clips. To do this, go to Home and click the Clipboard option.
Change the Column’s Cell Format
You can get the “Cannot paste the data” error when the information you need to paste does not match the cell format in the column. In such a case, you can change the column’s cell format. To do this, navigate to the Home option and then click on the General menu arrow. Then, change the cell format suitable to the type of information you are trying to paste in that column.
Add Columns
The copy-and-paste error in Excel can also occur if there are not enough columns to accept the data that you are trying to paste. You can insert more columns and then try copying and pasting data. To insert additional columns, click on the column heading, click Home, and then select Insert.
Remove Incompatible Add-ins
Sometimes, incompatible or faulty add-ins can also create conflicts with Excel’s clipboard operations, leading to the error. To check if add-ins are causing the issue, open the Excel file in safe mode. In safe mode, if you are able to paste the data, then check and uninstall the incompatible Excel Add-ins.
What to do if Nothing Works?
If the above methods do not work, then corruption in the Excel file could be the cause of the “Cannot paste the data” error. In such a case, you can use Excel’s built-in Open and Repair utility to repair the corrupted file. Here’s how to use this utility to repair the Excel file:
- Open your Excel application.
- Navigate to File and then click Open.
- Click the Browse option to select the affected Excel file.
- The Open dialog box opens up. Click on the corrupted file.
- From the Open dropdown, select the Open and Repair option.
- The Excel will prompt you to choose one of the below options:
- Repair
- Extract
- Cancel
- Select the Repair option to extract maximum data from the file. If the Repair option fails, choose the Extract option to recover the data, excluding formulas and values.
The Open and Repair utility may not be able to repair your Excel file if it is severely corrupted. In such a situation, the best possible way out is to use a professional Excel repair software to repair the file. You can try Stellar Repair for Excel. It can repair highly damaged or corrupted Excel (.xls, .xlsx, .xltm, .xltx, or .xlsm) file and recover all the objects from the file by maintaining the original formatting. The tool supports 2007 and higher editions of MS Excel. You can download the demo version of the software to preview the repaired objects and verify its functionality.
Conclusion
The “Excel cannot paste the data” error in Excel can occur due to different factors. You can check and clear the clipboard, unmerge the cells, unlock the cells, and use various other methods mentioned above to troubleshoot the error. If you fail to copy and paste the data due to file corruption, then opt for an advanced Excel repair software, like Stellar Repair for Excel. It is a reliable tool that can help you repair highly damaged/corrupted Excel files. It enables you to recover all the objects from the corrupted Excel file, with complete integrity.
- Title: Easy Steps to Make Excel 2019 Hyperlinks Working | Stellar
- Author: Nova
- Created at : 2024-03-12 23:19:24
- Updated at : 2024-03-14 21:13:12
- Link: https://phone-solutions.techidaily.com/easy-steps-to-make-excel-2019-hyperlinks-working-stellar-by-stellar-guide/
- License: This work is licensed under CC BY-NC-SA 4.0.
