
Filter Not Working Error in Excel 2019 Fix 2024 | Stellar
Filter Not Working Error in Excel [Fix 2024]
Summary: The filter is not working issue in Excel can occur due to several reasons, like blank rows, hidden rows, merged cells, corrupted data, etc. In this post, we will mention the reasons why the filter is not working correctly in Excel and several fixes to resolve the issue. We will also mention an advanced Excel repair tool to repair the Excel file if corruption in file is the cause of the issue.

You can use the Filter function in Excel to filter data in large-sized Excel files quickly. While using Excel filters, sometimes, you face a situation where the filter is disabled or may fail to function properly.


The Excel filter usually fails to work if you have not selected the complete and correct range of data. Let’s learn more about the “Sort and Filter not working in Excel” issue and look at the possible methods to fix it.
Why the Filter is not Working in Excel?
You can face the “filter is not working” issue if you are applying the filter on a protected worksheet or trying to find the data from a hidden row. Besides this, there could be many other reasons contributing to this issue, such as:
- The data you are trying to filter is in merged cells.
- The Excel file automatically selected the data up to the first empty cell, excluding the remaining rows.
- Grouped sheets in Excel file.
- Blank row in the Excel sheet.
- You are trying to apply a filter on an invalid data range.
- The workbooks in which you’re facing the filter issues are corrupted.
- You are specifying incorrect criteria in the filter columns.
Solutions to Resolve the Filter is not Working Issue in Excel
There might be two scenarios: the Excel filter option is disabled/grayed out or the filters fail to function properly. You can follow the given troubleshooting solutions to resolve the issue based on the scenario you’re facing.
Scenario 1 – Filter Option is Disabled or Grayed Out
Method 1: Check and Un-group the Worksheet
When you apply filters to a single sheet in a grouped set, Excel disables the filter option in other sheets within the group. You can check the grouped sheets and try ungrouping them to enable the filter option. Here’s how to do so:
- In the Excel file, go to the Group section.

- Right-click on the Ungroup Sheets.
Alternatively, you can press the Shift + Alt + Left keys to ungroup the sheets.
Method 2: Unprotect Worksheet
The “disabled Excel filter” issue can also occur if your worksheet is protected. You can unprotect the worksheet to enable the filter option. To do so, go to the Review tab and then select Unprotect Sheet.


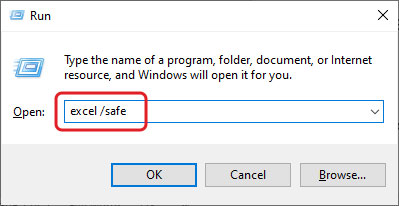
Method 3: Check and Uninstall Excel Add-ins
Sometimes, the Excel filter gets disabled due to faulty or corrupted Excel add-ins. You can run the Excel in Safe mode to check whether the issue has occurred due to add-ins. To do this, type excel /safe in the Run window and click OK.

In safe mode, if you see the filter option, it indicates some problematic Excel add-ins were causing the issue. In such a case, you can check and uninstall the faulty Excel add-ins to fix the issue.

Scenario 2 – Filter is not Working
Method 1: Try Clearing Filters
Sometimes, the Excel filter fails to work correctly if some filters from the previous sessions are still active. In such a case, you can clear the applied filters. Follow the below steps:
- In Excel file, click Sort & Filter option.
- Select clear.

Method 2: Select Entire Data
The filter not working issue in Excel can occur when the range selected for filtering is incomplete or incorrect. You need to make sure that you’ve selected the entire data range in Excel. You can use the Ctrl+A keys to select the entire content in the worksheet.
Method 3: Check and Delete Blank Cells from the Table’s Columns
When you apply a filter to the data, Excel expects data to be in a continuous range. Excel filters do not consider the blank cells, thereby resulting in incorrect functioning of the filter. To resolve this issue, check and delete all blank cells. In case your Excel file is too large to delete the blank cells, then you can add a “Serial number” row as an alternative. Adding serial number row creates a data continuity, thus helping in fixing the filter-related issue.
Method 4: Unhide Hidden Rows and Columns
Hidden rows or columns in worksheets can also affect the filter functionality. You can check and unhide rows/columns to troubleshoot the issue. Here is how to do so:
- In the affected Excel file, go to Home.
- Click on Format > Hide & Unhide.

- Click Unhide Rows or Unhide Columns (as required).

Method 5: Unmerge Cells
You can experience the filter in Excel is not working issue if you are using the filter to extract data from merged cells. Ensure to unmerge the “merged cells” before applying a filter in Excel. Follow the below steps to unmerge the merged cells in Excel:
- Navigate to the Home option.
- In the toolbar, select the Merge & Center option.
- Click Unmerge Cells.
Method 6: Repair the Workbook
Sometimes, the Filter Not Working in Excel issue can occur due to inconsistencies in file structure. If these issues occurred due to corruption in the worksheet, you can repair it using the Open and Repair tool. It is an in-built tool in Excel that is used to repair corrupted Excel files. Here are the steps to use this tool:
- In the Excel application, navigate to the File option.
- Click Open and then click Browse to choose the Excel file.
- In the Open dialog box, click the problematic Excel file.
- Click the arrow next to the Open option and select Open and Repair.
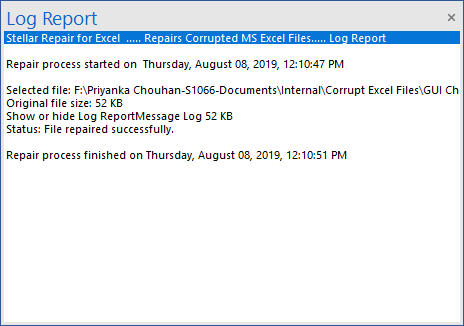
- Click Repair to recover as much data as possible.
- The application prompts a message after the repair process is complete. Click Close.
In most cases, the Open and Repair tool can easily fix corruption issues in the Excel file. However, for any reason, if the open and repair tool doesn’t work you can consider repairing the file using a professional Excel Repair tool. Stellar Repair for Excel is one such advanced and secure tool to repair Excel files. With this tool’s powerful scanning capabilities, you can repair highly corrupted Excel files and recover all their objects with complete integrity. The tool is compatible with all Windows editions, including the latest Windows 11.
Closure
Several reasons are associated with the filter not working issue in Excel. The filter option may not work as expected if you have not selected the complete and correct range of data or for many other reasons. You can follow the troubleshooting methods discussed above to fix the issue. If the filter fails to work due to corruption in the workbook, then try Stellar Repair for Excel . It is an advanced tool that can even repair severely damaged files. It also helps to recover all the data from corrupted files without changing the original formatting. You can check the tool’s functionality by downloading its demo version. It allows you to preview all the repairable objects in the corrupted Excel file.
How to Fix Excel has Encountered a Problem
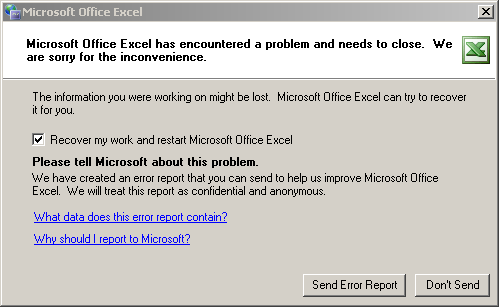
While working on MS Excel, you may encounter various errors that can hamper your work and productivity. One of the errors that you may receive is ‘Microsoft Excel has encountered a problem and needs to close’.Due to this error, your Excel program may stop and asks you to recover the data from Excel file.
What are the Reasons for ‘MS Excel has Encountered a Problem’ Error?
Following are some primary causes that may result in the ‘Microsoft Excel has encountered a problem and needs to close’ error:
- Corrupt Excel File: If you try to open a corrupt or damaged Excel file, the file may not open and displays this error message.
- File not Saved Properly: If Excel files aren’t saved correctly, this error may occur when you open the file.
- Incompatible File Version: If the MS Excel application version does not support the Excel file version, the file may not open and throws the error.
- Issues with MS Office/MS Excel Installation: This error can sometimes be caused due to damaged MS Office/MS Excel installation.
How to Fix ‘MS Excel has Encountered a Problem’ Error?
You can resolve the error by using the following methods:
1. Try to Open Excel in Safe Mode
Open the Excel application in safe mode and then try to open the Excel file. This will help you find out if the problem is caused by some incompatible add-ins. The steps are as follows:
- Hold Windows + R keys together to launch the Run dialog box.
- Type Excel /safe in the search box and hit Enter.
- If your Excel application opens in safe mode, it means that the issue is caused due to incompatible or faulty add-ins. In such a case, you need to disable the add-ins:
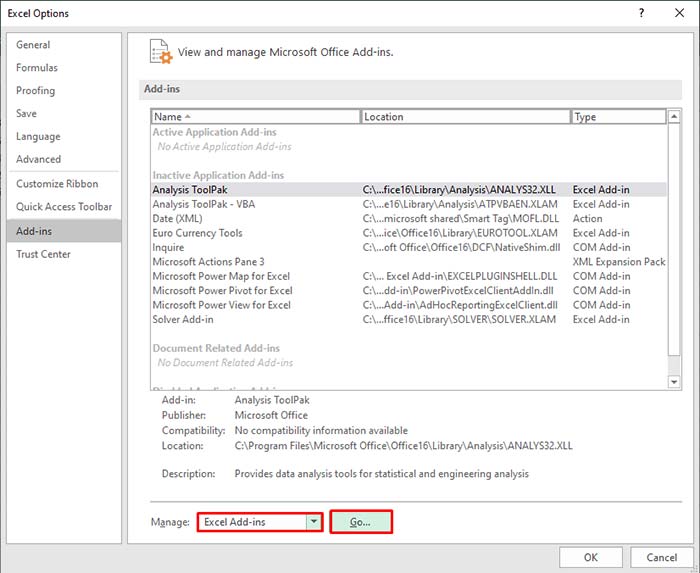
- Go to the File menu and click the Options menu. Further, choose the Add-ins option.
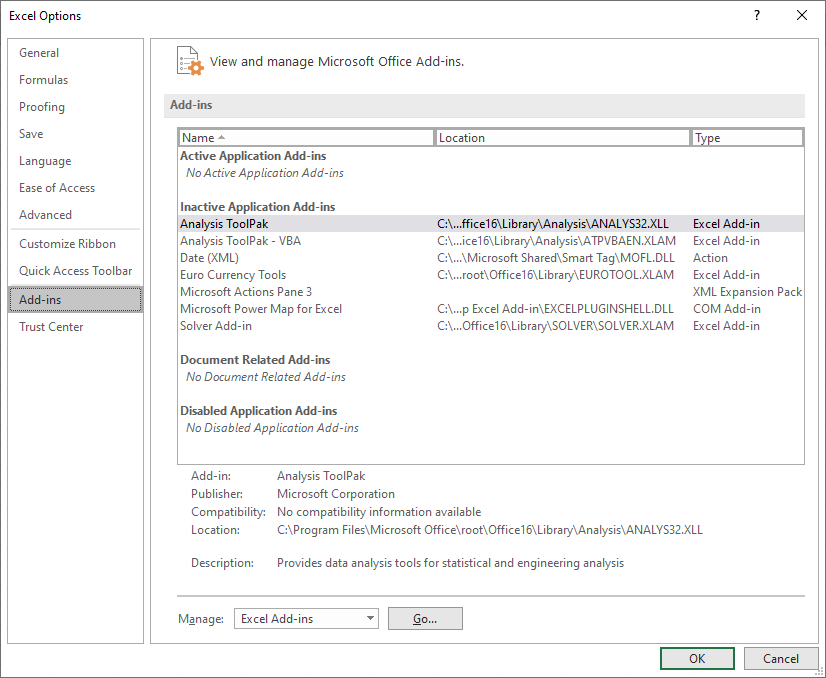
- Now, choose the Go button at the bottom of the Excel Options window.
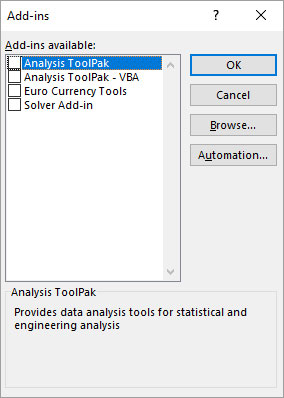
- A list of available add-ins appears.
- Now, uncheck the boxes against the add-ins.
2. Disable Macros Using the Trust Center Settings
Sometimes, the Macros prevent Excel from managing the files. You can disable the Macros to resolve the issue. Follow these steps:
- Launch your MS Excel application.
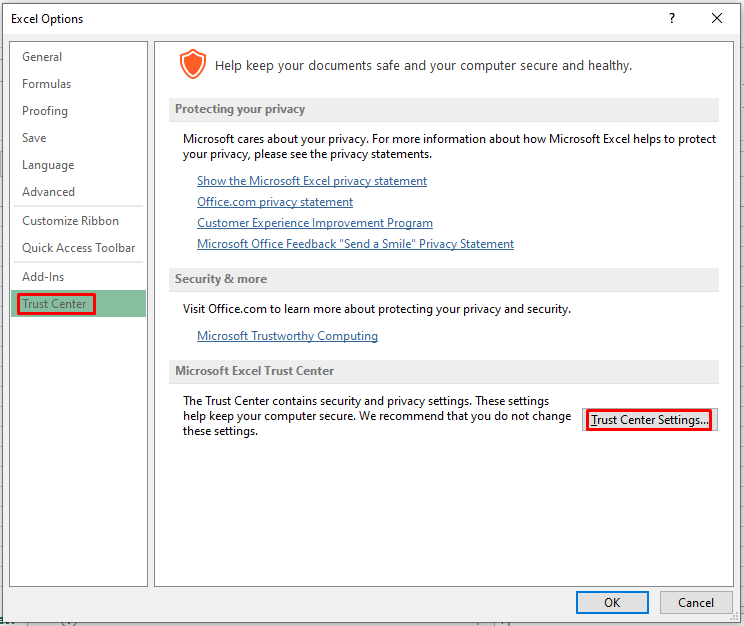
- Now, go to File > Options > Trust Center.
- Further, click the Trust Center Settings.
- Now, navigate to the Macro Settings option.
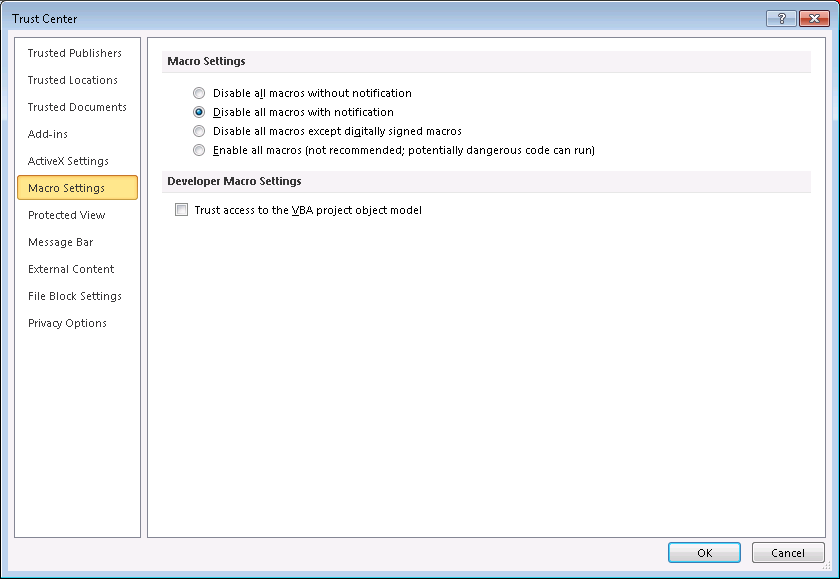
- Herein, select the ‘Disable all macros with notification’ radio button. Then, click OK.
3. Repair MS Office Application
Sometimes, problems with your MS Office application may cause the Excel has encountered a problem error. In such a case, you need to repair your MS Office application. Here are the steps to do so:
- Launch Control Panel > Uninstall a Program.
- Find your MS Office application and click the Change option.
- A new window will appear. Herein, select the Repair option.
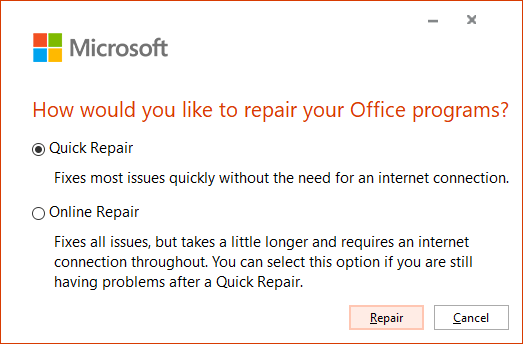
- Now, follow the MS Office installation wizard to finish the repair process.
What to do if the above methods don’t work?
If you have tried the solutions mentioned above and are still not able to resolve the ‘Excel has encountered a problem and need to close’ error, it indicates that the Excel file is corrupt. You can use a professional Excel repair software, such as Stellar Repair for Excel , to repair the corrupt file. The software repairs the file and retrieves all the data, including the tables, charts, formulas, etc. from the damaged workbook. It is compatible with all the MS Excel versions.

To know how Stellar Repair for Excel works, see the following video:

To Wrap Up
The ‘Excel has encountered a problem and needs to close’ error may occur due to different reasons. You can fix this error by following the methods mentioned in this post. If the error has occurred due to corruption in the Excel file, you can use a third-party Excel repair tool, like Stellar Repair for Excel. The software can repair damaged or corrupt Excel file of any size and retrieve all the data.
How to Fix the Unable to Record Macro Error in Excel?
Summary: You may encounter the “Unable to record macro” error in MS Excel when using Personal Macro Workbooks. In this post, we’ll discuss the possible causes behind this error and the ways to fix it. We’ll also mention a professional Excel repair tool that can help fix the error if it occurs due to corrupted workbook.
A personal macro workbook (Personal.xlsb file) is a hidden workbook in Excel that stores all macros in a single workbook. This allows you to automate processes while working in Excel. Sometimes, when recording macro codes in the personal macro workbook, you may get the message “Personal Macro Workbook in a startup folder must stay open for recording”. When you click on the OK button, it will show the “unable to record” error. This prevents you from recording the macros. Below, we’ll see the causes behind this error and discuss how to resolve this error.
Causes of Unable to Record Macro Error
You may be unable to record macros in Excel due to several reasons. Let’s take a look at the possible causes that can lead to this issue.
- The location of personal.xlsb file is changed.
- Personal.xlsb file is corrupted.
- Macros are disabled.
Methods to Fix the “Unable to Record Macro” Error in Excel
Here are some possible solutions that can help you resolve the unable to record macro error in Excel.
Method 1: Check the Path of XLStart Folder
You may be unable to record macros if the path of XLStart folder is incorrect. It is a folder where the Personal.xlsb file is stored by default. Follow these steps to find out the path of this folder:
- Open MS Excel. Go to File > Options.
- Click Trust Center > Trust Center Settings.

- In the Trust Center Settings window, click on Trusted Locations.

- Verify the path of the XLSTART folder and modify it if there is an issue.
- Once you are done, click on OK.
Method 2: Change Macro Security
The “Unable to record macro” error can occur if macros are disabled in the Macro Security settings. You can try changing the macro settings using the below steps:
- In MS Excel, go to File > Options > Trust Center.

- Under Trust Center, click on Trust Center Settings.

- Select “Enable all macros” and then click OK.
Method 3: Check Add-ins for Disabled Items
If there are any items in add-ins that are disabled, they may prevent Excel from functioning properly. You can check and enable the items in MS Excel using the below steps:
- Click File > Options.

- In Excel Options, click on the Add-ins option.
- Select Disabled Items from the Manage section and click on Go.

- The Disabled Items window is displayed.
- Click on the disabled item and then click Enable.
- Restart Excel for the changes to take place.
Method 4: Repair your Excel File
You may fail to record macros if there is corruption in the workbook. In such a case, you can use the “Open and Repair” utility in MS Excel to repair the corrupt workbook. To use this tool, follow these steps:
- Open your Excel application.
- Click File > Open.
- Browse to the location where the corrupted file is stored.
- In the Open dialog box, choose the corrupted workbook.

- From the Open dropdown list, click Open and Repair.

Excel will prompt you to repair the file or extract data from it. Click Repair to retrieve maximum data. If the Repair option fails, then click on the Extract Data option to recover the data without formulas and values.
If the Microsoft utility “Open and Repair” fails to repair the corrupted Excel workbook, then try a professional Excel repair tool such as Stellar Repair for Excel. It is an advanced tool that can easily repair severely corrupted Excel (XLSX and XLS) files. It can recover all the file items, including chart sheets, cell comments, tables, macros, formulas, etc. without impacting the properties and cell format of the Excel file.
Closure
You may receive the “unable to record” error in Excel while creating or storing macros in Personal Macro Workbooks. There are several reasons that can lead to this error. You can try the methods covered in this post to resolve the error. If the error appears due to corruption in workbook, then try to repair it using the Open and Repair utility. Alternatively, you can use Stellar Repair for Excel – a professional tool that can help you repair an Excel file with problematic macros. Also, it allows recovery of all the file components with complete integrity. The tool is compatible with Excel 2021, 2019, 2016, and older versions.
Simple ways to Open Corrupt Excel file Without any Backup
Summary: The blog describes simple ways to open corrupt Excel file without any backup. It explains some manual workarounds that you can try to open the file. Also, it mentions about an Excel file repair tool that can quickly fix the corrupt file and recover data from it.
Do you have an Excel file that does not open because of corruption issue? And every time you try to open it, an error message ‘the file is corrupt and cannot be opened’ pops-up?

Excel File Corruption Message
Also, you don’t have a healthy backup of the Excel file to restore the data? If so, you can try repairing the corrupt file by using a few simple yet effective manual workarounds mentioned below.
How to Open a Corrupt Excel File without Backup?
Following are some manual methods that can help you open a corrupt Excel file:
Method 1: Repair Corrupt Excel File
When attempting to open a corrupt file, Excel automatically starts ‘File Recovery’ mode to repair the file. But, if the recovery mode doesn’t start, try Microsoft Excel’s built-in ‘Open and Repair’ feature to manually repair the file.
To use this feature, perform the following steps:
Step 1: Open a Blank workbook in Excel, and then click File > Open.
Step 2: In the Open window, browse and select the corrupt file.
Step 3: Click the arrow that is beside the Open tab, and select Open and Repair.

Open and Repair Option
Step 4: Implement one of the following:
- Click the Repair button. (This is to recover as much data as possible.)
- Click the Extract Data button. (This is to recover values and formulas from the Excel file if the repair process fails to recover the entire data.)

Excel Built-in Repair Options
If using Open and Repair does not work , move to the next method.
Method 2: Disable the Protected View Feature
Some Excel users have reported that turning off the ‘protected view’ feature in Excel helped them open the corrupt file. You can also try to disable this feature and open the file. To do so, follow these steps:
Step 1: Open a blank Excel file, click on File > Options.
Step 2: In the Excel Options window, select Trust Center, and then click Trust Center Settings.

Excel Trust Center Settings
Step 3: Click OK.
Now check if you can open the corrupt file. If not, try implementing the next method.
### **Method 3: Look For Automatically Recovered Excel File**If you have Excel’s AutoRecover feature enabled, you’ll have access to a copy of the Excel file corrupted or lost due to application crash, power outage, or accidental deletion.
The ‘AutoRecover’ feature saves Excel worksheets at a temporary location after a certain time interval. It saves the worksheets automatically and is turned on by default to reduce the chance of data loss.
Check if you can recover corrupted Excel file by following these steps:
Step 1: In Excel, open a Blank workbook.
Step 2: Go to File and click Options.

Figure 5 – Excel Options
Step 3: In the Excel Options dialog box, click Save, and then copy the ‘AutoRecover file location’.

Excel Options Window
Step 4: Open File Explorer window and paste the copied AutoRecover file location, and press Enter.
Step 5: A list of saved Excel files will be displayed. Choose the file you want to recover.
TIP: Use Excel’s AutoBackup feature to reduce chances of data loss, by saving a previous version of your spreadsheet automatically.
Use an Excel File Repair Software
If the above manual methods fail, repair the corrupt Excel file by using a third-party software, such as Stellar Repair for Excel**.** The software helps repair Excel (XLS and XLSX) files easily and effectively.
[](https://tools.techidaily.com/stellardata-recovery/repaire-for-excel/)Read this: How to repair corrupt Excel file using Stellar Repair for Excel?
Some key features of Excel Repair software are as follows:
- Fixes all errors in the MS Excel file.
- Repairs multiple damaged Excel files in a go.
- Recovers chart, chart sheet, table, cell comment, image, formula, and sort & filter.
- Preserves properties and cell formatting of Excel worksheets.
- Previews recoverable Excel file data before saving.
- Recovers all data components from the corrupt files and saves them in a new blank Excel file.
- Compatible with Excel 2019, 2016, 2013, 2010, 2007, and lower versions.

Conclusion
You can try the workarounds discussed in the blog to open a corrupt Excel file without a backup. Disabling the protected view feature can help you open the file. If the issue persists then try repairing the corrupted Excel file using the Open and Repair utility. Although, it may not be able to fix a severely corrupted workbook. In such a case you can use Stellar Repair for Excel . It is an advanced tool that can help you repair a corrupted Excel file with 100% integrity.
How to Fix a Corrupted .xls File? The Everything Guide
Undoubtedly, Excel is so powerful that it can help you to process, analysis, and store data, in masses.
That’s the reason it has been there for years and helping this world in data.
But…
With all those powers comes some nasty problems which no Excel users like to face. Can you guess what I’m talking about?
Think about a Corrupted Excel File. Nightmare? Isn’t it?
And do you remember that last time when you have opened a workbook and you got a message that this workbook is might corrupt?
The TRUTH is, this is something which you cannot avoid, but, you can prepare yourself in the best way and deal with it like a PRO.
So today, in this post, I’d like to share with you to everything you need to know about a corrupt Excel file (.xls), why it happens, how to fix it like a PRO, and much more.
…let’s get started.

Note: In this post, we’ll be covering the .xls version (which is the extension for the file which is created in Excel 2007 or the earlier versions) and if you want to know about the new version, here’s the quick fix for that.
Why My Excel File Got Corrupted?
There can be one or multiple reasons for an Excel file to get corrupted. Below I have detailed about some of the major of them.
1. Large Excel File
You can store data in a workbook the way you want but sometimes using excessive thing can make an Excel file bigger in size.
And that kind of data files can crash at any point in time. Here are a few things which make the Excel files heavy, like
- Conditional Formatting.
- Colors formatting.
- Using merged cells in place of text alignment.
- Volatile functions: Formulae that iterate every time you open or change a cell value; OFFSET, NOW.
- Using a complete column or row as a reference than the data set range.
- Using complex formulas; VLOOKUP in place of Index/Match, Nested If in place of MAXIFS, MINIFS.
- Calculations or reference across workbooks.
Related: How to Fix Formatting Issues in Excel

2. Abrupt System Shutdown
Shutting down the system without following the procedure can corrupt your data file.
This shut down can be due to a power failure or any other unexpected technical challenges.
So it is always important to follow the procedures and shut down your system properly to avoid data losses.
3. Infected Excel File (Virus Attack)
This is the most common and obvious reason for Excel file corruption.
Although we always keep our system safe using various Antiviruses, still there is always a probability of virus attacks and loss of important files.
It is always advised to use a safe and strong antivirus compatible with your system requirements.

What are the Signs to Know When an Excel File is Corrupted?
In this section, we will discuss what are the signs which you can get when an Excel file is corrupted, let’s dig into it.
1. The File is Corrupt and Cannot Be Opened
This is one of the most common messages you can see when your workbook is corrupted.
But there is also a chance that it is just because of the version compatibility where you have a .xls file but you are using the latest version of Excel check out this detailed post by Priyanka
2. We Found a Problem with some Content in this File…
There’s another error message which you can get while opening a file:
We Found a Problem with some content in Do you want us to recover as much as we can? If you trust the source of this workbook, click yes.

There are a lot of applications out there (I think almost every) which exports the data as a .xls format. Those files have a greater chance of having this kind of error.
3. “Filename.xls” cannot be accessed
There can also be a situation where you get the error:
“Filename.xls” cannot be accessed. The file may be corrupted, located on a server that is not responding.
Well, this message is a bit misleading.
You won’t be able to decide that your file is actually corrupted or just not on the location.
My Excel File Got Corrupted, now What Should I Do?
There are many ways to recover the data from the corrupt excel files. But before you start, it is always advised to create a copy of the corrupted file.
You can save a lot of time with Stellar Repair for Excel, which make data recovery just with few clicks.
But before you go for a data recovery software, let’s try out some manual steps which can help.
When a workbook get corrupted the first thing comes to the mind is to recover data from it…
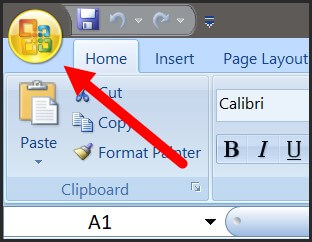
…and you what there’s a simple option there in the Excel which you can use to do this. Below are the steps you need to follow:
- First of all, open the Excel and click on the office icon.
Parental Control Software
After that, go to the “Open” and select the file which is corrupted.
Now, click on the open drop-down and select “Open and Repair”.
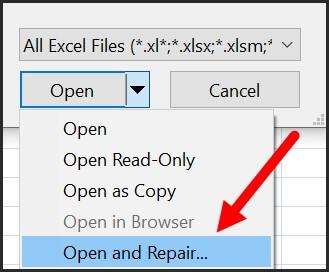
- At this point, you have two options:
- Repair File
- Extract Data

Let’s get into both of these options one by one…
1. Repair File
This option helps you to repair the file and the moment you click on it it takes a few seconds afterward and shows you the result with a message box and also provide you a log file.
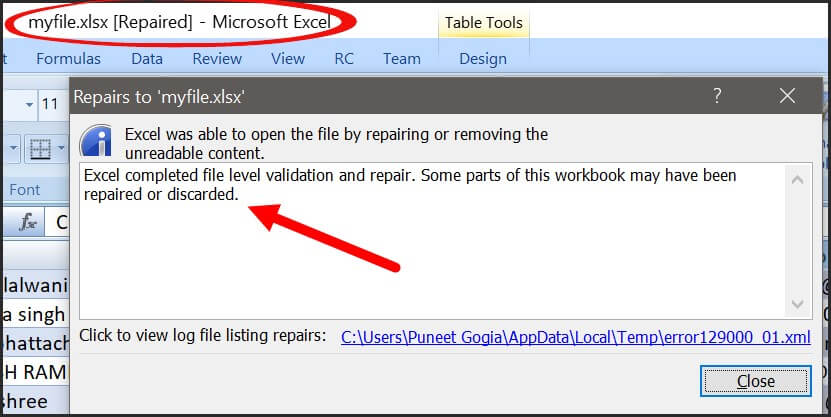
And once it is done with repairing, you’ll get your file opened and you can save that file as a new copy.
Yes, that’s it.

2. Extract Data
If somehow you aren’t able to get your file repaired, you can also extract data from that file using “Extract Data” option.
Even in this option, you can get data in two ways.

- As Values
- With Formulas
In the first option, Excel simply extracts data as value ignoring all the formulas driving those value (which is the best way if you just need to have that data back).
But in the second option, Excel tries to recover the formulas as much as possible.
Check out this smart technique by Jyoti which you can use it you aren’t able to recover data from the file.
Preventions to Not to have any Excel File Go Corrupt in Future
Future is fragile, what I’m trying to say is the more you work in Excel and process data there could be a chance that your workbook goes corrupt.
If there’s no security then what an EXCEL POWER user should do?
Well, there are few things which you can do or take care of while working with Excel so that you won’t have to worry about corruption of Excel workbooks.
Let’s see what you can do…
1. Change Recalculation Option
Now here’s the thing when you work with a hell lot of data, there a common thing that you gotta using formulas. Right?
But, the thing these formulas are something which makes your Excel file slows down sometimes make them go corrupt.
There’s one small tweak you can do in your workbook is change the calculation method.
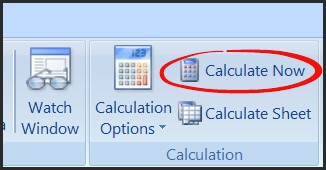
Now with the manual calculation, you just need to whenever you open your file it won’t recalculate all the formulas.
And when you update your data you can simply click on the “Calculate Now” and it will calculate all the formulas again.
Quick Tip: Beware of Volatile Functions and use them with caution as recalculates them every time you change something in the worksheet.
2. Use VBA Codes Instead of Formulas
Now, this is what I do when I need to use complex formulas in a workbook.
Here’s how you can do this: Let’s say you have a formula in the cell A1, like below, which calculates the age.
=“You age is “& DATEDIF(Date-of-Birth,TODAY(),”y”) &” Year(s), “& DATEDIF(Date-of-Birth,TODAY(),”ym”)& “ Month(s) & “& DATEDIF(Date-of-Birth,TODAY(),”md”)& “ Day(s).”
Now, instead of simply entering it into the cell A1 which I would write a macro code which inserts this formula into the cell A1 and then convert it into the a value.
Here’s the code:
Sub CalculateAge()
Range(“B1”).Value = _
“=””Your age is “”” & _
“&DATEDIF(A1,TODAY(),””y””)” & _
“&”” Year(s), “”” & _
“&DATEDIF(A1,TODAY(),””ym””)” & _
“&”” Month(s), and “”” & _
“&DATEDIF(A1,TODAY(),””md””)” & _
“&”” Days(s).”””
Range(“B1”) = Range(“B1”).Value
End Sub

Note: To write these code you need to have basic understading of VBA (make sure check out this guide for this).
3. Use a File Recovery Application
Recently we asked a quick question to our readers on ExcelChamps that if they have ever faced a situation where they got a corruption message in Excel.
You’ll be astonied to hear that 50% percent of the people said “YES” they faced this thing in the past.

Now, this is alarming, if you are heading a team or you have a bunch of people in your company who use Excel…
…there’s a high probability that half of them gonna face this issue. So the best way to deal with this to have an App FIX your Excel file for you.
With STELLAR REPAIR FOR EXCEL, you just need a few clicks, yes that’s right. Let me show you with the below steps:
- First of all, download the app and install it (it’s simple).

- After that, open the app and click on the “Browse” and simply select the file which is corrupted.
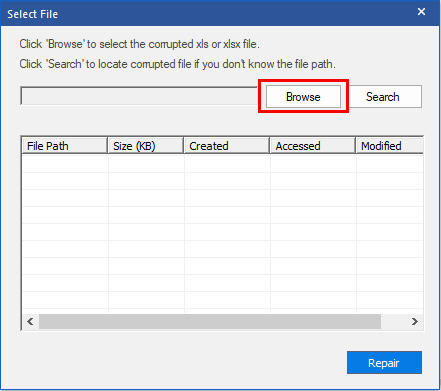
- In the end, click on the REPAIR to let the Excel repair software fix your file (it takes a few seconds).
Once you complete repairing your file, you’ll get a message in your on the status bar and after that, you can open your file.

Final Thoughts
If you are a POWER Excel user then there’s a must for you to have known how to deal with a situation where you got a corrupt Excel file.
But I must recommend you to TRY OUT Stellar Repair for Excel so that’s you don’t have to worry about your Excel files anymore.

I’m sure you found this post helpful, and please don’t forget to share this tip with your colleagues, I’m sure they’ll appreciate it.
Ways to Fix the “Failed to Parse the Corrupted Excel File” Error
Summary: While parsing an Excel file, you may experience the “Failed to parse the corrupted Excel file” error. It usually occurs if the Excel file is corrupt. This blog covers some easy fixes to fix this Excel error. It also mentions an advanced Excel repair tool that can help fix the issue by repairing the corrupted file.
You may encounter the “Failed to parse the corrupted Excel file” error when parsing (extracting or converting) the data in an Excel file. This error usually occurs if the Excel file is corrupted – either completely or partially (some of its objects, like formulas, macros, and values are corrupt). However, there are various other reasons that may lead to this Excel error. Let’s know the possible causes behind the “Failed to parse the corrupted Excel file” error and how to fix it.
Causes of the “Failed to parse the corrupted Excel file” Error
This error could occur due to any of the following causes:
- Damaged or corrupted macros
- Excel document is closed suddenly
- Issues with Excel application installation
- Virus or malware attack
- Hardware failure
- Bad sectors on the hard drive
Ways to Fix the “Failed to parse the corrupted Excel file” Error
Here are some possible ways to fix this error and recover the Excel file.
Method 1: Try to Save the File in a Different Format
Sometimes, the error can occur if the file format is not compatible with your Excel version. You can try saving the file to a different format. To do this, follow the below steps:
- Open the Excel file.
- Click on the File option and then select Save As.
- Click on Browse option and then click Save as Type.

- Select the desired Excel file format and click Save.

Method 2: Revert to the Previously Saved Version of the Excel File
You can try reverting to the previously saved version of the Excel file. Here’s how:
- Open your Excel application.
- Navigate to File > Info > Manage Workbook.

- Click Recover unsaved workbooks.

- Click on the Restore option you see at the top of the file.
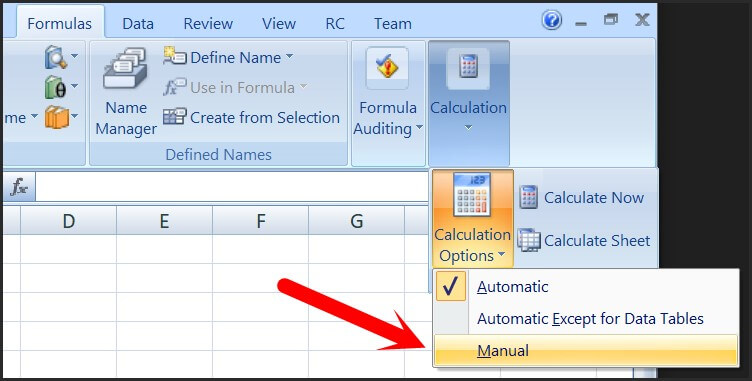
Method 3: Set the Calculation Option to Manual
When the calculation mode is set to automatic, Excel automatically recalculates all the formulas in the file even if you make a minor change. It can take time to load the file and stop you from parsing data in your Excel file. You can change the calculation option to manual so that Excel only recalculates when you explicitly tell the application to do it. Here are the steps:
- Open your Excel application.
- Navigate to File and then click Options.
- In Excel Options, select Formulas.
- Under Workbook Calculation, select Manual and click OK.

Method 4: Use Open and Repair Utility
You can try repairing the corrupted Excel file with Excel’s inbuilt tool – Open and Repair . To use the tool, follow the steps cited below:
- In Excel, go to the File tab and then click Open.
- Click Browse to select the corrupted file.
- The Open dialog box will appear. Click on the corrupted file.
- Click on the arrow next to the Open button and then click Open and Repair.
- You will see a dialog box with three buttons Repair, Extract Data, and Cancel.

- Click on the Repair button to recover as much of your work as possible.
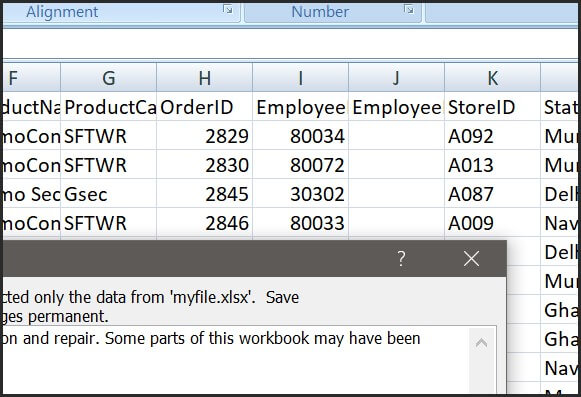
- After repair, a message will appear (as shown in the below figure).

- Click Close.
What If None of the Above Methods Works?
The above methods may fail to work if the Excel file is severely damaged. In such a case, we recommend using an efficient Excel repair tool , such as Stellar Repair for Excel. It can quickly repair corrupted Excel (.XLS/.XLSX) files. It can recover all the objects from the file, including charts, tables, formulas, etc. You can download the free trial version of the tool to preview the recoverable data.
Conclusion
Above, we have discussed some tried and tested methods to fix the “Failed to parse the corrupted Excel file” error. If the Excel file is severely damaged or corrupted, you can try repairing it using a third-party Excel repair software, like Stellar Repair for Excel . It can repair multiple Excel files without affecting the original formatting. The tool is compatible with all Excel versions.
How to Fix “Errors were detected while saving Excel” Error?
When trying to save the Excel file, you might face unexpected errors. The “Errors were detected while saving Excel” is one such error. It can also occur when using VBA in Excel. The complete error message appears as:
**“Errors were detected while saving [file name]. Microsoft Excel may be able to save the file by removing or repairing some features. To make the repairs in a new file, click Continue. To cancel saving the file, click Cancel.”
**
The error can occur if the features (Pivot tables, charts, macros) used in the Excel file get corrupted . However, there could be several other reasons behind the occurrence of the error. Let’s discuss them.
What Causes the “Errors were detected while saving Excel” Error?
There are various reasons why you encounter this error. Here are some of them:
- Incompatible pivot table in the Excel file
- Large or uncompressed images in the Excel file
- File-sharing properties are not allowing file saving
- Excel file is corrupted
- Large-sized Excel file
- File version incompatibility
- VBA code is corrupted
Ways to Fix the “Errors were detected while saving Excel” Error
You’re not able to save the Excel file if there is no storage space on your hard drive. So, first check if your hard drive has sufficient storage space to save the file. If this is not the case, then it might happen that your antivirus program is interrupting the saving process. To check this, temporarily disable your antivirus program and then try to save the file. If still your Excel is throwing the “Errors were detected while saving Excel” error, then follow the below given methods to fix the error:
Method 1: Open the Excel in Safe Mode and Disable the Add-ins
When you open Excel in safe mode, it opens without the third-party add-ins. This helps in finding out if any add-ins are causing the error.
Here’s how to open the Excel in safe mode:
- Open the Run window by pressing Windows key + R.
- Type excel /safe in the Run window.
?
- Next, click on OK.
- It will open Excel in safe mode.
- Now, try to open and save the affected file.
If you are able to save the file without any issue, then this means that the error has occurred due to third-party add-ins or settings. You can try disabling the add-ins to fix the issue. To do this, follow these steps:
- First, open Excel.
- Then, go to the File tab and click Options.

- In Excel Options, click on the Add-ins

- Under the Manage section, select Excel Add-ins and then click on the Go
- In the Add-ins dialog box, unselect the add-ins under the Add-ins available option and click OK.

Note: Disabling add-ins does not remove them from the system. To remove them permanently, you need to uninstall them.
Method 2: Check the Excel File Name
Some users have observed this error when saving the Excel file with an invalid name. You can check the file name and ensure that it should not contain more than 218 characters. If the name exceeds the required limit, then try shortening the file name or move the file to a folder with a short path name.
Method 3: Copy the Data from the Affected File to a New File
If you are not able to save the Excel document, then try copying the data from the affected file to a new Excel file. Then, save the new file with a different name. This helps in resolving the issue.
Method 4: Check and Provide File Permissions
You may experience the “Errors were detected while saving Excel” issue when you do not have desired permissions to modify the folder in which your Excel file is located. To modify the folder, you should have read, write, and create permissions. You can check and provide the desired permissions using the below steps:
- Navigate to the Windows Program Files and then find the desired folder (where the Excel file is saved).
- Right-click on the folder and then choose Properties.
- Select the Security tab and then click
- Click on Change Permissions in the Advanced Settings
- Click Administrators and then click Edit.
- Now set the Apply to drop-down button to This Folder, Subfolder, and Files.
- Click on the Full Control field and then click Apply > OK.
Method 5: Check Pivot Tables in Excel Sheet
You can review Pivot tables to see if they are causing the “Errors were detected while saving Excel” error. To do so, follow the below steps:
Click Power Pivot > Manage.
Check the tabs in the Power Pivot
Check if all the formulas used in the table are correct. Sometimes, even a small typo can create an issue in Excel.

Method 6: Repair Your Excel File
The “Errors were detected while saving Excel” issue can also occur if the Excel file is corrupted. In such a case, you can take the help of the built-in utility in Excel – Open and Repair to repair your Excel file. Here’s how to use the tool:
- In Excel, click the File tab and then click Open.
- Click Browse to select the desired file.
- The Open dialog box is displayed. Click on the corrupted file.
- Click on the arrow next to the Open button and then click Open and Repair.
- Click on the Repair

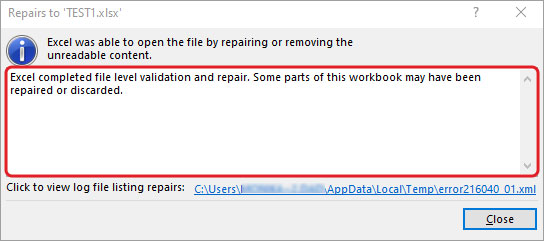
After repair, a message will appear (as shown in the below figure).
Click Close.
However, sometimes, the Open and Repair utility fails to fix the file if it is severely corrupted or large-sized. In such a case, you can take the help of a third-party Excel repair software, such as Stellar Repair for Excel. The tool performs a comprehensive scan of the corrupted Excel file to fix the issues and recover all the items from the file without changing the original formatting. It can recover pivot tables, charts, images, engineering formulas, etc. The tool is compatible with Windows 11/10/8.1/8/7. You can download the free trial version of the tool to evaluate its functionality.
Closure
Many Excel users reported facing the situation when they are saving the Excel file. You can check the file’s compatibility to fix the “Errors were detected while saving Excel” issue. If you are getting this error in a Macro-enabled file then you can try deleting the VBA project from a document to resolve the issue. However, deleting the entire VBA code cannot be a better solution as it can lead a data loss in the Project you are working on. In the above article, you have learned the reasons behind the issue and discovered how to fix the error. Follow the methods and if none of them works then try using Stellar Repair for Excel. It is an advanced tool that can quickly repair corruption in Excel worksheets at any level. It lets you restore the corrupted components from the corrupted file without removing the existing data.
- Title: Filter Not Working Error in Excel 2019 Fix 2024 | Stellar
- Author: Nova
- Created at : 2024-07-17 17:13:35
- Updated at : 2024-07-18 17:13:35
- Link: https://phone-solutions.techidaily.com/filter-not-working-error-in-excel-2019-fix-2024-stellar-by-stellar-guide/
- License: This work is licensed under CC BY-NC-SA 4.0.