:max_bytes(150000):strip_icc():format(webp)/espnplus-6d79c347f2df42d7a38cdb0ba9a2472b.jpg)
Fix Excel 2019 formula not showing result | Stellar

[Fix] Excel formula not showing result
Summary: Is your Excel spreadsheet showing text of a formula you’ve entered and not its result? This blog explains the possible reasons behind such an issue. Also, it describes solutions to fix the ‘Excel formula not showing result’ error. You can try Stellar Repair for Excel software to recover engineering and shared formulas.
Sometimes, when you type a formula in a cell of worksheet and press Enter, instead of showing the calculated result, it returns the formula as text. For instance, Excel cell shows:

But you should get the result as:

Why Does Excel Show or Display the Formula Not the Result?
Following are the possible reasons that may lead to the ‘Excel showing formula not result’ issue:
- You accidentally enabled “Show Formulas” in Excel.
- The cell format in a spreadsheet is set to text.
- ‘Automatic calculation’ feature in Excel is set to manual.
- Excel thinks your formula is text (Syntax are not followed).
- You type numbers in a cell with unnecessary formatting.
How to Fix ‘Excel Showing Formula Not Result’ Issue?
Solution 1 – Disable Show Formulas
If only the formula shows in Excel not result, check if you have accidentally or intentionally enabled ‘show formula’ feature of Excel. Instead of applying calculations and then showing results, this feature displays the actual text written by you.
You can use the ‘Show Formulas’ feature to quickly view all formulas, but if you are not aware of this feature, and enabled it accidentally, it can be a headache. To disable this mode, go to ‘Formulas’ and click on ‘Show formula enabled.’ If it’s previously enabled, it will be disabled by just clicking on it.

Solution 2 – Cell Format Set to Text
Another possible reason that only formula shows in Excel not result could be that the cell format is set to text. This means that anything written in any format in that cell will be treated as regular text. If so, change the format to General or any other. To get Excel to recognize the change in the format, you may need to enter cell edit mode by clicking into the formula bar or just press F2.

Solution 3 – Change Calculation Options from ‘Manual’ to ‘Automatic’
There is an “automatic calculation” feature in Excel, which tells Excel to do calculations automatically or manually. If ‘Excel formula is not showing results’, it may be because the automatic calculations feature is set to manual. This issue is not easily detected because it results in calculating formula in one cell but if you copy it to some other cell, it will retain the first calculation and will not recalculate on the base of the new location. To fix this, follow these steps:
- In Excel, click on the ‘File’ tab on the top left corner of the screen.
- In the window that opens, click on ‘Options’ from the left menu bar.
- From ‘Excel Options’ dialog box, select ‘Formulas’ from the left side menu and then change the ‘Calculation options’ to ‘Automatic’ if it’s currently set as ‘Manual’.

- Click on ‘OK’. This will redirect you to your sheet.
Solution 4 – Type Formula in the Right Format
There is a proper way to tell Excel that your text is a formula. If you don’t write the formula in a particular format, Excel considers it as simple text and hence no calculations are performed according to it. For this reason, keep the following in mind when typing a formula:
Equal sign: Every formula in Excel should start with an equal sign (=). If you miss it, Excel will mistake your formula as regular text.
Space before equal sign: You are not supposed to enter any space before equal sign. Maybe a single space will be hard for us to detect, but it breaks the rule of writing formulas for Excel.
Formula wrapped in quotes: You need to make sure that your formula is not wrapped in quotes. People usually make this mistake of writing a formula in quotes, but in Excel, quotes are used to signify text. So your formula won’t be evaluated. But you can add quotes inside formula if required, for example: =SUMIFS(F5:F9,G5:G9,”>30″).
Match all parentheses in a formula: Arguments of Excel functions are entered in parenthesis. In complex cases, you may need to enter more sets of parenthesis. If those parentheses are not paired/closed properly, Excel may not be able to evaluate the entered formula.
Nesting limit: If you are nesting two or more Excel functions into each other, for example using nested IF loop, remember the following rules:
- Excel 2019, 2016, 2013, 2010, and 2007 versions only allow to use up to 64 nested functions.
- Excel 2003 and lower versions only allow up to 7 nested functions.
Solution 5 – Enter Numbers without any Formatting
When you use a number in the formula, make sure you don’t enter any decimal separator or currency sign, e.g. $, etc. In an Excel formula, a comma is used to separate arguments of a function and a dollar sign makes an absolute cell reference. Most of these special characters have built-in functions so avoid using them unnecessarily.
What to Do If the Manual Solutions Don’t Work?
If you’ve tried out the manual solutions mentioned above but still unable to resolve the ‘Excel formula not showing result’ issue, you can try repairing your Excel file with the help of an automated Excel repair software , such as Stellar Repair for Excel.
This reliable and competent software scans and repairs Excel files (.XLSX and .XLS). It also helps recover all the file components, like formulas, cell formatting, etc. Armed with an interactive GUI, this software is extremely easy to work with, and its advanced algorithms allow it to fend off Excel errors with ease.
Conclusion
This blog outlined the possible reasons that may cause ‘Excel not showing formula results’ issue. Check out these reasons and implement the manual fixes, depending on what resulted in the problem in the first place. If none of these fixes help resolve the issue, corruption in the Excel file might be preventing the formulas from showing the actual results. In that case, using Stellar Repair for Excel tool might help.
Excel Repair Tool to Repair Corrupt Excel files (.XLS/.XLSX)
When to Use Stellar Excel File Repair Tool?
Unable to Open an Excel File Due to Invalid Extension?
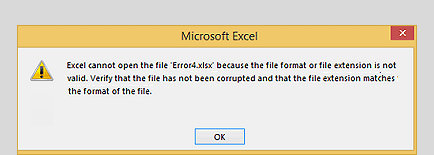
You may face an error - “Excel cannot open the file .xlsx” in Excel 2021, 2019, 2016, etc., leading to data loss. This error occurs when you try to open corrupt Excel file or an invalid file format. Using the correct extension can resolve the issue, if there is no corruption. However, you need an Excel repair tool if the file is corrupt. Stellar Repair for Excel can repair the corrupt file and recover all objects in intact form.
Excel File Not Opening Due to Corruption?
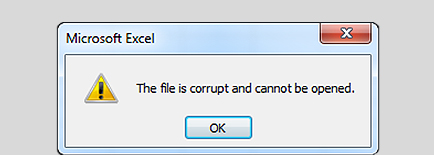
You cannot open an Excel file if it is corrupted. For example, opening an Excel file created in a lower version like Excel 2007 in Excel 2010 or later version can throw a corruption error message. Or, the file may open in a ‘protected view,’ not allowing any write operations. The Excel repair tool from Stellar provides a comprehensive solution to fix corrupt Excel files across all versions, including Excel 2021, 2019, 2016, 2013, and older.
Excel Found Unreadable Content?
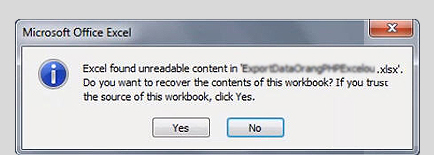
You may encounter an error message – “Excel found unreadable content in filename.xls”, with a message to recover the contents of the workbook. Clicking ‘Yes’ to recover the contents may lead to loss of formatting, replacement of formulas, and inconsistencies. Stellar Phoenix Excel Repair software now Stellar Repair for Excel can scan the workbook and recover its contents.
KEY FEATURES FOR REPAIR FOR EXCEL
Software Important Capabilities
![]()
Repair Large-sized Excel Files
Stellar Repair for Excel software previously known as Stellar Phoenix Excel Repair can repair & fix corrupt Excel files of any size. It removes corruption from individual objects, fixes the damage, and restores the Excel file back to its original state. The Excel repair tool can repair multiple Excel files in a batch.
Learn More
![]()
Resolves All Excel Corruption Errors
This Excel file repair tool fixes all types of Excel corruption errors, such as unrecognizable format, Excel found unreadable content in name.xls, Excel cannot open the file filename.xlsx, file name is not valid, the Excel file is corrupt and cannot be opened, etc. It provides a comprehensive solution for fixing Excel file issues.
Learn More
![]()
Preview the Repaired Excel File
The software shows a preview of the repaired Excel file and its recoverable contents in the main interface. This functionality allows you to verify the data in your repaired Excel file, including all of its objects, before saving the file. The Excel File Recovery software helps in determining the final state of data you will receive after repairing the corrupted Excel file.
Learn More
![]()
Recovers All Excel file Objects
The software repairs the corrupt Excel file and recovers all objects, including tables, charts, series trendline, conditional formatting rules, and properties of the worksheet. The software also recovers embedded functions, group & subtotal, engineering formulas, numbers, texts, rules, etc. It recovers Excel file data in its intact form.
Reviews & Feedback
Recommendation by Microsoft MVPs
OTHER IMPORTANT FEATURES
Know your Product Better
![]()
Option to Find Excel Files
Stellar Excel repair software helps users unaware of the Excel file location to search for all the Excel files on the computer. It provides ‘Find’ option to quickly locate and list all the Excel files for repair. You can select single or multiple files from the list that you want to repair.
![]()
Stellar Toolkit for File Repair
Stellar Toolkit for File Repair provides essential tools to repair corrupt Office files via a single interface. It comprises tools like MS Excel Repair, MS Word Repair, MS PowerPoint Repair, and PDF Repair to fix corrupt documents while maintaining the original file format.
Learn More
HOW TO USE STELLAR REPAIR FOR EXCEL
Screenshots & Video
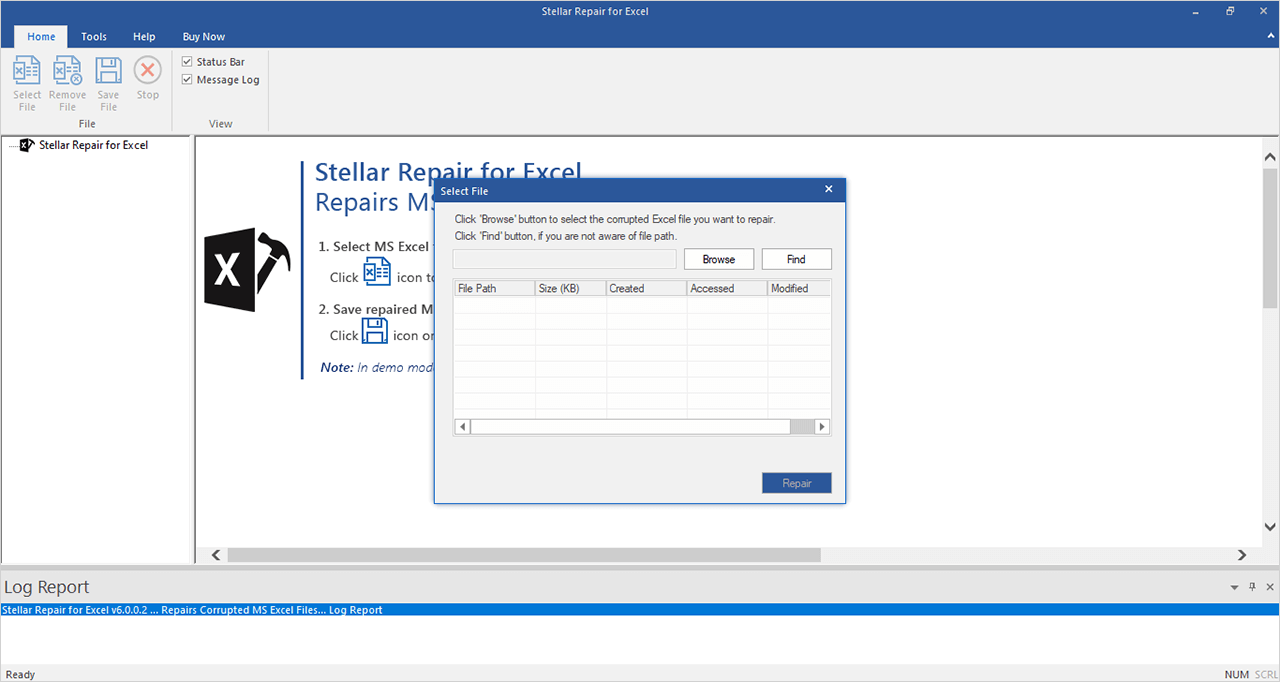
PRICING
Choose The Best Plan
Excel Repair
Repairs corrupted Excel files with 100% integrity.
- Repairs XLS, XLSX, XLTM, XLTX, and XLSM files
- Repairs multiple Excel files
- Previews the repaired file
- Supports Excel 2021 & older versions
File Repair Toolkit
Repairs corrupted Excel, Word, PowerPoint, & PDF files.
- Repairs XLS, XLSX, XLTM, XLTX, and XLSM files
- Repairs multiple files
- Previews the repaired file
- Supports Excel 2021 & older versions
- Repairs .DOC & .DOCX files
- Repairs .PPT, .PPTX, & .PPTM files
- Repairs corrupted PDF file
Best Seller
File Repair Toolkit Technician
Repairs corrupted Excel, Word, PowerPoint, & PDF files up to 3 systems.
- Repairs XLS, XLSX, XLTM, XLTX, and XLSM files
- Repairs multiple files
- Previews the repaired file
- Supports Excel 2021 & older versions
- Repairs .DOC & .DOCX files
- Repairs .PPT, .PPTX, & .PPTM files
- Repairs corrupted PDF file
CUSTOMER REVIEWS
You’re in Good Hands


AWARDS & REVIEWS
Most tested. Most awarded


DATA SHEET
Technical Specifications
About Product
Stellar Repair for Excel
| Version: | 6.0.0.7 |
| License: | Single System |
| Edition: | Standard, Technician, & Toolkit |
| Language Supported: | English |
| Release Date: | February, 2024 |
| Processor: | Intel compatible (x64-based processor) |
| Memory: | 4 GB minimum (8 GB recommended) |
| Hard Disk: | 250 MB of Free Space |
| Operating System: (64 Bit only) | Windows 11, 10, 8.1, 8, 7 |
USEFUL ARTICLES
Product Related Articles
How do I repair multiple Excel files by using Stellar Repair for Excel software?
After launching the software, click Select File button in the Home tab. Next, click Browse and select the checkbox against all the Excel files you need to repair. Then, click the Repair button to start repairing all the Excel files.
How do I see the Preview of repaired Excel file using the Demo version of the software?
Browse and select the file(s) to repair. The software will start scanning the Excel files once you click the Repair button. Next, it will display the files in the left pane. You can preview their contents in the right pane.
How do I find the recovered Excel file?
The software saves the repaired file with the prefix “Recovered” at the user-specified location. You can find the recovered file using the Search box utility in the taskbar.
Start Using Stellar Repair for Excel Today
- Trusted by Millions of Users
- Awarded by Top Tech Media
- 100% Safe & Secure to Use
Free download to scan and preview all recoverable Excel data.
[Solved] : How to Fix MS Excel Crash Issue
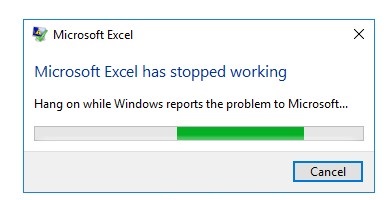
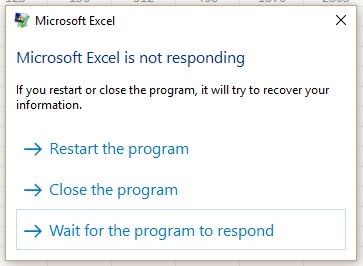
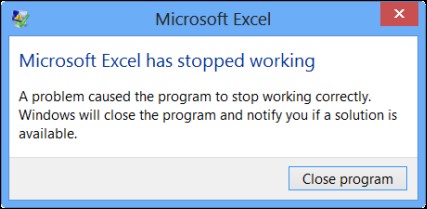
Microsoft Excel may stop responding , hang, freeze, or stop working due to several reasons, such as in compatible add-ins. In such a case, you may receive one of the following error messages.
- Excel has stopped working
- Excel is not responding
- A problem caused the program to stop working correctly. Windows will close the program and notify you if a solution is available.
Why Does Excel Keep Crashing?
If Excel keeps crashing on your PC while opening a workbook, saving Excel file, scrolling or editing cells, etc., it indicates a problem with your Excel program or the Excel file.
Microsoft Excel may crash due to any one or more reasons given below,
- Incompatible Add-Ins
- Outdated MS Excel program
- Conflict with other programs or antivirus tool
- Excel file created by third party software
- Problem with network connection
- Combination of Cell formatting and stylings
- Problem with MS Office installation
- Partially damaged or corrupt Excel file
Problems Caused by Excel Crash Issue
Microsoft Excel crash may cause damage to Excel file and also lead to Excel (XLS/XLSX) file corruption.
Such corrupt Excel files can’t be opened or accessed via MS Excel app. If you try to access a corrupt Excel file, MS Excel may fail to open the file or stop responding and crash. Additionally, you may receive the following or similar error message,
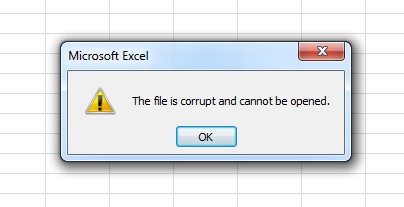
In such a case, you should immediately try to recover the Excel file. You may do so by restoring the Excel file from backup or by using an Excel File Repair software. Otherwise, continue following this guide.
How to Solve Excel Crash Issue?
Before heading to solutions, follow these troubleshooting steps to resolve the Excel Crash issue.
Step 1: Copy File to Local Drive
If you are trying to access and edit or view an Excel file from a network drive, try moving the file to local drive. This will help you find if there is something wrong with the file or the network.
Step 2: Ensure Sufficient Memory
Excel files can grow fairly large when you start adding lots of formatting and shapes. Make sure that your system has enough RAM to run the application.
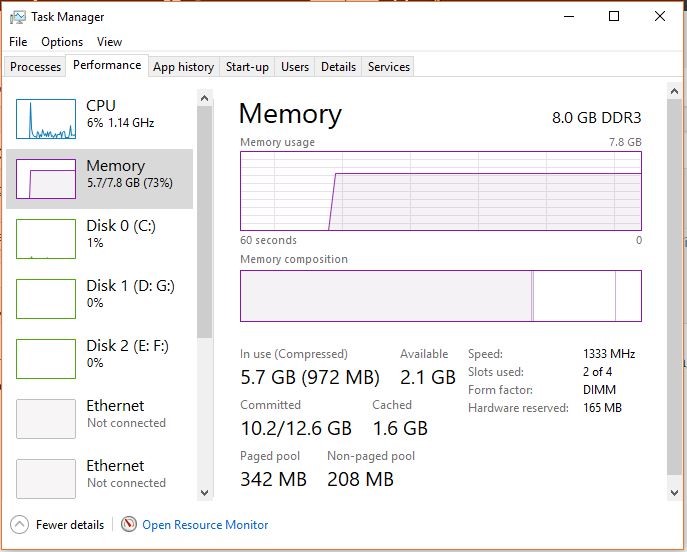
If you often work with large Excel files and complex data values& formulas, then install 64-bit versions of MS Office. It will give you an advantage of larger processing capacities and prevent Excel from crash or freeze.
Step 3: Check If Excel is Open and In Use by Another Process
Open Task Manager and close all processes or apps (tasks) that may be using or have access to your Excel file that you are working on. You can find this detail in status bar of Excel program at the bottom of program window.
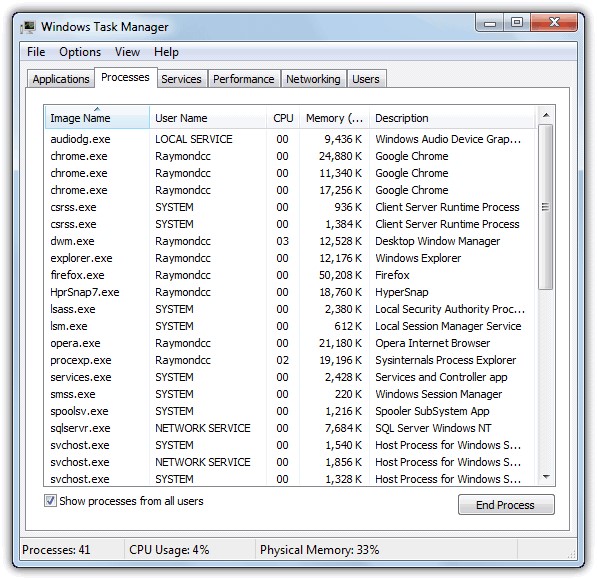
After closing the tasks, try to access the Excel file and check if this fixes the performance and crash problem in Excel.
Step 4: Test and Repair Excel File
Create a copy of the Excel file and install Stellar Repair for Excel software. It’s free to download. Scan and repair your Excel file using the software. After repair, save the Excel file at your desired location and then open the Excel file in the MS Excel program.
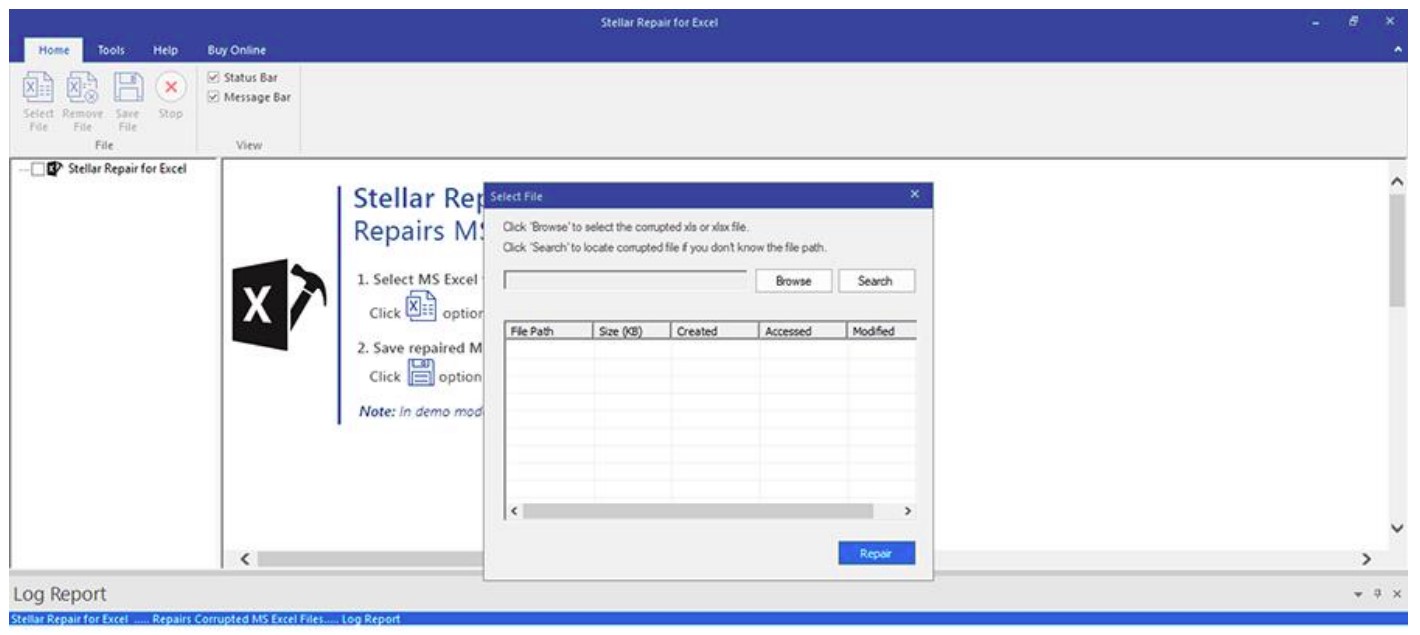
This should ideally fix all the issues with Excel.
However, if the Excel program still crashes, the problem lies within the system or program. Follow the solutions discussed in this guide to try to fix the Excel crash issue.
NOTE: To save repaired Excel file using the mentioned software, you must purchase the activation key and activate it.
Solutions to Fix MS Excel Crash Issue
Following are some solutions to resolve problems with MS Excel such as,
- Excel not responding
- Excel won’t open
- Excel keeps crashing
Follow these solutions in the given order. In case a method doesn’t work, move to the next one.
Solution 1: Restart Excel in Safe Mode
By starting MS Excel in safe mode, you can run the program without loading the Excel add-ins and with limited features. But COM add-ins are excluded.
To launch Excel in safe mode, close MS Excel and follow these steps,
- Create a shortcut of MS Excel (.exe) on Desktop
- Press and hold the Ctrl key while launching the program
- Click ‘Yes’ when a prompt appears to confirm
Alternatively, press Windows+R, type excel /safe and press ‘Enter’. Use this to open Excel in safe mode on Windows 10, 8.1, 8, or 7 system.

Now try to open and access the Excel file and check if the issue is resolved. If it’s not, head on to the next solution.
Solution 2: Check and Remove Faulty Add-ins
In case Excel doesn’t crash in Safe Mode, it’s possible that some faulty add-ins are the culprit behind frequent Excel crash and freeze. These Excel add-ins may interfere or conflict with the Excel program.
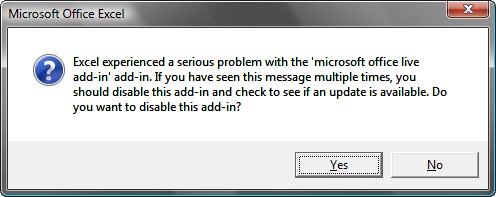
Find and remove the faulty add-in. It can resolve the issue. To do so, follow these steps,
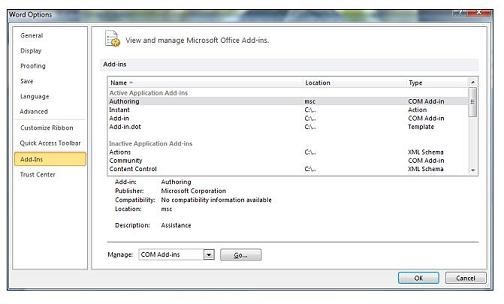
- Restart Excel in normal mode and go to File> Options> Add-ins
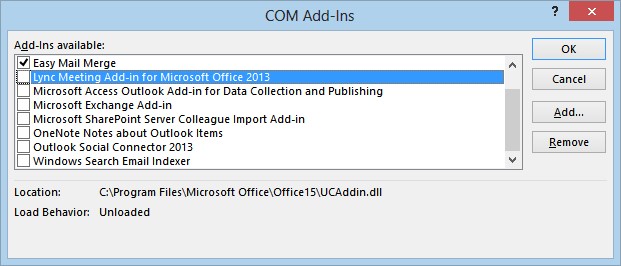
- Choose COM Add-ins from the drop-down and click Go
- Uncheck all the checkboxes and click OK
- Restart Excel and check if the issue is resolved
- If Excel doesn’t crash or freeze anymore, open COM Add-ins and enable one add-in at a time followed by Excel restart. Then observe Excel for freeze or crash problem
This will help you find out the faulty add-in, which is causing the problem. Remove the add-in which is causing the problem to resolve the issue. If that doesn’t fix, move to the next solution.
Solution 3: Check and Install the Latest Updates
If you haven’t set Windows to Download and Install Updates automatically, do it now.
Apart from updating the operating system, latest Windows updates sometimes fixes bugs for other applications installed on the system such as MS Office. Often installing an important update that you might have missed may correct the Excel crash problem.
You can also update MS Office manually. Follow these steps,
Go to File > Account
Under Product Information, select Update Options and click Update Now
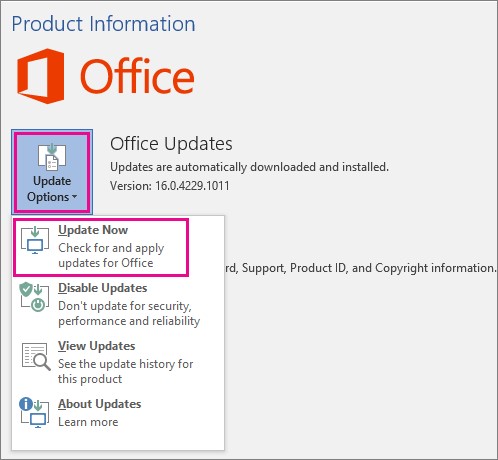
If you have installed MS Excel from Microsoft Store, open the store and update your Office applications.
NOTE: This also works if you can’t open Excel file or Excel crashes after Windows upgrade from Windows 7 or Windows 8/8.1 to Windows 10.
After installing the latest MS Office updates, check if Excel works fine. If not, head to the next solution.
Solution 4: Clear Conditional Formatting Rules
If a sheet is causing Excel to freeze or crash, there might be a problem with that particular sheet. In such a case, you may try clearing the Conditional Formatting rules. The steps are as follows,
- Under Home, click ‘Conditional Formatting > Clear Rules> Clear Rules from Entire Sheet’
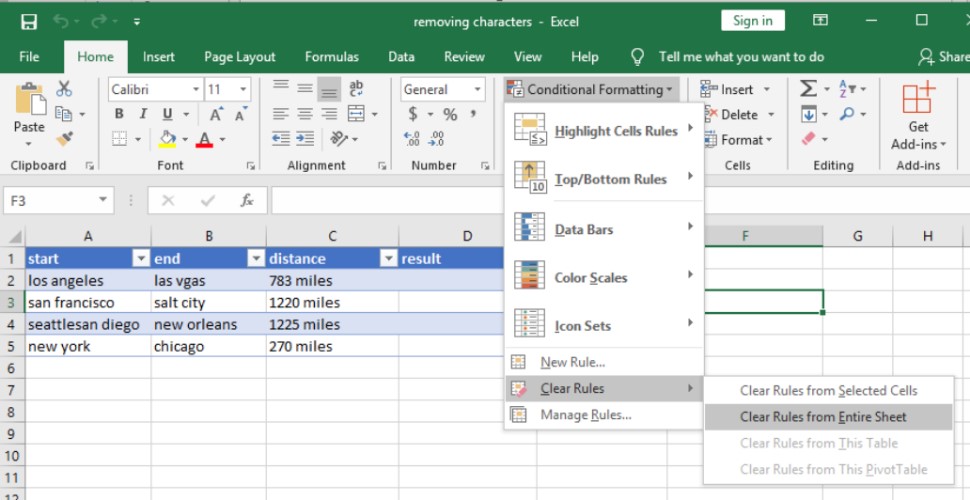
- You may repeat this step for all other sheets in the Excel workbook
- Then click File> Save as and save the Sheet as a new file at a different location
This avoids overwriting or making changes to the original Excel file. Once done, try working on the sheet.
If this doesn’t work out, move to the next solution.
Solution 5: Remove Multiple Cell Formatting and Styles
If a workbook is being shared and edited by others on different platforms then it’s possible that many cells are formatted differently. This can cause issues with Excel such as crash and freeze. It can also lead to Excel file corruption. The problem mostly occurs when a workbook contains multiple worksheets using different formatting.
You can follow this guide to remove different cell formats and styles, and then open the Excel file.
Solution 6: Disable Microsoft Excel Animation
Animations require additional processing power and resources. By disabling animations in Excel, you may resolve Excel freeze and crash issue. This also improves MS Excel performance.
To disable the animations in MS Excel, follow these steps:
- Go to File > Options
- Click ‘Advanced’ and check ‘Disable hardware graphics acceleration’animation
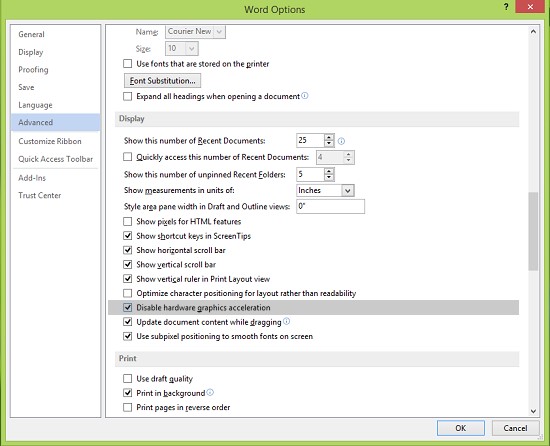
- Click ‘OK’ to close the window and then restart MS Excel
This has helped many users in fixing the Excel crash issue. If it doesn’t work for you, head to the next solution.
Solution 7: Check If Excel File is Generated by a Third-Party Application
There are applications which you may have used to generate Excel files to fetch data. For instance, downloading data from Google Analytics in Excel format.
Sometimes, these Excel files are not generated correctly by such third-party apps. Thus, some features in Excel may not work as intended when you access the files in MS Excel.
In such a case, you should get in touch with the app developer for help with the file or use Stellar Repair for Excel to repair such Excel files.
Solution 8: Check If Antivirus or Other Apps are Conflicting with MS Excel
Ensure your antivirus is up-to-date and not conflicting with MS Excel. An outdated antivirus tool may conflict with Excel which can cause the application to hang, freeze, or crash.
- Update your antivirus
- Try disabling the add-in or integration between Excel and antivirus. See if it works
Alternatively, you may disable the anti-virus tool temporarily to check if it is the culprit behind Excel performance issue and crash. If that resolves the problem, get in touch with your antivirus vendor and report the problem.
They might provide you with a better solution or workaround to fix this problem without disabling the antivirus protection.
IMPORTANT NOTE: Disabling or altering antivirus protection makes your PC vulnerable to malicious attacks and virus or malware intrusion.
Solution 9: Clean Boot Windows to Inspect the Cause Behind Excel Crash
When Windows boot, it starts several processes, services, and application during start up automatically, which runs in the background.
These startup apps and services can interfere with other applications such as MS Excel. To find out if that’s the cause behind Excel crash, you can perform a Clean Boot.
This helps you identify processes, services, or applications that are conflicting with Excel. Steps to perform Clean Boot are as follows,
- Press Windows key + R, type MSConfig, and press ‘Enter’
- In System Configuration window, click on the General tab and choose Selective startup
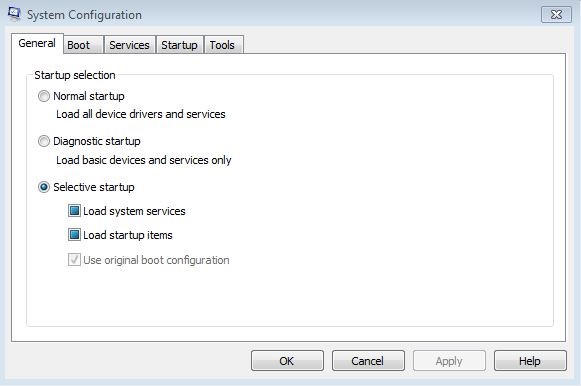
Uncheck ‘Load startup items’ and click ‘OK’
After this, close all running applications and restart your PC
Check if the crash problem with Excel is resolved. Uninstall the conflicting apps or update them. If your issue is not resolved, follow the next solution.
Solution 10: Repair or Reinstall MS Office
Repairing Office programs may also resolve Excel crash issues if caused by damaged MS Excel program or MS Office files. The steps are as follow,
- Close all MS Office apps and open the Control Panel
- Click Uninstall a program under Programs

- Click on Microsoft Office and then click on the Change option
- Choose ‘Quick repair’ and then select ‘Repair’
- Click ‘Continue’ to repair MS Office installation
You may also try ‘Online Repair’ if this fails to fix the issue. After repair, if the Excel issue persists, reinstall MS Office.
Need More Help?
If none of the above-mentioned solutions worked for you, it indicates that the problem is not with the Excel program but with the Excel file. If you haven’t tried the Stellar Repair for Excel software, do it now.
Select the Excel file which is causing the problem and repair it with the software. It’s a powerful Excel repair software that can fix all the problems with Excel files (XLS/XLSX). It repairs corrupt and severely damaged Excel files.
The software is compatible with all Excel files created using MS Excel 2019, 2016, 2013, 2010, 2007, 2003 or 2000.
After repairing and saving the Excel file, you can open it in your MS Excel program and work on it without any performance issue. To know more about this software, visit this page.
Excel File Corruption Warnings and Solutions
Summary: Many users reported error messages they receive when they try to save or open an Excel file. In this blog, you will learn about the warning messages that indicate your Excel file is corrupt and possible solutions to repair it. It also outlines the Stellar Repair for Excel to repair corrupt Excel files.
Excel users often report about receiving warning messages suggesting corruption in the workbook. This usually happens while opening an Excel file, ‘.xls’ or ‘.xlsx’ file created by earlier versions, or attempting to create a copy of the workbook.
Excel file corruption may occur due to several reasons including (but not limited to) virus infection, sudden system shutdown during write operation, and leaving excel file open on the shared network.
Occurrences of Excel File Corruption Warnings
Occurrence 1 – “Excel found unreadable content in

On clicking ‘Yes’, you will receive the following error:
“The file is corrupt and cannot be opened”.

Occurrence 2 – “Excel cannot open the file

Besides the warning messages outlined above, there are a few other tell-tale signs of Excel file corruption such as:
- Excel crashes or freezes, preventing you from accessing the workbook and information stored in it.
- Unexpected errors occur during the save operation listed as below:
- “An unexpected error has occurred. AutoRecover has been disabled for this session of Excel”.
- “Errors were detected while saving
”.
Solutions to Fix Excel File Corruption Issue
Follow the below-listed solutions to deal with corruption issues in Excel:
NOTE: If you encountered problem opening Excel files after upgrading to latest Windows Operating System (OS) and Office program, try updating your Office as well as Windows OS to latest patches provided on the Microsoft site. Microsoft frequently releases Office and Windows OS patches to help users’ correct known errors. Check if you can open the corrupt workbook after installing the update.
Solution 1 – Use Open and Repair Utility
Excel comes with a built-in recovery mechanism. It automatically starts ‘File Recovery Mode’ when a user opens a corrupt workbook, and attempts to open and repair the workbook. Sometimes, the recovery mode might not start automatically. In that case, you will need to repair the Excel file manually by using ‘Open and Repair ’ utility.
Steps to use Microsoft’s built-in repair utility are as follows:
Step 1: Select File > Open.
Step 2: Click the folder containing the corrupt workbook, and then click Browse.
Step 3: In the Open window, select the corrupt workbook.
Step 4: Next, click the arrow in the Open button, and then click Open and Repair.

Step 5: In the window that appears, click Repair.

If ‘Open and Repair’ doesn’t work in excel , select Extract Data to extract formulas and values from the corrupt workbook.
NOTE: If you need a quick solution to salvage your data, use an Excel file repair tool.
Or else, attempt the following solutions to deal with corruption in Excel file .
Solution 2 – Uninstall and Re-install Office Installation
NOTE: Make sure to create a backup of your Excel file before uninstalling and re-installing your Office application.
Download the Office uninstall support tool to remove the application.
You can read: Simple Ways to Open Corrupt Excel file Without any Backup
To reinstall Microsoft Office, follow these steps:
NOTE: Before proceeding with Office re-installation process, make sure that you have license keys ready.
Step 1: Open the Microsoft Office site.
Step 2: Select Sign in.
NOTE: You may skip this step if you’re already signed in.
Step 3: After signing in, from the Office sign-in page, click Install/Install Office
Your Office application will get re-installed. Now open the backed-up Excel file and see if the problem is fixed.
Solution 3 – Move Excel File to a Different Location
Often moving a corrupt Excel file to a different location can help solve the corruption problem. Here’s how:
Step 1: Open the corrupt Excel file by navigating to the following path:
C:\Users\User_Name\AppData\Roaming\Microsoft\Excel
NOTE: Make sure to replace User_Name with your user name. If you are unable to find the Excel file, you will have to search for the file manually in Program Files (x86).

Step 2: Open the Excel folder, and move the corrupt file to some other location.
Step 3: Delete the files from the Excel folder.
Now try opening the Excel file you have moved and see if the issue is resolved.
Solution 4 – Use Excel File Repair Software
If none of the above solutions works for you, use Stellar Repair for Excel. It is a specialized Excel file repair software that helps repair corrupt Excel file and recover workbook data in its original state.
Essentially, the software helps rebuild the corrupt file to restore every single object in the file. It can recover objects including user-defined charts, conditional formatting rules, formatting of the charts, properties of worksheet, engineering formulas, etc.
Steps to use Stellar Repair for Excel are as follows:
Step 1: Download, install and launch Stellar Repair for Excel software.
Step 2: In Select File window, click Browse to select the file you want to repair.

NOTE: If you are unaware of the Excel file location, click ‘Search’ in the Select File window to find the file.
Step 3: Once the files are selected, click Repair to initiate the repair process.

Step 4: Preview the repaired file and select all or specific files you want to save.

Step 5: Click Save File on Home menu.

Step 6: In Save File window, choose ‘Default Location’ or ‘Select New Folder’ to select the location where you wish to save the file. Click OK.

The selected files will be saved at the specified location.
Conclusion
You may experience Excel file corruption warning messages while opening or saving an Excel file. The file may become corrupt due to malware infection, sudden system shutdown, and forgetting to close workbook on a shared network. This post outlined occurrences of Excel file corruption warnings, and also described solutions to fix the issue.
You may try using Microsoft’s built-in ‘Open and Repair’ tool to repair corrupt workbook and recover data from it. If this solution doesn’t work, proceed with uninstalling and re-installing the Office application. Another solution is to move corrupt files to another location. But if the problem still persists, use Stellar Repair for Excel software to repair single or multiple Excel (.xls or .xlsx) files and restore data.
Ways to Fix Personal Macro Workbook not Opening Issue
Many users have reported encountering issues while accessing personal macro workbook, such as personal macro workbook not opening, personal macro workbook not loading automatically, Excel personal macro workbook keeps getting disabled, etc.
Such issues may arise due to a problem with the directory where the personal workbook is stored. However, there are various other reasons that may lead to such issues. Below, we’ll discuss the reasons behind the personal macro workbook not opening issue and the solutions to troubleshoot and fix the issue. But before proceeding, let’s understand why personal macro workbook is used.
Why Personal Macro Workbook is used?
You can access macros in a specific Excel workbook. However, when you need to use the same macro in other Excel worksheets, then you can create a personal macro workbook. A personal macro workbook (Personal.xlsb) is a hidden workbook that is used to store all macros. It makes your macros available every time you open Excel.
Causes of Personal Macro Workbook not Opening Issue
You may encounter personal macro workbook is not opening issue when attempting to record macros. Some possible causes behind such an issue are:
- Personal macro workbook is stored at an untrusted location
- Location of xlsb is changed
- Personal macro workbook is hidden
- Personal macro workbook becomes corrupted
- Disabled items in add-ins
- Workbook is Read-only
Methods to Fix the “Personal Macro Workbook not Opening” Issue
Follow the given methods to fix the personal macro workbook is not opening issue:
Method 1: Check the Path of Personal.xlsb
The personal macro workbook (Personal.xlsb) file is stored in XLStart folder. It opens automatically when you open your Excel application. However, sometimes it fails to load automatically. It usually occurs when you try to open the file from an incorrect path. You can check the path of Personal.xlsb by following these steps:
- Open the workbook.
- Click on the Developer tab.

- Press Alt + F11 to open Visual Basic Editor.
- Go to View > Immediate Window.
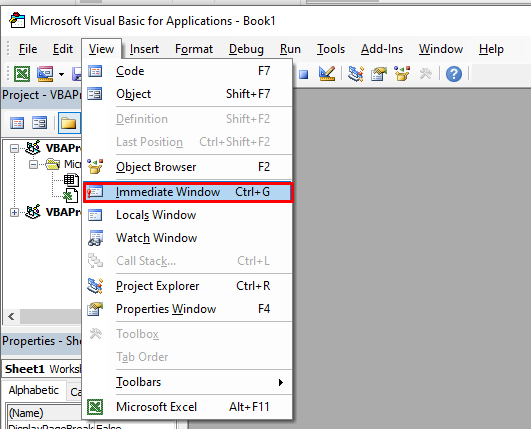
- In Immediate Window, type the following code to know the location of the workbook:
?thisworkbook.path.
- Then, hit Enter.
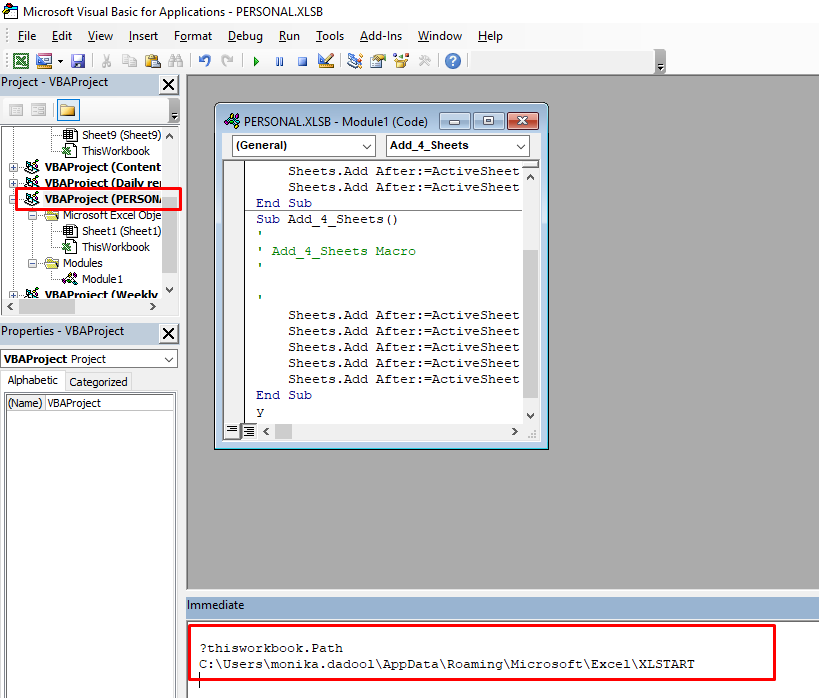
- You will see the path of the personal macro workbook.
- Copy the path and paste it into Quick Access field in File Explorer.

Method 2: Unhide Personal Macro Workbook
If personal macro workbook is hidden, you may unable to see and open the Personal.xlsb file. To unhide the personal Macro workbook, follow the below steps:
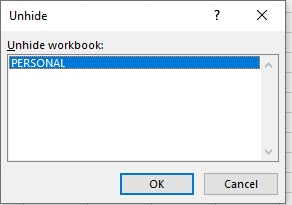
- In Microsoft Excel, go to View and then click Unhide

- The Unhide dialog box is displayed. Click PERSONAL and then OK.
Method 3: Enable the Macro Add-ins
You may unable to open the previously recorded macros in your personal macro workbook if the macros are disabled. To check and enable the items, follow these steps:
- Go to File > Options.
- In Excel Options, click on the Add-ins
- Select Disabled Items from the Manage section and click on Go.
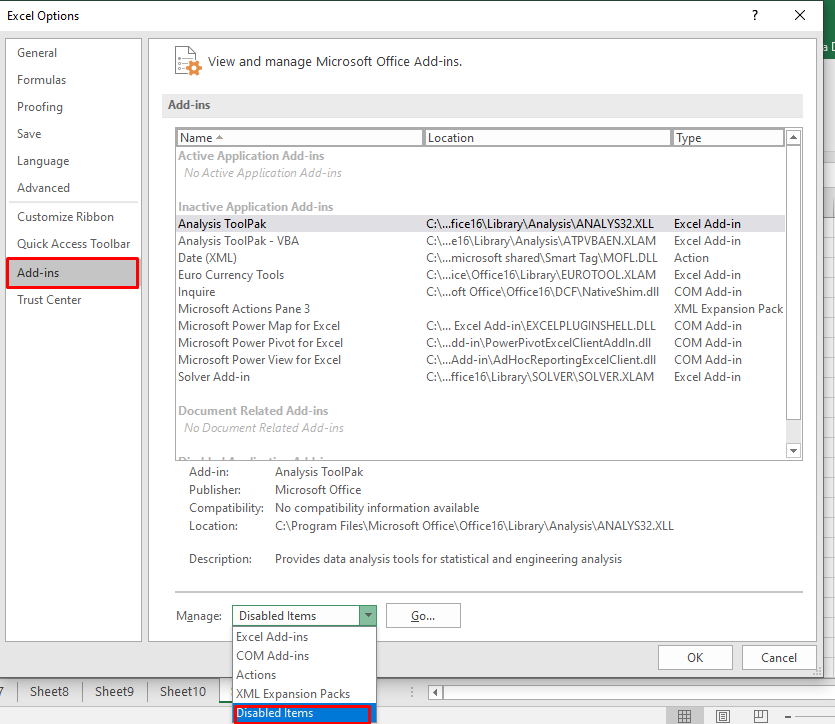
- The Disabled Items dialog box appears. Click on the disabled item and then click Enable.
Method 4: Change the Trusted Location
You may encounter the “personal macro workbook not opening” issue if the Personal.xlsb file is stored at an untrusted location. You can check and modify the path of XLSTART folder using the Trust Center window. Here are the steps:
- Open MS Excel. Go to File > Options.
- Click Trust Center > Trust Center Settings.
- In the Trust Center Settings dialog box, click on Trusted Locations.
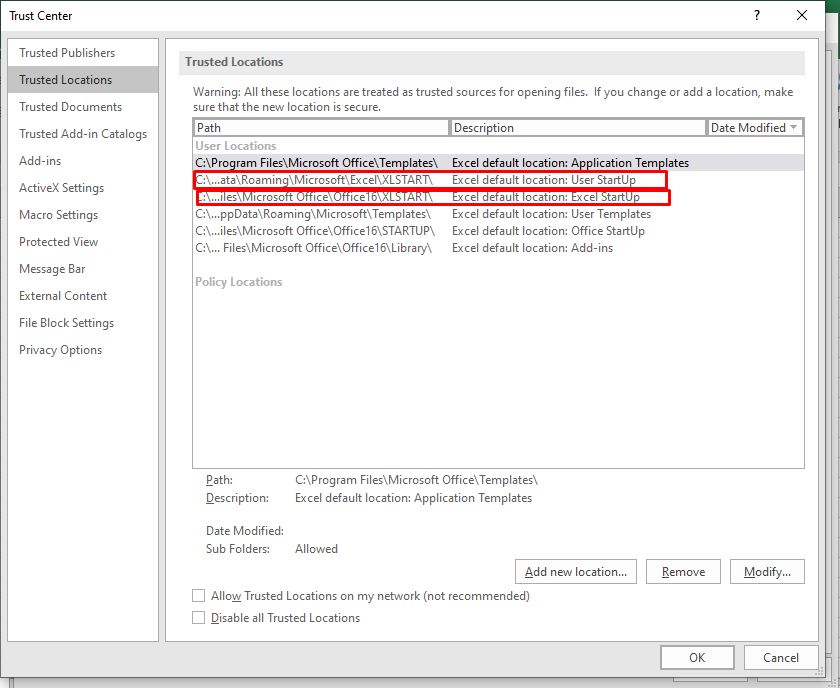
- Verify the path of the XLSTART If it is untrusted or there is any issue, then click Modify and then click OK.
Method 5: Repair your Excel File
You may fail to open personal macro workbook if it is corrupted. To repair the corrupt workbook, you can use the built-in Open and Repair utility in MS Excel. To use this tool, follow these steps:
- Open your Excel application.
- Click File > Open.

- Browse to the location where the corrupted file is stored.
- In the Open dialog box, select the corrupted workbook.
- From the Open dropdown list, click Open and Repair.
The dialog box appears with the Repair and Extract buttons. Click Repair to retrieve all possible data or the Extract option to recover the data without formulas and values.
If the Open and Repair utility fails to repair the corrupted Excel workbook, then you can use a professional Excel repair tool, such as Stellar Repair for Excel. It can easily repair severely corrupted Excel (XLSX and XLS) files and recover all the components. You can download the free trial version of the tool to preview the recoverable data.
Closure
This article discussed the ways to fix the personal macro workbook not opening issue. In case you are unable to open the personal macro workbook because of corruption in the workbook, you can use the Open and Repair utility in MS Excel. If it fails, then you can use Stellar Repair for Excel to fix corruption in the Excel file and recover all its data with complete integrity.
[Fix] Excel formula not showing result
Summary: Is your Excel spreadsheet showing text of a formula you’ve entered and not its result? This blog explains the possible reasons behind such an issue. Also, it describes solutions to fix the ‘Excel formula not showing result’ error. You can try Stellar Repair for Excel software to recover engineering and shared formulas.
Sometimes, when you type a formula in a cell of worksheet and press Enter, instead of showing the calculated result, it returns the formula as text. For instance, Excel cell shows:

But you should get the result as:

Why Does Excel Show or Display the Formula Not the Result?
Following are the possible reasons that may lead to the ‘Excel showing formula not result’ issue:
- You accidentally enabled “Show Formulas” in Excel.
- The cell format in a spreadsheet is set to text.
- ‘Automatic calculation’ feature in Excel is set to manual.
- Excel thinks your formula is text (Syntax are not followed).
- You type numbers in a cell with unnecessary formatting.
How to Fix ‘Excel Showing Formula Not Result’ Issue?
Solution 1 – Disable Show Formulas
If only the formula shows in Excel not result, check if you have accidentally or intentionally enabled ‘show formula’ feature of Excel. Instead of applying calculations and then showing results, this feature displays the actual text written by you.
You can use the ‘Show Formulas’ feature to quickly view all formulas, but if you are not aware of this feature, and enabled it accidentally, it can be a headache. To disable this mode, go to ‘Formulas’ and click on ‘Show formula enabled.’ If it’s previously enabled, it will be disabled by just clicking on it.

Solution 2 – Cell Format Set to Text
Another possible reason that only formula shows in Excel not result could be that the cell format is set to text. This means that anything written in any format in that cell will be treated as regular text. If so, change the format to General or any other. To get Excel to recognize the change in the format, you may need to enter cell edit mode by clicking into the formula bar or just press F2.

Solution 3 – Change Calculation Options from ‘Manual’ to ‘Automatic’
There is an “automatic calculation” feature in Excel, which tells Excel to do calculations automatically or manually. If ‘Excel formula is not showing results’, it may be because the automatic calculations feature is set to manual. This issue is not easily detected because it results in calculating formula in one cell but if you copy it to some other cell, it will retain the first calculation and will not recalculate on the base of the new location. To fix this, follow these steps:
- In Excel, click on the ‘File’ tab on the top left corner of the screen.
- In the window that opens, click on ‘Options’ from the left menu bar.
- From ‘Excel Options’ dialog box, select ‘Formulas’ from the left side menu and then change the ‘Calculation options’ to ‘Automatic’ if it’s currently set as ‘Manual’.

- Click on ‘OK’. This will redirect you to your sheet.
Solution 4 – Type Formula in the Right Format
There is a proper way to tell Excel that your text is a formula. If you don’t write the formula in a particular format, Excel considers it as simple text and hence no calculations are performed according to it. For this reason, keep the following in mind when typing a formula:
Equal sign: Every formula in Excel should start with an equal sign (=). If you miss it, Excel will mistake your formula as regular text.
Space before equal sign: You are not supposed to enter any space before equal sign. Maybe a single space will be hard for us to detect, but it breaks the rule of writing formulas for Excel.
Formula wrapped in quotes: You need to make sure that your formula is not wrapped in quotes. People usually make this mistake of writing a formula in quotes, but in Excel, quotes are used to signify text. So your formula won’t be evaluated. But you can add quotes inside formula if required, for example: =SUMIFS(F5:F9,G5:G9,”>30″).
Match all parentheses in a formula: Arguments of Excel functions are entered in parenthesis. In complex cases, you may need to enter more sets of parenthesis. If those parentheses are not paired/closed properly, Excel may not be able to evaluate the entered formula.
Nesting limit: If you are nesting two or more Excel functions into each other, for example using nested IF loop, remember the following rules:
- Excel 2019, 2016, 2013, 2010, and 2007 versions only allow to use up to 64 nested functions.
- Excel 2003 and lower versions only allow up to 7 nested functions.
Solution 5 – Enter Numbers without any Formatting
When you use a number in the formula, make sure you don’t enter any decimal separator or currency sign, e.g. $, etc. In an Excel formula, a comma is used to separate arguments of a function and a dollar sign makes an absolute cell reference. Most of these special characters have built-in functions so avoid using them unnecessarily.
What to Do If the Manual Solutions Don’t Work?
If you’ve tried out the manual solutions mentioned above but still unable to resolve the ‘Excel formula not showing result’ issue, you can try repairing your Excel file with the help of an automated Excel repair software , such as Stellar Repair for Excel.
This reliable and competent software scans and repairs Excel files (.XLSX and .XLS). It also helps recover all the file components, like formulas, cell formatting, etc. Armed with an interactive GUI, this software is extremely easy to work with, and its advanced algorithms allow it to fend off Excel errors with ease.
Conclusion
This blog outlined the possible reasons that may cause ‘Excel not showing formula results’ issue. Check out these reasons and implement the manual fixes, depending on what resulted in the problem in the first place. If none of these fixes help resolve the issue, corruption in the Excel file might be preventing the formulas from showing the actual results. In that case, using Stellar Repair for Excel tool might help.
Ways to Fix the “Failed to Parse the Corrupted Excel File” Error
Summary: While parsing an Excel file, you may experience the “Failed to parse the corrupted Excel file” error. It usually occurs if the Excel file is corrupt. This blog covers some easy fixes to fix this Excel error. It also mentions an advanced Excel repair tool that can help fix the issue by repairing the corrupted file.
You may encounter the “Failed to parse the corrupted Excel file” error when parsing (extracting or converting) the data in an Excel file. This error usually occurs if the Excel file is corrupted – either completely or partially (some of its objects, like formulas, macros, and values are corrupt). However, there are various other reasons that may lead to this Excel error. Let’s know the possible causes behind the “Failed to parse the corrupted Excel file” error and how to fix it.
Causes of the “Failed to parse the corrupted Excel file” Error
This error could occur due to any of the following causes:
- Damaged or corrupted macros
- Excel document is closed suddenly
- Issues with Excel application installation
- Virus or malware attack
- Hardware failure
- Bad sectors on the hard drive
Ways to Fix the “Failed to parse the corrupted Excel file” Error
Here are some possible ways to fix this error and recover the Excel file.
Method 1: Try to Save the File in a Different Format
Sometimes, the error can occur if the file format is not compatible with your Excel version. You can try saving the file to a different format. To do this, follow the below steps:
- Open the Excel file.
- Click on the File option and then select Save As.
- Click on Browse option and then click Save as Type.

- Select the desired Excel file format and click Save.
Method 2: Revert to the Previously Saved Version of the Excel File
You can try reverting to the previously saved version of the Excel file. Here’s how:
- Open your Excel application.
- Navigate to File > Info > Manage Workbook.

- Click Recover unsaved workbooks.

- Click on the Restore option you see at the top of the file.
Method 3: Set the Calculation Option to Manual
When the calculation mode is set to automatic, Excel automatically recalculates all the formulas in the file even if you make a minor change. It can take time to load the file and stop you from parsing data in your Excel file. You can change the calculation option to manual so that Excel only recalculates when you explicitly tell the application to do it. Here are the steps:
- Open your Excel application.
- Navigate to File and then click Options.
- In Excel Options, select Formulas.
- Under Workbook Calculation, select Manual and click OK.

Method 4: Use Open and Repair Utility
You can try repairing the corrupted Excel file with Excel’s inbuilt tool – Open and Repair . To use the tool, follow the steps cited below:
- In Excel, go to the File tab and then click Open.
- Click Browse to select the corrupted file.
- The Open dialog box will appear. Click on the corrupted file.
- Click on the arrow next to the Open button and then click Open and Repair.
- You will see a dialog box with three buttons Repair, Extract Data, and Cancel.

- Click on the Repair button to recover as much of your work as possible.
- After repair, a message will appear (as shown in the below figure).

- Click Close.
What If None of the Above Methods Works?
The above methods may fail to work if the Excel file is severely damaged. In such a case, we recommend using an efficient Excel repair tool , such as Stellar Repair for Excel. It can quickly repair corrupted Excel (.XLS/.XLSX) files. It can recover all the objects from the file, including charts, tables, formulas, etc. You can download the free trial version of the tool to preview the recoverable data.
Conclusion
Above, we have discussed some tried and tested methods to fix the “Failed to parse the corrupted Excel file” error. If the Excel file is severely damaged or corrupted, you can try repairing it using a third-party Excel repair software, like Stellar Repair for Excel . It can repair multiple Excel files without affecting the original formatting. The tool is compatible with all Excel versions.
- Title: Fix Excel 2019 formula not showing result | Stellar
- Author: Nova
- Created at : 2024-03-11 10:31:44
- Updated at : 2024-03-14 15:27:32
- Link: https://phone-solutions.techidaily.com/fix-excel-2019-formula-not-showing-result-stellar-by-stellar-guide/
- License: This work is licensed under CC BY-NC-SA 4.0.


