
Fix Excel 2023 formula not showing result | Stellar

[Fix] Excel formula not showing result
Summary: Is your Excel spreadsheet showing text of a formula you’ve entered and not its result? This blog explains the possible reasons behind such an issue. Also, it describes solutions to fix the ‘Excel formula not showing result’ error. You can try Stellar Repair for Excel software to recover engineering and shared formulas.
Sometimes, when you type a formula in a cell of worksheet and press Enter, instead of showing the calculated result, it returns the formula as text. For instance, Excel cell shows:

But you should get the result as:

Why Does Excel Show or Display the Formula Not the Result?
Following are the possible reasons that may lead to the ‘Excel showing formula not result’ issue:
- You accidentally enabled “Show Formulas” in Excel.
- The cell format in a spreadsheet is set to text.
- ‘Automatic calculation’ feature in Excel is set to manual.
- Excel thinks your formula is text (Syntax are not followed).
- You type numbers in a cell with unnecessary formatting.
How to Fix ‘Excel Showing Formula Not Result’ Issue?
Solution 1 – Disable Show Formulas
If only the formula shows in Excel not result, check if you have accidentally or intentionally enabled ‘show formula’ feature of Excel. Instead of applying calculations and then showing results, this feature displays the actual text written by you.
You can use the ‘Show Formulas’ feature to quickly view all formulas, but if you are not aware of this feature, and enabled it accidentally, it can be a headache. To disable this mode, go to ‘Formulas’ and click on ‘Show formula enabled.’ If it’s previously enabled, it will be disabled by just clicking on it.

Solution 2 – Cell Format Set to Text
Another possible reason that only formula shows in Excel not result could be that the cell format is set to text. This means that anything written in any format in that cell will be treated as regular text. If so, change the format to General or any other. To get Excel to recognize the change in the format, you may need to enter cell edit mode by clicking into the formula bar or just press F2.

Solution 3 – Change Calculation Options from ‘Manual’ to ‘Automatic’
There is an “automatic calculation” feature in Excel, which tells Excel to do calculations automatically or manually. If ‘Excel formula is not showing results’, it may be because the automatic calculations feature is set to manual. This issue is not easily detected because it results in calculating formula in one cell but if you copy it to some other cell, it will retain the first calculation and will not recalculate on the base of the new location. To fix this, follow these steps:
- In Excel, click on the ‘File’ tab on the top left corner of the screen.
- In the window that opens, click on ‘Options’ from the left menu bar.
- From ‘Excel Options’ dialog box, select ‘Formulas’ from the left side menu and then change the ‘Calculation options’ to ‘Automatic’ if it’s currently set as ‘Manual’.

- Click on ‘OK’. This will redirect you to your sheet.
Solution 4 – Type Formula in the Right Format
There is a proper way to tell Excel that your text is a formula. If you don’t write the formula in a particular format, Excel considers it as simple text and hence no calculations are performed according to it. For this reason, keep the following in mind when typing a formula:
Equal sign: Every formula in Excel should start with an equal sign (=). If you miss it, Excel will mistake your formula as regular text.
Space before equal sign: You are not supposed to enter any space before equal sign. Maybe a single space will be hard for us to detect, but it breaks the rule of writing formulas for Excel.
Formula wrapped in quotes: You need to make sure that your formula is not wrapped in quotes. People usually make this mistake of writing a formula in quotes, but in Excel, quotes are used to signify text. So your formula won’t be evaluated. But you can add quotes inside formula if required, for example: =SUMIFS(F5:F9,G5:G9,”>30″).
Match all parentheses in a formula: Arguments of Excel functions are entered in parenthesis. In complex cases, you may need to enter more sets of parenthesis. If those parentheses are not paired/closed properly, Excel may not be able to evaluate the entered formula.
Nesting limit: If you are nesting two or more Excel functions into each other, for example using nested IF loop, remember the following rules:
- Excel 2019, 2016, 2013, 2010, and 2007 versions only allow to use up to 64 nested functions.
- Excel 2003 and lower versions only allow up to 7 nested functions.
Solution 5 – Enter Numbers without any Formatting
When you use a number in the formula, make sure you don’t enter any decimal separator or currency sign, e.g. $, etc. In an Excel formula, a comma is used to separate arguments of a function and a dollar sign makes an absolute cell reference. Most of these special characters have built-in functions so avoid using them unnecessarily.
What to Do If the Manual Solutions Don’t Work?
If you’ve tried out the manual solutions mentioned above but still unable to resolve the ‘Excel formula not showing result’ issue, you can try repairing your Excel file with the help of an automated Excel repair software , such as Stellar Repair for Excel.
This reliable and competent software scans and repairs Excel files (.XLSX and .XLS). It also helps recover all the file components, like formulas, cell formatting, etc. Armed with an interactive GUI, this software is extremely easy to work with, and its advanced algorithms allow it to fend off Excel errors with ease.
Conclusion
This blog outlined the possible reasons that may cause ‘Excel not showing formula results’ issue. Check out these reasons and implement the manual fixes, depending on what resulted in the problem in the first place. If none of these fixes help resolve the issue, corruption in the Excel file might be preventing the formulas from showing the actual results. In that case, using Stellar Repair for Excel tool might help.
How to fix Microsoft Excel not responding error and save your data
Summary: This guide helps you resolve Excel not responding and frequent Excel freeze issues in Excel on Windows 10. It mentions some effective solutions to repair Excel and resolve Excel is not responding problem. These solutions will also help you fix Excel crashing problem while working on the spreadsheet.
Similar to any other program, you may experience problems with Microsoft Excel while opening or working on a document. Sometimes, it may not start at all or freeze and display an error message such as ‘Excel is not responding’. When it happens, you may want to wait for the program to respond.

‘Microsoft Excel is not responding’ problem
Tip: If you are experiencing Excel not responding problem with a particular Excel file, it’s quite possible that the file is corrupt or partially damaged. And thus, leading to an Excel freeze or crash problem. Use Stellar Repair for Excel software to quickly repair and restore Excel (.xls/.xlsx) file in its original, intact form. You can download the free trial version of the software from the below link.
But if Excel doesn’t respond after a while and remains stuck, you need to force close the program from “Task Manager”. Now, this could be disastrous if happens while you are working on an important Excel document that took you hours to prepare. Force closing Excel due to such error can damage the Excel document and it may fail to open next time.
Why Excel is Not Responding?
Excel may stop responding, freeze, or crash suddenly due to several reasons. It can happen while saving a spreadsheet or opening an Excel document. It may also occur while editing or inserting images, graphs, etc. But usually, it occurs when the system crashes or shuts down abruptly while you are working on a document. Here’s an instance,
Suppose, you worked overnight on a critical document which is to be presented at a meeting the next day. This Excel spreadsheet includes critical graphs and charts, and much more. When you are about to save it, there is a power failure, and your system shuts down without warning. When the power is up, you restarted the system to check your Excel. To your dismay, a message pops up – “Excel Crashed” or “Microsoft Excel not responding”.
This could be frustrating. However, there is no need to despair as there are solutions to not just overcome this error but other corresponding issues such as Excel freezing, hanging, crashing, etc. Below is an infographic that quickly briefs all the possible solutions to fix Excel not responding error.
Solutions to Fix ‘Microsoft Excel is not responding’ Error
Follow the solutions discussed below in the given order to fix Excel freezing and hanging issues.
Solution 1: Open Excel in Safe Mode
If Excel is not working as intended and frequently stops responding, you may try to start Excel in Safe Mode. It is a common DIY way to fix ‘Excel is not responding’ problem.
In Safe Mode, Excel starts with only essential services, bypasses certain functionalities and doesn’t load the add-ins, which might be the reason behind the error in MS Excel . To open and troubleshoot Excel in Safe Mode:
- Press Windows + R keys, type excel.exe /safe and press ‘Enter’ or click ‘OK’

MS Excel in Safe Mode
Open the Excel file and check if it still crashes. If not, the problem could be a faulty add-in or formatting and styling error.
Proceed to the next solution to check and fix the problem.
Solution 2: Check for Faulty and Unwanted Add-ins
In Microsoft Excel, there are two types of add-ins:
- COM add-ins
- Other Add-ins Installed as XLAM, XLA, or XLL File
Both types of add-ins can cause the freezing problem in Excel . Follow the steps below to disable unwanted and faulty add-ins:
- In Excel , click File and go to Options to open ‘Excel Options’ window
- Click Add-ins button to view and manage ‘Microsoft Office Add-ins’
- Uncheck required add-ins to disable them
- At this stage, you can also click the ‘Remove’ button to remove any unwanted add-ins

Disable COM Add-Ins
- Now enable an add-in and check the Excel performance. Observe Excel for not responding error or freezing problem
If Excel doesn’t freeze, enable subsequent add-in and then again use Excel to observe it. Repeat the steps until you find the faulty plugin, which is causing the problem.
Then remove it from Excel add-ins to resolve the problem.
Solution 3: Install the latest Windows and Office Updates
This problem may also occur if Windows and MS Office are not updated. Therefore, install the latest updates for both Microsoft Windows and Microsoft Office.
You can set the installation and update option to ‘Automatic mode’ in Windows. This will download and install critical updates for MS Office, which might fix the Excel performance issue. The steps to enable automatic updates are as follows:
- Go to Settings> Update & Security> Windows Update

Enable Automatic Windows updates
- Click Advanced options and enable all the toggle switches to automatically download and install updates for Windows and other Microsoft products

Update Microsoft Products
After update, restart Excel and check if the problem is resolved.
NOTE: From now on, MS Excel will also get the latest update consistently, without the need for manual intervention.
Solution 4: Check and Disable Anti-virus
Antivirus is important for device safety. However, if your antivirus conflicts with MS Office apps such as Excel, it could lead to Excel freezing and not responding errors.
To check if the problem is due to anti-virus, disable it and reopen the Excel document. Check if Excel performs well or if it still hangs.

Example of Antivirus conflict with Microsoft Excel
If the problem is resolved, contact your antivirus software provider for help to keep antivirus running without affecting the system and other programs such as MS Excel.
Solution 5: Change the ‘Default Printer’
Although it may seem irrelevant, changing the default printer is another easy and effective solution to overcome the error. Reason being, Excel communicates with the printer to find supported margins when we open an Excel sheet.
If Excel doesn’t find the supported margin, it may stop responding or crash. The steps to change the default printer are as follows:
- Open Control Panel on your Windows system
- Click Printer and Devices
- Right-click Microsoft XPS Document Writer to set it to the default printer

Change in Default Printer Setting
Reopen the Excel document to check whether the error occurs or not.
Solution 6: Repair Microsoft Office
A corrupt or damaged Microsoft Office can also cause the ‘Excel is not responding’ problem. You can resolve this by repairing the Microsoft Office files. The steps are as follows:
- Close all running MS Office programs
- Go to Control Panel on your Windows system
- Click Programs and then Programs and Features
- Select Microsoft Office and in the Microsoft Office window, click ‘Change’
- Then select the ‘Repair’ option and click ‘Continue’

Repair MS Office
This may take a while. After the repair is done, check your Excel program and file for the error.
Solution 7: Remove and Reinstall Microsoft Office
Sometimes, repairing MS Office may not work. In such a case, removing and reinstalling Microsoft Office can resolve the ‘Excel is not responding’ problem. To do so, follow these steps:
- Close all running MS Office programs
- Go to Control Panel on your Windows system
- Click Programs and then Programs and Features
- Right-click on Microsoft Office and choose Uninstall

Uninstall MS Office
Then run the MS Office installation setup to re-install MS Office on your system.
Solution 8: Repair Microsoft Excel (XLS/XLSX) file
In several situations, a corrupt or partially damaged Excel (XLS/XLSX) file is the cause of this error. In such a case, you can download and install Stellar Repair for Excel to repair the corrupt or damaged Excel file. By repairing the Excel file, you can resolve the Excel freezing error quickly without applying much efforts.
The steps to use the software for Excel file repair are as follows:
- Download, install and launch the Excel file repair software
- Browse and select the corrupt Excel file

- Click ‘Repair’ to start repairing the damaged Excel file
- After file repair, it provides a preview. Check your file

- Then click the ‘Save File’ option in the main menu
- You can either choose default location or browse a new folder location to save the repaired Excel file

- After repair, open the file in Excel and continue with your work

And keep Stellar Repair for Excel installed on your system. You never know when you might need this handy tool.
You may also refer to Microsoft support for more details on Excel not responding, hangs, freezes or stops working issues.
Conclusion
Now that the methods for fixing the ‘Excel is not responding’ error are before you, try all these and see which one works for you. If the cause of this error is a damaged or corrupt Excel file, only repairing the XLS/XLSX file can resolve the issue.
For this purpose, it’s recommended to use a reliable software such as Stellar Repair for Excel as it offers an easy-to-use interface, thereby making Excel file repair process a seamless experience.
The software recovers table, chart, chart sheet, cell comment, number, text, shared formulas, image, formula, sort and filter, and other objects. It also preserves worksheet properties, layout, and cell formatting. It can repair multiple XLS/XLSX files simultaneously and fix all Excel file corruption errors.
All these features extend the software capabilities beyond just fixing the ‘Excel not responding’ error.
Filter Not Working Error in Excel [Fix 2024]
Summary: The filter is not working issue in Excel can occur due to several reasons, like blank rows, hidden rows, merged cells, corrupted data, etc. In this post, we will mention the reasons why the filter is not working correctly in Excel and several fixes to resolve the issue. We will also mention an advanced Excel repair tool to repair the Excel file if corruption in file is the cause of the issue.
You can use the Filter function in Excel to filter data in large-sized Excel files quickly. While using Excel filters, sometimes, you face a situation where the filter is disabled or may fail to function properly.

The Excel filter usually fails to work if you have not selected the complete and correct range of data. Let’s learn more about the “Sort and Filter not working in Excel” issue and look at the possible methods to fix it.
Why the Filter is not Working in Excel?
You can face the “filter is not working” issue if you are applying the filter on a protected worksheet or trying to find the data from a hidden row. Besides this, there could be many other reasons contributing to this issue, such as:
- The data you are trying to filter is in merged cells.
- The Excel file automatically selected the data up to the first empty cell, excluding the remaining rows.
- Grouped sheets in Excel file.
- Blank row in the Excel sheet.
- You are trying to apply a filter on an invalid data range.
- The workbooks in which you’re facing the filter issues are corrupted.
- You are specifying incorrect criteria in the filter columns.
Solutions to Resolve the Filter is not Working Issue in Excel
There might be two scenarios: the Excel filter option is disabled/grayed out or the filters fail to function properly. You can follow the given troubleshooting solutions to resolve the issue based on the scenario you’re facing.
Scenario 1 – Filter Option is Disabled or Grayed Out
Method 1: Check and Un-group the Worksheet
When you apply filters to a single sheet in a grouped set, Excel disables the filter option in other sheets within the group. You can check the grouped sheets and try ungrouping them to enable the filter option. Here’s how to do so:
- In the Excel file, go to the Group section.

- Right-click on the Ungroup Sheets.
Alternatively, you can press the Shift + Alt + Left keys to ungroup the sheets.
Method 2: Unprotect Worksheet
The “disabled Excel filter” issue can also occur if your worksheet is protected. You can unprotect the worksheet to enable the filter option. To do so, go to the Review tab and then select Unprotect Sheet.

Method 3: Check and Uninstall Excel Add-ins
Sometimes, the Excel filter gets disabled due to faulty or corrupted Excel add-ins. You can run the Excel in Safe mode to check whether the issue has occurred due to add-ins. To do this, type excel /safe in the Run window and click OK.

In safe mode, if you see the filter option, it indicates some problematic Excel add-ins were causing the issue. In such a case, you can check and uninstall the faulty Excel add-ins to fix the issue.
Scenario 2 – Filter is not Working
Method 1: Try Clearing Filters
Sometimes, the Excel filter fails to work correctly if some filters from the previous sessions are still active. In such a case, you can clear the applied filters. Follow the below steps:
- In Excel file, click Sort & Filter option.
- Select clear.

Method 2: Select Entire Data
The filter not working issue in Excel can occur when the range selected for filtering is incomplete or incorrect. You need to make sure that you’ve selected the entire data range in Excel. You can use the Ctrl+A keys to select the entire content in the worksheet.
Method 3: Check and Delete Blank Cells from the Table’s Columns
When you apply a filter to the data, Excel expects data to be in a continuous range. Excel filters do not consider the blank cells, thereby resulting in incorrect functioning of the filter. To resolve this issue, check and delete all blank cells. In case your Excel file is too large to delete the blank cells, then you can add a “Serial number” row as an alternative. Adding serial number row creates a data continuity, thus helping in fixing the filter-related issue.
Method 4: Unhide Hidden Rows and Columns
Hidden rows or columns in worksheets can also affect the filter functionality. You can check and unhide rows/columns to troubleshoot the issue. Here is how to do so:
- In the affected Excel file, go to Home.
- Click on Format > Hide & Unhide.

- Click Unhide Rows or Unhide Columns (as required).

Method 5: Unmerge Cells
You can experience the filter in Excel is not working issue if you are using the filter to extract data from merged cells. Ensure to unmerge the “merged cells” before applying a filter in Excel. Follow the below steps to unmerge the merged cells in Excel:
- Navigate to the Home option.
- In the toolbar, select the Merge & Center option.
- Click Unmerge Cells.
Method 6: Repair the Workbook
Sometimes, the Filter Not Working in Excel issue can occur due to inconsistencies in file structure. If these issues occurred due to corruption in the worksheet, you can repair it using the Open and Repair tool. It is an in-built tool in Excel that is used to repair corrupted Excel files. Here are the steps to use this tool:
- In the Excel application, navigate to the File option.
- Click Open and then click Browse to choose the Excel file.
- In the Open dialog box, click the problematic Excel file.
- Click the arrow next to the Open option and select Open and Repair.
- Click Repair to recover as much data as possible.
- The application prompts a message after the repair process is complete. Click Close.
In most cases, the Open and Repair tool can easily fix corruption issues in the Excel file. However, for any reason, if the open and repair tool doesn’t work you can consider repairing the file using a professional Excel Repair tool. Stellar Repair for Excel is one such advanced and secure tool to repair Excel files. With this tool’s powerful scanning capabilities, you can repair highly corrupted Excel files and recover all their objects with complete integrity. The tool is compatible with all Windows editions, including the latest Windows 11.
Closure
Several reasons are associated with the filter not working issue in Excel. The filter option may not work as expected if you have not selected the complete and correct range of data or for many other reasons. You can follow the troubleshooting methods discussed above to fix the issue. If the filter fails to work due to corruption in the workbook, then try Stellar Repair for Excel . It is an advanced tool that can even repair severely damaged files. It also helps to recover all the data from corrupted files without changing the original formatting. You can check the tool’s functionality by downloading its demo version. It allows you to preview all the repairable objects in the corrupted Excel file.
Solutions to open Excel Read Only Documents
‘Excel cannot open read-only documents’ is an error message that usually appears when you try to open an Excel (XLS or XLSX) file downloaded from the Internet, email, or the network server. It may also appear when you try to open an encrypted or password-protected Excel document. In such a case, MS Excel prevents the user from making any changes to the document.

Reasons behind the “Excel cannot access ‘xxx.xls.’ The Document may be read-only or encrypted” Error
There could be several reasons that may cause the error. Some of them are as follows:
- Corrupt or damaged Excel workbook
- Incompatible or unsupported add-in
- Antivirus or malware software conflict
- Read-Only Excel file
- The file is encrypted
- File or drive read/write permissions issues
- Protected Excel workbook
- Damaged or missing MS Office (MS Excel) program files
Solutions to Open and Edit Read-Only Excel Documents
Below are a few solutions that can help you fix the ‘Excel cannot access ‘xxx.xls.’ The Document may be read-only or encrypted’ error and allow you to open and edit Excel documents.
- Remove Read-only Attribute from Excel File Properties
The ‘Excel cannot open read-only documents’ error message may appear when the Excel file property is set to read-only. To check if this is the case, follow these steps:
- Right-click on the particular Excel (xls/xlsx) document and select ‘Properties’.
- Uncheck the ‘Read-only’ attribute and then click the ‘OK’ button.
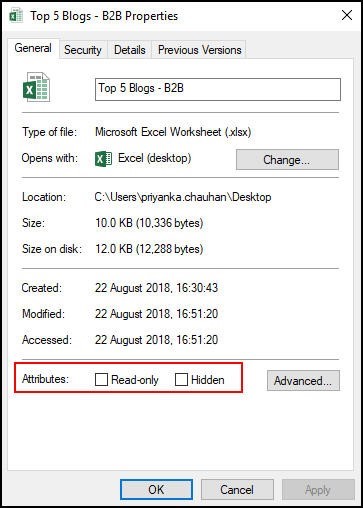
Now try to open the Excel document and check if the problem is fixed.
- Adjust Antivirus Settings
A few antivirus programs block Excel files and other Office documents by opening those in ‘read-only’ mode. In such cases, try adjusting the antivirus settings to open the Excel files normally. This will allow you to edit, modify, and save the Excel workbook without encountering the “Excel cannot access ‘xxx.xls.’ The Document may be a read-only or encrypted” error message.
- Disable Protected-View
The error may appear when you try to open an Excel file received as email attachments or downloaded from unsafe source. The file may potentially contain viruses, worms, or other types of malware that could damage the system or the server.
To safeguard the system, MS Excel opens such files in Protected View. It may also open an Excel workbook in Protected Mode when it detects a problem with the file. This security feature allows you to read or view Excel files and reduces the risks to the computer system or PC.
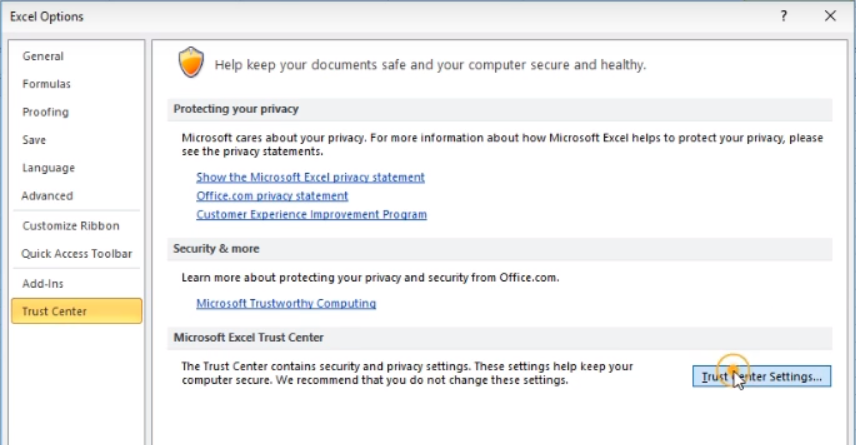
However, you can click File > Info and then click ‘Edit Anyway‘ to access and edit file content. You may also disable the Protected View setting via File > Options > Trust Center > Trust Center Settings…> Protected View. However, we do not recommend this.
- Renew/Activate Microsoft Office
If MS Office is in a deactivated state or its subscription has expired, the Office documents, including the Excel, could be in ‘read-only reduced functionality mode.’
In such a scenario, activate Microsoft Office or renew the Office subscription. Then open the Excel workbook and check if the problem of ‘Excel cannot open read-only documents’ is resolved.
- Check if OneDrive Storage is Full
If Excel files are saved on OneDrive with low or no storage space, you may encounter such issues with your files.
To know the amount of free space on OneDrive, follow these steps:
- On your PC, open Settings and navigate to OneDrive.
- Click ‘Sync Settings > File Storage‘ to see available space.
You may also visit onedrive.live.com, sign in to the account, and then check the available space. If there’s no space available or the drive is full, empty the storage space and see if the problem is resolved.
- Check and Update MS Office and Windows
Microsoft releases updates to fix known errors. Thus, it is critical to update both Windows and MS Office to the latest release and avoid issues, such as ‘Excel cannot access ‘xxx.xls.’ The Document may be read-only or encrypted.’
- Repair MS Office (MS Excel)
The error ‘Excel cannot open read-only documents’ may appear due to a problem with your MS Office (MS Excel) program. You can repair the MS Office program to resolve such errors. The steps are as follows:
- Open Control Panel and click Uninstall a Program link under Programs.
- Choose Microsoft Office from the list and click the Change button.
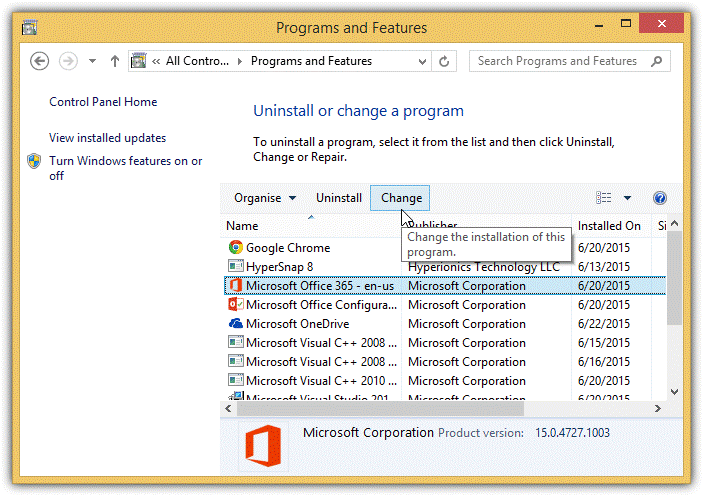
- Select Quick Repair and then click Repair to fix problems with MS Office and MS Excel. It will also restore any missing or damaged program files.
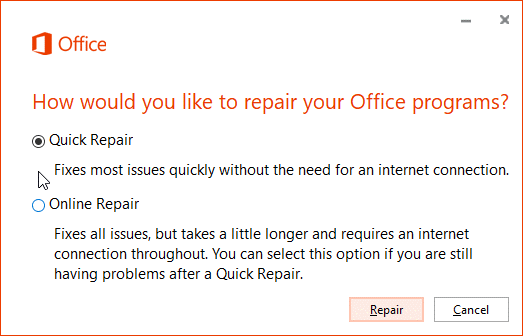
After the Repair, open the Excel workbook and check if the error is resolved.
- Check Permissions
The error message may also appear if you access an Excel workbook from a network or shared drive due to lack of write permission. Make sure you have read and write permissions assigned for the particular network drive. Alternatively, you can copy the file from the network drive and save it in your local folder to access and edit it without encountering this error message.
- Repair MS Excel File
If none of the solutions worked, the Excel workbook could be damaged or corrupt. To repair such damaged Excel workbook or spreadsheet, you can use the inbuilt ‘Open and Repair…’ option in MS Excel or install an Excel repair software , such as Stellar Repair for Excel. The software comes in handy when the Open and Repair option fails to fix the Excel workbook problems. It repairs the corrupt or damaged Excel workbook, extracts all components and content from the file with 100% integrity, and saves them in a new Excel workbook.
Conclusion
Sometimes, the ‘Excel cannot open read-only documents’ error can be resolved by a simple restart. But if it doesn’t work, you can follow the solutions discussed in this article to resolve the ‘Excel cannot open read-only documents’ issue. However, if the issue is caused due to a damaged or corrupt Excel workbook, these methods may not work. In such a case, you can use Excel’s inbuilt repair utility, i.e., Open and Repair, or install Stellar Repair for Excel software recommended by MVPs and industry experts to fix all kinds of problems with MS Excel workbooks.
Recover Excel Files from Virus-Infected Pen Drives for Free
Summary: Imagine you lost your important Excel file on which you had been working since the morning and in the next moment you realized that the file was not saved and you just lost hours of work. Wondering how to deal with this situation? Read this blog to know how Stellar free data recovery software can help you.
From making annual reports to business growth representation figures, excel is a commonly used program for organizing data, creating pivot tables, charts etc. People from all walks of life, know the importance of Excel and the part it plays. Although it is a common file, there is a probability that you may accidentally delete excel files while working or are unable to access it due to unexpected errors. In addition, one of the major issues users face is to recover excel files from a virus infected pen drive.
Pen drives have made it possible to store and carry our important files such as excel, word document, photos, videos, etc. with us day in and day out. They just fit perfectly in our pockets and are compatible with almost every device; hence, they are widely used for transferring data from one system to another. But what if your pen drive is infected by a virus and due to it you end up losing your excel files, how will you recover your excel files for free?
A user reported that his pen drive got virus-infected and to remove the virus from it, he ran an antivirus program which removed the virus but also deleted excel files stored on it.
When your pen drive is infected by a virus, the first thing you ought to do is stop using it, even not for removing virus as an antivirus utility may remove your files as well. Further, if you have a backup, then you can recover your excel files from it, else you can use these free data recovery methods to recover your excel files.
1. Free File Recovery Software Approach
Stellar Windows Data Recovery – Free Edition is an easy to use tool to recover files from a virus-infected pen drive. The software is equipped with powerful utilities to recover lost and deleted files for free. Further, it supports a wide range of file systems and is efficient in recovering files such as Excel, emails, word files, photos, audio and video files.
Using Stellar Windows Data Recovery – Free Edition, you can recover your files from all storage devices for free. Here’s how the software works:
- From the website, download Stellar Windows Data Recovery – Free Edition. Connect your pen drive to your system and launch the software
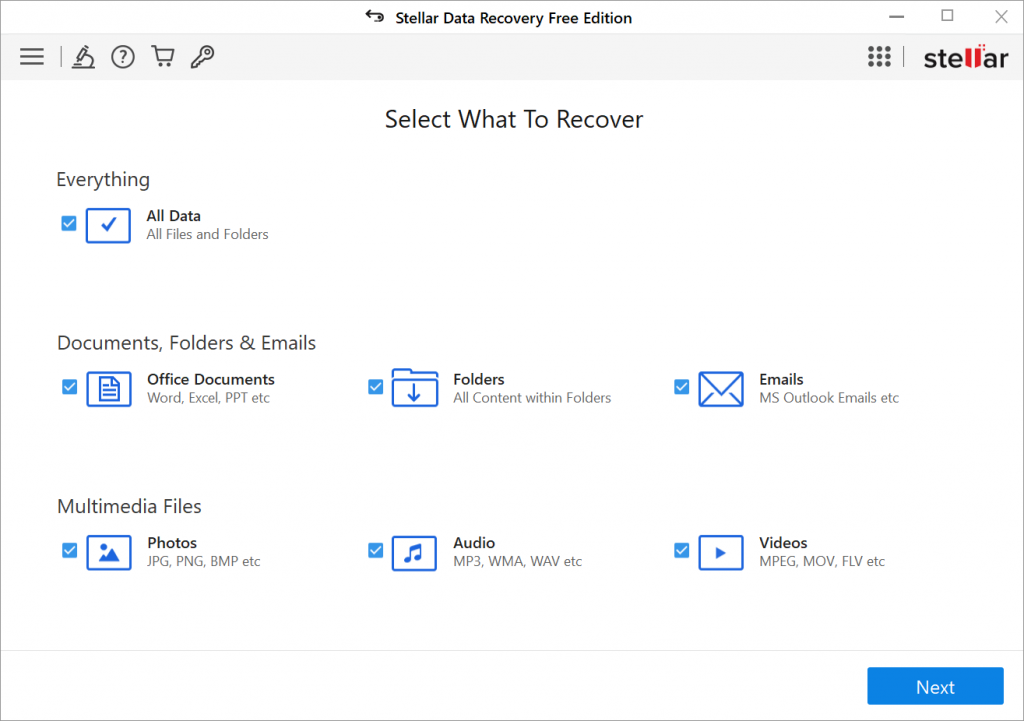
- On ‘Select What to Recover’ screen, select file types from the given option that you wish to recover. For instance, if you want to recover photos, then under Multimedia Files, select ‘Photos’ and click on ‘Next’
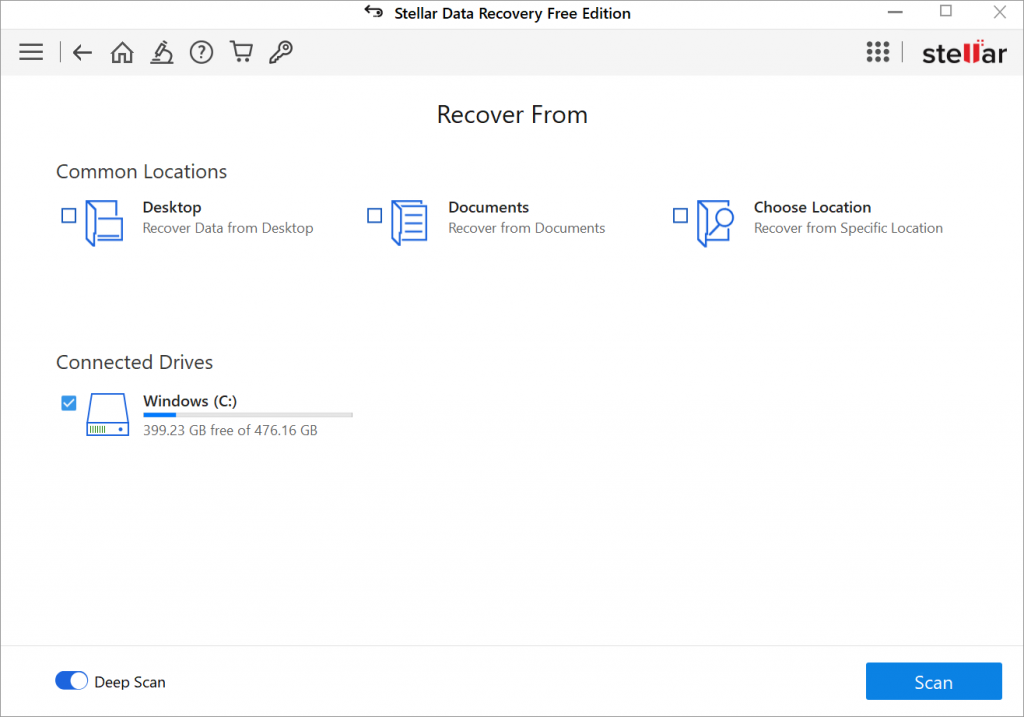
- From ‘Select Location’ screen, select the connected pen drive and click ‘Scan’
- The scanning process starts and once the process is complete, software lists all the recoverable files
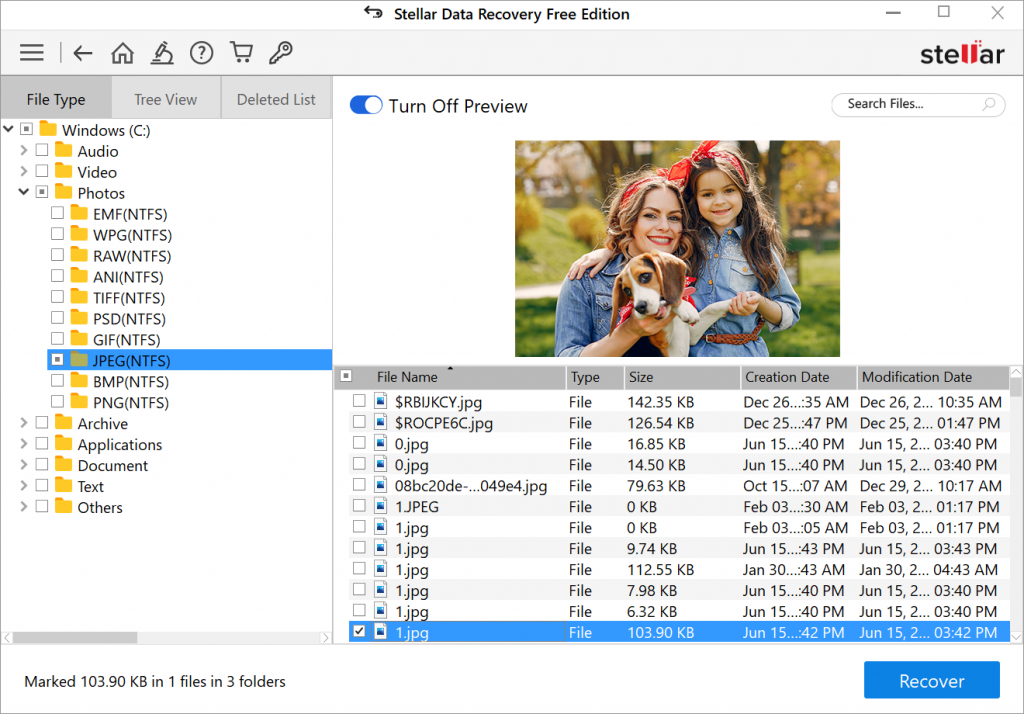
- Select the files from the list and click on ‘Recover’ to save the files
2. Restore Excel File from the Previous Version
If excel files are deleted from your pen drive or from your system; then you can recover them from the previous version. This feature works when Windows Backup option is enabled, else, it will not work.
Follow these steps to recover excel files:
- Connect your pen drive to your system, go to This PC and navigate to the folder of excel files
- Select the folder, right-click on it and select ‘Restore previous versions’
- From the available version of excel files, select the required one and click on ‘Restore’
3. Use Command Line to Recover Excel Files
The Command prompt should be your first choice to recover excel files from the virus-infected pen drive. Here’s how command prompt recovers your files:
- Connect your virus-infected pen drive to your system and then in the search box type ‘CMD’ and hit ‘Enter’
- In the command window, type in attrib –h-r-s /s/ drive letter:\*.*”, for example, “attrib -h -r -s /s /d G:\*.*” and hit ‘Enter’

- Windows starts repairing the virus-infected pen drive and once the process is complete, you can access your pen drive and recover excel files.
Even after following the above-mentioned steps you’re unable to recover your excel files, then try a Home approach i.e. a data recovery tool.
To Sum Up
It is always a good idea to create a backup of important files since no one can anticipate what might go wrong. The scenario presented in the blog paints a clear picture of how you can recover your Microsoft excel files for free from a virus-infected pen drive. For quick and better results, you can always go with Stellar Windows Data Recovery – Free Edition.
Quick Fixes to Repair Microsoft Excel 2013/2016 Content related error
Summary: The blog outlines some quick tips to fix ‘We found a problem with some content’ error in Microsoft Excel 2013/2016. It explains manual procedure to resolve the error and also suggests an automated tool to perform the repair process to retrieve all possible data from a corrupt workbook.
Sometimes, when opening an MS Excel file, you may receive an error message that reads:
“**We found a problem with some content in ‘filename.xlsx’. Do you want us to try to recover as much as we can? If you trust the source of this workbook, click Yes.**“

Figure 1 – Excel ‘found a problem with some content’ Error Message
What Causes ‘We Found a Problem with Some Content’ Error?
There is no clear answer as to what results in the Excel error – ‘**We found a problem with some content in <filename.xlsx>**’. However, based on some user experiences, it appears that the error occurs due to corruption in an Excel workbook. It may turn corrupt when:
- You try opening the Excel file saved on a network-shared drive.
- A string is added in a cell in Excel, instead of a numeric value.
- Text values in formulas exceed 255 characters.
How to Resolve ‘We Found a Problem with Some Content’ Error?
Follow these tips to fix the Excel error:
IMPORTANT! Before you follow the tips to resolve the Excel error, keep these points in mind: Make sure you have closed all of the opened Excel workbooks. Try restoring Excel file data from the most recent backup copy. If you don’t have a backup copy, make a copy of the corrupt Excel file and perform repair and recovery procedures on that backup copy.
Tip #1: Repair Corrupt Excel File
File Recovery mode is a native Excel recovery utility that automatically opens whenever any inconsistencies are found in the worksheet. If Microsoft doesn’t detect any issue or fails to open the File Recovery mode, you can start it manually to recover the corrupt Excel file. To do so, follow the steps below:
- Click on the File menu, and then select Open.
- In the Open dialog box, navigate to the folder location where the corrupt Excel file is saved.
- Select the corrupt file, and then click on arrow sign available next to Open button to select Open and Repair option.

Figure 2 – Open and Repair Feature in Excel
- Next, click Repair to recover maximum possible data.
- If the repair is not able to recover the data from the workbook, select Extract Data to extract all possible formulas and values from the workbook.
If repairing the corrupt Excel file doesn’t work, you can try an Excel file repair tool to fix corruption errors. You can also try to recover data from the corrupt file manually by following the next tips.
Read this: What to do when Open and Repair doesn’t work?
Tip #2: Set Calculation Option to Manual
To make the file accessible, try setting the calculation option in Excel from automatic to manual. As a result, the workbook will not be recalculated and may open in Excel. For this, perform the following:
- Click File, and then click New.
- Under New, click the Blank workbook option.
- When a blank workbook opens, click File > Options.
- Under the Formulas category, pick Manual in the Calculation options section, and then click OK.

Figure 3 – Select Manual in Calculation options
- Now, again click on the File menu and then click Open.
- Navigate to the corrupt workbook, and double-click it.
When the workbook opens, check if it contains all the data. If not, proceed to the next tip.
Tip #3: Copy Excel Workbook Contents to a New Workbook
Several users have reported that they were able to fix ‘We found a problem with some content in
- Open the Excel workbook in ‘read-only’ mode, and copy all its contents.
- Create a blank new workbook and paste the copied contents from the corrupt file to the new file.
Tip #4: Use External References to Link to the Damaged Workbook
Use external references to link to the corrupted workbook. By implementing this fix, data contents can be retrieved. However, it is not feasible to recover formulas or calculated values using this solution.
Follow the steps below:
- In Excel 2013/2016, click File > Open.
- Navigate to the folder where the corrupt file is saved.
- Right click the file, select Copy, and then click on Cancel.
- Again, click on File and then New.
- Under New option, click on Blank workbook.
- In the cell A1 of new workbook, type =File Name!A1 (where File Name indicates the name of the damaged workbook being copied in Step 3).
- If Update Values dialog box appears, click the corrupt workbook, and choose OK.
- If Select Sheet dialog box appears, click the appropriate sheet, and then click OK.
- Select cell A1.
- Next, click Home, and then click Copy (or, press Ctrl +C).
- Starting in cell A1, select area approximately the same size as that of the cell range that contains data in the damaged workbook.
- Next, click Home and select Paste (or click Ctrl + V).
- Keep the range of cells selected, click Home and then Copy.
- Finally, click on Home, click on the arrow associated with Paste and under Paste Values click on Values.
This will remove the link to the corrupt workbook and will retrieve data. But, keep in mind, the recovered data will no longer contain formulas or calculated values.
Alternative Solution – Stellar Repair for Excel
If the above manual methods fail to fix the ‘We found a problem with some content in Excel error’, try using the Stellar Repair for Excel software to resolve this error. The software helps repair and recover corrupt Excel files in just a few clicks. It can be used on a Windows 10/8/7/Vista/XP/NT machine to repair a corrupted workbook and recover every single bit of data from all the versions of the Excel workbook.
Read this: How to repair corrupt Excel file using Stellar Repair for Excel?
Conclusion
In this blog, we discussed some possible reasons behind Microsoft Excel 2013/2016 ‘We found a problem with some content’ error. The error may occur when an Excel file becomes corrupt. You may try repairing the corrupted Excel file manually by using the built-in ‘Open and Repair’ feature. Or, try the manual workarounds to extract data from the corrupt file discussed in this post. If the manual solutions don’t work for you, using Stellar Repair for Excel can come in handy in repairing the corrupt Excel (.xls/.xlsx) file and recovering the complete file data.
How to Repair Corrupt Excel Workbook?
Summary: Corruption in an Excel workbook could lead to data loss. This blog outlines the possible reasons behind corrupted workbook and describes how to repair the workbook manually and using an Excel repair tool.
[](https://tools.techidaily.com/stellardata-recovery/repaire-for-excel/ "Free Download for Windows")Is your Excel behaving differently, for instance, stops responding or freezes? Or have you encountered a warning or an error message indicating corruption in the Excel workbook?

Figure 1 - Corruption Warning in Excel: The corrupt workbook cannot be opened or repaired
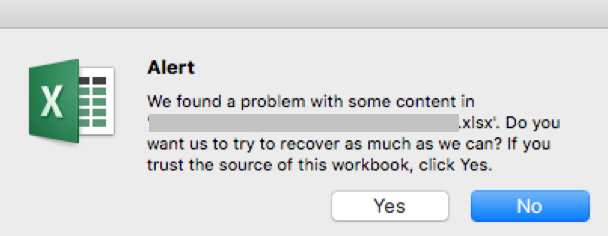
Figure 2 - Excel File Corruption Message
In any of these situations, you won?t be able to open your Excel workbook.
TIP! If you?re unable to open an Excel workbook, it does not necessarily mean that the workbook is corrupt. Try a few workarounds to resolve the issue, like disabling the ?Protected View Settings?, disabling add-ins, or moving the workbook to another drive.
You will need to repair the corrupted Excel workbook to make it usable. Before discussing the repair methods, let?s first look at the possible reasons behind file corruption.
To jump to methods to repair the workbook, click here .
Possible Reasons behind Corrupted Excel Workbook
- Large size of a workbook: A workbook containing lots of information or objects like images, shaded cells, or other visual representations is prone to corruption.
- Unexpected system shutdown or power loss: If you haven?t saved your Excel file, abrupt system shutdown or power failure can corrupt the data and render the file inaccessible.
- Bad sectors on storage media: Accumulation of bad sectors on storage media on which Excel files are saved is another reason that may lead to Excel file corruption.
Other common reasons causing Excel file corruption are virus attack, network errors, etc.
Methods to Repair Corrupted Excel Workbook
Note: Repairing the corrupt workbook may result in data loss. And so, it?s recommended to back up the workbook before attempting to repair the file.
Method 1 ? Repair the Excel Workbook Manually
Use the Excel ?Open and Repair? feature to repair your corrupt workbook manually. Here?s how:
Step 1: In Excel, click the File tab and then click Open.
Step 2: Select the corrupt Excel file, click the arrow button next to the Open button and then select Open and Repair.
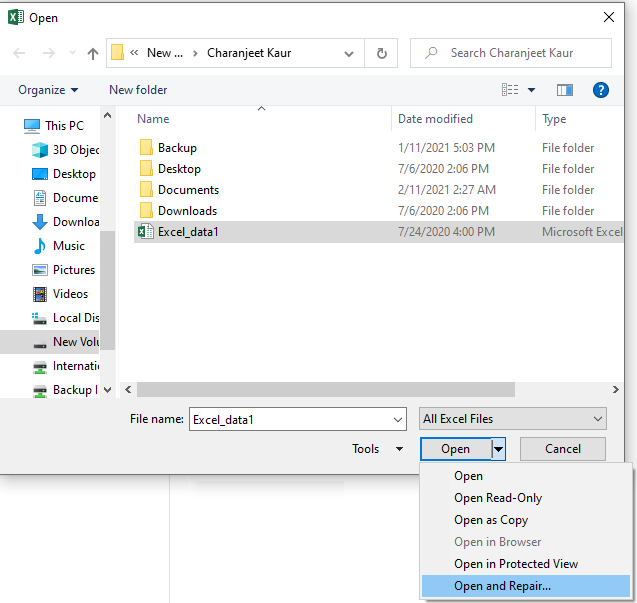
Figure 3 - Excel Open and Repair Feature
Step 3: In Microsoft Excel dialog box that opens, click Repair to begin repairing your corrupt workbook.

Figure 4 - Repair the Microsoft Excel File
Note: If the Excel repair process fails, repeat Steps 1 till 3 and click the ?Extract Data? button. This will help you extract values and formulas from the corrupted workbook.
Performing these steps will repair your Excel file. If the issue persists, skip to the next method.
Method 2 ? Use Excel File Repair Software
If the above method failed to fix corruption in the workbook, use Excel file repair software to repair your workbook quickly. This Excel repair tool is purpose-built to help users repair large-sized Excel files (.xlsx and .xls) in just a few clicks. Also, it helps recover all the data from the corrupted workbook while preserving the cell formatting and worksheet properties.
Steps to Repair Corrupt Excel File Using the Software
Step 1: Download, install, and open Stellar Repair for Excel software.
Free Download for windows ](https://tools.techidaily.com/stellardata-recovery/repaire-for-excel/ )
Step 2: Click Browse to select your corrupted .xlsx or .xls file. If you are not aware of the file location, click Search to locate and select the file.
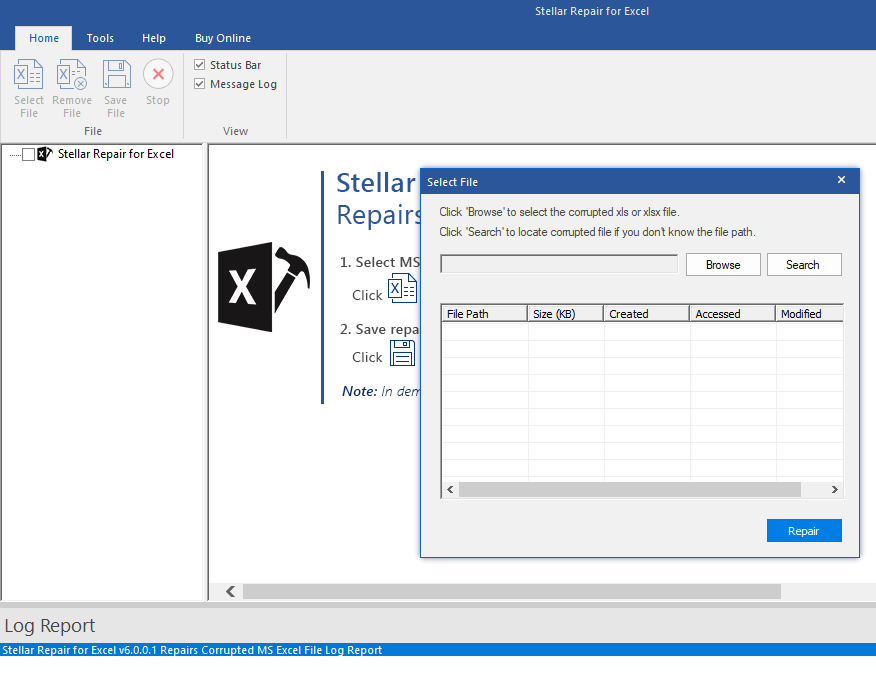
Figure 5 - Select Corrupt Excel Workbook
Step 3: Once the file is selected, click Repair.
Step 4: A preview of recoverable workbook data gets displayed.
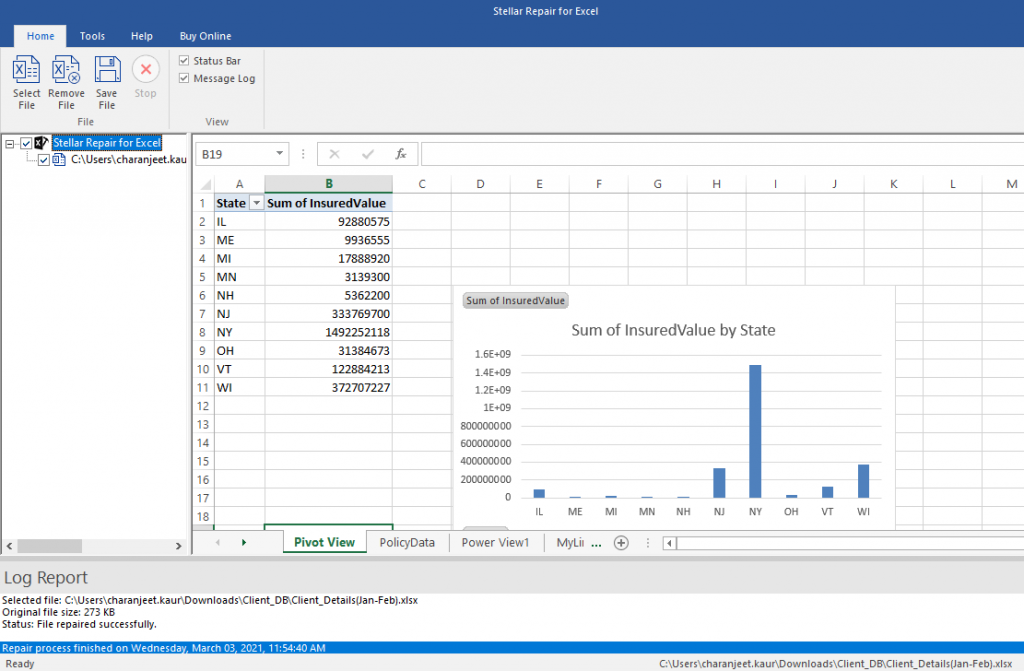
Figure 6 - Preview of Recoverable Excel Workbook Data
Note: You will need to activate the licensed version of Stellar Repair for Excel software for saving the repaired file. Once activated, proceed with the steps below to save the repaired file.
Step 5: Click Save File on the File menu. This will open a Save File dialog box with options to save the repaired .xlsx/.xls file at default or new location. After choosing the appropriate option, click OK.
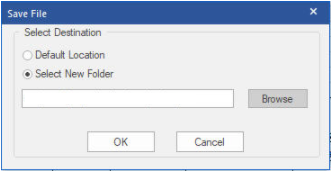
Figure 7 - Save Repaired Excel File
The repaired file will get saved at the selected location.
Key Features of Stellar Repair for Excel Software
- Repairs severely corrupt Excel file and recovers pivots, pivot tables, conditional formatting rules, chart, chart sheets, etc.
- Can repair multiple Excel files in a batch simultaneously
- Can handle all types of Excel file corruption errors, like ?Excel found unreadable content in filename.xls?, ?Excel cannot open the file filename.xlsx?, etc.
- Supports repairing corrupt workbooks of Excel 2019, 2016, 2013, 2007, 2003, and lower versions.
End Note
If your Excel workbook has turned corrupt, try using the methods discussed in this blog to repair the workbook. Once it is repaired, you must follow preventive measures to avoid your Excel file from getting corrupt. Some of these measures are as follows:
Reduce the size of your workbook by:
- Removing unused data
- Saving images at lower resolutions
- Avoid saving pivot table cache
Turn on the ?AutoRecover? and ?AutoSave? features in Excel
- Title: Fix Excel 2023 formula not showing result | Stellar
- Author: Nova
- Created at : 2024-07-17 17:14:29
- Updated at : 2024-07-18 17:14:29
- Link: https://phone-solutions.techidaily.com/fix-excel-2023-formula-not-showing-result-stellar-by-stellar-guide/
- License: This work is licensed under CC BY-NC-SA 4.0.


