
Fixed Cannot Insert Object Error in Excel 2007 | Step-by-Step Guide | Stellar
Fixed “Cannot Insert Object” Error in Excel | Step-by-Step Guide
Summary: The error “cannot insert object” in MS Excel can prevent you from modifying objects in the worksheet. This blog will discuss the primary reasons behind this error and the possible solutions to fix it. You will also learn about a professional Excel repair software that can help fix the error if it has occurred due to corruption in Excel file.


Many users have reported encountering the “cannot insert object” error while adding/embedding objects into the Excel file. It usually occurs when using Object Linking and Embedding (OLE) to add content (PDF, Microsoft documents) from external applications to worksheet. The error can also occur when using ActiveX control in Excel. Below, we’ll explain why you cannot insert object into Excel sheet and how to troubleshoot the issue.
Why the “Cannot Insert Object” Error Occurs?
- Macro Settings can prevent the insertion of objects into a workbook.
- The Excel file in which you are trying to add an element is corrupted.
- The object (you are inserting into the workbook) is damaged.
- Object size limitations.
- System’s insufficient memory might prevent new objects’ addition.
- Incompatible Excel file format.
- Add-ins controls are disabled.
- Incompatible or faulty Add-ins.
- Issue with Security Settings.

Methods to Fix the “Cannot Insert Object” Error in Excel
You may encounter the “Cannot insert object” error when trying to add an element stored on a network. It can occur due to issues with the file link, such as incorrect file location. In such a case, you can check the link by selecting the link to file option from the Insert tab.
Sometimes, the error can occur if the file in which you are trying to insert the object is locked and password-protected. In this case, you can unprotect the Excel file . If the issue still persists, then you can follow the below methods.
Method 1: Check and Change Restricted Security Settings
Excel provides security settings to protect your workbook. Sometimes, these settings can prevent inserting objects in the file. You can change the security settings to allow Excel to insert objects. To do so, follow these steps:
- Open your Excel application.
- Locate the File and then click Options.
- In Excel Options, click Trust Center.

- Click Trust Center Settings.
- In the Trust Center Settings window, select Protected View from the left pane.

- Under Protected View, unselect the below three options:
- Enable Protected View for files originating from the internet.
- Enable Protected View for files located in potentially unsafe locations.
- Enable Protected View for Outlook attachments.

- Click OK.
- Once you’re done with this, click on Macro Settings in the Trust Center window.
- Under Macro Settings, make sure “Disable all macros without notification” is not selected. If it is selected, then unselect it. After that, click OK.

- Restart Excel to apply the changes.
Method 2: Uninstall Microsoft Office Updates
You can also encounter the “Cannot insert object” error in Excel after installing MS Office updates. It might be due to the issues with the installed updates. To fix this, you can uninstall the recently installed Office updates. To uninstall the Office updates, follow these steps:
- Go to the system’s Control Panel.
- Click Programs and then click Program and Features.
- Search for “View Installed Updates” and click on the desired Office updates.
- Right-click on it and then click Uninstall.
- Follow the uninstallation steps on the screen.
- Once the process is complete, restart the system.

Method 3: Check Memory Usage
The “Cannot insert object” issue can also occur if your system is low on memory. You can check and close unnecessary processes and applications running in the background to free up memory. To do so, follow these steps:
- Press CTRL + ALT + DEL on the keyboard and click Task Manager.
- Click on the Processes tab and search for any unnecessary processes.
- Right-click on the process and then select End Task.
- Restart Excel to see if the issue is fixed.
Method 4: Check Excel File Size
If your Excel file size exceeds the prescribed limit, it can also lead to the “Cannot insert Excel object” error. So, check the Excel file size. You can reduce the file size by removing unnecessary objects, such as formulas or images.
Method 5: Check and Change Excel ActiveX Settings
You can get the “Excel cannot insert object” error if your Excel file contains macros, controls, and other interactive buttons. It usually occurs if the ActiveX Controls option is disabled. You can check and change the ActiveX Settings to fix the issue. Here are the steps:
- Open your Excel application.
- Navigate to File and then click Options.
- In Excel Options, click the Trust Center tab.
- In the Trust Center Settings, click ActiveX Settings.
- Under ActiveX Settings, make sure the “Enable all controls without restrictions and without prompting” option is selected.

- If the option is not selected, then select it and click OK.
- Restart the Excel and check if the error is fixed or not.

Method 6: Repair the Excel Workbook
The “Cannot insert object” error can occur if the object you are trying to insert is corrupted or the file in which you are inserting the object is damaged. If the issue has occurred due to a corrupted Excel file, then you can repair the file using the Open and Repair utility in MS Excel. To use this Microsoft-inbuilt utility, follow these steps:
- In the Excel application, go to the File tab and then click Open.
- Click Browse to choose the affected file.
- The Open dialog box is displayed. Click on the corrupted file.
- Click on the arrow next to the Open button and then click Open and Repair.
- Click on Repair.

- After repair, a message will appear (as shown in the below figure).

- Click Close.
If the Open and Repair utility fails to fix the issue, then try a professional Excel Repair software, like Stellar Repair for Excel. It is designed to repair severely corrupted Excel files. It can restore all the Excel file objects, such as tables, charts, formulas, etc. It helps fix all types of corruption related errors. The software is compatible with all versions of Excel.
Conclusion
You might encounter the “Cannot insert object” error when embedding or inserting objects in Excel. In this post, we have discussed the possible solutions to fix this error. We have also mentioned an Excel repair software that can help to easily repair the corrupted Excel file and recover all the data. You can download the Stellar Repair for Excel’s free demo version to preview the recoverable objects of the corrupted Excel file.
How to fix runtime error 424 object required error in Excel
The Runtime error 424: Object required occurs when Excel is not able to recognize an object that you are referring to in a VBA code. The object can be a workbook, worksheet, range, variable, class, macro, etc. Some users have also reported that this error occurred when they tried to copy the values of the cells from one workbook to another.
Let’s understand the error through a small scenario. Suppose, I want to check the last field row in a table in a spreadsheet named “First” using the VBA code. To do this, I have added a command button and double-clicked on it and entered the below code in the backend:
Private Sub CommandButton2_Click()
Dim LRow As Integer
LRow = Worksheets(“First”).Cells(Rows.Count, 2).End(xlUp).Row
MsgBox (“Last Row “ & LRow)
End Sub
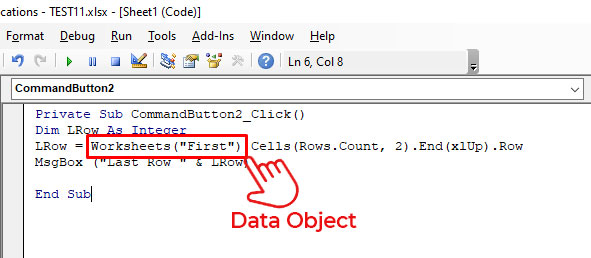
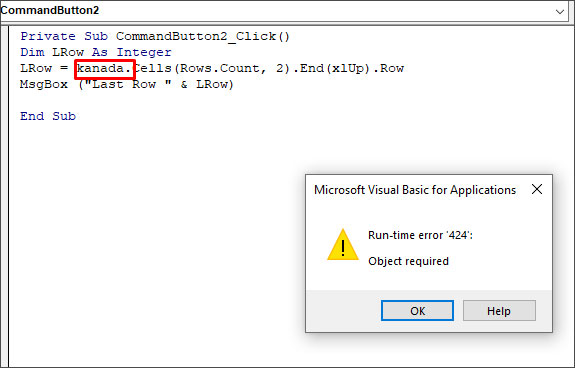
In this code, Worksheets(“First”) is a data object. If I mistakenly delete this data object and insert any random name (for example - kanada), then it will not be recognized by Excel. When I run this code, I will get the “Run-time error 424”.
Causes of Runtime Error 424 in Excel
The Runtime error 424: Object required can occur due to the following reasons:
- Incorrect name of the object you are trying to refer to in a code.
- You have provided an invalid qualifier to an object.
- You have not used the Set statement while assigning an object reference.
- The object is corrupted.
- Missing objects in a workbook.
- Objects you are trying to call in a code are mistakenly deleted or unavailable.
- You have used an incorrect syntax for object declaration.
- You are trying to perform an invalid action on an object in a code.
- Workbook is corrupted.

Solutions to Fix Runtime Error 424: Object Required in Excel
The VBA error ‘object required’ may occur due to different reasons. Based on the reason, you can follow the solutions mentioned below to fix the error.
1. Check the Name of the Object
The Runtime error 424 can occur when you run the VBA code using an incorrect name of the object. For example, the object name is ‘MyObject’ but you’re using “Backcolor”.
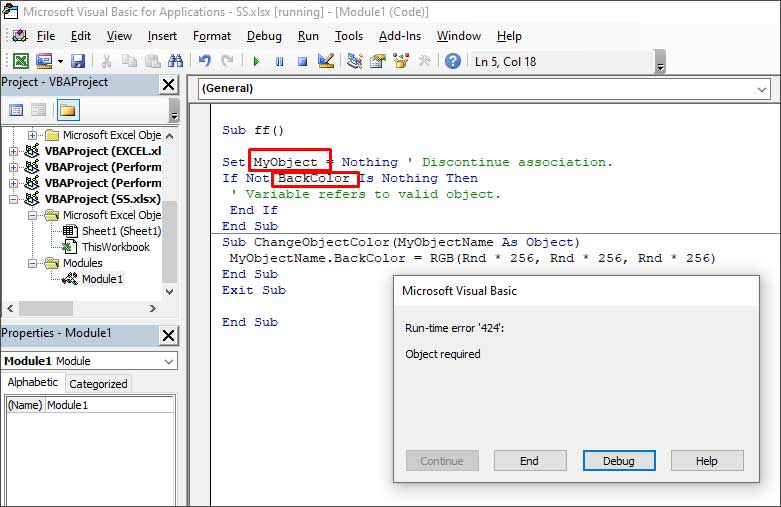
When you click the Debug button, the line with the error will highlight.

To fix the issue, you need to provide the correct name of the object.
2. Check if the Object is Missing
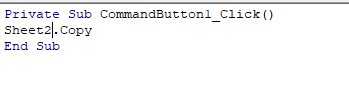
The Runtime error 424 can occur if the object you are referring to as a method is not available or you are using the wrong object in a code. In the below example, you can see that the error occurs when an object named “Employee” is not available in the Project list.
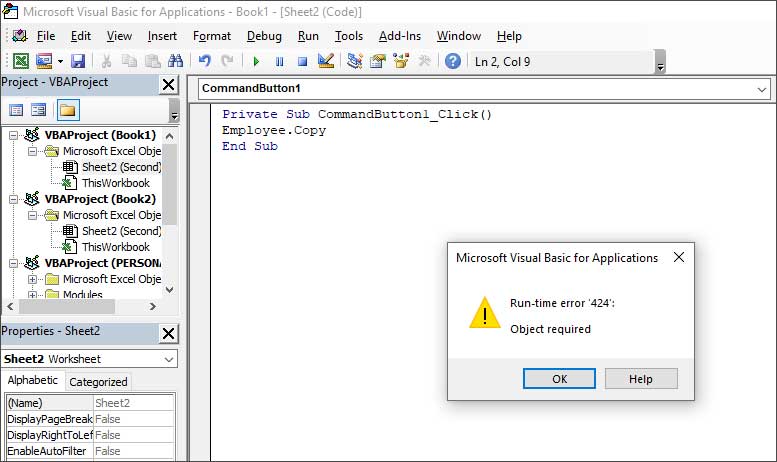
You can check and mention the object which is available. For instance, Sheet2 in the below code.
3. Check All References are Declared in the Code
You can get the Runtime error 424 if all the references are not declared. So, make sure you have declared all the references in the code. To verify this, you can use the debug mode by pressing F5 or clicking on the Debug option.

4. Check the Macro Security Settings
Sometimes, the error can occur if macros are disabled in the Macro Security settings. You can check and change the settings by following these steps:
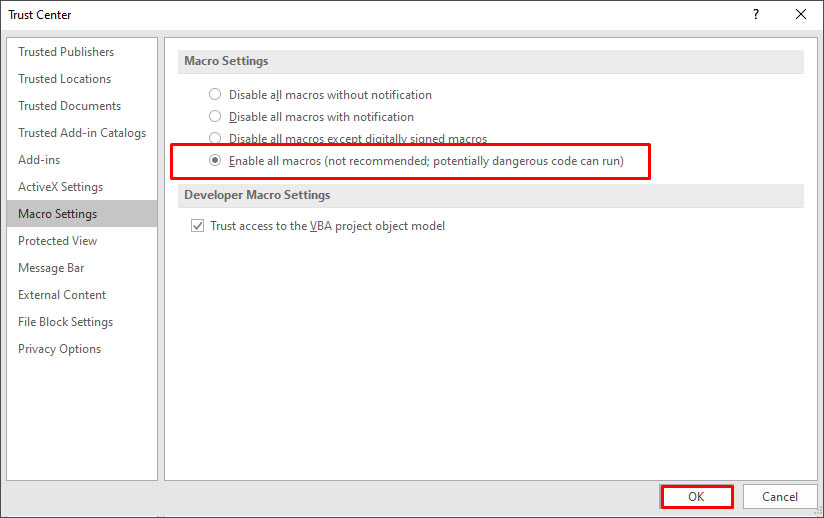
- On the Developer tab, in the Code section, click Macro Security.
- In the Trust Center window, select Enable all macros.

- Click OK.
5. Repair your Workbook
Sometimes, the ‘Object required’ error can occur if your Excel file is damaged or corrupted. In such a case, you can try repairing the file using Microsoft’s in-built utility - Open and Repair. To use this utility, follow these steps:
- In Excel, go to File > Open > Browse.
- In the Open dialog box, click on the corrupted Excel file.
- Click the arrow next to the Open button and select Open and Repair from the dropdown.
- Select Repair to recover as much data from the file as possible.
If the Open and Repair utility fails or stops working, then you can try a professional Excel repair tool, such as Stellar Repair for Excel . It is an advanced tool that can repair severely corrupted Excel files (.xls, .xlsx, .xltm, .xltx, and .xlsm). It helps recover all the file components, including images, charts, tables, pivot tables, cell comments, chart sheets, formulas, etc., without impacting the original structure.
Conclusion
The Runtime error 424 usually occurs when there is an issue with the objects in your VBA code. In this article, we have covered some effective methods to resolve the “object required” error in Excel. If the error occurs due to corruption in Excel file, then you can repair the corrupt file using Stellar Repair for Excel. It is a reliable tool that can repair severely corrupted Excel file without changing its actual formatting. You can download the free trial version of the software to evaluate its functionality.

Ways to Fix Personal Macro Workbook not Opening Issue
Many users have reported encountering issues while accessing personal macro workbook, such as personal macro workbook not opening, personal macro workbook not loading automatically, Excel personal macro workbook keeps getting disabled, etc.
Such issues may arise due to a problem with the directory where the personal workbook is stored. However, there are various other reasons that may lead to such issues. Below, we’ll discuss the reasons behind the personal macro workbook not opening issue and the solutions to troubleshoot and fix the issue. But before proceeding, let’s understand why personal macro workbook is used.
Why Personal Macro Workbook is used?
You can access macros in a specific Excel workbook. However, when you need to use the same macro in other Excel worksheets, then you can create a personal macro workbook. A personal macro workbook (Personal.xlsb) is a hidden workbook that is used to store all macros. It makes your macros available every time you open Excel.
Causes of Personal Macro Workbook not Opening Issue
You may encounter personal macro workbook is not opening issue when attempting to record macros. Some possible causes behind such an issue are:
- Personal macro workbook is stored at an untrusted location
- Location of xlsb is changed
- Personal macro workbook is hidden
- Personal macro workbook becomes corrupted
- Disabled items in add-ins
- Workbook is Read-only
Methods to Fix the “Personal Macro Workbook not Opening” Issue
Follow the given methods to fix the personal macro workbook is not opening issue:
Method 1: Check the Path of Personal.xlsb
The personal macro workbook (Personal.xlsb) file is stored in XLStart folder. It opens automatically when you open your Excel application. However, sometimes it fails to load automatically. It usually occurs when you try to open the file from an incorrect path. You can check the path of Personal.xlsb by following these steps:
- Open the workbook.
- Click on the Developer tab.

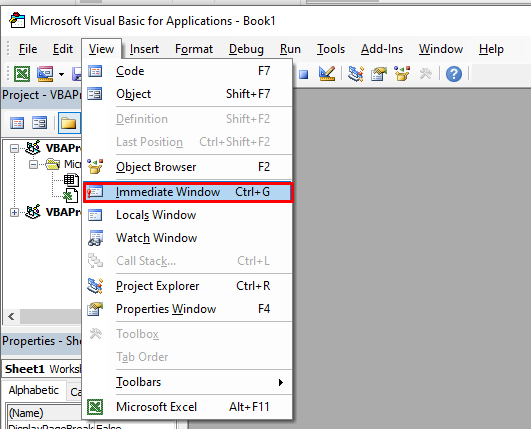
- Press Alt + F11 to open Visual Basic Editor.
- Go to View > Immediate Window.
- In Immediate Window, type the following code to know the location of the workbook:
?thisworkbook.path.
- Then, hit Enter.
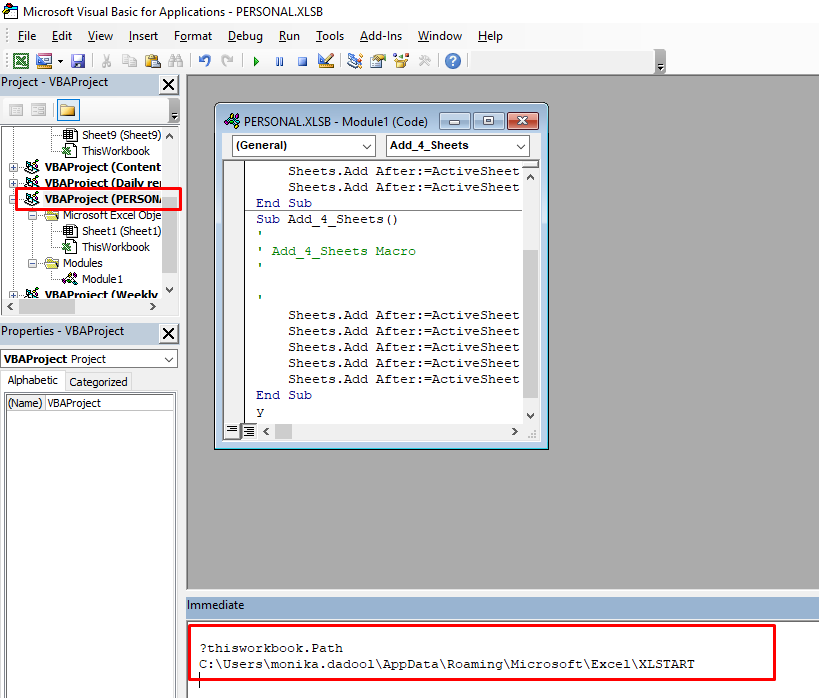
- You will see the path of the personal macro workbook.
- Copy the path and paste it into Quick Access field in File Explorer.

Method 2: Unhide Personal Macro Workbook
If personal macro workbook is hidden, you may unable to see and open the Personal.xlsb file. To unhide the personal Macro workbook, follow the below steps:
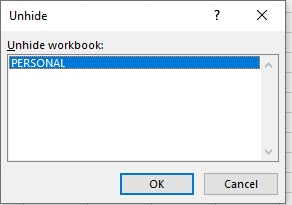
- In Microsoft Excel, go to View and then click Unhide

- The Unhide dialog box is displayed. Click PERSONAL and then OK.
Method 3: Enable the Macro Add-ins
You may unable to open the previously recorded macros in your personal macro workbook if the macros are disabled. To check and enable the items, follow these steps:
- Go to File > Options.
- In Excel Options, click on the Add-ins
- Select Disabled Items from the Manage section and click on Go.
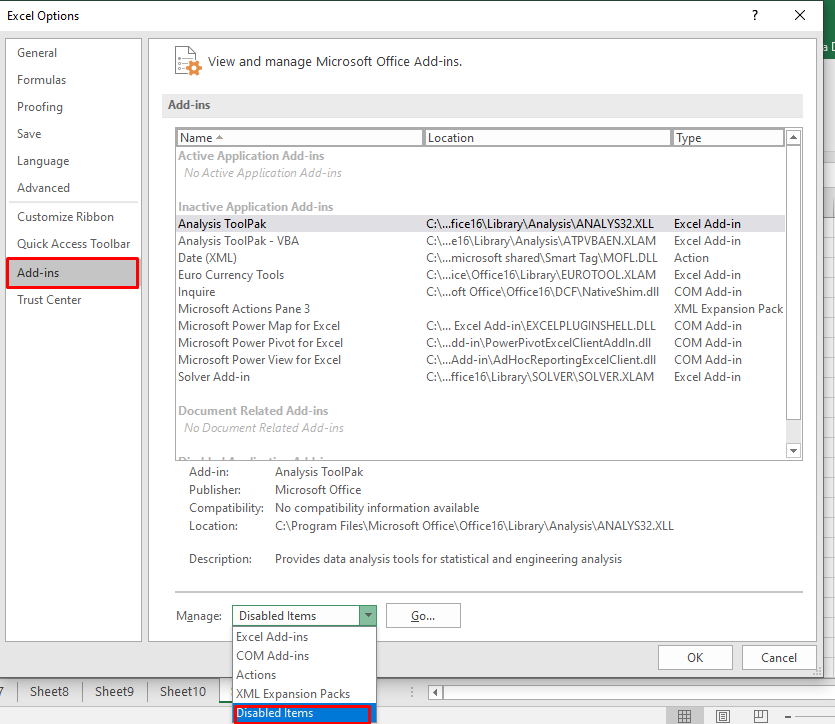
- The Disabled Items dialog box appears. Click on the disabled item and then click Enable.
Method 4: Change the Trusted Location
You may encounter the “personal macro workbook not opening” issue if the Personal.xlsb file is stored at an untrusted location. You can check and modify the path of XLSTART folder using the Trust Center window. Here are the steps:
- Open MS Excel. Go to File > Options.
- Click Trust Center > Trust Center Settings.
- In the Trust Center Settings dialog box, click on Trusted Locations.
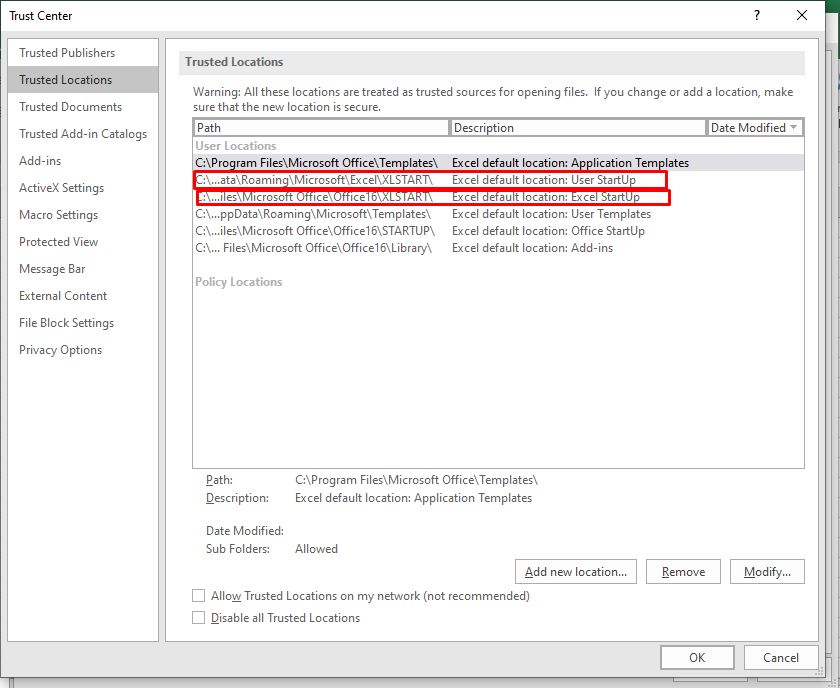
- Verify the path of the XLSTART If it is untrusted or there is any issue, then click Modify and then click OK.
Method 5: Repair your Excel File
You may fail to open personal macro workbook if it is corrupted. To repair the corrupt workbook, you can use the built-in Open and Repair utility in MS Excel. To use this tool, follow these steps:
- Open your Excel application.
- Click File > Open.

- Browse to the location where the corrupted file is stored.
- In the Open dialog box, select the corrupted workbook.
- From the Open dropdown list, click Open and Repair.
The dialog box appears with the Repair and Extract buttons. Click Repair to retrieve all possible data or the Extract option to recover the data without formulas and values.
If the Open and Repair utility fails to repair the corrupted Excel workbook, then you can use a professional Excel repair tool, such as Stellar Repair for Excel. It can easily repair severely corrupted Excel (XLSX and XLS) files and recover all the components. You can download the free trial version of the tool to preview the recoverable data.

Closure
This article discussed the ways to fix the personal macro workbook not opening issue. In case you are unable to open the personal macro workbook because of corruption in the workbook, you can use the Open and Repair utility in MS Excel. If it fails, then you can use Stellar Repair for Excel to fix corruption in the Excel file and recover all its data with complete integrity.
How to Fix ‘Sharing Violation Error’ when Saving Excel?
Summary: You may encounter the sharing violation error in Excel when you repeatedly save changes in a workbook. The error can occur due to different reasons. In this blog, we will discuss the possible reasons behind this sharing violation error and some effective solutions to fix it. If the issue has occurred due to corruption in Excel file, you can try the advanced Excel repair tool mentioned in the post to repair the corrupted file.
It is not uncommon to encounter errors while working with Excel application. One common error that Excel users face is the sharing violation error that occurs while saving an Excel spreadsheet. The complete error message says, “Your changes could not be saved to file because of a sharing violation.” When this error occurs, users won’t be able to save the changes in the file. So, it is important to fix this issue as soon as possible. But before fixing the error, let’s find out the causes behind this error.
Causes of Excel Sharing Violation Error
This error may pop up due to the below reasons:
- The file you are trying to save is corrupted.
- The Excel file is not in the trusted location.
- Sharing Wizard is disabled.
- You do not have permission to modify the Excel file.
- The Excel file is not permitted to get indexed.
Methods to Fix the Sharing Violation Error in Excel
You can move the affected Excel file to a new folder and save it with a different name. Then, see if it fixes the error. If it doesn’t help, you can try the below methods.
Method 1: Check and Change the Excel File Properties
You can get the sharing violation error in Excel if the file attribute options, such as “File is ready for archiving” and “Allow this file to have contents indexed in addition to file properties” are disabled. You can check the File Properties and enable these options to fix the issue. Here are the steps:
- Right-click on any Excel file and select Properties.

- In the Properties window, click on the Advanced option.

- In the Advanced Attributes window, select the below options under File attributes:
- File is ready for archiving.
- Allow this file to have contents indexed in addition to file properties.

- Click OK.
Note: If these options are already selected, then unselect and re-select them.
Method 2: Enable Sharing Wizard Option
The error “Your changes could not be saved to file because of a sharing violation” can also occur if the sharing wizard option is disabled on your system. You can check and enable the sharing wizard option using these steps:
- Go to your system’s Documents folder.
- Click View > Options > Change folders and search options.

- In the Folder Options window, click View.

- Under the View section, search for the “Use Sharing Wizard” option in the Advanced Settings.

- If the Use Sharing Wizard option is unselected, select it and then click OK.
Method 3: Move the Excel File to a Trusted Location
You can encounter the sharing violation error if the file you are trying to save is not in the trusted location. You can try moving the file to a trusted location by following these steps:
- In Excel, go to File and then click Options.
- Click Trust Center and then click Trust Center Settings.
- In the Trust Center window, click Trusted Locations and then click Add new location.

- In the Add new location window, select Browse to locate and choose the folder, and then click OK.
Method 4: Open Excel in Safe Mode
Incompatible add-ins can create issues in the Excel file. To check if the sharing violation issue has occurred due to add-ins, open Excel in safe mode. To do so, follow these steps:
- Open the Run window using Windows + R.

- Type excel /safe and click on OK.
- Open the affected file and then try to save the changes.
- If you are able to save the changes without any error, then it indicates add-ins are causing the issue. To fix this, you can remove the recently downloaded add-ins (if any).
Method 5: Repair the Excel File
Corruption in Excel file can also create issue while saving the changes. In such a case, you can repair the corrupted Excel file using the inbuilt utility in Excel, named Open and Repair. Follow these steps to use this utility:
- In Excel, navigate to File > Open > Browse.
- In the Open dialog box, click on the affected Excel file.
- Click the arrow next to the Open button and select Open and Repair from the dropdown.
- Click on the Repair option to recover as much data from the file as possible.
If the above utility fails to fix the corrupt Excel file, then you can use a more powerful Excel repair tool , such as Stellar Repair for Excel. This Excel repair tool can repair even severely corrupted or damaged Excel files (xls, .xlsx, .xltm, .xltx, and .xlsm). This tool can recover all the data from the corrupted Excel file, including images, chart sheets, formulas, etc., without changing the original format. It can help in fixing common corruption-related errors in Excel. You can download the software’s demo version to scan the corrupt file.
To Conclude
Above, we have discussed some effective methods to fix the sharing violation error in Excel. This error may also occur if you try to save the Excel file in an incompatible format. So, check the format and try saving the file in a compatible format. If the error occurs due to Excel file corruption, you can repair corrupt Excel file using the Open and Repair tool. If nothing works, then download a third-party Excel repair tool, such as Stellar Repair for Excel. It is an advanced tool that can fix severely corrupted Excel files. You can install this repair tool on any Windows system.
How to Repair Corrupted or Damaged Excel File with Ease?
Summary: The Excel file is prone to corruption. Users can face several issues related to corruption. So here in this infographic, I am discussing a professional tool,- Stellar Repair for Excel, to easily repair corrupted Excel files.
Stellar Repair for Excel is among the top choices for repairing corrupt or damaged Excel (.XLS/.XLSX) files. This Excel recovery software restores everything from the corrupt file to a new blank Excel file. Incoming, the information graphics complete overview of the repair process is explained in step-by-step methodology. Explore and reap the benefits of recovering corrupt or damaged Excel files.

Very much sure about the result of using the excel file recovery tool, share your experience with us.
Top 5 Ways to Fix Excel File Not Opening Error
Summary: MS Excel users sometimes face issues while using the MS Excel application. One such issue is the Excel file not opening error. In this post, we’ve mentioned the reasons that may result in this error and the ways to resolve it. Also, you’ll find about an Excel repair software that can help you repair corrupt Excel files.
Several Microsoft Excel users have reported encountering the ‘Excel file not opening’ error when opening their Excel file. There are several reasons that may cause this error. In this post, we’ll be discussing the reasons that may lead to the ‘Excel file not opening’ error and the top 5 ways to fix this error.
Why Does the ‘Excel File Not Opening’ Error Appear?
Following are some possible causes that may result in the ‘Excel file not opening’ error:
- There may be a problem with an add-in that is preventing you from opening the Excel files.
- There’s a chance that your Excel application is faulty.
- Your Excel program is unable to communicate with other programs or the operating system.
- The file association might have been broken. This is a common problem faced by users who have upgraded their Excel application or operating system.
- The file you’re trying to open is corrupted.
5 Ways to Fix Excel File Not Opening Error
Let’s explore the ways to resolve the Excel file not opening error:
1. Uncheck the Ignore DDE Checkbox
Dynamic Data Exchange (DDE)allows Excel to communicate with other programs. The Excel error may occur due to incorrect DDE settings. You need to ensure that the correct DDE configuration is enabled. Follow the steps provided below:
- Launch your MS Excel file.
- Go to File > Options.

- Now click on Advanced.

- Further, find the General option on the screen.

- Uncheck the option **‘Ignore other applications that use Dynamic Data Exchange (DDE)**’.
- Click OK to save the changes.
2. Reset Excel File Associations
When you launch your Excel file, the file association ensures that the Excel application is used to open the file. You can try to reset these associations and see if Excel opens after this. Proceed with the following steps to do so:
- Navigate to Start Menu and launch Control Panel.
- Now, navigate to Programs > Default Programs > Set Your Default Programs.

- A new window will open. Herein, find the Excel program in the list and select it. Now, select the option ‘Choose defaults for this program’. Click OK.

- A new window for ‘Set Program Associations’ will open.
- Check the box against the ‘Select All’ option.
- Further, click Save to reset the Excel File Associations settings.

3. Disable Add-Ins
Many people install third-party add-ins to enhance the application’s functionality. Sometimes, these add-ins can create an issue. Follow the below-mentioned steps to disable the problem creating add-ins:
- Launch MS Excel application.
- Navigate to File > Options > Add-ins.

- In the window that opens, go to the Manage option at the bottom.
- Herein, select the COM Add-ins option from the dropdown list. Click Go.

- In the COM Add-ins window, uncheck all the boxes to disable the add-ins. Click OK.

4. Repair MS Office Program
Sometimes the issue is not with your Excel file. Instead, the reason for the error can be a corrupt MS Office application. You can repair the program to fix the Excel file not opening error. Here are the steps:
- Press the Windows + R keys to launch the ‘Run’ dialog box.

- Enter the text ‘appwiz.cpl’ to launch the program and features window.

- Find the MS Office program in the list of applications.

- Right-click on it and select Change.

- In the new window, select the Quick Repair radio button. Click Repair.

- Follow the on-screen instructions to repair the Office application. Once the repair process is completed, you can try opening the Excel file to see if the problem is resolved.
5. Disable Hardware Graphics Acceleration
The hardware graphics acceleration assists in the system’s better performance, especially when you use MS Office applications, like MS Excel or Word. Sometimes, this causes the Excel file not opening issue. You can disable this option to try to resolve the issue. Here are the steps:
- Launch your MS Excel application.
- Navigate to File > Options > Advanced.
- Herein, go to the Display option.
- Uncheck the Disable hardware graphics acceleration checkbox. Click OK.

What If These Solutions Do Not Work?
If you have applied all the methods mentioned above and still cannot open your Excel file, there are chances that your file is corrupted. You can use a specialized Excel repair tool , such as Stellar Repair for Excel to repair the corrupted Excel file. This software has powerful algorithms that can scan and repair even severely corrupt Excel files, without any file size limitation. After repairing the file, it restores all the data, including tables, charts, rules, etc. to a new Excel, with 100% integrity.
To know how the software works, see the video below:

Conclusion
Before you proceed with resolving the Excel file not opening error, try to find out the root cause of this error. If you know the real reason, you can try the method right away. If the reason for the error is corruption in the Excel file, the best option is to repair the file using a professional Excel repair tool, such as Stellar Repair for Excel .
Fixed “Cannot Insert Object” Error in Excel | Step-by-Step Guide
Summary: The error “cannot insert object” in MS Excel can prevent you from modifying objects in the worksheet. This blog will discuss the primary reasons behind this error and the possible solutions to fix it. You will also learn about a professional Excel repair software that can help fix the error if it has occurred due to corruption in Excel file.
Many users have reported encountering the “cannot insert object” error while adding/embedding objects into the Excel file. It usually occurs when using Object Linking and Embedding (OLE) to add content (PDF, Microsoft documents) from external applications to worksheet. The error can also occur when using ActiveX control in Excel. Below, we’ll explain why you cannot insert object into Excel sheet and how to troubleshoot the issue.
Why the “Cannot Insert Object” Error Occurs?
- Macro Settings can prevent the insertion of objects into a workbook.
- The Excel file in which you are trying to add an element is corrupted.
- The object (you are inserting into the workbook) is damaged.
- Object size limitations.
- System’s insufficient memory might prevent new objects’ addition.
- Incompatible Excel file format.
- Add-ins controls are disabled.
- Incompatible or faulty Add-ins.
- Issue with Security Settings.
Methods to Fix the “Cannot Insert Object” Error in Excel
You may encounter the “Cannot insert object” error when trying to add an element stored on a network. It can occur due to issues with the file link, such as incorrect file location. In such a case, you can check the link by selecting the link to file option from the Insert tab.
Sometimes, the error can occur if the file in which you are trying to insert the object is locked and password-protected. In this case, you can unprotect the Excel file . If the issue still persists, then you can follow the below methods.
Method 1: Check and Change Restricted Security Settings
Excel provides security settings to protect your workbook. Sometimes, these settings can prevent inserting objects in the file. You can change the security settings to allow Excel to insert objects. To do so, follow these steps:
- Open your Excel application.
- Locate the File and then click Options.
- In Excel Options, click Trust Center.
- Click Trust Center Settings.
- In the Trust Center Settings window, select Protected View from the left pane.
- Under Protected View, unselect the below three options:
- Enable Protected View for files originating from the internet.
- Enable Protected View for files located in potentially unsafe locations.
- Enable Protected View for Outlook attachments.
- Click OK.
- Once you’re done with this, click on Macro Settings in the Trust Center window.
- Under Macro Settings, make sure “Disable all macros without notification” is not selected. If it is selected, then unselect it. After that, click OK.
- Restart Excel to apply the changes.
Method 2: Uninstall Microsoft Office Updates
You can also encounter the “Cannot insert object” error in Excel after installing MS Office updates. It might be due to the issues with the installed updates. To fix this, you can uninstall the recently installed Office updates. To uninstall the Office updates, follow these steps:
- Go to the system’s Control Panel.
- Click Programs and then click Program and Features.
- Search for “View Installed Updates” and click on the desired Office updates.
- Right-click on it and then click Uninstall.
- Follow the uninstallation steps on the screen.
- Once the process is complete, restart the system.
Method 3: Check Memory Usage
The “Cannot insert object” issue can also occur if your system is low on memory. You can check and close unnecessary processes and applications running in the background to free up memory. To do so, follow these steps:
- Press CTRL + ALT + DEL on the keyboard and click Task Manager.
- Click on the Processes tab and search for any unnecessary processes.
- Right-click on the process and then select End Task.
- Restart Excel to see if the issue is fixed.
Method 4: Check Excel File Size
If your Excel file size exceeds the prescribed limit, it can also lead to the “Cannot insert Excel object” error. So, check the Excel file size. You can reduce the file size by removing unnecessary objects, such as formulas or images.
Method 5: Check and Change Excel ActiveX Settings
You can get the “Excel cannot insert object” error if your Excel file contains macros, controls, and other interactive buttons. It usually occurs if the ActiveX Controls option is disabled. You can check and change the ActiveX Settings to fix the issue. Here are the steps:
- Open your Excel application.
- Navigate to File and then click Options.
- In Excel Options, click the Trust Center tab.
- In the Trust Center Settings, click ActiveX Settings.
- Under ActiveX Settings, make sure the “Enable all controls without restrictions and without prompting” option is selected.
- If the option is not selected, then select it and click OK.
- Restart the Excel and check if the error is fixed or not.
Method 6: Repair the Excel Workbook
The “Cannot insert object” error can occur if the object you are trying to insert is corrupted or the file in which you are inserting the object is damaged. If the issue has occurred due to a corrupted Excel file, then you can repair the file using the Open and Repair utility in MS Excel. To use this Microsoft-inbuilt utility, follow these steps:
- In the Excel application, go to the File tab and then click Open.
- Click Browse to choose the affected file.
- The Open dialog box is displayed. Click on the corrupted file.
- Click on the arrow next to the Open button and then click Open and Repair.
- Click on Repair.
- After repair, a message will appear (as shown in the below figure).
- Click Close.
If the Open and Repair utility fails to fix the issue, then try a professional Excel Repair software, like Stellar Repair for Excel. It is designed to repair severely corrupted Excel files. It can restore all the Excel file objects, such as tables, charts, formulas, etc. It helps fix all types of corruption related errors. The software is compatible with all versions of Excel.
Conclusion
You might encounter the “Cannot insert object” error when embedding or inserting objects in Excel. In this post, we have discussed the possible solutions to fix this error. We have also mentioned an Excel repair software that can help to easily repair the corrupted Excel file and recover all the data. You can download the Stellar Repair for Excel’s free demo version to preview the recoverable objects of the corrupted Excel file.
- Title: Fixed Cannot Insert Object Error in Excel 2007 | Step-by-Step Guide | Stellar
- Author: Nova
- Created at : 2024-07-17 17:15:22
- Updated at : 2024-07-18 17:15:22
- Link: https://phone-solutions.techidaily.com/fixed-cannot-insert-object-error-in-excel-2007-step-by-step-guide-stellar-by-stellar-guide/
- License: This work is licensed under CC BY-NC-SA 4.0.