
Fixed Excel 2010 Found a Problem with One or more Formula | Stellar
[Fixed] Excel Found a Problem with One or more Formula
Summary: The error ‘Excel found a problem with one or more formula references in this worksheet’ may appear while saving the Excel workbook. It occurs when Excel found a problem with the formula used in the sheet. However, it may also occur when the Excel workbook gets damaged or corrupt. In this guide, we’ve explained the reasons that may lead to this Excel error and methods to resolve the error, by using various Excel options and a third-party Excel file repair software.

If you are experiencing the ‘Excel found a problem with one or more formula references in this worksheet’ error message in the Excel workbook, it indicates that the Excel file is corrupt or partially damaged. However, it may also occur due to incorrect reference to a wrong cell or object linking, which is not working. The complete error message says,
‘Excel found a problem with one or more formula references in this worksheet. Check that the cell references, range names, defined names, and links to other workbooks in your formulas are all correct.’

In any case, resolving the error is critical as it doesn’t let you save the file and may result in loss of information from the Excel workbook.
Reasons for Excel Formula References Error
A few reasons that may lead to such error are as follows,
- Wrong formula or reference cell
- Incorrect object linking or link embedding OLE
- Empty or no values in named or range cells
- Multiple Excel files (not common)

Methods to Resolve ‘Excel Found a Problem with One or More Formula References in this Worksheet’ Error
Following are a few methods that you can follow to fix Excel file that can’t be saved due to problems with one or more formula references in the worksheet.
Method 1: Check Formulas
If the problem has occurred in a large Excel workbook with multiple sheets, it’s quite hard to pinpoint the problem cell. In such cases, you can use the Error Checking option that runs a scan and checks for a problem with formulas used in the worksheet.
To run Error Checking in the Excel sheet, follow these steps,
- Go to Formulas and click on the ‘Error Checking’ button

- This runs a scan on the sheet and displays the issues, if any. If no issue is found, it displays the following message,
The error check is completed for the entire sheet.
In such a case, you can try saving the Excel file again. If the error message persists, proceed to the next method.
Method 2: Check Individual Sheet
The problem may also occur due to an issue with one of the sheets in the workbook. To find the faulty sheet and fix the problem, you can copy each sheet content in a new Excel file and then try to save the Excel file.
This will help you find the faulty sheet from the workbook that you can review. This method makes the entire process of troubleshooting Excel formula reference error quite easy and convenient.
In case the error is not fixed, you can back up the faulty sheet content and remove it from the workbook to save the Excel file.
Method 3: Check Links
When the Excel file contains external links with errors, MS Excel may display such error messages. To check and confirm if external links are causing the error, follow these steps,
- Navigate to Data Tab > Queries & Connections > Edit Links
- Check the links. If you find any faulty link, remove it and then save the sheet
Method 4: Review Charts
You can review the charts to check if they are causing the formula reference error in Excel. It may take a while based on the size of the Excel file. Sometimes, it’s not practically possible to track down which Excel chart object is causing the error. Thus, you need to check specific locations, such as:
- Check horizontal axis formula inside Select Data Source dialog box
- Check Secondary Axis
- Check linked Data Labels, Axis Labels, or Chart Title
Method 5: Check Pivot Tables
To check Pivot Tables, follow these steps,
- Navigate to PivotTable Tools > Analyze > Change Data Source > Change Data Source…

- Check if any of the formula used is problematic. Sometimes small typo, such as misplaced comma, can lead to such problems in Excel. Thus, check each formula thoroughly and correct the formulas wherever needed.
Method 6: Use Excel Repair Software
When none of the methods resolve the error, then you can rely on advanced Excel repair software , such as Stellar Repair for Excel. It’s a powerful tool that is recommended by several MVPs and IT administrators for resolving common Excel errors, such as ‘Excel found a problem with one or more formula references in this worksheet.’

It repairs corrupt or damaged Excel (.xls/.xlsx) files, recovers Pivot tables, charts, etc., and save them in a new Excel worksheet. It helps Excel users, facing formula reference error, restore their Excel file without any risk of data loss, while preserving the sheet properties and formatting with 100% precision.
Conclusion
Although the error ‘Excel found a problem with one or more formula references in this worksheet’ can be resolved by using various options in MS Excel, it may lead to a partial loss of information. Thus, you must perform these operations after taking a backup of the Excel worksheet. Also, if the MS Excel options fail to resolve the problem, you can use an Excel file repair software, such as Stellar Repair for Excel. The software helps fix Excel file corruption and restores the information and data from corrupt or damaged Excel files (.xls/.xlsx) to a new worksheet.
How to Repair Corrupt Pivot Table of MS Excel File?
Summary: If you are not able to perform any action on the Pivot Table of MS Excel file, it indicates Excel Pivot Table corruption. In such a case, you must repair the corrupt Pivot Table of MS Excel file by using an Excel repair software or manual troubleshooting steps discussed in this post.
MS Excel is equipped with several brilliant features and functions which make working with large volumes of data easy. In addition to helping users save data into well-organized cells and tables, the application helps users draw inferences from the data. Pivot Table is one such Excel feature that helps users extract the gist from a large number of rowed data. But often, the Pivot table may get corrupted and lead to unexpected errors or data loss.
Corrupt Pivot Tables can stop users from reopening previously saved Excel workbooks, raising the serious issue of data inaccessibility. Resolving such issues is an uphill task unless one gets to the actual root cause of the problem.
However, with Stellar Repair for Excel software, you can repair the corrupt Pivot table of MS Excel file while keeping the Excel file data, formatting, layout, etc. intact.

Excel Pivot Tables & Associated Problems
Pivot Tables in Microsoft Excel are created by applying an operation such as sorting, averaging, or summing to the data in certain tables. The results of the operation are saved as summarized data in other tables. Typically, working on the grouping of saved data, Pivot Tables are used in data processing and are found in data visualization programs, such as spreadsheets or business intelligence software.
Put simply, Pivot Tables in Excel allow you to extract the significance or the gist from a large, detailed data set by allowing you to slice-and-dice data, sort-and-filter data, or arrange it in any way you want.
Frequently Encountered Problems with Pivot Tables in MS Excel
Take a look at the most frequently encountered Pivot Table issues:
- You add new data into a pivot table but it doesn’t show up when you refresh
- Pivot Table contains Blanks instead of Zeros for fields that have no source data
- Automatic field names assigned by the Pivot Table can be inappropriate
- It doesn’t directly show the percentage of total
- Grouping one pivot table affects another
- Your number of formatting gets lost
- Refreshing a pivot table messes up column widths
- Field headings make no sense and add clutter
While some of the above problems seem minute and can easily be resolved using a few tweaks, bigger issues like unexpected Pivot Table error messages that an Excel throws can be troublesome.
Pivot Table Errors & Their Reasons
Excel users who have built new Pivot Tables in Excel often report the following errors when trying to reopen a previously saved workbook:
We found a problem with some content in

Naturally, users are prompted to click on ‘Yes’. But when they do, they get another error message saying:
Removed Part: /xl/pivotCache/pivotCacheDefinition1.xml part with XML error
(PivotTable cache) Load error. Line 2, column 0
Removed Feature: PivotTable report from /xl/pivotTables/pivotTable1.xml part (PivotTable view)
Such errors are indicative of the fact that the data within the Pivot Table still exists, but the table itself isn’t functioning anymore.
There could be two primary reasons behind such behavior:
- You’ve created the Pivot Table in an older version of Excel but are trying to open-refresh-save it through a newer Excel version
- The Pivot Table itself is corrupted
How to Repair the Pivot Table Quickly?
To solve the errors associated with Pivot Tables, you need to repair them. But Microsoft doesn’t offer any inbuilt technique or option to repair Pivot Tables. Thus, to fix the issue, you either need some sort of workaround or an Excel file repair software .
Methods to Fix Corrupt Pivot Table in MS Excel
Though there aren’t many options to fix the Pivot Table, you can follow these workarounds to try and repair a corrupt Pivot Table of MS Excel. However, before following these steps, create a backup copy of your Excel file.

Method 1: Open MS Excel in Safe Mode
First, try opening the Excel file in safe mode and then check if you can access the Pivot Table. If you can, save all its contents to a new Pivot Table in the latest version of Excel so that this problem doesn’t arise anymore.
Method 2: Use Pivot Table Options
If, however, above method doesn’t work, follow the below-mentioned steps:
- Right-click on the Pivot Table and click on Pivot Table Options
- On the Display tab, clear the checkbox labeled “Show Properties in ToolTips”
- Save the file (.xls, .xlsx) with the new settings intact
Method 3: Make Changes to Pivot Table
If the above method or steps didn’t work,
- Try opening the Pivot Table Options window by right-clicking on the Pivot Table within your Excel file
- Select Pivot Table Options from the pop-up menu and make appropriate changes to the options given there
- Then check if the issues go away
Method 4: Check and Set Data Source
If the problem in the Pivot table is related to data refresh,
- Go to Analyze > Change Data Source
- Check if the data source is set properly
- Also, try reselecting the data source and check if the refresh option is working properly
If not, resorting to Stellar Repair for Excel software might be your only hope.
Excel Pivot Table Repair by Using Excel Repair Software
When corruption strikes an Excel Pivot Table and no manual trick work, Stellar Repair for Excel is the best solution. This easy-to-use Excel Repair software repairs even the most severely corrupted Excel (XLS/XLSX) files to restore all data, properties, formatting, and preferences. It enables users to extract their saved data into new blank Excel files.
If you have this utility by your side, you don’t need to think twice about any Excel error.

What customer says about the Excel Repair Software?


Conclusion
Excel Pivot Table corruption may occur due to any unexpected errors or reasons. This can lead to inaccurate observation in data analysis and also cause data loss if not fixed quickly. However, you can prevent data loss due to problems caused by Pivot Table corruption by keeping a backup of all your critical Excel files and fix the Pivot Table corruption by using proper tools, such as Excel file repair software, that can help you get over any Excel corruption and errors quickly.
Fixed “Cannot Insert Object” Error in Excel | Step-by-Step Guide
Summary: The error “cannot insert object” in MS Excel can prevent you from modifying objects in the worksheet. This blog will discuss the primary reasons behind this error and the possible solutions to fix it. You will also learn about a professional Excel repair software that can help fix the error if it has occurred due to corruption in Excel file.

Many users have reported encountering the “cannot insert object” error while adding/embedding objects into the Excel file. It usually occurs when using Object Linking and Embedding (OLE) to add content (PDF, Microsoft documents) from external applications to worksheet. The error can also occur when using ActiveX control in Excel. Below, we’ll explain why you cannot insert object into Excel sheet and how to troubleshoot the issue.
Why the “Cannot Insert Object” Error Occurs?
- Macro Settings can prevent the insertion of objects into a workbook.
- The Excel file in which you are trying to add an element is corrupted.
- The object (you are inserting into the workbook) is damaged.
- Object size limitations.
- System’s insufficient memory might prevent new objects’ addition.
- Incompatible Excel file format.
- Add-ins controls are disabled.
- Incompatible or faulty Add-ins.
- Issue with Security Settings.
Methods to Fix the “Cannot Insert Object” Error in Excel
You may encounter the “Cannot insert object” error when trying to add an element stored on a network. It can occur due to issues with the file link, such as incorrect file location. In such a case, you can check the link by selecting the link to file option from the Insert tab.
Sometimes, the error can occur if the file in which you are trying to insert the object is locked and password-protected. In this case, you can unprotect the Excel file . If the issue still persists, then you can follow the below methods.
Method 1: Check and Change Restricted Security Settings
Excel provides security settings to protect your workbook. Sometimes, these settings can prevent inserting objects in the file. You can change the security settings to allow Excel to insert objects. To do so, follow these steps:
- Open your Excel application.
- Locate the File and then click Options.
- In Excel Options, click Trust Center.

- Click Trust Center Settings.
- In the Trust Center Settings window, select Protected View from the left pane.

- Under Protected View, unselect the below three options:
- Enable Protected View for files originating from the internet.
- Enable Protected View for files located in potentially unsafe locations.
- Enable Protected View for Outlook attachments.

- Click OK.
- Once you’re done with this, click on Macro Settings in the Trust Center window.
- Under Macro Settings, make sure “Disable all macros without notification” is not selected. If it is selected, then unselect it. After that, click OK.

- Restart Excel to apply the changes.
Method 2: Uninstall Microsoft Office Updates
You can also encounter the “Cannot insert object” error in Excel after installing MS Office updates. It might be due to the issues with the installed updates. To fix this, you can uninstall the recently installed Office updates. To uninstall the Office updates, follow these steps:
- Go to the system’s Control Panel.
- Click Programs and then click Program and Features.
- Search for “View Installed Updates” and click on the desired Office updates.
- Right-click on it and then click Uninstall.
- Follow the uninstallation steps on the screen.
- Once the process is complete, restart the system.

Method 3: Check Memory Usage
The “Cannot insert object” issue can also occur if your system is low on memory. You can check and close unnecessary processes and applications running in the background to free up memory. To do so, follow these steps:
- Press CTRL + ALT + DEL on the keyboard and click Task Manager.
- Click on the Processes tab and search for any unnecessary processes.
- Right-click on the process and then select End Task.
- Restart Excel to see if the issue is fixed.
Method 4: Check Excel File Size
If your Excel file size exceeds the prescribed limit, it can also lead to the “Cannot insert Excel object” error. So, check the Excel file size. You can reduce the file size by removing unnecessary objects, such as formulas or images.
Method 5: Check and Change Excel ActiveX Settings
You can get the “Excel cannot insert object” error if your Excel file contains macros, controls, and other interactive buttons. It usually occurs if the ActiveX Controls option is disabled. You can check and change the ActiveX Settings to fix the issue. Here are the steps:
- Open your Excel application.
- Navigate to File and then click Options.
- In Excel Options, click the Trust Center tab.
- In the Trust Center Settings, click ActiveX Settings.
- Under ActiveX Settings, make sure the “Enable all controls without restrictions and without prompting” option is selected.

- If the option is not selected, then select it and click OK.
- Restart the Excel and check if the error is fixed or not.
Method 6: Repair the Excel Workbook
The “Cannot insert object” error can occur if the object you are trying to insert is corrupted or the file in which you are inserting the object is damaged. If the issue has occurred due to a corrupted Excel file, then you can repair the file using the Open and Repair utility in MS Excel. To use this Microsoft-inbuilt utility, follow these steps:
- In the Excel application, go to the File tab and then click Open.
- Click Browse to choose the affected file.
- The Open dialog box is displayed. Click on the corrupted file.
- Click on the arrow next to the Open button and then click Open and Repair.
- Click on Repair.

- After repair, a message will appear (as shown in the below figure).

- Click Close.
If the Open and Repair utility fails to fix the issue, then try a professional Excel Repair software, like Stellar Repair for Excel. It is designed to repair severely corrupted Excel files. It can restore all the Excel file objects, such as tables, charts, formulas, etc. It helps fix all types of corruption related errors. The software is compatible with all versions of Excel.
Conclusion
You might encounter the “Cannot insert object” error when embedding or inserting objects in Excel. In this post, we have discussed the possible solutions to fix this error. We have also mentioned an Excel repair software that can help to easily repair the corrupted Excel file and recover all the data. You can download the Stellar Repair for Excel’s free demo version to preview the recoverable objects of the corrupted Excel file.
How to Repair Corrupt Excel Workbook?
Summary: Corruption in an Excel workbook could lead to data loss. This blog outlines the possible reasons behind corrupted workbook and describes how to repair the workbook manually and using an Excel repair tool.
Is your Excel behaving differently, for instance, stops responding or freezes? Or have you encountered a warning or an error message indicating corruption in the Excel workbook?
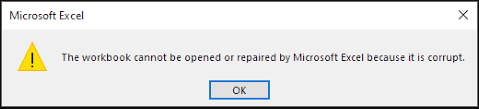
Figure 1 - Corruption Warning in Excel: The corrupt workbook cannot be opened or repaired

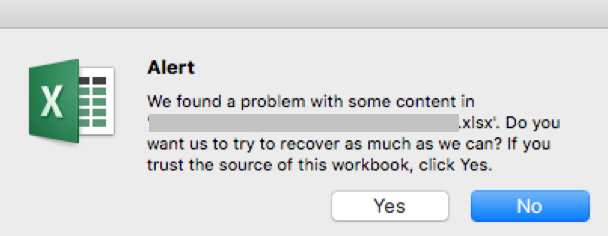
Figure 2 - Excel File Corruption Message
In any of these situations, you won?t be able to open your Excel workbook.
TIP! If you?re unable to open an Excel workbook, it does not necessarily mean that the workbook is corrupt. Try a few workarounds to resolve the issue, like disabling the ?Protected View Settings?, disabling add-ins, or moving the workbook to another drive.
You will need to repair the corrupted Excel workbook to make it usable. Before discussing the repair methods, let?s first look at the possible reasons behind file corruption.
To jump to methods to repair the workbook, click here .
Possible Reasons behind Corrupted Excel Workbook
- Large size of a workbook: A workbook containing lots of information or objects like images, shaded cells, or other visual representations is prone to corruption.
- Unexpected system shutdown or power loss: If you haven?t saved your Excel file, abrupt system shutdown or power failure can corrupt the data and render the file inaccessible.
- Bad sectors on storage media: Accumulation of bad sectors on storage media on which Excel files are saved is another reason that may lead to Excel file corruption.
Other common reasons causing Excel file corruption are virus attack, network errors, etc.
Methods to Repair Corrupted Excel Workbook
Note: Repairing the corrupt workbook may result in data loss. And so, it?s recommended to back up the workbook before attempting to repair the file.
### **Method 1 ? Repair the Excel Workbook Manually**Use the Excel ?Open and Repair? feature to repair your corrupt workbook manually. Here?s how:
Step 1: In Excel, click the File tab and then click Open.
Step 2: Select the corrupt Excel file, click the arrow button next to the Open button and then select Open and Repair.

Figure 3 - Excel Open and Repair Feature
Step 3: In Microsoft Excel dialog box that opens, click Repair to begin repairing your corrupt workbook.

Figure 4 - Repair the Microsoft Excel File
Note: If the Excel repair process fails, repeat Steps 1 till 3 and click the ?Extract Data? button. This will help you extract values and formulas from the corrupted workbook.
Performing these steps will repair your Excel file. If the issue persists, skip to the next method.
Method 2 ? Use Excel File Repair Software
If the above method failed to fix corruption in the workbook, use Excel file repair software to repair your workbook quickly. This Excel repair tool is purpose-built to help users repair large-sized Excel files (.xlsx and .xls) in just a few clicks. Also, it helps recover all the data from the corrupted workbook while preserving the cell formatting and worksheet properties.
Steps to Repair Corrupt Excel File Using the Software
Step 1: Download, install, and open Stellar Repair for Excel software.
Free Download for windows ](https://tools.techidaily.com/stellardata-recovery/repaire-for-excel/ )
Step 2: Click Browse to select your corrupted .xlsx or .xls file. If you are not aware of the file location, click Search to locate and select the file.

Figure 5 - Select Corrupt Excel Workbook
Step 3: Once the file is selected, click Repair.
Step 4: A preview of recoverable workbook data gets displayed.
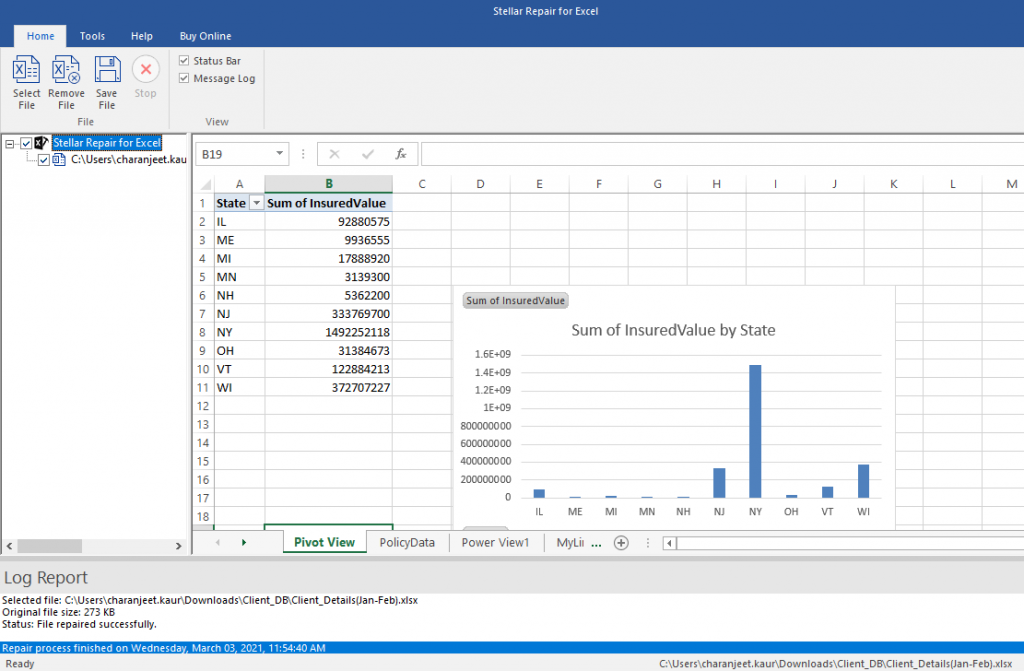
Figure 6 - Preview of Recoverable Excel Workbook Data
Note: You will need to activate the licensed version of Stellar Repair for Excel software for saving the repaired file. Once activated, proceed with the steps below to save the repaired file.
Step 5: Click Save File on the File menu. This will open a Save File dialog box with options to save the repaired .xlsx/.xls file at default or new location. After choosing the appropriate option, click OK.
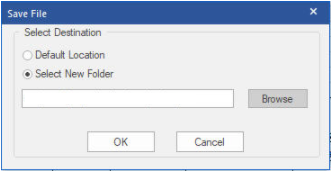
Figure 7 - Save Repaired Excel File
The repaired file will get saved at the selected location.
Key Features of Stellar Repair for Excel Software
- Repairs severely corrupt Excel file and recovers pivots, pivot tables, conditional formatting rules, chart, chart sheets, etc.
- Can repair multiple Excel files in a batch simultaneously
- Can handle all types of Excel file corruption errors, like ?Excel found unreadable content in filename.xls?, ?Excel cannot open the file filename.xlsx?, etc.
- Supports repairing corrupt workbooks of Excel 2019, 2016, 2013, 2007, 2003, and lower versions.
End Note
If your Excel workbook has turned corrupt, try using the methods discussed in this blog to repair the workbook. Once it is repaired, you must follow preventive measures to avoid your Excel file from getting corrupt. Some of these measures are as follows:
Reduce the size of your workbook by:
- Removing unused data
- Saving images at lower resolutions
- Avoid saving pivot table cache
Turn on the ?AutoRecover? and ?AutoSave? features in Excel
[Fix] Excel formula not showing result
Summary: Is your Excel spreadsheet showing text of a formula you’ve entered and not its result? This blog explains the possible reasons behind such an issue. Also, it describes solutions to fix the ‘Excel formula not showing result’ error. You can try Stellar Repair for Excel software to recover engineering and shared formulas.
Sometimes, when you type a formula in a cell of worksheet and press Enter, instead of showing the calculated result, it returns the formula as text. For instance, Excel cell shows:

But you should get the result as:

Why Does Excel Show or Display the Formula Not the Result?
Following are the possible reasons that may lead to the ‘Excel showing formula not result’ issue:
- You accidentally enabled “Show Formulas” in Excel.
- The cell format in a spreadsheet is set to text.
- ‘Automatic calculation’ feature in Excel is set to manual.
- Excel thinks your formula is text (Syntax are not followed).
- You type numbers in a cell with unnecessary formatting.
How to Fix ‘Excel Showing Formula Not Result’ Issue?
Solution 1 – Disable Show Formulas
If only the formula shows in Excel not result, check if you have accidentally or intentionally enabled ‘show formula’ feature of Excel. Instead of applying calculations and then showing results, this feature displays the actual text written by you.
You can use the ‘Show Formulas’ feature to quickly view all formulas, but if you are not aware of this feature, and enabled it accidentally, it can be a headache. To disable this mode, go to ‘Formulas’ and click on ‘Show formula enabled.’ If it’s previously enabled, it will be disabled by just clicking on it.

Solution 2 – Cell Format Set to Text
Another possible reason that only formula shows in Excel not result could be that the cell format is set to text. This means that anything written in any format in that cell will be treated as regular text. If so, change the format to General or any other. To get Excel to recognize the change in the format, you may need to enter cell edit mode by clicking into the formula bar or just press F2.

Solution 3 – Change Calculation Options from ‘Manual’ to ‘Automatic’
There is an “automatic calculation” feature in Excel, which tells Excel to do calculations automatically or manually. If ‘Excel formula is not showing results’, it may be because the automatic calculations feature is set to manual. This issue is not easily detected because it results in calculating formula in one cell but if you copy it to some other cell, it will retain the first calculation and will not recalculate on the base of the new location. To fix this, follow these steps:
- In Excel, click on the ‘File’ tab on the top left corner of the screen.
- In the window that opens, click on ‘Options’ from the left menu bar.
- From ‘Excel Options’ dialog box, select ‘Formulas’ from the left side menu and then change the ‘Calculation options’ to ‘Automatic’ if it’s currently set as ‘Manual’.

- Click on ‘OK’. This will redirect you to your sheet.
Solution 4 – Type Formula in the Right Format
There is a proper way to tell Excel that your text is a formula. If you don’t write the formula in a particular format, Excel considers it as simple text and hence no calculations are performed according to it. For this reason, keep the following in mind when typing a formula:
Equal sign: Every formula in Excel should start with an equal sign (=). If you miss it, Excel will mistake your formula as regular text.
Space before equal sign: You are not supposed to enter any space before equal sign. Maybe a single space will be hard for us to detect, but it breaks the rule of writing formulas for Excel.
Formula wrapped in quotes: You need to make sure that your formula is not wrapped in quotes. People usually make this mistake of writing a formula in quotes, but in Excel, quotes are used to signify text. So your formula won’t be evaluated. But you can add quotes inside formula if required, for example: =SUMIFS(F5:F9,G5:G9,”>30″).
Match all parentheses in a formula: Arguments of Excel functions are entered in parenthesis. In complex cases, you may need to enter more sets of parenthesis. If those parentheses are not paired/closed properly, Excel may not be able to evaluate the entered formula.
Nesting limit: If you are nesting two or more Excel functions into each other, for example using nested IF loop, remember the following rules:
- Excel 2019, 2016, 2013, 2010, and 2007 versions only allow to use up to 64 nested functions.
- Excel 2003 and lower versions only allow up to 7 nested functions.
Solution 5 – Enter Numbers without any Formatting
When you use a number in the formula, make sure you don’t enter any decimal separator or currency sign, e.g. $, etc. In an Excel formula, a comma is used to separate arguments of a function and a dollar sign makes an absolute cell reference. Most of these special characters have built-in functions so avoid using them unnecessarily.
What to Do If the Manual Solutions Don’t Work?
If you’ve tried out the manual solutions mentioned above but still unable to resolve the ‘Excel formula not showing result’ issue, you can try repairing your Excel file with the help of an automated Excel repair software , such as Stellar Repair for Excel.
This reliable and competent software scans and repairs Excel files (.XLSX and .XLS). It also helps recover all the file components, like formulas, cell formatting, etc. Armed with an interactive GUI, this software is extremely easy to work with, and its advanced algorithms allow it to fend off Excel errors with ease.

Conclusion
This blog outlined the possible reasons that may cause ‘Excel not showing formula results’ issue. Check out these reasons and implement the manual fixes, depending on what resulted in the problem in the first place. If none of these fixes help resolve the issue, corruption in the Excel file might be preventing the formulas from showing the actual results. In that case, using Stellar Repair for Excel tool might help.
[Fixed] The Workbook Cannot Be Opened or Repaired By Microsoft Excel
An MS Excel workbook (.XLS/.XLSX) file may not open due to damage or corruption caused by various reasons, such as:
- Sudden power failure
- System crash
- Virus or malware intrusion
- Large or oversized Excel file
- Incompatible add-ins
- Drive errors
- Damaged MS Office/Excel program files
As a result, when you try to open or access a corrupt Excel document, the program displays errors, such as “The workbook cannot be opened or repaired by Microsoft Excel because it is corrupt.” This may lead to a data loss situation.

Methods to Fix ‘The Workbook Cannot Be Opened’ Error
When an Excel workbook gets corrupt, MS Excel automatically detects and starts the file recovery mode to open and repair the file. However, when it fails to repair the corruption or recover the Excel file automatically, it displays the error message, “The workbook cannot be opened or repaired by Microsoft Excel because it is corrupt.” In such a situation, you can follow these methods to repair and recover the Excel document manually.
If the manual methods fail to resolve the error, you can use an Excel repair software, such as Stellar Repair for Excel. The software repairs corrupt XLS/XLSX file, recovers all the data, and saves it in a new Excel document with 100% precision, while keeping the cell formatting and properties intact.
NOTE: Before performing the below methods to repair or recover Excel documents, create a backup copy of the original file. This will help you recover data by using an Excel repair tool and avoid permanent data loss.
1. Repair Excel Workbook Manually
If the automatic repair fails, you may try manual repair to fix the damage or extract the data from the damaged Excel workbook. The steps are as follows:
- Navigate to File > Open and then go to the location where the spreadsheet is located.
- In the Open window, select the corrupted workbook that you want to fix and then click on the arrow next to the Open button.
- From the available options, choose Open and Repair…

- Then click ‘Repair‘ if you want to recover maximum data from the workbook or click ‘Extract data‘ if the repair option fails to fix the issue. It will extract all the values, formulas, tables, etc., from the corrupt workbook.

If both options fail to fix the issue, head to the next method.
2. Remove Faulty or Incompatible Add-ins
Faulty or incompatible add-ins may also cause this error. To find and remove such add-ins, follow these steps:
- Press **Windows key + R.
**
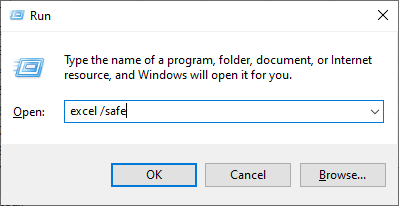
- Type Excel /safe and press ‘Enter‘ or click ‘OK.’ This opens MS Excel in Safe Mode.
- Go to File > Options and then select ‘Add-ins.‘
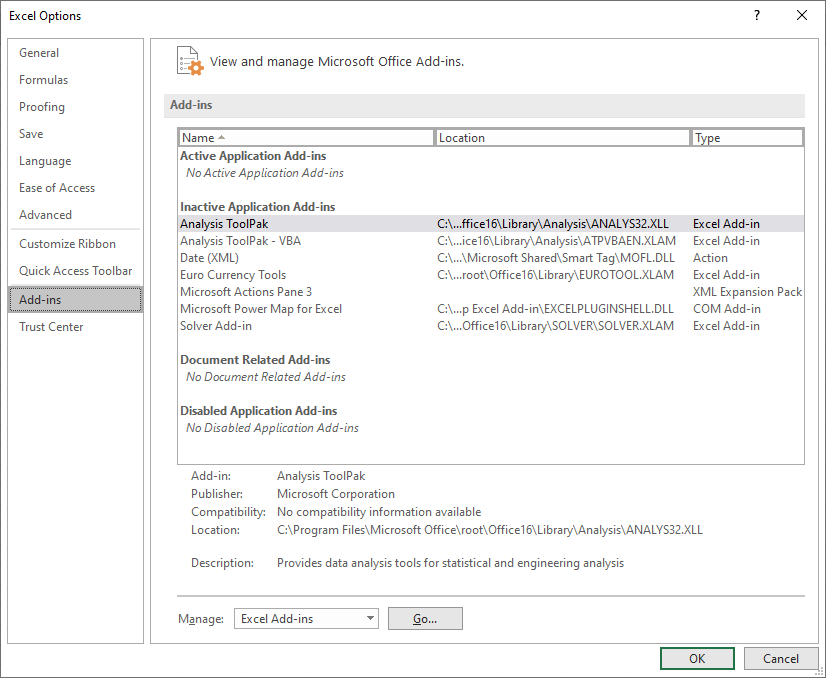
- Choose ‘Excel Add-ins‘ from Manage: option and then click on the Go button to view all Add-ins.
- Uncheck the checkboxes of Add-ins and then click ‘OK‘ to disable them.
Now close the Excel program and run it normally. Click ‘File > Open‘ and choose the Excel file you want to access.
3. Repair MS Office Installation
Damaged Excel program files may also lead to such errors. However, you can easily repair MS Office installation to fix the problem. The steps are as follows:
- Open Control Panel and select ‘Uninstall a program.‘
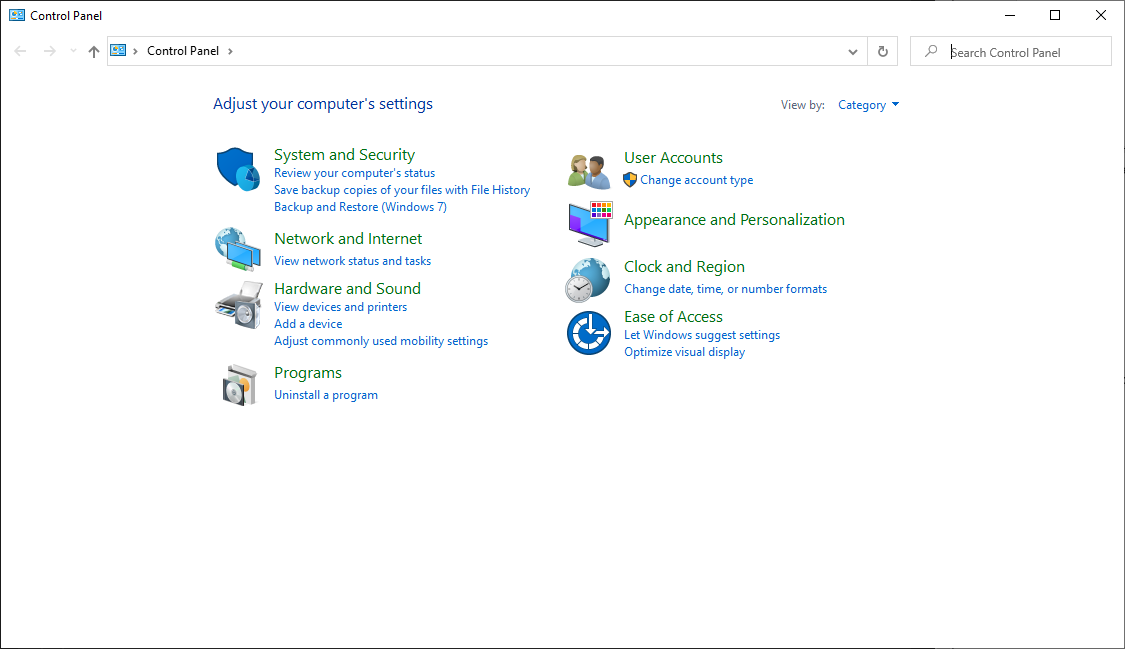
- Search and choose MS Office from the programs list. Then click on the ‘Change’ button.
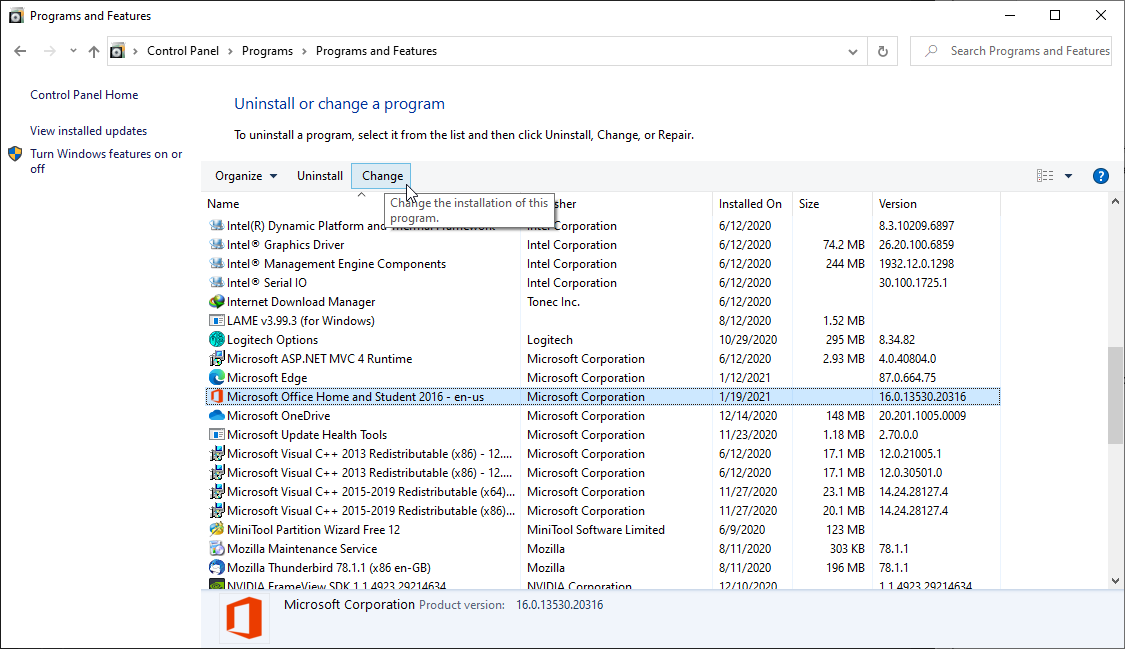
- Select ‘Repair’ and follow the wizard to fix the damaged program files.

If this fails to address the issue, you can uninstall and then fresh install MS Office on your system. Alternatively, try accessing the file on another PC.
4. Use Excel Repair Software
The best option is to use an Excel repair software, such as Stellar Repair for Excel , to repair the file, resolve the error, and access the Excel (XLS/XLSX) worksheet. The software can repair an Excel file without any size limitation.
After recovering the Excel file using the software, you can open it in any MS Excel program without encountering the error message.
Conclusion
A corrupt or damaged Excel workbook may lead to errors, such as “The workbook cannot be opened or repaired by Microsoft Excel because it is corrupt,” and cause a data loss situation. The most efficient way to fix such corrupt Excel files is to repair them by using an Excel repair tool, such as Stellar Repair for Excel.
Unlike manual methods that may fail to resolve the issue or lead to further damage, this software extracts the data from the damaged Excel file and saves it in a new Excel workbook. Thus, it is 100% safe to run on an original Excel file, as it does not overwrite or alter the original file.
The software is free to download. You can scan, repair, and preview a corrupt Excel file by using the demo version. Once you are satisfied with the results, activate the software to save the repaired Excel workbook data in a new sheet.
Recover Excel Files from Virus-Infected Pen Drives for Free
Summary: Imagine you lost your important Excel file on which you had been working since the morning and in the next moment you realized that the file was not saved and you just lost hours of work. Wondering how to deal with this situation? Read this blog to know how Stellar free data recovery software can help you.
From making annual reports to business growth representation figures, excel is a commonly used program for organizing data, creating pivot tables, charts etc. People from all walks of life, know the importance of Excel and the part it plays. Although it is a common file, there is a probability that you may accidentally delete excel files while working or are unable to access it due to unexpected errors. In addition, one of the major issues users face is to recover excel files from a virus infected pen drive.
Pen drives have made it possible to store and carry our important files such as excel, word document, photos, videos, etc. with us day in and day out. They just fit perfectly in our pockets and are compatible with almost every device; hence, they are widely used for transferring data from one system to another. But what if your pen drive is infected by a virus and due to it you end up losing your excel files, how will you recover your excel files for free?
A user reported that his pen drive got virus-infected and to remove the virus from it, he ran an antivirus program which removed the virus but also deleted excel files stored on it.
When your pen drive is infected by a virus, the first thing you ought to do is stop using it, even not for removing virus as an antivirus utility may remove your files as well. Further, if you have a backup, then you can recover your excel files from it, else you can use these free data recovery methods to recover your excel files.
1. Free File Recovery Software Approach
Stellar Windows Data Recovery – Free Edition is an easy to use tool to recover files from a virus-infected pen drive. The software is equipped with powerful utilities to recover lost and deleted files for free. Further, it supports a wide range of file systems and is efficient in recovering files such as Excel, emails, word files, photos, audio and video files.
Using Stellar Windows Data Recovery – Free Edition, you can recover your files from all storage devices for free. Here’s how the software works:
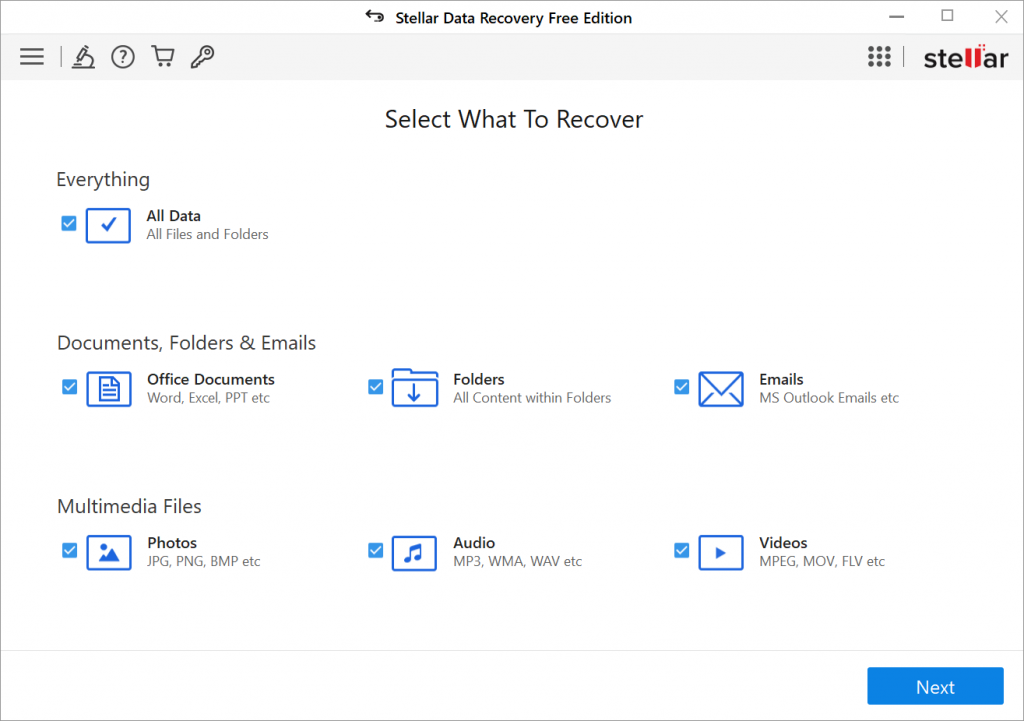
- From the website, download Stellar Windows Data Recovery – Free Edition. Connect your pen drive to your system and launch the software
- On ‘Select What to Recover’ screen, select file types from the given option that you wish to recover. For instance, if you want to recover photos, then under Multimedia Files, select ‘Photos’ and click on ‘Next’
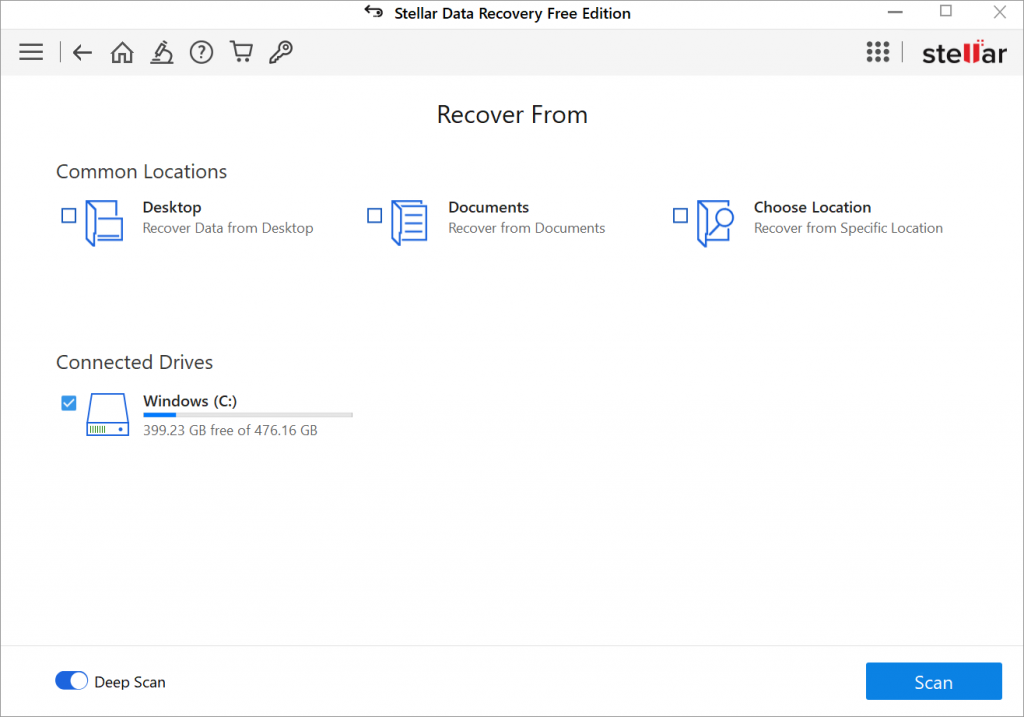
- From ‘Select Location’ screen, select the connected pen drive and click ‘Scan’
- The scanning process starts and once the process is complete, software lists all the recoverable files
- Select the files from the list and click on ‘Recover’ to save the files
2. Restore Excel File from the Previous Version
If excel files are deleted from your pen drive or from your system; then you can recover them from the previous version. This feature works when Windows Backup option is enabled, else, it will not work.
Follow these steps to recover excel files:
- Connect your pen drive to your system, go to This PC and navigate to the folder of excel files
- Select the folder, right-click on it and select ‘Restore previous versions’
- From the available version of excel files, select the required one and click on ‘Restore’
3. Use Command Line to Recover Excel Files
The Command prompt should be your first choice to recover excel files from the virus-infected pen drive. Here’s how command prompt recovers your files:
- Connect your virus-infected pen drive to your system and then in the search box type ‘CMD’ and hit ‘Enter’
- In the command window, type in attrib –h-r-s /s/ drive letter:\*.*”, for example, “attrib -h -r -s /s /d G:\*.*” and hit ‘Enter’
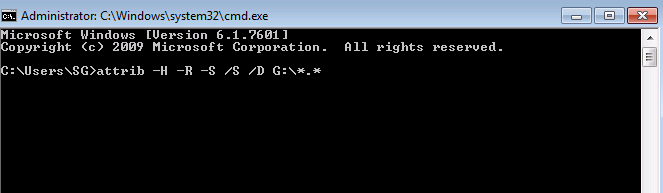
- Windows starts repairing the virus-infected pen drive and once the process is complete, you can access your pen drive and recover excel files.
Even after following the above-mentioned steps you’re unable to recover your excel files, then try a Home approach i.e. a data recovery tool.
To Sum Up
It is always a good idea to create a backup of important files since no one can anticipate what might go wrong. The scenario presented in the blog paints a clear picture of how you can recover your Microsoft excel files for free from a virus-infected pen drive. For quick and better results, you can always go with Stellar Windows Data Recovery – Free Edition.
- Title: Fixed Excel 2010 Found a Problem with One or more Formula | Stellar
- Author: Nova
- Created at : 2024-07-17 17:15:49
- Updated at : 2024-07-18 17:15:49
- Link: https://phone-solutions.techidaily.com/fixed-excel-2010-found-a-problem-with-one-or-more-formula-stellar-by-stellar-guide/
- License: This work is licensed under CC BY-NC-SA 4.0.