
:max_bytes(150000):strip_icc():format(webp)/6-things-to-consider-before-buying-a-gaming-pc-5221042-8a79710a1e4549edbc357125123fb04e.jpg)
Fixed Freeze Panes not Working in Excel 2007 | Stellar
[Fixed]: Freeze Panes not Working in Excel
Summary: This blog discusses the “freeze panes not working” issue in Excel. It mentions the possible reasons behind the issue and offers workarounds and methods to fix it. If the issue is associated with corruption in the Excel file, you can use the specialized Excel repair tool mentioned in the blog to repair the affected file.

The freeze panes feature in Excel is used to freeze the row/column headings to keep them visible while scrolling the worksheet. It is a useful feature when you’re working on a large worksheet containing data that exceeds the rows and columns on the screen. Sometimes, you notice that the ‘Excel freeze panes feature is not working’. There could be numerous factors that can trigger this issue. Let’s know the reasons for the freeze pane not working issue in Excel and how to resolve this issue.
Why can’t I freeze panes in excel?
Several factors may contribute to the Excel freeze panes not working issue in Excel. A few of them are:
- The cell editing mode is enabled in the workbook in which you are trying to use the Freeze Panes feature.
- The Excel file is corrupted.
- The worksheet is protected.
- Advanced Options are disabled in Excel Settings.
- The Excel application is not up-to-date.
- You might be trying to lock rows in the middle of the worksheet.
- Your Excel workbook is not in normal file preview mode.
- Wrong/incorrect positioning of the frozen panes.
How to fix ‘Freeze Panes not Working’ in Excel?
The freeze panes option is available in the View bar. Sometimes, you’re unable to see the View option. It usually occurs if you are using the Excel Started version. Check and try to open the file in the advanced Excel version, which supports all the features. If you are using the advanced Excel version, then try the below workarounds to fix the freeze panes not working issue in Excel.
Workaround 1: Exit the Cell Editing Mode
If your Excel file is switched from normal file view mode to cell editing mode, you can encounter the freeze panes not working issue. In cell editing mode, certain features in Excel, such as the freeze panes, are temporarily disabled to prevent any conflicts. You can disable cell editing mode by pressing the ESC or Enter key. Now locate the View tab and check whether the freeze pane feature is working. If not, then try the next workaround.
Workaround 2: Change the Page Layout View
The Excel freeze panes not working issue can also occur if your workbook is opened in Page Layout view. The Page Layout view doesn’t support freeze panes. If you select page layout, the freeze panes option gets disabled.

To enable the freeze pane option, go to View and click the Page Break Preview tab.

Workaround 3: Check and Remove Options under the Data Tab
Sometimes, you can experience the “freeze panes not working” issue if Sorting, Data Filter, Group, and Subtotal options are enabled in Excel workbook. Such options, when enabled, can lead to unexpected problems with the freeze panes’ functionality. You can check and remove these features from your workbook. To do so, follow these steps:
- Open the Excel file in which you are getting the issue.
- Navigate to the Data tab.
- Check and remove the below features (if enabled):
- Sort
- Filter
- Group
- Subtotal

Workaround 4: Check and Unprotect Worksheet
The freeze panes feature may stop working if your worksheet is protected. You can try to disable the worksheet protection option. Here are the steps:
- In the Excel file, go to the Review tab.
- Click Unprotect Sheet.

After unprotecting the sheet, check whether the “freeze panes not working” issue is resolved. If not, follow the next workaround.
Workaround 5: Use Correct Cell Positioning
The freeze pane is not working issue in Excel can also occur when you use incorrect cell positioning to apply the freeze panes feature. Several users have reported facing this issue when trying to lock multiple rows with the wrong cell selection. So, use correct cell positioning to freeze the rows. For example, if you are trying to lock two rows in an Excel worksheet, then you need to click on 3rd row’s column.

What if the above Workarounds Fail to Fix the Freeze Panes not Working Issue?
If none of the above workarounds works, then there are chances that the workbook is damaged or corrupt. In such a case, you can try the below methods to repair the corrupt Excel workbook.
Run Open and Repair Utility
In case of corruption in the Excel file, you can use the Open and Repair tool in Excel to repair the file. To use this utility, follow these steps:
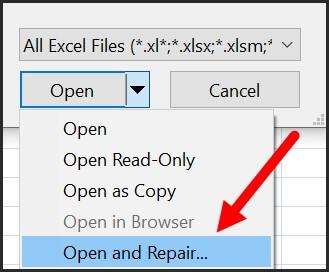
- In the Excel application, navigate to File and then click Open.
- Click Browse to select the workbook in which you are facing the issue.
- The Open dialog box is displayed. Click on the affected file.
- Click the arrow next to the Open option and then click Open and Repair.

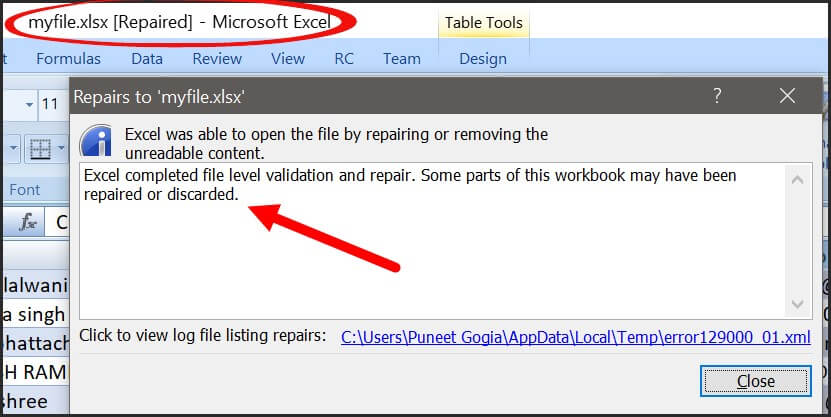
- Click on the Repair option to recover as much data as possible.
- You can see a completion message once the repair process is complete. Click Close.
Use a Professional Excel Repair Tool
If the Open and Repair tool doesn’t work to resolve complex file-related issues and your Excel file is severely corrupted, you can opt for a reliable third-party Excel repair tool, such as Stellar Repair for Excel. This tool can help you repair the Excel file and recover all the data with complete integrity. You can try the software’s demo version to scan the affected file and preview the recoverable data. The software is compatible with all MS Excel versions and Windows operating systems, including Windows 11.
Closure
The “freeze panes not working” issue in Excel can occur due to several reasons, like protected worksheet, incompatible Excel version, and incorrect cell position. Try the workarounds shared in the blog to fix the issue. If the Excel file is corrupt, you can use Stellar Repair for Excel to fix the corruption issues in the file. This tool can quickly repair the Excel file and recover all the data from the file with 100% integrity.
How to Fix the Unable to Record Macro Error in Excel?
Summary: You may encounter the “Unable to record macro” error in MS Excel when using Personal Macro Workbooks. In this post, we’ll discuss the possible causes behind this error and the ways to fix it. We’ll also mention a professional Excel repair tool that can help fix the error if it occurs due to corrupted workbook.
A personal macro workbook (Personal.xlsb file) is a hidden workbook in Excel that stores all macros in a single workbook. This allows you to automate processes while working in Excel. Sometimes, when recording macro codes in the personal macro workbook, you may get the message “Personal Macro Workbook in a startup folder must stay open for recording”. When you click on the OK button, it will show the “unable to record” error. This prevents you from recording the macros. Below, we’ll see the causes behind this error and discuss how to resolve this error.
Causes of Unable to Record Macro Error
You may be unable to record macros in Excel due to several reasons. Let’s take a look at the possible causes that can lead to this issue.
- The location of personal.xlsb file is changed.
- Personal.xlsb file is corrupted.
- Macros are disabled.
Methods to Fix the “Unable to Record Macro” Error in Excel
Here are some possible solutions that can help you resolve the unable to record macro error in Excel.
Method 1: Check the Path of XLStart Folder
You may be unable to record macros if the path of XLStart folder is incorrect. It is a folder where the Personal.xlsb file is stored by default. Follow these steps to find out the path of this folder:
- Open MS Excel. Go to File > Options.
- Click Trust Center > Trust Center Settings.

- In the Trust Center Settings window, click on Trusted Locations.

- Verify the path of the XLSTART folder and modify it if there is an issue.
- Once you are done, click on OK.
Method 2: Change Macro Security
The “Unable to record macro” error can occur if macros are disabled in the Macro Security settings. You can try changing the macro settings using the below steps:
- In MS Excel, go to File > Options > Trust Center.

- Under Trust Center, click on Trust Center Settings.

- Select “Enable all macros” and then click OK.
Method 3: Check Add-ins for Disabled Items
If there are any items in add-ins that are disabled, they may prevent Excel from functioning properly. You can check and enable the items in MS Excel using the below steps:
- Click File > Options.

- In Excel Options, click on the Add-ins option.
- Select Disabled Items from the Manage section and click on Go.

- The Disabled Items window is displayed.
- Click on the disabled item and then click Enable.
- Restart Excel for the changes to take place.
Method 4: Repair your Excel File
You may fail to record macros if there is corruption in the workbook. In such a case, you can use the “Open and Repair” utility in MS Excel to repair the corrupt workbook. To use this tool, follow these steps:
- Open your Excel application.
- Click File > Open.
- Browse to the location where the corrupted file is stored.
- In the Open dialog box, choose the corrupted workbook.

- From the Open dropdown list, click Open and Repair.

Excel will prompt you to repair the file or extract data from it. Click Repair to retrieve maximum data. If the Repair option fails, then click on the Extract Data option to recover the data without formulas and values.
If the Microsoft utility “Open and Repair” fails to repair the corrupted Excel workbook, then try a professional Excel repair tool such as Stellar Repair for Excel. It is an advanced tool that can easily repair severely corrupted Excel (XLSX and XLS) files. It can recover all the file items, including chart sheets, cell comments, tables, macros, formulas, etc. without impacting the properties and cell format of the Excel file.
Closure
You may receive the “unable to record” error in Excel while creating or storing macros in Personal Macro Workbooks. There are several reasons that can lead to this error. You can try the methods covered in this post to resolve the error. If the error appears due to corruption in workbook, then try to repair it using the Open and Repair utility. Alternatively, you can use Stellar Repair for Excel – a professional tool that can help you repair an Excel file with problematic macros. Also, it allows recovery of all the file components with complete integrity. The tool is compatible with Excel 2021, 2019, 2016, and older versions.
How to Fix Excel Formulas Not Working Properly | Step-by-Step Guide
Summary: Excel formulas sometimes fail to function correctly and even return an error. This article explains what you might be doing wrong that prevents Excel formulas from working properly and solutions to resolve the issue. If your formulas have disappeared from the Excel spreadsheet and you are having trouble recovering them, you can use an Excel repair tool to recover the formulas.
When working with Excel formulas, situations may arise when the formula doesn’t calculate or update automatically. Or, you may receive errors by clicking on a formula.
Problems Causing the ‘Excel Formulas not Working Properly’ Issue and Solutions
Let’s check out the possible reasons that cause Excel formulas to work properly and solutions to resolve the issue.
Problem 1 – Switching Automatic to Manual Calculation Mode
Automatic and manual are the two modes of calculation in Microsoft Excel.
By default, Excel is set to automatic calculation mode. Everything is recalculated automatically when any changes are made in a worksheet in this mode. You may switch from automatic to manual mode to disable the recalculation of formulas, particularly when working with a large Excel file with too many formulas.
Excel will not calculate automatically when set to manual calculation mode. And this may make you think that the Excel formula is not working properly.
Solution – Change Calculation Mode from Manual to Automatic
To do so, perform these steps:
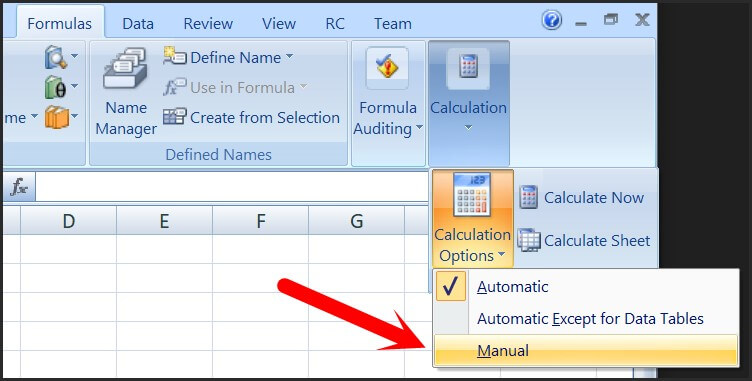
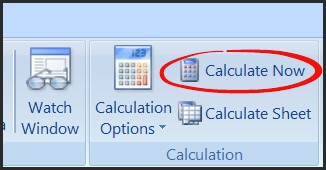
- Click on the column with problematic formulas.
- Go to the Formulas tab, click the Calculation Options drop-down, and select Automatic.

Problem 2 – Missing or Mismatched Parentheses
It’s easy to miss or incorrectly place parentheses or include extra parentheses in a complex formula. If a parenthesis is missing or mismatched and you click Enter after entering a formula, Excel displays a message window suggesting to fix the issue (refer to the screenshot below).

Clicking ‘Yes’ might help fix the issue. But Excel might not fix the parentheses properly, as it tends to add the missing parentheses at the end of a formula which won’t always be the case.
Solution – Check for Visual Cues When Typing or Editing a Formula with Parentheses
When typing a formula or editing one, Excel provides visual cues to determine if there’s an issue with the parentheses inserted in a formula. Checking for these visual cues can help you fix missing/mismatched parentheses.
- Excel helps identify parenthesis pairs by highlighting them in different colors. For instance, the pair of parenthesis outside is black.
- Excel does not make the opening parentheses bold. So, if you’ve inserted the last closing parentheses in a formula, you can determine if your parentheses are mismatched.
- Excel helps identify parentheses pairs by highlighting and formatting them with the same color once you cross over them.
Problem 3 – Formatting Cells in an Excel Formula
When adding a number in an Excel formula, don’t add any decimal separator or special characters like $ or €. You may use a comma to separate a function’s argument in an Excel formula or use a currency sign like $ or € as part of cell references. Formatting the numbers may prevent the formula from functioning correctly.
Solution – Use Format Cells Option for Formatting
Use Format Cells instead of using a comma or currency signs for formatting a number in the formula. For instance, rather than entering a value of $10,000 in your formula, insert 10000, and click the ‘Ctrl+1’ keys together to open the Format Cells dialog box.

Problem 4 – Formatting Numbers as Text
Numbers are displayed as left-aligned in a sheet in a worksheet, and text formatted numbers are right-aligned in cells. Excel considers numbers formatted as text to be text strings. Thus, it leaves those numbers out of calculations. As a result, a formula won’t work as intended. For example, in the following screenshot, you can see that the SUM formula works correctly for normal numbers. But, when the SUM formula is applied to numbers formatted as text, the formula doesn’t return the correct value.

Sometimes, you may also see an apostrophe in the cells or green triangles in the top-left corner of all the cells when numbers in those cells are formatted as Text.
Solution – Do Not Format Numbers as Text
To fix the issue, do the following:
- Select the cells with numbers stored as text, right-click on them, and click Format Cells.
- From the Format Cells window, click on Number and then press OK.

Problem 5 – Double Quotes to Enclose Numbers
Avoid enclosing numbers in a formula in double-quotes, as the numbers are interpreted as a string value.
Meaning if you enter a formula like =IF(A1>B1, “1”), Excel will consider the output one as a string and not a number. So, you won’t be able to use 1’s in calculations.
Solution – Don’t Enclose Numbers in Double Quotes
Remove any double quotes around a number in your formula unless you want that number to be treated as text. For example, you can write the formula mentioned above as “1” =IF(A1>B1, 1).
Problem 6 – Extra Space at Beginning of the Formula
When entering a formula, you may end up adding an extra space before the equal (=) sign. You may also add an apostrophe (‘) in the formula at times. As a result, the calculation won’t be performed and may return an error. This usually happens when you use a formula copied from the web.
Solution – Remove Extra Space from the Formula
The fix to this issue is pretty simple. You need to look for extra space before the equal sign and remove it. Also, ensure there is an additional apostrophe added in the formula.
Other Things to Consider to Fix the ‘Excel Formulas not Working Properly’ Issue
- If your Excel formula is not showing the result as intended, see this blog .
- When you refer to other worksheets with spaces or any non-alphabetical character in their names, enclose the names in ‘single quotation marks’. For example, an external 5reference to cell A2 in a sheet named Data enclose the name in single quotes: ‘Data’!A1.
- You may see the formula instead of the result if you have accidentally clicked the ‘Show Formulas’ option. So, click on the problematic cell, click on the Formula tab, and then click Show Formulas.
- If you’re getting an error “Excel found a problem with one or more formula references in this worksheet”, find solutions to fix the error here .
Conclusion
This blog discussed some problems you might make causing an Excel formula to stop working properly. Read about these common problems and solutions to fix them. If a problem doesn’t apply in your case, move to the next one. If you cannot retrieve formulas in your Excel sheet, using an Excel file repair tool like Stellar Repair for Excel can help you restore all the formulas. It does so by repairing the Excel file (XLS/XLSX) and recovering all the components, including formulas.

Simple ways to Open Corrupt Excel file Without any Backup
Summary: The blog describes simple ways to open corrupt Excel file without any backup. It explains some manual workarounds that you can try to open the file. Also, it mentions about an Excel file repair tool that can quickly fix the corrupt file and recover data from it.
Do you have an Excel file that does not open because of corruption issue? And every time you try to open it, an error message ‘the file is corrupt and cannot be opened’ pops-up?

Excel File Corruption Message
Also, you don’t have a healthy backup of the Excel file to restore the data? If so, you can try repairing the corrupt file by using a few simple yet effective manual workarounds mentioned below.
How to Open a Corrupt Excel File without Backup?
Following are some manual methods that can help you open a corrupt Excel file:
Method 1: Repair Corrupt Excel File
When attempting to open a corrupt file, Excel automatically starts ‘File Recovery’ mode to repair the file. But, if the recovery mode doesn’t start, try Microsoft Excel’s built-in ‘Open and Repair’ feature to manually repair the file.
To use this feature, perform the following steps:
Step 1: Open a Blank workbook in Excel, and then click File > Open.
Step 2: In the Open window, browse and select the corrupt file.
Step 3: Click the arrow that is beside the Open tab, and select Open and Repair.

Open and Repair Option
Step 4: Implement one of the following:
- Click the Repair button. (This is to recover as much data as possible.)
- Click the Extract Data button. (This is to recover values and formulas from the Excel file if the repair process fails to recover the entire data.)

Excel Built-in Repair Options
If using Open and Repair does not work , move to the next method.
Method 2: Disable the Protected View Feature
Some Excel users have reported that turning off the ‘protected view’ feature in Excel helped them open the corrupt file. You can also try to disable this feature and open the file. To do so, follow these steps:
Step 1: Open a blank Excel file, click on File > Options.
Step 2: In the Excel Options window, select Trust Center, and then click Trust Center Settings.

Excel Trust Center Settings
Step 3: Click OK.
Now check if you can open the corrupt file. If not, try implementing the next method.
Method 3: Look For Automatically Recovered Excel File
If you have Excel’s AutoRecover feature enabled, you’ll have access to a copy of the Excel file corrupted or lost due to application crash, power outage, or accidental deletion.
The ‘AutoRecover’ feature saves Excel worksheets at a temporary location after a certain time interval. It saves the worksheets automatically and is turned on by default to reduce the chance of data loss.
Check if you can recover corrupted Excel file by following these steps:
Step 1: In Excel, open a Blank workbook.
Step 2: Go to File and click Options.

Figure 5 – Excel Options
Step 3: In the Excel Options dialog box, click Save, and then copy the ‘AutoRecover file location’.

Excel Options Window
Step 4: Open File Explorer window and paste the copied AutoRecover file location, and press Enter.
Step 5: A list of saved Excel files will be displayed. Choose the file you want to recover.
TIP: Use Excel’s AutoBackup feature to reduce chances of data loss, by saving a previous version of your spreadsheet automatically.
Use an Excel File Repair Software
If the above manual methods fail, repair the corrupt Excel file by using a third-party software, such as Stellar Repair for Excel**.** The software helps repair Excel (XLS and XLSX) files easily and effectively.

Read this: How to repair corrupt Excel file using Stellar Repair for Excel?
Some key features of Excel Repair software are as follows:
- Fixes all errors in the MS Excel file.
- Repairs multiple damaged Excel files in a go.
- Recovers chart, chart sheet, table, cell comment, image, formula, and sort & filter.
- Preserves properties and cell formatting of Excel worksheets.
- Previews recoverable Excel file data before saving.
- Recovers all data components from the corrupt files and saves them in a new blank Excel file.
- Compatible with Excel 2019, 2016, 2013, 2010, 2007, and lower versions.
Conclusion
You can try the workarounds discussed in the blog to open a corrupt Excel file without a backup. Disabling the protected view feature can help you open the file. If the issue persists then try repairing the corrupted Excel file using the Open and Repair utility. Although, it may not be able to fix a severely corrupted workbook. In such a case you can use Stellar Repair for Excel . It is an advanced tool that can help you repair a corrupted Excel file with 100% integrity.
How to Fix a Corrupted .xls File? The Everything Guide
Undoubtedly, Excel is so powerful that it can help you to process, analysis, and store data, in masses.
That’s the reason it has been there for years and helping this world in data.
But…
With all those powers comes some nasty problems which no Excel users like to face. Can you guess what I’m talking about?
Think about a Corrupted Excel File. Nightmare? Isn’t it?
And do you remember that last time when you have opened a workbook and you got a message that this workbook is might corrupt?
The TRUTH is, this is something which you cannot avoid, but, you can prepare yourself in the best way and deal with it like a PRO.
So today, in this post, I’d like to share with you to everything you need to know about a corrupt Excel file (.xls), why it happens, how to fix it like a PRO, and much more.
…let’s get started.

Note: In this post, we’ll be covering the .xls version (which is the extension for the file which is created in Excel 2007 or the earlier versions) and if you want to know about the new version, here’s the quick fix for that.
Why My Excel File Got Corrupted?
There can be one or multiple reasons for an Excel file to get corrupted. Below I have detailed about some of the major of them.
1. Large Excel File
You can store data in a workbook the way you want but sometimes using excessive thing can make an Excel file bigger in size.
And that kind of data files can crash at any point in time. Here are a few things which make the Excel files heavy, like
- Conditional Formatting.
- Colors formatting.
- Using merged cells in place of text alignment.
- Volatile functions: Formulae that iterate every time you open or change a cell value; OFFSET, NOW.
- Using a complete column or row as a reference than the data set range.
- Using complex formulas; VLOOKUP in place of Index/Match, Nested If in place of MAXIFS, MINIFS.
- Calculations or reference across workbooks.
Related: How to Fix Formatting Issues in Excel
2. Abrupt System Shutdown
Shutting down the system without following the procedure can corrupt your data file.
This shut down can be due to a power failure or any other unexpected technical challenges.
So it is always important to follow the procedures and shut down your system properly to avoid data losses.
3. Infected Excel File (Virus Attack)
This is the most common and obvious reason for Excel file corruption.
Although we always keep our system safe using various Antiviruses, still there is always a probability of virus attacks and loss of important files.
It is always advised to use a safe and strong antivirus compatible with your system requirements.
What are the Signs to Know When an Excel File is Corrupted?
In this section, we will discuss what are the signs which you can get when an Excel file is corrupted, let’s dig into it.
1. The File is Corrupt and Cannot Be Opened
This is one of the most common messages you can see when your workbook is corrupted.
But there is also a chance that it is just because of the version compatibility where you have a .xls file but you are using the latest version of Excel check out this detailed post by Priyanka
2. We Found a Problem with some Content in this File…
There’s another error message which you can get while opening a file:
We Found a Problem with some content in Do you want us to recover as much as we can? If you trust the source of this workbook, click yes.

There are a lot of applications out there (I think almost every) which exports the data as a .xls format. Those files have a greater chance of having this kind of error.
3. “Filename.xls” cannot be accessed
There can also be a situation where you get the error:
“Filename.xls” cannot be accessed. The file may be corrupted, located on a server that is not responding.
Well, this message is a bit misleading.
You won’t be able to decide that your file is actually corrupted or just not on the location.
My Excel File Got Corrupted, now What Should I Do?
There are many ways to recover the data from the corrupt excel files. But before you start, it is always advised to create a copy of the corrupted file.
You can save a lot of time with Stellar Repair for Excel, which make data recovery just with few clicks.
But before you go for a data recovery software, let’s try out some manual steps which can help.
When a workbook get corrupted the first thing comes to the mind is to recover data from it…
…and you what there’s a simple option there in the Excel which you can use to do this. Below are the steps you need to follow:
- First of all, open the Excel and click on the office icon.
![]()
After that, go to the “Open” and select the file which is corrupted.
Now, click on the open drop-down and select “Open and Repair”.
- At this point, you have two options:
- Repair File
- Extract Data

Let’s get into both of these options one by one…
1. Repair File
This option helps you to repair the file and the moment you click on it it takes a few seconds afterward and shows you the result with a message box and also provide you a log file.
And once it is done with repairing, you’ll get your file opened and you can save that file as a new copy.
Yes, that’s it.
2. Extract Data
If somehow you aren’t able to get your file repaired, you can also extract data from that file using “Extract Data” option.
Even in this option, you can get data in two ways.

- As Values
- With Formulas
In the first option, Excel simply extracts data as value ignoring all the formulas driving those value (which is the best way if you just need to have that data back ).
But in the second option, Excel tries to recover the formulas as much as possible.
Check out this smart technique by Jyoti which you can use it you aren’t able to recover data from the file.
Preventions to Not to have any Excel File Go Corrupt in Future
Future is fragile, what I’m trying to say is the more you work in Excel and process data there could be a chance that your workbook goes corrupt.
If there’s no security then what an EXCEL POWER user should do?
Well, there are few things which you can do or take care of while working with Excel so that you won’t have to worry about corruption of Excel workbooks.
Let’s see what you can do…
1. Change Recalculation Option
Now here’s the thing when you work with a hell lot of data, there a common thing that you gotta using formulas. Right?
But, the thing these formulas are something which makes your Excel file slows down sometimes make them go corrupt.
There’s one small tweak you can do in your workbook is change the calculation method.
Now with the manual calculation, you just need to whenever you open your file it won’t recalculate all the formulas.
And when you update your data you can simply click on the “Calculate Now” and it will calculate all the formulas again.
Quick Tip: Beware of Volatile Functions and use them with caution as recalculates them every time you change something in the worksheet.
2. Use VBA Codes Instead of Formulas
Now, this is what I do when I need to use complex formulas in a workbook.
Here’s how you can do this: Let’s say you have a formula in the cell A1, like below, which calculates the age.
=“You age is “& DATEDIF(Date-of-Birth,TODAY(),”y”) &” Year(s), “& DATEDIF(Date-of-Birth,TODAY(),”ym”)& “ Month(s) & “& DATEDIF(Date-of-Birth,TODAY(),”md”)& “ Day(s).”
Now, instead of simply entering it into the cell A1 which I would write a macro code which inserts this formula into the cell A1 and then convert it into the a value.
Here’s the code:
Sub CalculateAge()
Range(“B1”).Value = _
“=””Your age is “”” & _
“&DATEDIF(A1,TODAY(),””y””)” & _
“&”” Year(s), “”” & _
“&DATEDIF(A1,TODAY(),””ym””)” & _
“&”” Month(s), and “”” & _
“&DATEDIF(A1,TODAY(),””md””)” & _
“&”” Days(s).”””
Range(“B1”) = Range(“B1”).Value
End Sub

Note: To write these code you need to have basic understading of VBA (make sure check out this guide for this).
3. Use a File Recovery Application
Recently we asked a quick question to our readers on ExcelChamps that if they have ever faced a situation where they got a corruption message in Excel.
You’ll be astonied to hear that 50% percent of the people said “YES” they faced this thing in the past.

Now, this is alarming, if you are heading a team or you have a bunch of people in your company who use Excel…
…there’s a high probability that half of them gonna face this issue. So the best way to deal with this to have an App FIX your Excel file for you.
With STELLAR REPAIR FOR EXCEL, you just need a few clicks, yes that’s right. Let me show you with the below steps:
- First of all, download the app and install it (it’s simple).

- After that, open the app and click on the “Browse” and simply select the file which is corrupted.
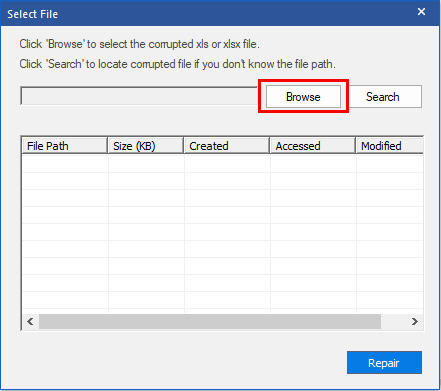
- In the end, click on the REPAIR to let the Excel repair software fix your file (it takes a few seconds).
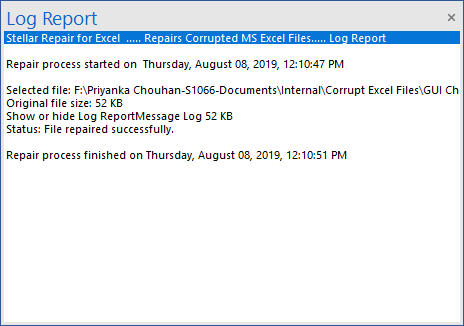
Once you complete repairing your file, you’ll get a message in your on the status bar and after that, you can open your file.
Final Thoughts
If you are a POWER Excel user then there’s a must for you to have known how to deal with a situation where you got a corrupt Excel file.
But I must recommend you to TRY OUT Stellar Repair for Excel so that’s you don’t have to worry about your Excel files anymore.

I’m sure you found this post helpful, and please don’t forget to share this tip with your colleagues, I’m sure they’ll appreciate it.
How to fix Microsoft Excel not responding error and save your data
Summary: This guide helps you resolve Excel not responding and frequent Excel freeze issues in Excel on Windows 10. It mentions some effective solutions to repair Excel and resolve Excel is not responding problem. These solutions will also help you fix Excel crashing problem while working on the spreadsheet.
Similar to any other program, you may experience problems with Microsoft Excel while opening or working on a document. Sometimes, it may not start at all or freeze and display an error message such as ‘Excel is not responding’. When it happens, you may want to wait for the program to respond.

‘Microsoft Excel is not responding’ problem
Tip: If you are experiencing Excel not responding problem with a particular Excel file, it’s quite possible that the file is corrupt or partially damaged. And thus, leading to an Excel freeze or crash problem. Use Stellar Repair for Excel software to quickly repair and restore Excel (.xls/.xlsx) file in its original, intact form. You can download the free trial version of the software from the below link.
But if Excel doesn’t respond after a while and remains stuck, you need to force close the program from “Task Manager”. Now, this could be disastrous if happens while you are working on an important Excel document that took you hours to prepare. Force closing Excel due to such error can damage the Excel document and it may fail to open next time.
Why Excel is Not Responding?
Excel may stop responding, freeze, or crash suddenly due to several reasons. It can happen while saving a spreadsheet or opening an Excel document. It may also occur while editing or inserting images, graphs, etc. But usually, it occurs when the system crashes or shuts down abruptly while you are working on a document. Here’s an instance,
Suppose, you worked overnight on a critical document which is to be presented at a meeting the next day. This Excel spreadsheet includes critical graphs and charts, and much more. When you are about to save it, there is a power failure, and your system shuts down without warning. When the power is up, you restarted the system to check your Excel. To your dismay, a message pops up – “Excel Crashed” or “Microsoft Excel not responding”.
This could be frustrating. However, there is no need to despair as there are solutions to not just overcome this error but other corresponding issues such as Excel freezing, hanging, crashing, etc. Below is an infographic that quickly briefs all the possible solutions to fix Excel not responding error.
Solutions to Fix ‘Microsoft Excel is not responding’ Error
Follow the solutions discussed below in the given order to fix Excel freezing and hanging issues.
Solution 1: Open Excel in Safe Mode
If Excel is not working as intended and frequently stops responding, you may try to start Excel in Safe Mode. It is a common DIY way to fix ‘Excel is not responding’ problem.
In Safe Mode, Excel starts with only essential services, bypasses certain functionalities and doesn’t load the add-ins, which might be the reason behind the error in MS Excel . To open and troubleshoot Excel in Safe Mode:
- Press Windows + R keys, type excel.exe /safe and press ‘Enter’ or click ‘OK’

MS Excel in Safe Mode
Open the Excel file and check if it still crashes. If not, the problem could be a faulty add-in or formatting and styling error.
Proceed to the next solution to check and fix the problem.
Solution 2: Check for Faulty and Unwanted Add-ins
In Microsoft Excel, there are two types of add-ins:
- COM add-ins
- Other Add-ins Installed as XLAM, XLA, or XLL File
Both types of add-ins can cause the freezing problem in Excel . Follow the steps below to disable unwanted and faulty add-ins:
- In Excel , click File and go to Options to open ‘Excel Options’ window
- Click Add-ins button to view and manage ‘Microsoft Office Add-ins’
- Uncheck required add-ins to disable them
- At this stage, you can also click the ‘Remove’ button to remove any unwanted add-ins

Disable COM Add-Ins
- Now enable an add-in and check the Excel performance. Observe Excel for not responding error or freezing problem
If Excel doesn’t freeze, enable subsequent add-in and then again use Excel to observe it. Repeat the steps until you find the faulty plugin, which is causing the problem.
Then remove it from Excel add-ins to resolve the problem.
Solution 3: Install the latest Windows and Office Updates
This problem may also occur if Windows and MS Office are not updated. Therefore, install the latest updates for both Microsoft Windows and Microsoft Office.
You can set the installation and update option to ‘Automatic mode’ in Windows. This will download and install critical updates for MS Office, which might fix the Excel performance issue. The steps to enable automatic updates are as follows:
- Go to Settings> Update & Security> Windows Update

Enable Automatic Windows updates
- Click Advanced options and enable all the toggle switches to automatically download and install updates for Windows and other Microsoft products

Update Microsoft Products
After update, restart Excel and check if the problem is resolved.
NOTE: From now on, MS Excel will also get the latest update consistently, without the need for manual intervention.
Solution 4: Check and Disable Anti-virus
Antivirus is important for device safety. However, if your antivirus conflicts with MS Office apps such as Excel, it could lead to Excel freezing and not responding errors.
To check if the problem is due to anti-virus, disable it and reopen the Excel document. Check if Excel performs well or if it still hangs.

Example of Antivirus conflict with Microsoft Excel
If the problem is resolved, contact your antivirus software provider for help to keep antivirus running without affecting the system and other programs such as MS Excel.
Solution 5: Change the ‘Default Printer’
Although it may seem irrelevant, changing the default printer is another easy and effective solution to overcome the error. Reason being, Excel communicates with the printer to find supported margins when we open an Excel sheet.
If Excel doesn’t find the supported margin, it may stop responding or crash. The steps to change the default printer are as follows:
- Open Control Panel on your Windows system
- Click Printer and Devices
- Right-click Microsoft XPS Document Writer to set it to the default printer

Change in Default Printer Setting
Reopen the Excel document to check whether the error occurs or not.
Solution 6: Repair Microsoft Office
A corrupt or damaged Microsoft Office can also cause the ‘Excel is not responding’ problem. You can resolve this by repairing the Microsoft Office files. The steps are as follows:
- Close all running MS Office programs
- Go to Control Panel on your Windows system
- Click Programs and then Programs and Features
- Select Microsoft Office and in the Microsoft Office window, click ‘Change’
- Then select the ‘Repair’ option and click ‘Continue’

Repair MS Office
This may take a while. After the repair is done, check your Excel program and file for the error.
Solution 7: Remove and Reinstall Microsoft Office
Sometimes, repairing MS Office may not work. In such a case, removing and reinstalling Microsoft Office can resolve the ‘Excel is not responding’ problem. To do so, follow these steps:
- Close all running MS Office programs
- Go to Control Panel on your Windows system
- Click Programs and then Programs and Features
- Right-click on Microsoft Office and choose Uninstall

Uninstall MS Office
Then run the MS Office installation setup to re-install MS Office on your system.
Solution 8: Repair Microsoft Excel (XLS/XLSX) file
In several situations, a corrupt or partially damaged Excel (XLS/XLSX) file is the cause of this error. In such a case, you can download and install Stellar Repair for Excel to repair the corrupt or damaged Excel file. By repairing the Excel file, you can resolve the Excel freezing error quickly without applying much efforts.
The steps to use the software for Excel file repair are as follows:
- Download, install and launch the Excel file repair software
- Browse and select the corrupt Excel file

- Click ‘Repair’ to start repairing the damaged Excel file
- After file repair, it provides a preview. Check your file

- Then click the ‘Save File’ option in the main menu
- You can either choose default location or browse a new folder location to save the repaired Excel file

- After repair, open the file in Excel and continue with your work

And keep Stellar Repair for Excel installed on your system. You never know when you might need this handy tool.
You may also refer to Microsoft support for more details on Excel not responding, hangs, freezes or stops working issues.
Conclusion
Now that the methods for fixing the ‘Excel is not responding’ error are before you, try all these and see which one works for you. If the cause of this error is a damaged or corrupt Excel file, only repairing the XLS/XLSX file can resolve the issue.
For this purpose, it’s recommended to use a reliable software such as Stellar Repair for Excel as it offers an easy-to-use interface, thereby making Excel file repair process a seamless experience.
The software recovers table, chart, chart sheet, cell comment, number, text, shared formulas, image, formula, sort and filter, and other objects. It also preserves worksheet properties, layout, and cell formatting. It can repair multiple XLS/XLSX files simultaneously and fix all Excel file corruption errors.
All these features extend the software capabilities beyond just fixing the ‘Excel not responding’ error.
[Fixed] “Microsoft Excel Cannot Access the File” Error
Summary: The “Microsoft Excel cannot access the file” error usually occurs when there is an issue with the Excel file you are trying to save. This post summarizes the causes behind the error and mentions some effective solutions to fix it. If you suspect the problem is encountered due to corruption in the Excel file, you can use the professional Excel repair tool mentioned in the post to repair the file.
You may experience the “Microsoft Excel cannot access the file” error when saving the Excel file. This happens when the Excel application fails to read the file you are attempting to save. The error message indicates that there is an issue with the file name or its path. Sometimes, the error occurs if the file you are trying to access is already in use by another application. Some other reasons for the “Excel cannot access the file” error are:
- Faulty or incompatible Excel add-ins.
- The file is in Protected View.
- The Excel file is damaged or corrupted.
- You do not have the required permissions to access the file.
- The Excel file is not in a compatible format.
Methods to Fix “Microsoft Excel Cannot Access the File” Error
Sometimes, changing the file location can fix the “Microsoft Excel cannot access the file” error. You can try changing the file location, if the location is incorrect. If moving the file to a different location didn’t work, then try the below troubleshooting methods.
Method 1: Check the File Name and Path
You can get the “Microsoft Excel cannot access file” error if there is an issue with the file path – either the path does not exist or it is too lengthy, thus creating conflicts. Make sure the file path is correct. If the file name is too long, you can rename the file with a short name and also move the file to the parent folder instead of a subfolder. After that, remove the file from the Recent list that is created by Excel based on your recent activity. Follow the below steps:
- Open the Excel application.
- In the Recent list, right-click on the affected Excel file.
- Now, select Remove from list.

- Close the Excel application.
Now, reopen the problematic file and check if the error exists. If yes, then follow the next solution.
Method 2: Try Clearing the Microsoft Office Cache
Sometimes, clearing the Microsoft Office cache can help eliminate the “Excel cannot access the file” error. To clear the Microsoft Office cache, follow the given steps:
- First, close all the Office applications.
- Press Windows+R to open the Run window.
- Type %localappdata%\Microsoft\Office\16.0\OfficeFileCache and press the Enter key. You can change ‘16.0’ with your Office version.

- In the OfficeFileCache window, clear all the temporary files.
Method 3: Check and Update Microsoft Excel
You can try updating your Microsoft Excel application. The latest updates include bug fixes, security patches, and other improvements. Updating the application can help fix several issues that might be causing the error. Here are the steps to update Microsoft Excel:
- Open your Excel application.
- Go to File and then select Account.
- Under Product information, click Update Options and then click Update Now.
Method 4: Disable Protected View
You may get the “Microsoft Excel cannot access the file” error if the Protected View option is enabled. You can try disabling the Protected View settings in Excel. This allows you to open the file without any restrictions. However, disabling the protected view can put your system at high risk. To disable the Protected View in Microsoft Excel, follow the below steps:
- In Excel, go to File and then click Options.
- In the Excel Options window, click Trust Center and then click Trust Center Settings.

- Click Protected View from the left pane in the Trust Center Settings window.
- Unselect the options under Protected View. Click OK.
Method 5: Check and Disable Add-ins
The “Excel cannot access the file” error can also occur due to faulty add-ins in Excel. To check if the error has occurred due to some faulty add-ins, open the application in safe mode (press Windows + R and typeexcel /safe in the Run window**)**. If you can save the file without any hiccups in safe mode, this indicates some problematic add-ins are behind the error. You can remove the Excel add-ins by following these steps:
Open your Excel application and go to File > Options.
In Excel Options, select Trust Center and then click Trust Center Settings.
In Trust Center Settings, click Add-ins and thenselect “Disable all applications Add-ins”. Click OK.

Method 6: Check File Permission
You can get the “Excel cannot access the file” error if you don’t have sufficient permissions to modify the Excel file. You can check and provide the write permissions to fix the issue. Here’s how to do so:
- Open Windows Explorer.
- Find the affected Excel file, right-click on it, and click Properties.

- In the Properties window, click the Securities option and click Edit.

- In the Security window, select the user names under ‘Group or users name’.
- Check the file permissions and make sure the write option is enabled. If not, then grant the permission. Click Apply and then OK.
Method 7: Check External Links
The “Excel cannot access the file” error can also occur due to broken external links in the Excel file. External links are references to the data or content in other files. The link usually breaks if the file has been moved to another location or the file name is changed. You can check and change the source of link.
Method 8: Repair your Excel File
Excel may fail to read the file if it is corrupted or damaged. If the error “Excel cannot access the file” has occurred due to file corruption, then try the Excel’s Open and Repair utility to repair the Excel file. Here are the steps:
- In the Excel application, click the File tab and then select Open.
- Click Browse to select the problematic workbook.
- The Open dialog box will appear. Click on the corrupted file.
- Click the arrow next to the Open button and then select Open and Repair.
- You will see a dialog box with three buttons – Repair, Extract Data, and Cancel.

- Click on the Repair button to recover as much of the data as possible.
- After repair, a message is displayed. Click Close.
If the Open and Repair utility fails to work , it indicates the Excel file is severely corrupted. Use Stellar Repair for Excel to repair severely corrupt Excel file. It helps recover all the components of the corrupted Excel file, such as charts, formulas, etc. without making any changes to the original file. It can also fix all types of corruption-related errors. You can use Stellar Repair for Excel to repair Excel files created in all Excel versions – from 2007 to 2023.
Closure
The “Microsoft Excel cannot access the file” error can occur due to numerous reasons. Follow the troubleshooting methods, such as checking file location, path, permissions, etc., as discussed above to fix this error. Sometimes, Excel throws this error if the file you are trying to save is corrupted. You can try repairing the file using the built-in utility – Open and Repair. If the file is severely corrupted, then you can use Stellar Repair for Excel . It can repair damaged Excel files (.xls, .xlsx, .xltm, .xltx, and .xlsm) with complete integrity.
- Title: Fixed Freeze Panes not Working in Excel 2007 | Stellar
- Author: Nova
- Created at : 2024-03-13 20:13:28
- Updated at : 2024-03-14 16:11:46
- Link: https://phone-solutions.techidaily.com/fixed-freeze-panes-not-working-in-excel-2007-stellar-by-stellar-guide/
- License: This work is licensed under CC BY-NC-SA 4.0.
