
Fixed Microsoft Excel 2003 Cannot Access the File Error | Stellar
[Fixed] “Microsoft Excel Cannot Access the File” Error
Summary: The “Microsoft Excel cannot access the file” error usually occurs when there is an issue with the Excel file you are trying to save. This post summarizes the causes behind the error and mentions some effective solutions to fix it. If you suspect the problem is encountered due to corruption in the Excel file, you can use the professional Excel repair tool mentioned in the post to repair the file.


You may experience the “Microsoft Excel cannot access the file” error when saving the Excel file. This happens when the Excel application fails to read the file you are attempting to save. The error message indicates that there is an issue with the file name or its path. Sometimes, the error occurs if the file you are trying to access is already in use by another application. Some other reasons for the “Excel cannot access the file” error are:
- Faulty or incompatible Excel add-ins.
- The file is in Protected View.
- The Excel file is damaged or corrupted.
- You do not have the required permissions to access the file.
- The Excel file is not in a compatible format.
Methods to Fix “Microsoft Excel Cannot Access the File” Error
Sometimes, changing the file location can fix the “Microsoft Excel cannot access the file” error. You can try changing the file location, if the location is incorrect. If moving the file to a different location didn’t work, then try the below troubleshooting methods.
Method 1: Check the File Name and Path
You can get the “Microsoft Excel cannot access file” error if there is an issue with the file path – either the path does not exist or it is too lengthy, thus creating conflicts. Make sure the file path is correct. If the file name is too long, you can rename the file with a short name and also move the file to the parent folder instead of a subfolder. After that, remove the file from the Recent list that is created by Excel based on your recent activity. Follow the below steps:
- Open the Excel application.
- In the Recent list, right-click on the affected Excel file.
- Now, select Remove from list.

- Close the Excel application.
Now, reopen the problematic file and check if the error exists. If yes, then follow the next solution.
Method 2: Try Clearing the Microsoft Office Cache
Sometimes, clearing the Microsoft Office cache can help eliminate the “Excel cannot access the file” error. To clear the Microsoft Office cache, follow the given steps:
- First, close all the Office applications.
- Press Windows+R to open the Run window.
- Type %localappdata%\Microsoft\Office\16.0\OfficeFileCache and press the Enter key. You can change ‘16.0’ with your Office version.

- In the OfficeFileCache window, clear all the temporary files.
Method 3: Check and Update Microsoft Excel
You can try updating your Microsoft Excel application. The latest updates include bug fixes, security patches, and other improvements. Updating the application can help fix several issues that might be causing the error. Here are the steps to update Microsoft Excel:
- Open your Excel application.
- Go to File and then select Account.
- Under Product information, click Update Options and then click Update Now.
Method 4: Disable Protected View
You may get the “Microsoft Excel cannot access the file” error if the Protected View option is enabled. You can try disabling the Protected View settings in Excel. This allows you to open the file without any restrictions. However, disabling the protected view can put your system at high risk. To disable the Protected View in Microsoft Excel, follow the below steps:
- In Excel, go to File and then click Options.
- In the Excel Options window, click Trust Center and then click Trust Center Settings.

- Click Protected View from the left pane in the Trust Center Settings window.
- Unselect the options under Protected View. Click OK.
Method 5: Check and Disable Add-ins
The “Excel cannot access the file” error can also occur due to faulty add-ins in Excel. To check if the error has occurred due to some faulty add-ins, open the application in safe mode (press Windows + R and typeexcel /safe in the Run window**)**. If you can save the file without any hiccups in safe mode, this indicates some problematic add-ins are behind the error. You can remove the Excel add-ins by following these steps:
Open your Excel application and go to File > Options.
In Excel Options, select Trust Center and then click Trust Center Settings.
In Trust Center Settings, click Add-ins and thenselect “Disable all applications Add-ins”. Click OK.

Method 6: Check File Permission
You can get the “Excel cannot access the file” error if you don’t have sufficient permissions to modify the Excel file. You can check and provide the write permissions to fix the issue. Here’s how to do so:
- Open Windows Explorer.
- Find the affected Excel file, right-click on it, and click Properties.

- In the Properties window, click the Securities option and click Edit.

- In the Security window, select the user names under ‘Group or users name’.
- Check the file permissions and make sure the write option is enabled. If not, then grant the permission. Click Apply and then OK.
Method 7: Check External Links
The “Excel cannot access the file” error can also occur due to broken external links in the Excel file. External links are references to the data or content in other files. The link usually breaks if the file has been moved to another location or the file name is changed. You can check and change the source of link.
Method 8: Repair your Excel File
Excel may fail to read the file if it is corrupted or damaged. If the error “Excel cannot access the file” has occurred due to file corruption, then try the Excel’s Open and Repair utility to repair the Excel file. Here are the steps:
- In the Excel application, click the File tab and then select Open.
- Click Browse to select the problematic workbook.
- The Open dialog box will appear. Click on the corrupted file.
- Click the arrow next to the Open button and then select Open and Repair.
- You will see a dialog box with three buttons – Repair, Extract Data, and Cancel.

- Click on the Repair button to recover as much of the data as possible.
- After repair, a message is displayed. Click Close.
If the Open and Repair utility fails to work , it indicates the Excel file is severely corrupted. Use Stellar Repair for Excel to repair severely corrupt Excel file. It helps recover all the components of the corrupted Excel file, such as charts, formulas, etc. without making any changes to the original file. It can also fix all types of corruption-related errors. You can use Stellar Repair for Excel to repair Excel files created in all Excel versions – from 2007 to 2023.
Closure
The “Microsoft Excel cannot access the file” error can occur due to numerous reasons. Follow the troubleshooting methods, such as checking file location, path, permissions, etc., as discussed above to fix this error. Sometimes, Excel throws this error if the file you are trying to save is corrupted. You can try repairing the file using the built-in utility – Open and Repair. If the file is severely corrupted, then you can use Stellar Repair for Excel . It can repair damaged Excel files (.xls, .xlsx, .xltm, .xltx, and .xlsm) with complete integrity.

Solutions to Repair Corrupt Excel File
Summary: MS Excel can throw various errors due to corrupted Excel files. This blog discusses the error messages that indicate Excel file corruption and the methods to prevent data loss due to a corrupt file. It also discusses the reasons behind the corruption in Excel file and their solutions. It also mentions a “Stellar repair for Excel” tool that can help to repair the corrupt or damaged Excel file.

Is your Excel file corrupted? And you don’t have backup of your data? There is no need to worry. There are some simple solutions to repair Excel file 2019. But before heading towards the solutions, let’s discuss the possible reasons for Excel file corruption and how you can prevent losing your data.
Error Messages that Indicate Excel File Corruption
When an Excel file gets corrupted, different error messages appear. For example:
- “Excel found unreadable content in
. Do you want to recover the content of this workbook, click Yes.” - “Can’t find project and library.”
- “The workbook cannot be opened or repaired by Microsoft Excel because it is corrupted.”
- “Microsoft Excel has stopped working.”
Reasons Behind Excel File Corruption
The reasons for corruption in Excel file could be any of the following:
- Improper system shutdown
- Computer virus/malware attack/Hacker attack
- Outdated anti-virus definition
- Hardware failure
- Unintentional deletion of files
- Large Excel files
- Bad sectors on storage media
How to Avoid Data Loss Due to Excel File Corruption?
Excel users should follow the below precautionary measures to prevent data loss due to Excel file corruption:
1. Create an Automatic Backup Copy
When you create an Excel spreadsheet, it is advised to Save As your document, as follows:
- In Save As window, click Tools next to Save option.
- Select General Options from the drop-down menu.
- Then check the dialogue box Always create back up and click OK.

This will always create a backup of your Excel. If it’s deleted or corrupted at any time, it can be recovered.
2. Create Recovery File at Different Time Periods
Steps are as follows:
- Go to File and then click Excel Options.
- Click Save and then select the Save Auto Recover information every checkbox
- Add the required minutes and location. Ensure that Disable AutoRecover for this workbook only box is unchecked.

Methods to Repair Corrupted Excel 2019 File
Try using these 5 methods to restore your Excel file and recover data:
Method 1: ‘Open and Repair’ Excel Files
Excel automatically opens the corrupted file in Recovery Mode. If not, you can repair Excel file manually through the following steps:
- Click on the File and select Open.

- Go to the location where the corrupt workbook is stored. In the Open window, select the corrupt file.
- Click Open and then select Open and Repair.
- In the window that opens, click Repair.
If the Repair option doesn’t work, you can select Extract Data and try to extract the values and formulae safely from the corrupt file.
Method 2: Recover Data from Open Workbook
If you face issues while working in an Excel file, you can choose to return to the last saved version of the Excel file. For this:
- Click File. Then select Open.
- Double click on the name of the workbook (the one that is open in your Excel).
- Click Yes to reopen it.

- The workbook will now appear.
Please note that it will show the last saved version and changes made after that won’t be recovered.
Method 3: Set Calculation Option as Manual
You can also recover data from Excel workbooks that you’re unable to open. For this, you need to configure the calculation option as manual in Excel. You can do this through the following steps:
- Click on File. Select New and open a Blank workbook.
- From File, select Excel Options.

- From the Formulas category, under the section Calculation options, select Manual. Now click OK.

- Then click File, and select Open to open the corrupted or damaged Excel file.
Method 4: Recover Content by Using External Links
You can also recover specifically the content (leaving formulas/calculated values) from the workbook by using external references (to link Excel workbook). For this:
- Click on File, Select Open.
- Navigate to the folder that contains the corrupted workbook.
- Now, right-click on the file name of the corrupted workbook and click Copy.
- Click File button. Then, select New and create another blank workbook.
- In the first cell (A1), type =!A1 and press Enter.
- Select the corrupted workbook in the Update Values dialogue (if it appears). Then click OK.
- Select the relevant sheet in the Select Sheet dialogue (if it appears). Then click OK.

- Again, select the cell A1, go to Home and select Copy.
- Now select (start from the cell A1) an area equal to that of the data in the original workbook.
- Go to Home now and select Paste.
- Again, go to Home, and Copy the data (the same selection of cells).
- Go to Home, and then click on the arrow below Paste. Then click on Values.
By pasting values, you removed the links to the corrupted workbook and only the data is left behind.
Method 5: Excel Repair Software
If the above-mentioned methods do not help in repairing the corrupt Excel file, try an Excel repair software.
One of the most commonly used Excel repair tools is Stellar Repair for Excel. Its trial version is available for free download, which lets you scan and preview the repaired Excel files. Once you’ve ascertained the effectiveness of the software, you can save the file after activating the software.
Here’s the complete repairing process of the corrupt Excel file
Conclusion
This post shared the reasons behind Excel file corruption and precautionary measures to prevent data loss. It also outlined different methods to repair corrupt Excel file 2019. There are several in-built utilities in Microsoft Excel to repair corrupt workbooks and recover data from it. In case these methods didn’t work, you can use Stellar Repair for Excel – an easy-to-use DIY tool that can fix all Excel corruption errors and restore data with all original properties.
[Fixed] “Microsoft Excel Cannot Access the File” Error
Summary: The “Microsoft Excel cannot access the file” error usually occurs when there is an issue with the Excel file you are trying to save. This post summarizes the causes behind the error and mentions some effective solutions to fix it. If you suspect the problem is encountered due to corruption in the Excel file, you can use the professional Excel repair tool mentioned in the post to repair the file.
You may experience the “Microsoft Excel cannot access the file” error when saving the Excel file. This happens when the Excel application fails to read the file you are attempting to save. The error message indicates that there is an issue with the file name or its path. Sometimes, the error occurs if the file you are trying to access is already in use by another application. Some other reasons for the “Excel cannot access the file” error are:
- Faulty or incompatible Excel add-ins.
- The file is in Protected View.
- The Excel file is damaged or corrupted.
- You do not have the required permissions to access the file.
- The Excel file is not in a compatible format.
Methods to Fix “Microsoft Excel Cannot Access the File” Error
Sometimes, changing the file location can fix the “Microsoft Excel cannot access the file” error. You can try changing the file location, if the location is incorrect. If moving the file to a different location didn’t work, then try the below troubleshooting methods.

Method 1: Check the File Name and Path
You can get the “Microsoft Excel cannot access file” error if there is an issue with the file path – either the path does not exist or it is too lengthy, thus creating conflicts. Make sure the file path is correct. If the file name is too long, you can rename the file with a short name and also move the file to the parent folder instead of a subfolder. After that, remove the file from the Recent list that is created by Excel based on your recent activity. Follow the below steps:
- Open the Excel application.
- In the Recent list, right-click on the affected Excel file.
- Now, select Remove from list.

- Close the Excel application.
Now, reopen the problematic file and check if the error exists. If yes, then follow the next solution.
Method 2: Try Clearing the Microsoft Office Cache
Sometimes, clearing the Microsoft Office cache can help eliminate the “Excel cannot access the file” error. To clear the Microsoft Office cache, follow the given steps:
- First, close all the Office applications.
- Press Windows+R to open the Run window.
- Type %localappdata%\Microsoft\Office\16.0\OfficeFileCache and press the Enter key. You can change ‘16.0’ with your Office version.
- In the OfficeFileCache window, clear all the temporary files.
Method 3: Check and Update Microsoft Excel
You can try updating your Microsoft Excel application. The latest updates include bug fixes, security patches, and other improvements. Updating the application can help fix several issues that might be causing the error. Here are the steps to update Microsoft Excel:
- Open your Excel application.
- Go to File and then select Account.
- Under Product information, click Update Options and then click Update Now.
Method 4: Disable Protected View
You may get the “Microsoft Excel cannot access the file” error if the Protected View option is enabled. You can try disabling the Protected View settings in Excel. This allows you to open the file without any restrictions. However, disabling the protected view can put your system at high risk. To disable the Protected View in Microsoft Excel, follow the below steps:
- In Excel, go to File and then click Options.
- In the Excel Options window, click Trust Center and then click Trust Center Settings.
- Click Protected View from the left pane in the Trust Center Settings window.
- Unselect the options under Protected View. Click OK.
Method 5: Check and Disable Add-ins
The “Excel cannot access the file” error can also occur due to faulty add-ins in Excel. To check if the error has occurred due to some faulty add-ins, open the application in safe mode (press Windows + R and typeexcel /safe in the Run window**)**. If you can save the file without any hiccups in safe mode, this indicates some problematic add-ins are behind the error. You can remove the Excel add-ins by following these steps:
Open your Excel application and go to File > Options.
In Excel Options, select Trust Center and then click Trust Center Settings.
In Trust Center Settings, click Add-ins and thenselect “Disable all applications Add-ins”. Click OK.
Method 6: Check File Permission
You can get the “Excel cannot access the file” error if you don’t have sufficient permissions to modify the Excel file. You can check and provide the write permissions to fix the issue. Here’s how to do so:
- Open Windows Explorer.
- Find the affected Excel file, right-click on it, and click Properties.
- In the Properties window, click the Securities option and click Edit.
- In the Security window, select the user names under ‘Group or users name’.
- Check the file permissions and make sure the write option is enabled. If not, then grant the permission. Click Apply and then OK.
Method 7: Check External Links
The “Excel cannot access the file” error can also occur due to broken external links in the Excel file. External links are references to the data or content in other files. The link usually breaks if the file has been moved to another location or the file name is changed. You can check and change the source of link.
Method 8: Repair your Excel File
Excel may fail to read the file if it is corrupted or damaged. If the error “Excel cannot access the file” has occurred due to file corruption, then try the Excel’s Open and Repair utility to repair the Excel file. Here are the steps:
- In the Excel application, click the File tab and then select Open.
- Click Browse to select the problematic workbook.
- The Open dialog box will appear. Click on the corrupted file.
- Click the arrow next to the Open button and then select Open and Repair.
- You will see a dialog box with three buttons – Repair, Extract Data, and Cancel.
- Click on the Repair button to recover as much of the data as possible.
- After repair, a message is displayed. Click Close.
If the Open and Repair utility fails to work , it indicates the Excel file is severely corrupted. Use Stellar Repair for Excel to repair severely corrupt Excel file. It helps recover all the components of the corrupted Excel file, such as charts, formulas, etc. without making any changes to the original file. It can also fix all types of corruption-related errors. You can use Stellar Repair for Excel to repair Excel files created in all Excel versions – from 2007 to 2023.
Closure
The “Microsoft Excel cannot access the file” error can occur due to numerous reasons. Follow the troubleshooting methods, such as checking file location, path, permissions, etc., as discussed above to fix this error. Sometimes, Excel throws this error if the file you are trying to save is corrupted. You can try repairing the file using the built-in utility – Open and Repair. If the file is severely corrupted, then you can use Stellar Repair for Excel . It can repair damaged Excel files (.xls, .xlsx, .xltm, .xltx, and .xlsm) with complete integrity.
Top 5 Ways to Fix Excel File Not Opening Error
Summary: MS Excel users sometimes face issues while using the MS Excel application. One such issue is the Excel file not opening error. In this post, we’ve mentioned the reasons that may result in this error and the ways to resolve it. Also, you’ll find about an Excel repair software that can help you repair corrupt Excel files.
Several Microsoft Excel users have reported encountering the ‘Excel file not opening’ error when opening their Excel file. There are several reasons that may cause this error. In this post, we’ll be discussing the reasons that may lead to the ‘Excel file not opening’ error and the top 5 ways to fix this error.
Why Does the ‘Excel File Not Opening’ Error Appear?
Following are some possible causes that may result in the ‘Excel file not opening’ error:
- There may be a problem with an add-in that is preventing you from opening the Excel files.
- There’s a chance that your Excel application is faulty.
- Your Excel program is unable to communicate with other programs or the operating system.
- The file association might have been broken. This is a common problem faced by users who have upgraded their Excel application or operating system.
- The file you’re trying to open is corrupted.
5 Ways to Fix Excel File Not Opening Error
Let’s explore the ways to resolve the Excel file not opening error:
1. Uncheck the Ignore DDE Checkbox
Dynamic Data Exchange (DDE)allows Excel to communicate with other programs. The Excel error may occur due to incorrect DDE settings. You need to ensure that the correct DDE configuration is enabled. Follow the steps provided below:
- Launch your MS Excel file.
- Go to File > Options.

- Now click on Advanced.

- Further, find the General option on the screen.

- Uncheck the option **‘Ignore other applications that use Dynamic Data Exchange (DDE)**’.
- Click OK to save the changes.
2. Reset Excel File Associations
When you launch your Excel file, the file association ensures that the Excel application is used to open the file. You can try to reset these associations and see if Excel opens after this. Proceed with the following steps to do so:
- Navigate to Start Menu and launch Control Panel.
- Now, navigate to Programs > Default Programs > Set Your Default Programs.

- A new window will open. Herein, find the Excel program in the list and select it. Now, select the option ‘Choose defaults for this program’. Click OK.

- A new window for ‘Set Program Associations’ will open.
- Check the box against the ‘Select All’ option.
- Further, click Save to reset the Excel File Associations settings.

3. Disable Add-Ins
Many people install third-party add-ins to enhance the application’s functionality. Sometimes, these add-ins can create an issue. Follow the below-mentioned steps to disable the problem creating add-ins:
- Launch MS Excel application.
- Navigate to File > Options > Add-ins.

- In the window that opens, go to the Manage option at the bottom.
- Herein, select the COM Add-ins option from the dropdown list. Click Go.


- In the COM Add-ins window, uncheck all the boxes to disable the add-ins. Click OK.

4. Repair MS Office Program
Sometimes the issue is not with your Excel file. Instead, the reason for the error can be a corrupt MS Office application. You can repair the program to fix the Excel file not opening error. Here are the steps:
- Press the Windows + R keys to launch the ‘Run’ dialog box.

- Enter the text ‘appwiz.cpl’ to launch the program and features window.
- Find the MS Office program in the list of applications.

- Right-click on it and select Change.

- In the new window, select the Quick Repair radio button. Click Repair.

- Follow the on-screen instructions to repair the Office application. Once the repair process is completed, you can try opening the Excel file to see if the problem is resolved.
5. Disable Hardware Graphics Acceleration
The hardware graphics acceleration assists in the system’s better performance, especially when you use MS Office applications, like MS Excel or Word. Sometimes, this causes the Excel file not opening issue. You can disable this option to try to resolve the issue. Here are the steps:
- Launch your MS Excel application.
- Navigate to File > Options > Advanced.
- Herein, go to the Display option.
- Uncheck the Disable hardware graphics acceleration checkbox. Click OK.
What If These Solutions Do Not Work?
If you have applied all the methods mentioned above and still cannot open your Excel file, there are chances that your file is corrupted. You can use a specialized Excel repair tool , such as Stellar Repair for Excel to repair the corrupted Excel file. This software has powerful algorithms that can scan and repair even severely corrupt Excel files, without any file size limitation. After repairing the file, it restores all the data, including tables, charts, rules, etc. to a new Excel, with 100% integrity.
To know how the software works, see the video below:


Conclusion
Before you proceed with resolving the Excel file not opening error, try to find out the root cause of this error. If you know the real reason, you can try the method right away. If the reason for the error is corruption in the Excel file, the best option is to repair the file using a professional Excel repair tool, such as Stellar Repair for Excel .
Quick Fixes to Repair Microsoft Excel 2013/2016 Content related error
Summary: The blog outlines some quick tips to fix ‘We found a problem with some content’ error in Microsoft Excel 2013/2016. It explains manual procedure to resolve the error and also suggests an automated tool to perform the repair process to retrieve all possible data from a corrupt workbook.
Sometimes, when opening an MS Excel file, you may receive an error message that reads:
“**We found a problem with some content in ‘filename.xlsx’. Do you want us to try to recover as much as we can? If you trust the source of this workbook, click Yes.**“

Figure 1 – Excel ‘found a problem with some content’ Error Message
What Causes ‘We Found a Problem with Some Content’ Error?
There is no clear answer as to what results in the Excel error – ‘**We found a problem with some content in <filename.xlsx>**’. However, based on some user experiences, it appears that the error occurs due to corruption in an Excel workbook. It may turn corrupt when:
- You try opening the Excel file saved on a network-shared drive.
- A string is added in a cell in Excel, instead of a numeric value.
- Text values in formulas exceed 255 characters.
How to Resolve ‘We Found a Problem with Some Content’ Error?
Follow these tips to fix the Excel error:
IMPORTANT! Before you follow the tips to resolve the Excel error, keep these points in mind: Make sure you have closed all of the opened Excel workbooks. Try restoring Excel file data from the most recent backup copy. If you don’t have a backup copy, make a copy of the corrupt Excel file and perform repair and recovery procedures on that backup copy.
Tip #1: Repair Corrupt Excel File
File Recovery mode is a native Excel recovery utility that automatically opens whenever any inconsistencies are found in the worksheet. If Microsoft doesn’t detect any issue or fails to open the File Recovery mode, you can start it manually to recover the corrupt Excel file. To do so, follow the steps below:
- Click on the File menu, and then select Open.
- In the Open dialog box, navigate to the folder location where the corrupt Excel file is saved.
- Select the corrupt file, and then click on arrow sign available next to Open button to select Open and Repair option.

Figure 2 – Open and Repair Feature in Excel
- Next, click Repair to recover maximum possible data.
- If the repair is not able to recover the data from the workbook, select Extract Data to extract all possible formulas and values from the workbook.
If repairing the corrupt Excel file doesn’t work, you can try an Excel file repair tool to fix corruption errors. You can also try to recover data from the corrupt file manually by following the next tips.
Read this: What to do when Open and Repair doesn’t work?
Tip #2: Set Calculation Option to Manual
To make the file accessible, try setting the calculation option in Excel from automatic to manual. As a result, the workbook will not be recalculated and may open in Excel. For this, perform the following:
- Click File, and then click New.
- Under New, click the Blank workbook option.
- When a blank workbook opens, click File > Options.
- Under the Formulas category, pick Manual in the Calculation options section, and then click OK.

Figure 3 – Select Manual in Calculation options
- Now, again click on the File menu and then click Open.
- Navigate to the corrupt workbook, and double-click it.
When the workbook opens, check if it contains all the data. If not, proceed to the next tip.
Tip #3: Copy Excel Workbook Contents to a New Workbook
Several users have reported that they were able to fix ‘We found a problem with some content in
- Open the Excel workbook in ‘read-only’ mode, and copy all its contents.
- Create a blank new workbook and paste the copied contents from the corrupt file to the new file.
Tip #4: Use External References to Link to the Damaged Workbook
Use external references to link to the corrupted workbook. By implementing this fix, data contents can be retrieved. However, it is not feasible to recover formulas or calculated values using this solution.
Follow the steps below:
- In Excel 2013/2016, click File > Open.
- Navigate to the folder where the corrupt file is saved.
- Right click the file, select Copy, and then click on Cancel.
- Again, click on File and then New.
- Under New option, click on Blank workbook.
- In the cell A1 of new workbook, type =File Name!A1 (where File Name indicates the name of the damaged workbook being copied in Step 3).
- If Update Values dialog box appears, click the corrupt workbook, and choose OK.
- If Select Sheet dialog box appears, click the appropriate sheet, and then click OK.
- Select cell A1.
- Next, click Home, and then click Copy (or, press Ctrl +C).
- Starting in cell A1, select area approximately the same size as that of the cell range that contains data in the damaged workbook.
- Next, click Home and select Paste (or click Ctrl + V).
- Keep the range of cells selected, click Home and then Copy.
- Finally, click on Home, click on the arrow associated with Paste and under Paste Values click on Values.
This will remove the link to the corrupt workbook and will retrieve data. But, keep in mind, the recovered data will no longer contain formulas or calculated values.
Alternative Solution – Stellar Repair for Excel
If the above manual methods fail to fix the ‘We found a problem with some content in Excel error’, try using the Stellar Repair for Excel software to resolve this error. The software helps repair and recover corrupt Excel files in just a few clicks. It can be used on a Windows 10/8/7/Vista/XP/NT machine to repair a corrupted workbook and recover every single bit of data from all the versions of the Excel workbook.

Read this: How to repair corrupt Excel file using Stellar Repair for Excel?
Conclusion
In this blog, we discussed some possible reasons behind Microsoft Excel 2013/2016 ‘We found a problem with some content’ error. The error may occur when an Excel file becomes corrupt. You may try repairing the corrupted Excel file manually by using the built-in ‘Open and Repair’ feature. Or, try the manual workarounds to extract data from the corrupt file discussed in this post. If the manual solutions don’t work for you, using Stellar Repair for Excel can come in handy in repairing the corrupt Excel (.xls/.xlsx) file and recovering the complete file data.
How to repair corrupt Excel file
Stellar Repair for Excel is an excellent tool to repair corrupt or damaged MS Excel files. Mentioned below are the steps to perform Excel repair with this tool:
- Download & Run the Stellar Repair for Excel.

- A dialog box appears on your screen, click ‘OK’ to proceed.
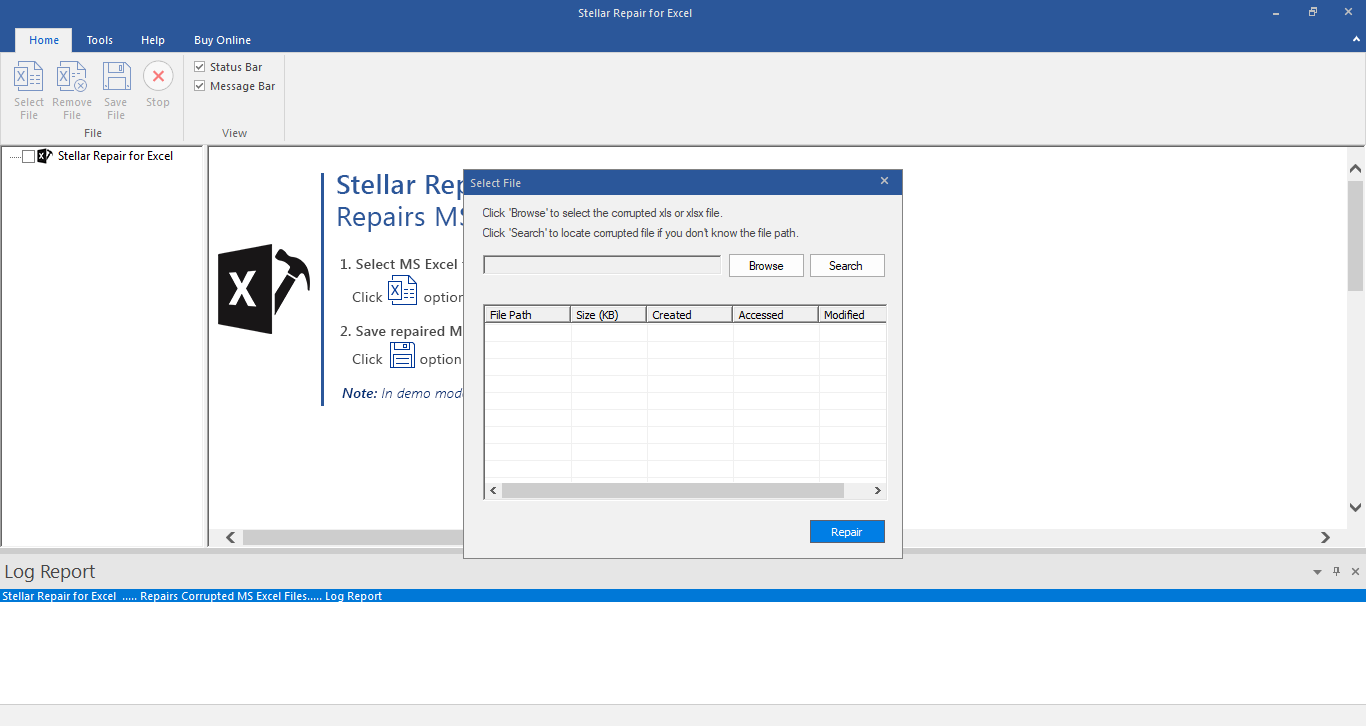
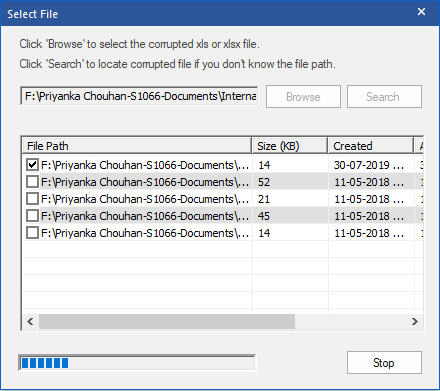
- To select your corrupt .XLS or .XLSX file, click ‘Browse’ button. However, if you do not know the location of your .XLS or .XLSX file, the software provides you the option ‘Search’ to search for your corrupt Excel files.

- Select the checkboxes against the files that you want to repair and click ‘Repair’. This starts the scanning process.
Parental Control Software
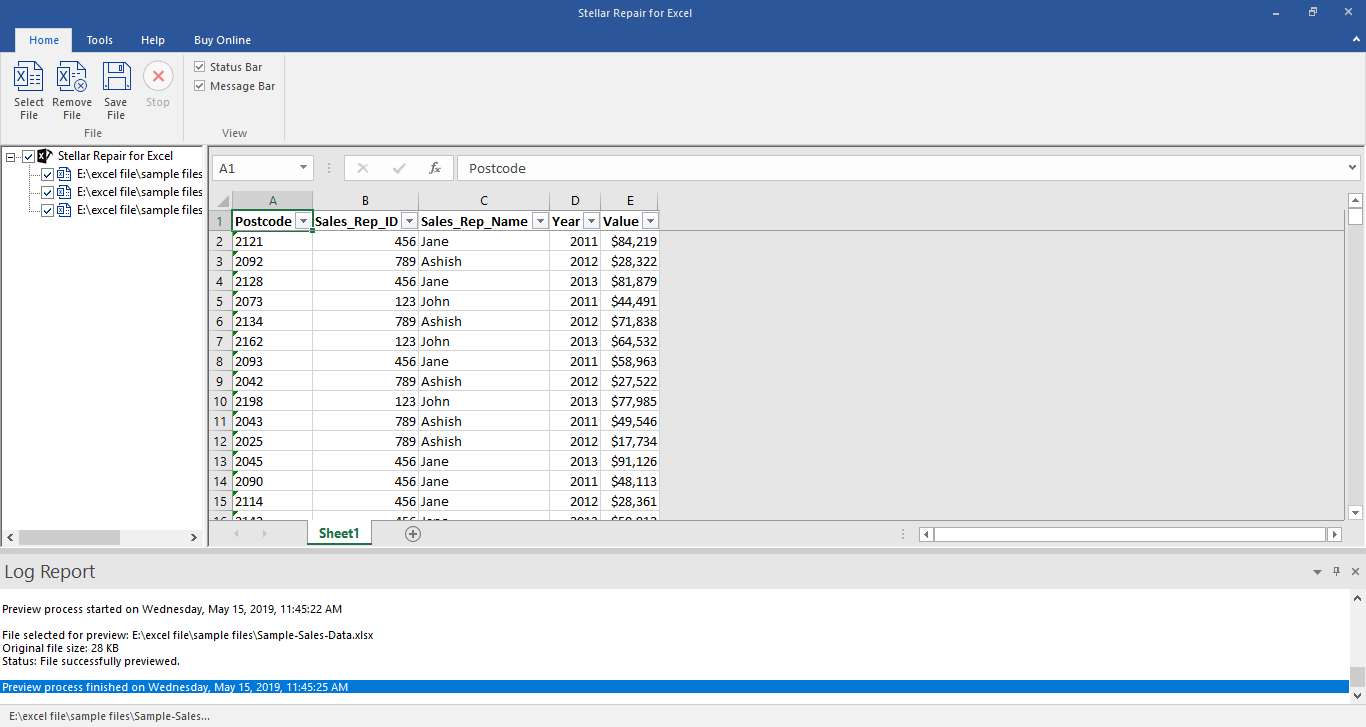
- The list of all the files that the software has scanned is displayed in the tree-view in the left pane. Click on a file from this tree-view to see its preview in the middle pane. From this list, you can select the file that you want to recover.
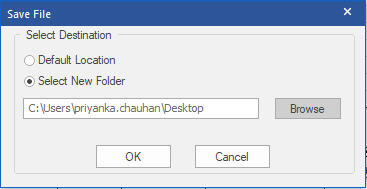
- You can either select the ‘Default location of file’ or ‘Select New Folder’ in the ‘Save Document’ dialog box to save the repaired files.
Stellar Repair for Excel Stellar Repair for Excel is the best choice for repairing corrupt or damaged Excel (.XLS/.XLSX) files. This Excel recovery software restores everything from corrupt file to a new blank Excel file.
How to Fix the Unable to Record Macro Error in Excel?
Summary: You may encounter the “Unable to record macro” error in MS Excel when using Personal Macro Workbooks. In this post, we’ll discuss the possible causes behind this error and the ways to fix it. We’ll also mention a professional Excel repair tool that can help fix the error if it occurs due to corrupted workbook.
A personal macro workbook (Personal.xlsb file) is a hidden workbook in Excel that stores all macros in a single workbook. This allows you to automate processes while working in Excel. Sometimes, when recording macro codes in the personal macro workbook, you may get the message “Personal Macro Workbook in a startup folder must stay open for recording”. When you click on the OK button, it will show the “unable to record” error. This prevents you from recording the macros. Below, we’ll see the causes behind this error and discuss how to resolve this error.
Causes of Unable to Record Macro Error
You may be unable to record macros in Excel due to several reasons. Let’s take a look at the possible causes that can lead to this issue.
- The location of personal.xlsb file is changed.
- Personal.xlsb file is corrupted.
- Macros are disabled.
Methods to Fix the “Unable to Record Macro” Error in Excel
Here are some possible solutions that can help you resolve the unable to record macro error in Excel.
Method 1: Check the Path of XLStart Folder
You may be unable to record macros if the path of XLStart folder is incorrect. It is a folder where the Personal.xlsb file is stored by default. Follow these steps to find out the path of this folder:
- Open MS Excel. Go to File > Options.
- Click Trust Center > Trust Center Settings.

- In the Trust Center Settings window, click on Trusted Locations.

- Verify the path of the XLSTART folder and modify it if there is an issue.
- Once you are done, click on OK.
Method 2: Change Macro Security
The “Unable to record macro” error can occur if macros are disabled in the Macro Security settings. You can try changing the macro settings using the below steps:
- In MS Excel, go to File > Options > Trust Center.

- Under Trust Center, click on Trust Center Settings.

- Select “Enable all macros” and then click OK.
Method 3: Check Add-ins for Disabled Items
If there are any items in add-ins that are disabled, they may prevent Excel from functioning properly. You can check and enable the items in MS Excel using the below steps:
- Click File > Options.

- In Excel Options, click on the Add-ins option.
- Select Disabled Items from the Manage section and click on Go.

- The Disabled Items window is displayed.
- Click on the disabled item and then click Enable.
- Restart Excel for the changes to take place.
Method 4: Repair your Excel File
You may fail to record macros if there is corruption in the workbook. In such a case, you can use the “Open and Repair” utility in MS Excel to repair the corrupt workbook. To use this tool, follow these steps:
- Open your Excel application.
- Click File > Open.
- Browse to the location where the corrupted file is stored.
- In the Open dialog box, choose the corrupted workbook.

- From the Open dropdown list, click Open and Repair.

Excel will prompt you to repair the file or extract data from it. Click Repair to retrieve maximum data. If the Repair option fails, then click on the Extract Data option to recover the data without formulas and values.
If the Microsoft utility “Open and Repair” fails to repair the corrupted Excel workbook, then try a professional Excel repair tool such as Stellar Repair for Excel. It is an advanced tool that can easily repair severely corrupted Excel (XLSX and XLS) files. It can recover all the file items, including chart sheets, cell comments, tables, macros, formulas, etc. without impacting the properties and cell format of the Excel file.

Closure
You may receive the “unable to record” error in Excel while creating or storing macros in Personal Macro Workbooks. There are several reasons that can lead to this error. You can try the methods covered in this post to resolve the error. If the error appears due to corruption in workbook, then try to repair it using the Open and Repair utility. Alternatively, you can use Stellar Repair for Excel – a professional tool that can help you repair an Excel file with problematic macros. Also, it allows recovery of all the file components with complete integrity. The tool is compatible with Excel 2021, 2019, 2016, and older versions.
- Title: Fixed Microsoft Excel 2003 Cannot Access the File Error | Stellar
- Author: Nova
- Created at : 2024-07-17 17:16:49
- Updated at : 2024-07-18 17:16:49
- Link: https://phone-solutions.techidaily.com/fixed-microsoft-excel-2003-cannot-access-the-file-error-stellar-by-stellar-guide/
- License: This work is licensed under CC BY-NC-SA 4.0.