
Fixed Microsoft Excel 2010 Cannot Access the File Error | Stellar
[Fixed] “Microsoft Excel Cannot Access the File” Error
Summary: The “Microsoft Excel cannot access the file” error usually occurs when there is an issue with the Excel file you are trying to save. This post summarizes the causes behind the error and mentions some effective solutions to fix it. If you suspect the problem is encountered due to corruption in the Excel file, you can use the professional Excel repair tool mentioned in the post to repair the file.


You may experience the “Microsoft Excel cannot access the file” error when saving the Excel file. This happens when the Excel application fails to read the file you are attempting to save. The error message indicates that there is an issue with the file name or its path. Sometimes, the error occurs if the file you are trying to access is already in use by another application. Some other reasons for the “Excel cannot access the file” error are:
- Faulty or incompatible Excel add-ins.
- The file is in Protected View.
- The Excel file is damaged or corrupted.
- You do not have the required permissions to access the file.
- The Excel file is not in a compatible format.
Methods to Fix “Microsoft Excel Cannot Access the File” Error
Sometimes, changing the file location can fix the “Microsoft Excel cannot access the file” error. You can try changing the file location, if the location is incorrect. If moving the file to a different location didn’t work, then try the below troubleshooting methods.
Method 1: Check the File Name and Path
You can get the “Microsoft Excel cannot access file” error if there is an issue with the file path – either the path does not exist or it is too lengthy, thus creating conflicts. Make sure the file path is correct. If the file name is too long, you can rename the file with a short name and also move the file to the parent folder instead of a subfolder. After that, remove the file from the Recent list that is created by Excel based on your recent activity. Follow the below steps:
- Open the Excel application.
- In the Recent list, right-click on the affected Excel file.
- Now, select Remove from list.

- Close the Excel application.
Now, reopen the problematic file and check if the error exists. If yes, then follow the next solution.
Method 2: Try Clearing the Microsoft Office Cache
Sometimes, clearing the Microsoft Office cache can help eliminate the “Excel cannot access the file” error. To clear the Microsoft Office cache, follow the given steps:
- First, close all the Office applications.
- Press Windows+R to open the Run window.
- Type %localappdata%\Microsoft\Office\16.0\OfficeFileCache and press the Enter key. You can change ‘16.0’ with your Office version.

- In the OfficeFileCache window, clear all the temporary files.
You can try updating your Microsoft Excel application. The latest updates include bug fixes, security patches, and other improvements. Updating the application can help fix several issues that might be causing the error. Here are the steps to update Microsoft Excel:
- Open your Excel application.
- Go to File and then select Account.
- Under Product information, click Update Options and then click Update Now.
Method 4: Disable Protected View
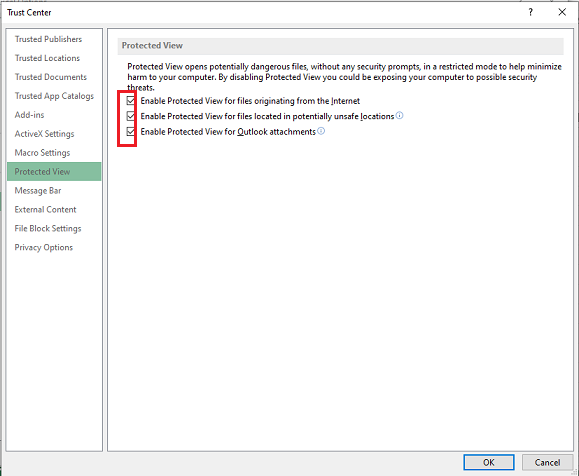
You may get the “Microsoft Excel cannot access the file” error if the Protected View option is enabled. You can try disabling the Protected View settings in Excel. This allows you to open the file without any restrictions. However, disabling the protected view can put your system at high risk. To disable the Protected View in Microsoft Excel, follow the below steps:
- In Excel, go to File and then click Options.
- In the Excel Options window, click Trust Center and then click Trust Center Settings.

- Click Protected View from the left pane in the Trust Center Settings window.
- Unselect the options under Protected View. Click OK.
Method 5: Check and Disable Add-ins
The “Excel cannot access the file” error can also occur due to faulty add-ins in Excel. To check if the error has occurred due to some faulty add-ins, open the application in safe mode (press Windows + R and typeexcel /safe in the Run window**)**. If you can save the file without any hiccups in safe mode, this indicates some problematic add-ins are behind the error. You can remove the Excel add-ins by following these steps:
Open your Excel application and go to File > Options.
In Excel Options, select Trust Center and then click Trust Center Settings.
In Trust Center Settings, click Add-ins and thenselect “Disable all applications Add-ins”. Click OK.


Method 6: Check File Permission
You can get the “Excel cannot access the file” error if you don’t have sufficient permissions to modify the Excel file. You can check and provide the write permissions to fix the issue. Here’s how to do so:
- Open Windows Explorer.
- Find the affected Excel file, right-click on it, and click Properties.

- In the Properties window, click the Securities option and click Edit.

- In the Security window, select the user names under ‘Group or users name’.
- Check the file permissions and make sure the write option is enabled. If not, then grant the permission. Click Apply and then OK.
Method 7: Check External Links
The “Excel cannot access the file” error can also occur due to broken external links in the Excel file. External links are references to the data or content in other files. The link usually breaks if the file has been moved to another location or the file name is changed. You can check and change the source of link.
Method 8: Repair your Excel File
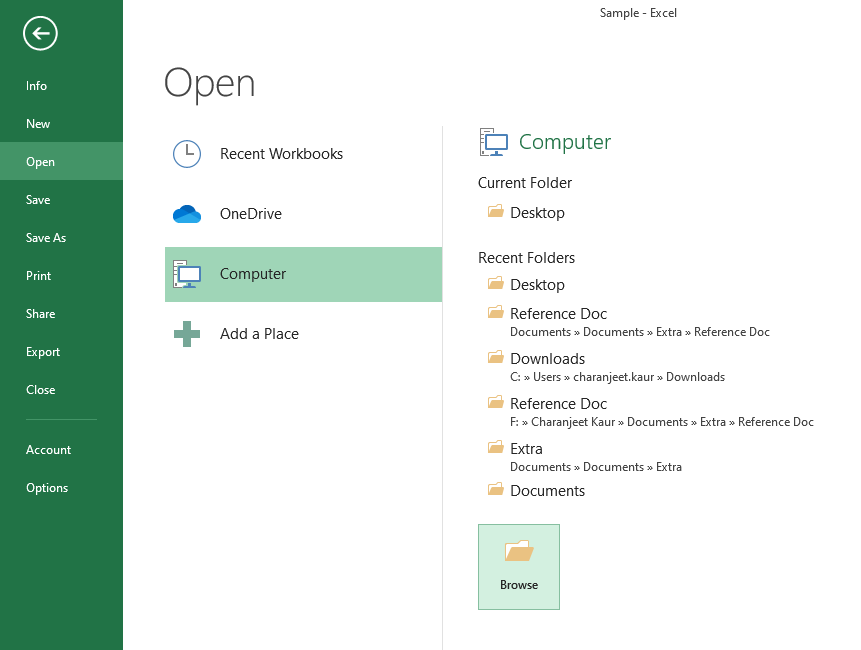
Excel may fail to read the file if it is corrupted or damaged. If the error “Excel cannot access the file” has occurred due to file corruption, then try the Excel’s Open and Repair utility to repair the Excel file. Here are the steps:
- In the Excel application, click the File tab and then select Open.
- Click Browse to select the problematic workbook.
- The Open dialog box will appear. Click on the corrupted file.
- Click the arrow next to the Open button and then select Open and Repair.
- You will see a dialog box with three buttons – Repair, Extract Data, and Cancel.


- Click on the Repair button to recover as much of the data as possible.
- After repair, a message is displayed. Click Close.
If the Open and Repair utility fails to work , it indicates the Excel file is severely corrupted. Use Stellar Repair for Excel to repair severely corrupt Excel file. It helps recover all the components of the corrupted Excel file, such as charts, formulas, etc. without making any changes to the original file. It can also fix all types of corruption-related errors. You can use Stellar Repair for Excel to repair Excel files created in all Excel versions – from 2007 to 2023.
Closure
The “Microsoft Excel cannot access the file” error can occur due to numerous reasons. Follow the troubleshooting methods, such as checking file location, path, permissions, etc., as discussed above to fix this error. Sometimes, Excel throws this error if the file you are trying to save is corrupted. You can try repairing the file using the built-in utility – Open and Repair. If the file is severely corrupted, then you can use Stellar Repair for Excel . It can repair damaged Excel files (.xls, .xlsx, .xltm, .xltx, and .xlsm) with complete integrity.
[Fixed]: Freeze Panes not Working in Excel
Summary: This blog discusses the “freeze panes not working” issue in Excel. It mentions the possible reasons behind the issue and offers workarounds and methods to fix it. If the issue is associated with corruption in the Excel file, you can use the specialized Excel repair tool mentioned in the blog to repair the affected file.
The freeze panes feature in Excel is used to freeze the row/column headings to keep them visible while scrolling the worksheet. It is a useful feature when you’re working on a large worksheet containing data that exceeds the rows and columns on the screen. Sometimes, you notice that the ‘Excel freeze panes feature is not working’. There could be numerous factors that can trigger this issue. Let’s know the reasons for the freeze pane not working issue in Excel and how to resolve this issue.
Why can’t I freeze panes in excel?
Several factors may contribute to the Excel freeze panes not working issue in Excel. A few of them are:
- The cell editing mode is enabled in the workbook in which you are trying to use the Freeze Panes feature.
- The Excel file is corrupted.
- The worksheet is protected.
- Advanced Options are disabled in Excel Settings.
- The Excel application is not up-to-date.
- You might be trying to lock rows in the middle of the worksheet.
- Your Excel workbook is not in normal file preview mode.
- Wrong/incorrect positioning of the frozen panes.
How to fix ‘Freeze Panes not Working’ in Excel?
The freeze panes option is available in the View bar. Sometimes, you’re unable to see the View option. It usually occurs if you are using the Excel Started version. Check and try to open the file in the advanced Excel version, which supports all the features. If you are using the advanced Excel version, then try the below workarounds to fix the freeze panes not working issue in Excel.
Workaround 1: Exit the Cell Editing Mode
If your Excel file is switched from normal file view mode to cell editing mode, you can encounter the freeze panes not working issue. In cell editing mode, certain features in Excel, such as the freeze panes, are temporarily disabled to prevent any conflicts. You can disable cell editing mode by pressing the ESC or Enter key. Now locate the View tab and check whether the freeze pane feature is working. If not, then try the next workaround.
Workaround 2: Change the Page Layout View
The Excel freeze panes not working issue can also occur if your workbook is opened in Page Layout view. The Page Layout view doesn’t support freeze panes. If you select page layout, the freeze panes option gets disabled.

To enable the freeze pane option, go to View and click the Page Break Preview tab.

Workaround 3: Check and Remove Options under the Data Tab
Sometimes, you can experience the “freeze panes not working” issue if Sorting, Data Filter, Group, and Subtotal options are enabled in Excel workbook. Such options, when enabled, can lead to unexpected problems with the freeze panes’ functionality. You can check and remove these features from your workbook. To do so, follow these steps:
- Open the Excel file in which you are getting the issue.
- Navigate to the Data tab.
- Check and remove the below features (if enabled):
- Sort
- Filter
- Group
- Subtotal

Workaround 4: Check and Unprotect Worksheet
The freeze panes feature may stop working if your worksheet is protected. You can try to disable the worksheet protection option. Here are the steps:
- In the Excel file, go to the Review tab.
- Click Unprotect Sheet.

After unprotecting the sheet, check whether the “freeze panes not working” issue is resolved. If not, follow the next workaround.

Workaround 5: Use Correct Cell Positioning
The freeze pane is not working issue in Excel can also occur when you use incorrect cell positioning to apply the freeze panes feature. Several users have reported facing this issue when trying to lock multiple rows with the wrong cell selection. So, use correct cell positioning to freeze the rows. For example, if you are trying to lock two rows in an Excel worksheet, then you need to click on 3rd row’s column.

What if the above Workarounds Fail to Fix the Freeze Panes not Working Issue?
If none of the above workarounds works, then there are chances that the workbook is damaged or corrupt. In such a case, you can try the below methods to repair the corrupt Excel workbook.
Run Open and Repair Utility
In case of corruption in the Excel file, you can use the Open and Repair tool in Excel to repair the file. To use this utility, follow these steps:
- In the Excel application, navigate to File and then click Open.
- Click Browse to select the workbook in which you are facing the issue.
- The Open dialog box is displayed. Click on the affected file.
- Click the arrow next to the Open option and then click Open and Repair.

- Click on the Repair option to recover as much data as possible.
- You can see a completion message once the repair process is complete. Click Close.
Use a Professional Excel Repair Tool
If the Open and Repair tool doesn’t work to resolve complex file-related issues and your Excel file is severely corrupted, you can opt for a reliable third-party Excel repair tool, such as Stellar Repair for Excel. This tool can help you repair the Excel file and recover all the data with complete integrity. You can try the software’s demo version to scan the affected file and preview the recoverable data. The software is compatible with all MS Excel versions and Windows operating systems, including Windows 11.

Closure
The “freeze panes not working” issue in Excel can occur due to several reasons, like protected worksheet, incompatible Excel version, and incorrect cell position. Try the workarounds shared in the blog to fix the issue. If the Excel file is corrupt, you can use Stellar Repair for Excel to fix the corruption issues in the file. This tool can quickly repair the Excel file and recover all the data from the file with 100% integrity.
[Fix] Excel formula not showing result
Summary: Is your Excel spreadsheet showing text of a formula you’ve entered and not its result? This blog explains the possible reasons behind such an issue. Also, it describes solutions to fix the ‘Excel formula not showing result’ error. You can try Stellar Repair for Excel software to recover engineering and shared formulas.
Sometimes, when you type a formula in a cell of worksheet and press Enter, instead of showing the calculated result, it returns the formula as text. For instance, Excel cell shows:

But you should get the result as:


Why Does Excel Show or Display the Formula Not the Result?
Following are the possible reasons that may lead to the ‘Excel showing formula not result’ issue:
- You accidentally enabled “Show Formulas” in Excel.
- The cell format in a spreadsheet is set to text.
- ‘Automatic calculation’ feature in Excel is set to manual.
- Excel thinks your formula is text (Syntax are not followed).
- You type numbers in a cell with unnecessary formatting.
How to Fix ‘Excel Showing Formula Not Result’ Issue?
Solution 1 – Disable Show Formulas
If only the formula shows in Excel not result, check if you have accidentally or intentionally enabled ‘show formula’ feature of Excel. Instead of applying calculations and then showing results, this feature displays the actual text written by you.
You can use the ‘Show Formulas’ feature to quickly view all formulas, but if you are not aware of this feature, and enabled it accidentally, it can be a headache. To disable this mode, go to ‘Formulas’ and click on ‘Show formula enabled.’ If it’s previously enabled, it will be disabled by just clicking on it.

Solution 2 – Cell Format Set to Text
Another possible reason that only formula shows in Excel not result could be that the cell format is set to text. This means that anything written in any format in that cell will be treated as regular text. If so, change the format to General or any other. To get Excel to recognize the change in the format, you may need to enter cell edit mode by clicking into the formula bar or just press F2.

Solution 3 – Change Calculation Options from ‘Manual’ to ‘Automatic’
There is an “automatic calculation” feature in Excel, which tells Excel to do calculations automatically or manually. If ‘Excel formula is not showing results’, it may be because the automatic calculations feature is set to manual. This issue is not easily detected because it results in calculating formula in one cell but if you copy it to some other cell, it will retain the first calculation and will not recalculate on the base of the new location. To fix this, follow these steps:
- In Excel, click on the ‘File’ tab on the top left corner of the screen.
- In the window that opens, click on ‘Options’ from the left menu bar.
- From ‘Excel Options’ dialog box, select ‘Formulas’ from the left side menu and then change the ‘Calculation options’ to ‘Automatic’ if it’s currently set as ‘Manual’.

- Click on ‘OK’. This will redirect you to your sheet.
Solution 4 – Type Formula in the Right Format
There is a proper way to tell Excel that your text is a formula. If you don’t write the formula in a particular format, Excel considers it as simple text and hence no calculations are performed according to it. For this reason, keep the following in mind when typing a formula:
Equal sign: Every formula in Excel should start with an equal sign (=). If you miss it, Excel will mistake your formula as regular text.
Space before equal sign: You are not supposed to enter any space before equal sign. Maybe a single space will be hard for us to detect, but it breaks the rule of writing formulas for Excel.
Formula wrapped in quotes: You need to make sure that your formula is not wrapped in quotes. People usually make this mistake of writing a formula in quotes, but in Excel, quotes are used to signify text. So your formula won’t be evaluated. But you can add quotes inside formula if required, for example: =SUMIFS(F5:F9,G5:G9,”>30″).
Match all parentheses in a formula: Arguments of Excel functions are entered in parenthesis. In complex cases, you may need to enter more sets of parenthesis. If those parentheses are not paired/closed properly, Excel may not be able to evaluate the entered formula.
Nesting limit: If you are nesting two or more Excel functions into each other, for example using nested IF loop, remember the following rules:
- Excel 2019, 2016, 2013, 2010, and 2007 versions only allow to use up to 64 nested functions.
- Excel 2003 and lower versions only allow up to 7 nested functions.
Solution 5 – Enter Numbers without any Formatting
When you use a number in the formula, make sure you don’t enter any decimal separator or currency sign, e.g. $, etc. In an Excel formula, a comma is used to separate arguments of a function and a dollar sign makes an absolute cell reference. Most of these special characters have built-in functions so avoid using them unnecessarily.
What to Do If the Manual Solutions Don’t Work?
If you’ve tried out the manual solutions mentioned above but still unable to resolve the ‘Excel formula not showing result’ issue, you can try repairing your Excel file with the help of an automated Excel repair software , such as Stellar Repair for Excel.
This reliable and competent software scans and repairs Excel files (.XLSX and .XLS). It also helps recover all the file components, like formulas, cell formatting, etc. Armed with an interactive GUI, this software is extremely easy to work with, and its advanced algorithms allow it to fend off Excel errors with ease.


Conclusion
This blog outlined the possible reasons that may cause ‘Excel not showing formula results’ issue. Check out these reasons and implement the manual fixes, depending on what resulted in the problem in the first place. If none of these fixes help resolve the issue, corruption in the Excel file might be preventing the formulas from showing the actual results. In that case, using Stellar Repair for Excel tool might help.
How to fix Microsoft Excel has stopped working error?
Summary: This blog discusses the possible reasons behind ‘Microsoft Excel has stopped working’ error and solutions to resolve the error manually. You can use Stellar Repair for Excel to quickly repair the file and recover all its data in a hassle-free manner.
Has your Microsoft Excel program stopped working or is acting strange? Excel not responding is a common issue you may experience on launching the application or opening a spreadsheet.
Parental Control Software
Figure 1 – Microsoft Excel Has Stopped Working Error Message
Possible Causes behind ‘Microsoft Excel has Stopped Working’ Error, and Solutions Thereof
Note: Several users have reported about encountering the ‘Excel has stopped working’ issue on Windows 10, 8, and 7 OS after installing an update for Excel (KB3118373). If you too have installed the update, then uninstall it and check if it solves the error. For detailed information, refer to this link .
How Can I Recover Corrupted Excel File 2016?
Error Messages Indicating Corruption in Excel File
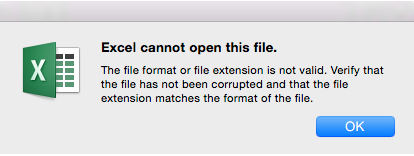
- When an Excel 2016 file turns corrupt, you’ll receive an error message that reads: “The file is corrupt and cannot be opened .”

- But sometimes, you encounter the “Excel cannot open this file” error message due to corruption in the file.
Why does Excel File turn Corrupt?
Following are some common reasons that can turn an Excel file corrupt:
- Large size of the Excel file
- The file is virus infected
- Hard drive on which Excel file is stored has developed bad sectors
- Abrupt system shutdown while working on a worksheet
Workarounds to Recover Data from Corrupt Excel
The workarounds to recover corrupted Excel file 2016 data will vary depending on whether you can open the file or not.
How to Recover Corrupted Excel File 2016 Data When You Can Open the File?
If the corrupt Excel file is open, try any of the following workarounds to retrieve the data:
Workaround 1 – Use the Recover Unsaved Workbooks Option
If your Excel file gets corrupt while you are working on it and you haven’t saved the changes, you can try retrieving the file’s data by following these steps:
- Open your Excel 2016 application and click on the Open Other Workbooks option.
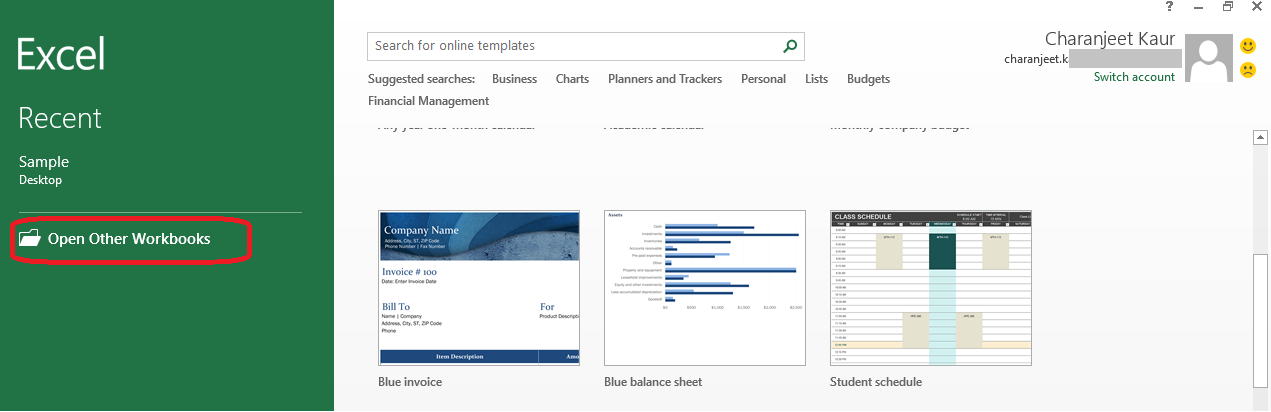
- Click the Recover Unsaved Workbooks button at the bottom of the ‘Recent Workbooks’ section.
- A window with list of unsaved Excel files will open. Click the corrupt file you want to open.
This will reopen your last saved version of the Excel workbook. If this method doesn’t work, proceed with the next workaround.

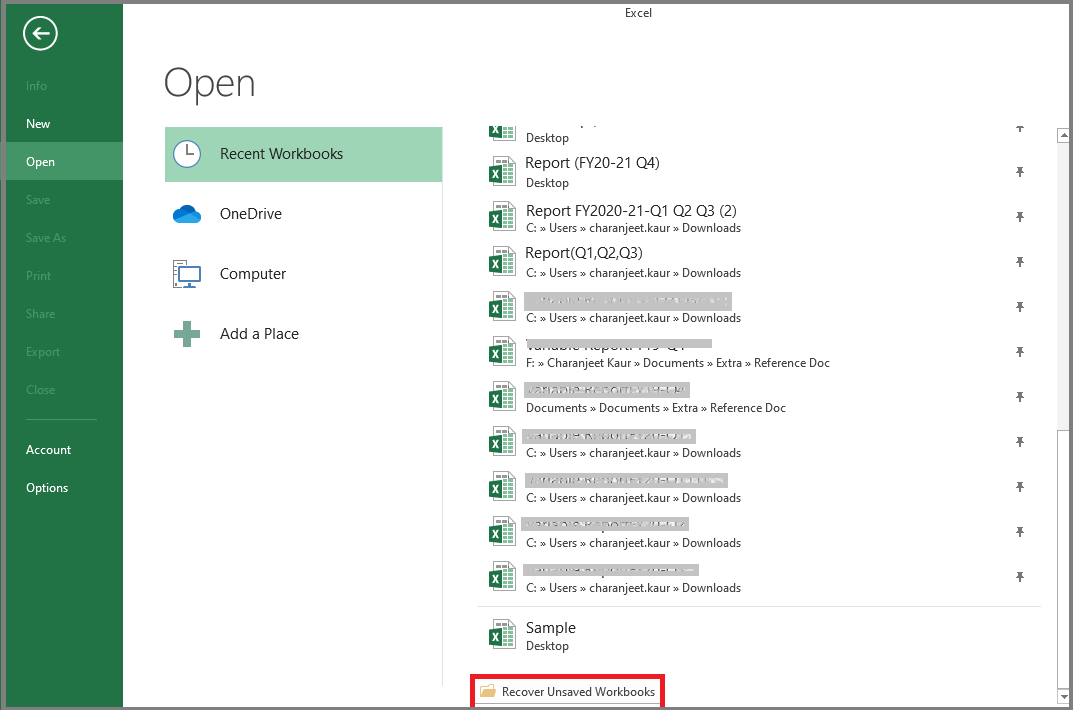
Workaround 2 – Revert to Last Saved Version of your Excel File
If your Excel file gets corrupt in the middle of making any changes, you can recover the file’s data if the changes haven’t been saved. For this, you need to revert to the last saved version of your Excel file. Doing so will discard any changes that may have caused the file to turn corrupt. Here’s how to do it:
- In your Excel 2016 file, click File from the main menu.
- Click Open. From the list of workbooks under Recent workbooks, double-click the corrupt workbook that is already open in Excel.
- Click Yes when prompted to reopen the workbook.
Excel will revert the corrupt file to its last saved version. If it fails, skip to the next workaround.
Workaround 3 – Save the Corrupted Excel File in Symbolic Link (SYLK) Format
Saving an Excel file in SYLK format might help you filter out corrupted elements from the file. Here are the steps to do so:
- From your Excel File menu, choose Save As.
- In ‘Save As’ window that pops-up, from the Save as type dropdown list, choose the SYLK (Symbolic Link) option, and then click Save.
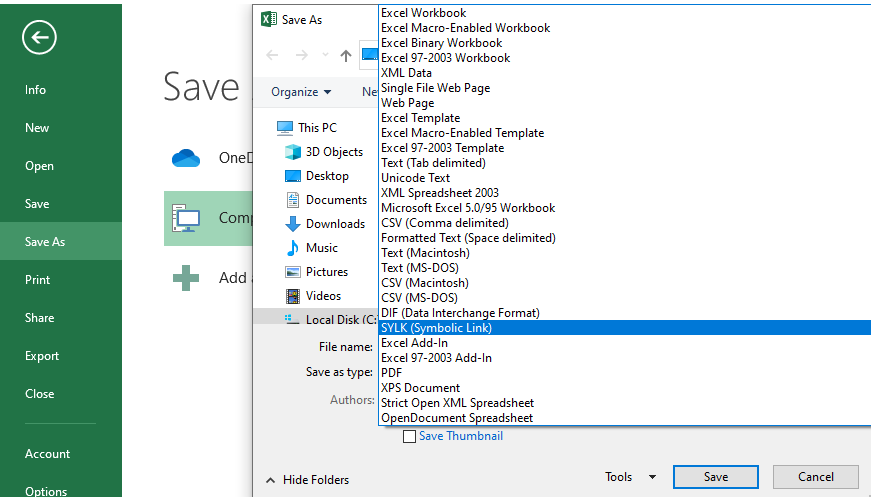
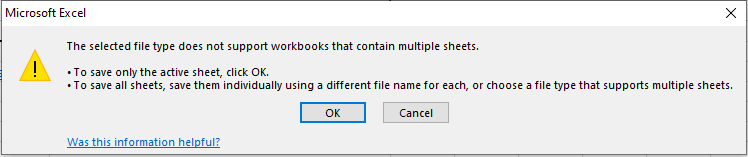
Note: Only the active sheet will be saved in workbook on choosing the SYLK format.
- Click OK when prompted that “The selected file type does not support workbooks that contain multiple sheets”. This will only save the active sheet.
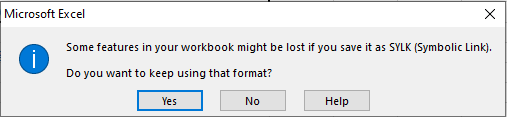
- Click Yes when the warning message appears - “Some features in your workbook might be lost if you save it as SYLK (Symbolic Link)”.

- Click File > Open.
- Browse the corrupt workbook saved with SYLK format (.slk) and open it.
- After opening the file, select File > Save As.
- In ‘Save as type’ dialog box, select Excel workbook.
- Rename the workbook and hit the Save button.
After performing these steps, a copy of your original workbook will be saved at the specified location.
How to Recover Corrupted Excel File 2016 Data When You Cannot Open the File?
If you can’t access the Excel file, apply one of these workarounds to salvage the file’s data.
Workaround 1 – Open and Repair the Excel File
Excel automatically initiates ‘File Recovery’ mode on opening a corrupt file. After starting the auto-recovery mode, it attempts to reopen and repair the corrupt Excel file at the same time. If the auto-recovery mode does not start automatically, you can try to fix corrupted Excel file 2016 manually by using ‘Open and Repair’. Follow these steps:
- Open a blank file, click the File tab and select Open.
- Browse the location where the corrupt 2016 Excel file is stored.
- When an ‘Open’ dialog box appears, select the file you want to repair.
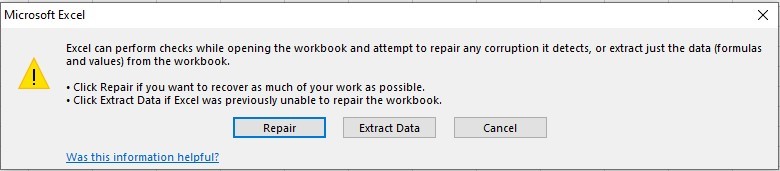
- Once the file is selected, click the arrow next to the Open button, and then click the Open and Repair button.
- Do any of these actions:
- Click Repair to fix corrupted file and recover data from it.
- Click Extract Data if you cannot repair the file or only need to extract values and formulas.
If performing these actions doesn’t help you retrieve the data, proceed with the next workaround.
Workaround 2 – Disable the Protected View Settings
Follow these steps to disable the protected view settings in an Excel file:
- Open a blank 2016 workbook.

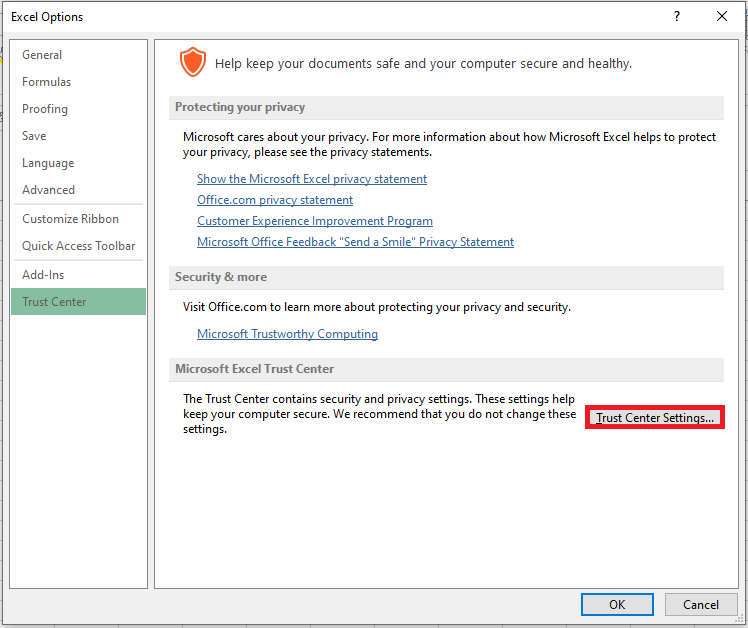
- Click the File tab and then select Options.

- When an Excel Options window opens, click Trust Center > Trust Center Settings.
- In the window that pops-up, choose Protected View from the left side navigation. Under ‘Protected View’, uncheck all the checkboxes, and then hit OK.
Now, try opening your corrupt Excel 2016 file. If it won’t open, try the next workaround.
Workaround 3 – Link to the Corrupt Excel File using External References
If you only need to extract Excel file data without formulas or calculated values, use external references to link to your corrupt Excel 2016 file. Here’s how you can do it:
- From your Excel file, click File > Open.
- From the window that opens, click Computer and then click Browse and copy the name of your corrupt Excel 2016 file. Click the Cancel button.
- Go back to your Excel file, click File > New > Blank workbook.

- In the new Excel workbook, type “=CorruptExcelFile Name!A1” in cell A1 to reference cell A1 of the corrupted file. Replace the ‘CorruptExcelFile Name’ with the name of the corrupt file that you have copied above. Hit ENTER.
- If ‘Update Values’ dialog box appears, select the corrupt 2016 Excel file, and then click OK.
- If ‘Select Sheet’ dialog box pops-up, select a corrupt sheet, and press the OK button.
- Select and drag cell A1 till the columns required to store the data of your corrupted Excel file.
- Next, copy row A and drag it down to the rows needed to save the file’s data.
- Select and copy the file’s data.
- From the Edit menu, choose the Paste Special option and then select Values. Click OK to paste values and remove the reference links to the corrupt file.
Check the new Excel file for recoverable data. If this didn’t work, consider using an Excel file repair tool to retrieve data.
Alternative Solution to Recover Excel File Data
Applying the above workarounds may take considerable time to recover corrupted Excel file 2016. Also, they may fail to extract data from a severely corrupted file. Using Stellar Repair for Excel software can help you overcome these limitations. The software helps repair severely corrupted XLS/XLSX file and retrieve all the file data in a few simple steps.

Key benefits of using Stellar Repair for Excel are as follows:
- Recovers tables, pivot tables, images, charts, chartsheets, hidden sheets, etc.
- Maintains original spreadsheet properties and cell formatting
- Batch repair multiple Excel XLS/XLSX files in a single go
- Supports MS Excel 2019, 2016, 2013, and previous versions
Check out this video to know how the Excel file repair tool from Stellar® works:
Conclusion
Errors such as ‘the file is corrupt and cannot be opened’, ‘Excel cannot open this file’, etc. indicate corruption in an Excel file. Large-sized workbook, virus infection, bad sectors on hard disk drive, etc. are some reasons that may result in Excel file corruption. The workarounds discussed in this article can help you recover corrupted Excel file 2016 data. However, manual methods can be time-consuming and might fail to extract data from severely corrupted workbook. A better alternative is to use Stellar Repair for Excel software that is purpose-built to repair and recover data from damaged or corrupted Excel file.
[Fixed] Excel VBA Runtime Error 9: Subscript Out of Range
Summary: The runtime error 9 in Excel usually occurs when you use different objects in a code or the object you are trying to use is not defined. This post will discuss the reasons behind the Excel VBA error “Subscript out of Range” and the solutions to resolve the issue. It will also mention an Excel repair tool that can help fix the error if it occurs due to corruption in worksheet.
Many users have reported encountering the error “Subscript out of range” (runtime error 9) when using VBA code in Excel. The error often occurs when the object you are referring to in a code is not available, deleted, or not defined earlier. Sometimes, it occurs if you have declared an array in code but forgot to specify the DIM or ReDIM statement to define the length of array.
Causes of VBA Runtime Error 9: Subscript Out Of Range
The error ‘Subscript out of range’ in Excel can occur due to several reasons, such as:
- Object you are trying to use in the VBA code is not defined earlier or is deleted.
- Entered a wrong declaration syntax of the array.
- Wrong spelling of the variable name.
- Referenced a wrong array element.
- Entered incorrect name of the worksheet you are trying to refer.
- Worksheet you trying to call in the code is not available.
- Specified an invalid element.
- Not specified the number of elements in an array.
- Workbook in which you trying to use VBA is corrupted.
Methods to Fix Excel VBA Error ‘Subscript out of Range’
Following are some workarounds you can try to fix the runtime error 9 in Excel.
Method 1: Check the Name of Worksheet in the Code
Sometimes, Excel throws the runtime error 9: Subscript out of range if the name of the worksheet is not defined correctly in the code. For example – When trying to copy content from one Excel sheet (emp) to another sheet (emp2) via VBA code, you have mistakenly mentioned wrong name of the worksheet (see the below code).
1 | Private Sub CommandButton1_Click() |

When you run the above code, the Excel will throw the Subscript out of range error.
So, check the name of the worksheet and correct it. Here are the steps:
- Go to the Design tab in the Developer section.
- Double-click on the Command button.
- Check and modify the worksheet name (e.g. from “emp” to “emp2”).

- Now run the code.
- The content in ‘emp’ worksheet will be copied to ‘emp2’ (see below).

Method 2: Check the Range of the Array
The VBA error “Subscript out of range” also occurs if you have declared an array in a code but didn’t specify the number of elements. For example – If you have declared an array and forgot to declare the array variable with elements, you will get the error (see below):

To fix this, specify the array variable:
1 | Sub FillArray() |
Method 3: Change Macro Security Settings
The Runtime error 9: Subscript out of range can also occur if there is an issue with the macros or macros are disabled in the Macro Security Settings. In such a case, you can check and change the macro settings. Follow these steps:
- Open your Microsoft Excel.
- Navigate to File > Options > Trust Center.
- Under Trust Center, select Trust Center Settings.
- Click Macro Settings, select Enable all macros, and then click OK.

Method 4: Repair your Excel File
The name or format of the Excel file or name of the objects may get changed due to corruption in the file. When the objects are not identified in a VBA code, you may encounter the Subscript out of range error. You can use the Open and Repair utility in Excel to repair the corrupted file. To use this utility, follow these steps:
- In your MS Excel, click File > Open.
- Browse to the location where the affected file is stored.
- In the Open dialog box, select the corrupted workbook.
- In the Open dropdown, click on Open and Repair.
- You will see a prompt asking you to repair the file or extract data from it.
- Click on the Repair option to extract the data as much as possible. If Repair button fails, then click Extract button to recover data without formulas and values.
If the “Open and Repair” utility fails to repair the corrupted/damaged macro-enabled Excel file, then try an advanced Excel repair tool, such as Stellar Repair for Excel. It can easily repair severely corrupted Excel workbook and recover all the items, including macros, cell comments, table, charts, etc. with 100% integrity. The tool is compatible with all versions of Microsoft Excel.
Conclusion
You may experience the “Subscript out of range” error while using VBA in Excel. You can follow the workarounds discussed in this blog to fix the error. If the Excel file is corrupt, then you can use Stellar Repair for Excel to repair the file. It’s a powerful software that can help fix all the issues that occur due to corruption in the Excel file. It helps to recover all the data from the corrupt Excel files (.xls, .xlsx, .xltm, .xltx, and .xlsm) without changing the original formatting. The tool supports Excel 2021, 2019, 2016, and older versions.
How to Repair Excel Document on a Flash Drive
Summary: Microsoft Excel files are stored on flash drives if they need to be transferred between systems or if they need to be backed up. But sometimes unforeseen issues can corrupt the Excel sheets stored on flash drives. When that happens, it can be an arduous task to repair Excel documents on a flash drive. Through this post let us try to understand the reasons why Excel sheets stored on flash drives can get corrupted and how users can resolve them easily.
In this digital age, we all work with computers, files, and documents. Flash drives or USBs are common ways of storing data in an external place. Be it for a meeting or for a party playlist, these devices come handy when one wants to transfer data or access the files stored elsewhere.
You may need to access your data from another location. That’s when a USB flash drive might come in handy. And, that’s exactly why Excel sheets too end up on flash drives; either that or for backup purposes. However, there are many instances where an Excel file stored in a USB gets corrupted when one tries to access the file. The error message you get while trying to open the Excel file would be a great clue for figuring out the exact reason behind corruption.
This blog will provide insights into what are the reasons for the corruption of a USB and how the users can repair Excel on flash drive that has been corrupted.
Reasons for USB inaccessibility
Sometimes flash drives or USBs can become unresponsive due to numerous reasons. There are two types of corruption – logical and physical. Physical corruptions occur due to broken stems and connectors, broken circuits, NAND gate, not recognised, RAW, need to format, not accessible, and dead drives (no power supply).
One of the main reasons behind such an error could be that the USB drive has been infected by some virus. This can affect any file – not only the ones which are there in the USB drive but also the ones which are there in the PC/Laptop where you connect the USB drive. It is recommended that you scan the USB drive with reliable antivirus software to detect viruses.
There can be various other reasons that may make your USB corrupt or unresponsive. But there are very slim chances that you will be able to recover a flash drive that has physical damage. However, you can try to run the check disk on the USB drive to fix the drive. We will be discussing this as you read on.
Recovery Methods for Corrupted Flash Drives
There are 3 tried and tested recovery methods. Try them and see which one works out for you.
- Restoring Excel Files from Windows backup
To bring back your old Excel files, fixing up the corrupt file is your best option. Importantly note that this method would work only if your system’s Windows backup option has been enabled.
Step-by-step process for restoring your older Excel files:
- Connect your USB drive
- Go to “My Computer”->USB Drive->Check if the file exists
- Right click on the excel file and click on the restore previous versions

- You will now see a list of older versions which were created
- Select one the backups and click on “restore”
- Using Command Line to Recover Excel Files
In case you are looking to repair Excel on flash drive, you can also resolve it by using the command line. Just follow the below steps to see if you can recover the excel files.
- Connect your USB Flash drive
- Open “Run” (press Windows+R) and then open “cmd”

- Type “attrib -h -r -s /s /d (USB Drive Letter):\*.*” where the (USB Drive Letter) is the drive letter you can find using “My Computer”
- Once this has been completed, Windows will start repairing your files
- After the process gets over, try accessing the excel file to see if the data has been recovered
- Running a “Check Disk” on flash drives
Follow the below steps while the USB flash drive has been plugged into your computer:
- Open “Run” and then open “cmd”
- Type in “chkdsk /X /f (USB Drive Letter)” where the “(USB Drive Letter)” is the letter of the corrupted USB Drive. You can get this letter easily from the “My Computer”.

It will now check your disk to and correct any corrupted records.
What if none of these methods works?
In case none of the above methods works to repair Excel document on a flash drive, then you would need a professional Excel repair software such as Stellar Repair for Excel to restore your files. Such software not only help repair corrupted Excel files on flash drives but also help in recovering the data stored within them in their original format.
Stellar Repair for Excel resolves corruption problems in Excel files and recovers all formulas, charts, cell formatting, and more from them. It can repair multiple Excel files in one go. Equipped with a fully interactive GUI, working with this product is extremely easy.

To sum it up
Although flash drives are quite popularly used, they are not the most reliable of storage devices. These drives can fail anytime without warning. Thus, always back up your data on other more robust devices instead of flash drives. We hope that with the above tried and tested methods you will easily be able to repair Excel document on flash drive if need be. For any queries that you have, feel free to leave a comment below!
- Title: Fixed Microsoft Excel 2010 Cannot Access the File Error | Stellar
- Author: Nova
- Created at : 2024-07-17 17:16:54
- Updated at : 2024-07-18 17:16:54
- Link: https://phone-solutions.techidaily.com/fixed-microsoft-excel-2010-cannot-access-the-file-error-stellar-by-stellar-guide/
- License: This work is licensed under CC BY-NC-SA 4.0.