
Forgot iPhone 12 mini Password? – Here are the Best Solutions | Stellar
Forgot iPhone Password? – Here are the Best Solutions
Summary: Can’t remember your iPhone password? This post brings the best solutions to fix forgotten password issue and restore your data from the locked iPhone.
Setting up a password on your iPhone is a great way to keep unauthorized access at bay but what if you forget the password? On a positive note, you can still access or restore your iPhone Data and this blog highlights some best solutions for forgotten iPhone password.
Password enabled iPhone ensures that no one can access it without your permission and is a great way to stop prying eyes from accessing your personal data. But what if you itself forget the password? Isn’t that a problematic situation? Obviously, as you cannot unlock your iPhone and access the data. Further, if you enter the wrong password six times, then a message is displayed stating that the iPhone has been disabled.
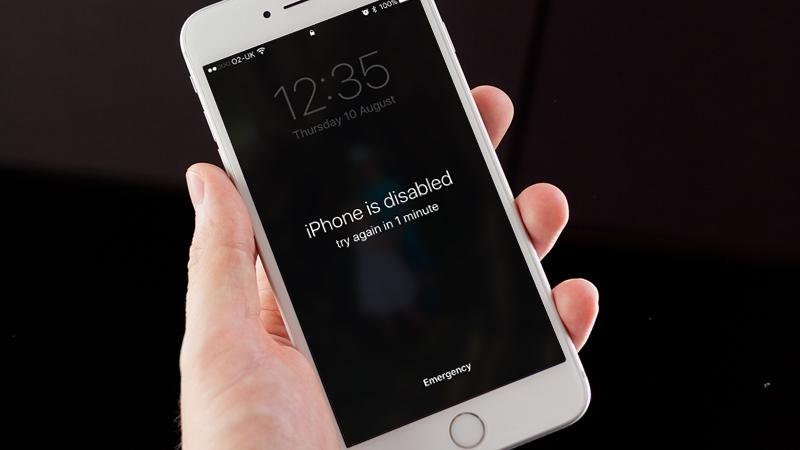 Figure 1. If you enter the wrong password six times in a row, then a message will be displayed stating that your iPhone has been disabled.
If you’re lucky then you might be able to unlock your iPhone and access the data stored on it else there is a probability that you may end up losing your data in the process of unlocking it.
Forgot iPhone passcode? What to do next?
Alright, I know it’s next to impossible that you will ever forget your passcode but we cannot overlook the fact that, yes there is a chance that you may forget it. The majority of us will say that we use fingerprint identity sensor (Touch ID) and hardly use a numeric passcode. Well, suppose your Touch ID stops working properly and to fix it you need to go to Settings < Touch ID & Passcode < Enter the Passcode.
Wait! What! You need to enter the passcode to get the Touch ID working again and you thought that you’d never need to remember the passcode. If you have a backup of your data, then all you have to do is simply reset your iPhone and restore your data from the backup. Unfortunately, you’ll only restore data that has been backed up and any new data added after that won’t be there. That said, let’s delve into some of the best solutions for forgotten iPhone password.
If you’ve forgotten the password, these options will help you out:
- Erase your iOS device with iTunes to remove the password
- Erase the passcode with iCloud
- Use Recovery mode if you’re unable to connect to either iCloud or iTunes
- Leverage an iPhone data recovery to recover deleted/lost data

Erase your iPhone with iTunes, restore files from it and remove the passcode
If you’ve synced your iPhone with iTunes, you can restore your files from it. Further, this will erase all the data and the passcode. To restore your data and remove the passcode, follow these steps:
i. Connect your iPhone to your computer and launch iTunes
ii. If you’re asked for the passcode, try another computer with which you’ve synced your iPhone, else proceed with either iCloud or Recovery mode
iii. Sync your iPhone with iTunes and make a backup of it
iv. On your iPhone set up the screen, choose Restore from iTunes backup
v. In iTunes select your iPhone and select the relevant backup
This process will restore all your data on iPhone. Now, configure a new passcode and never forget it.
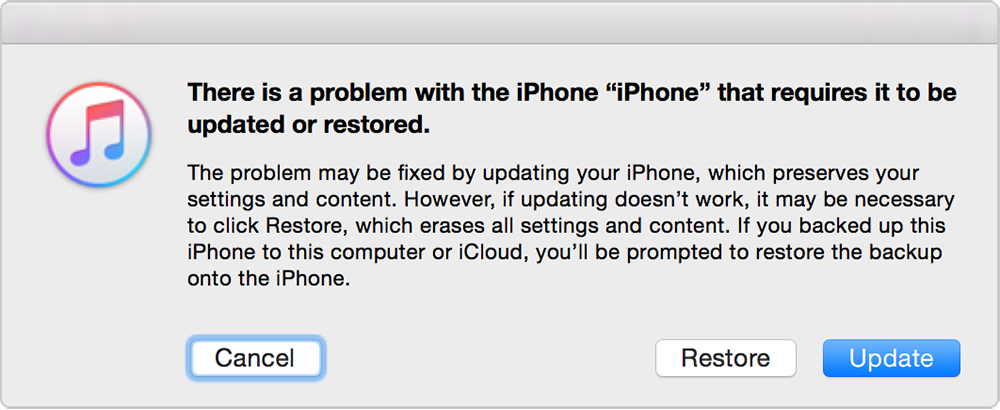
Figure 2 illustrates to erase the data & passcode and to restore your iPhone
Erase the passcode with iCloud
Follow these steps to erase the passcode of your iPhone with iCloud:
i. Go to iCloud.com and sign in with your valid Apple credentials to view the iCloud dashboard.
ii. At the top of the dashboard, select ‘All Devices’ and select your iPhone from the given list
iii. Click on ‘Erase’ to erase the passcode
iv. On the setup screen on your iPhone, choose the restore from a backup option to restore files from the iCloud backup
Important: You can erase your iPhone with Find My iPhone as long as it is connected to a Wi-Fi or cellular network.
Use Recovery mode to erase the passcode
If you’ve never synced your iPhone with iTunes or iCloud, then you need to erase the passcode in the Recovery mode. Follow these steps to erase the passcode:
i. Connect your iPhone to your system and force restart it. Different versions of iPhone have different settings; therefore, follow these settings depending on your iPhone
- iPhone 8/8 Plus: Press and release the Volume up button and then quickly press and release the Volume down button. Press and hold the Side button until the recovery mode screen appears
- iPhone 7/7 Plus: Press and keep holding both the Side and Volume down buttons until you see the recovery mode screen
- iPhone 6S and earlier: Press and keep holding the Home and the Side buttons until the recovery mode screen appears
ii. Finally, after restarting the iPhone, select Restore from the given options
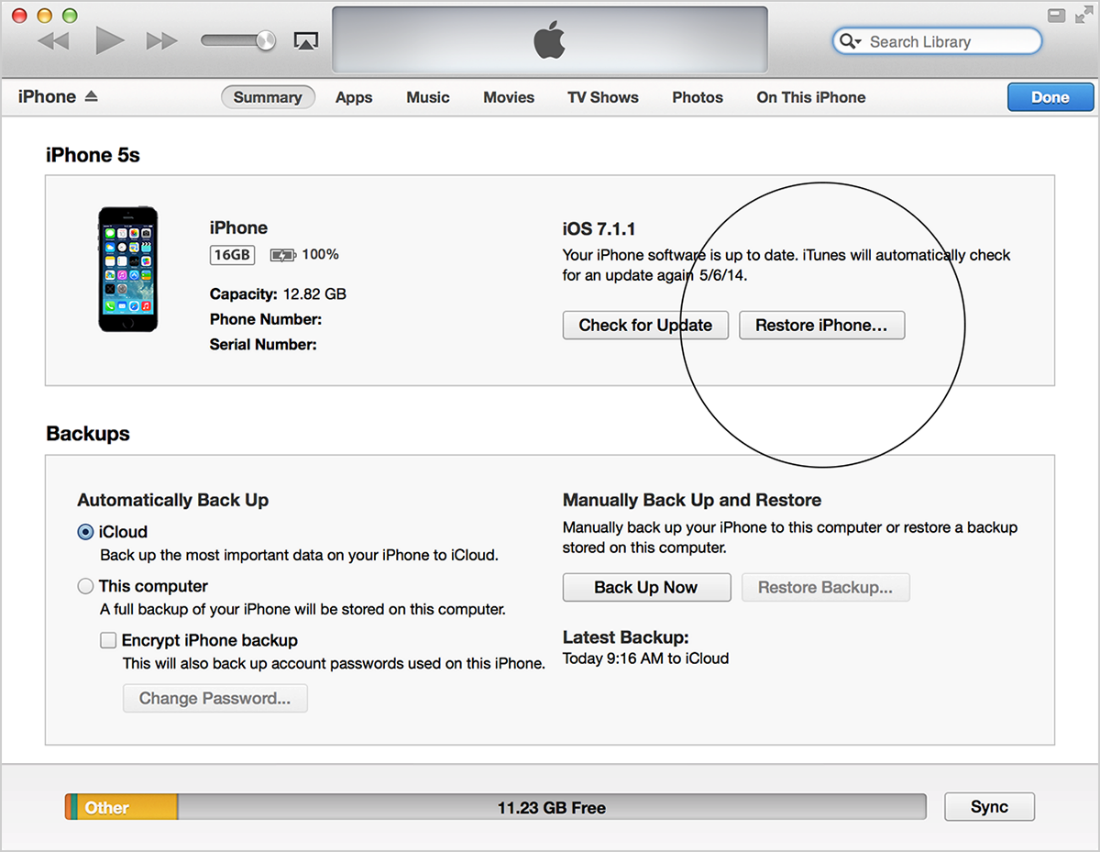
Figure 3 illustrates to restore iPhone via recovery mode
iii. Wait for the process to finish and then restore your files to your iPhone and set up a new passcode
Get more help
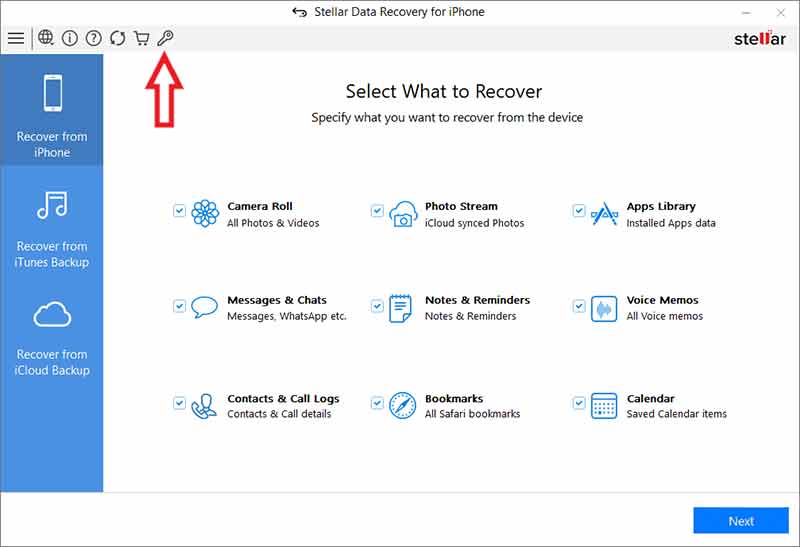
If due to any reason you lose your data stored on iPhone during the whole process, then you can utilize an iPhone data recovery software and recover all your lost data. Stellar Data Recovery for iPhone is a robust iPhone data recovery software which efficiently brings back all your lost data. Moreover, the software facilitates three recovery option namely:


- Recover from iPhone
- Recover from iTunes Backup
- Recover from iCloud backup
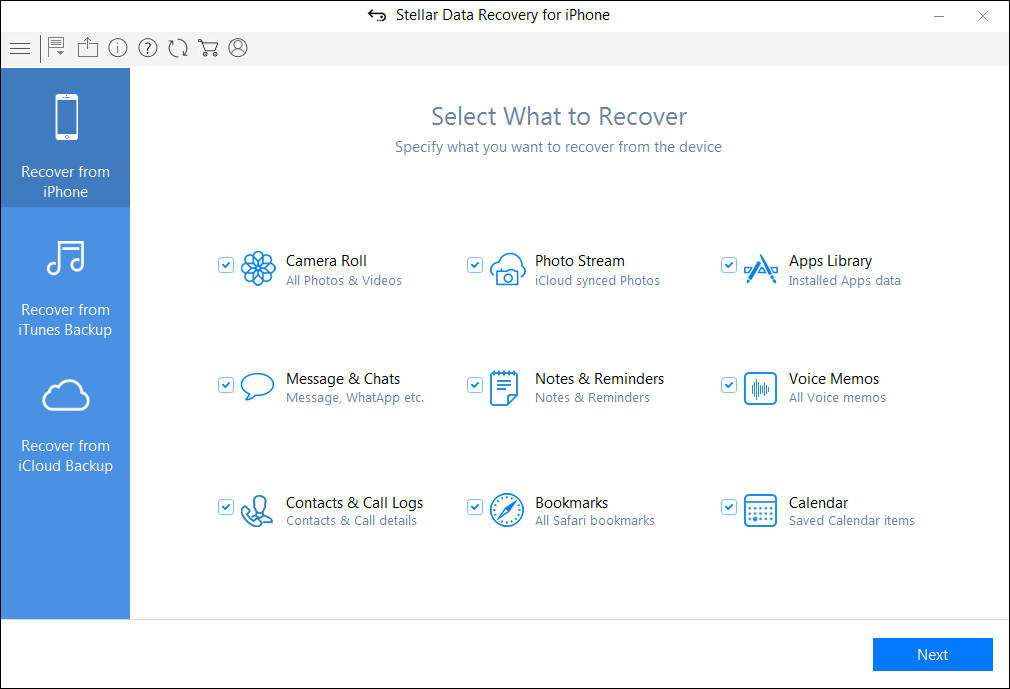
Figure 3 illustrates the home screen of Stellar Data Recovery for iPhone software
At Last
After restoring your iPhone , make sure that you never ever forget the passcode. The key is to create a strong passcode which is easy to remember. Further, if your iPhone gets stuck in recovery mode or due to any reason you’re unable to unlock your device, contact Apple support or visit the nearest service centre.
How to Put iPhone or iPad on Recovery mode? (Step by Step Tutorial)
Summary: DFU or Recovery mode is a way to recover your iPhone or iPad using a computer in case of technical issues. Read this post for a step-by-step process of how to enter and exit Recovery Mode and DFU mode on iPhone.
When you run out of solutions to troubleshoot your iPhone, Recovery Mode or DFU Mode comes as a rescue. Whether iPhone stops booting or fails to restore, you can use the functions in iPhone and fix the issue.
But the method to bring an iPhone in DFU or Recovery Mode varies in each iPhone model and iPad.
This post will guide you on how to enter and exit Recovery and DFU Modes in different iPhone and iPad variants. But first, understand what these iPhone functions are and their uses.

What is Recovery Mode and its use?
Recovery Mode uses iBoot to upgrade or restore your iPhone. iBoot is a bootloader program for iOS devices. Recovery Mode helps install the same or above iOS firmware version already on your iPhone. The iPhone screen in Recovery Mode prompts to connect iPhone to iTunes, showing a computer image.
Recovery Mode helps fix iPhone updates or restore issues, such as iPhone stuck at the Apple logo , unable to open the locked iPhone or want to reset iPhone but forgot iPhone passcode .
What is DFU Mode and its use?
Device Firmware Update or DFU mode lets your iPhone connect with iTunes on the computer without iBoot. As DFU mode doesn’t use iBoot, you can make changes in the operating system of the iOS device. An iPhone in DFU mode has a completely black screen.
Putting iPhone into DFU mode is the solution when Recovery Mode doesn’t resolve the problem. DFU mode can restore or upgrade iPhone. This mode is also commonly used to downgrade or jailbreak iPhone s.
Caution — you may lose all your iPhone data!
If you are entering DFU mode, make sure to back up your iPhone data . DFU mode permanently erases iPhone data . So always back up your videos, photos, messages, chats, Notes, etc., either to iCloud or iTunes.
However, if you have lost iPhone data and don’t have a backup, then immediately download iPhone data recovery software — Stellar Data Recovery for iPhone . The software helps to restore lost or deleted iPhone contacts, call logs, photos, videos, text, FaceTime, audio, chats, Calendar, Notes, Safari bookmarks, etc. It is quick to recover and extremely user-friendly.
What is required to perform Recovery and DFU modes in iPhone?
- Windows or Mac system.
- Lightning to USB cable.
- iTunes updated to the latest version on your computer.
How to put iPhone 6 and earlier versions in Recovery Mode
Follow the below steps to enter Recovery Mode on iPhone 6, iPhone 6s, iPhone 6s Plus, iPhone 5s, iPhone 5, iPhone 4s, and iPhone 4.
- Connect your iPhone to your PC using USB Lightning Cable and launch iTunes.
- Press and hold down the Home and Power button to turn the iPhone.

- Then connect the USB cable to iPhone and turn it on by holding the Home button.
- Continue to hold the Home button until a pop-up appears informing ‘an iPhone has been detected in recovery mode’ on your system.
- In Recovery mode, you can either restore the iPhone, set it up as new, or just recover your backups.

How to put iPhone 7 in Recovery Mode
It’s easy to enter Recovery Mode on iPhone 7 or iPhone 7 Plus. Follow the below steps:
- Turn off your iPhone 7 and connect it to your Mac or Windows computer.
- Ensure iTunes or Finder is running on the system.
- Press and hold the Power and Volume down button for 10 seconds.
- While continuing to hold the Volume down button, release the Power button.

- Release the button if you see the iTunes has detected an iPhone in recovery mode message on your system.
How to put iPhone 8 in Recovery Mode
If you want to enter the Recovery Mode on iPhone 8 and its variants, follow the below steps:
- Connect your iPhone 8 to your Mac or Windows system with a USB cable.
- Next, press and release the following buttons in a sequence Volume Up button, Volume Down, and Side button until your device reboots. Continue holding the Side button, even after seeing the Apple logo appear.
- Release the Side button once the Connect to iTunes logo appears on the iPhone’s display.

- Launch iTunes, and you should see a message stating, “There is a problem with the iPhone that requires it to be updated or restored.” You can choose to Update or Restore your iPhone’s software.
How to put iPhone 11 into Recovery Mode
To enter Recovery Mode on iPhone 11, iPhone 11 Pro, or iPhone 11 Pro Max, follow these steps:
- Connect your iPhone with your Mac or PC and launch iTunes.
- Force restart your iPhone with the following steps:
- Press and release the Volume Up button.
- Press and release the Volume Down button.
- Press and hold the Side button.
- Make sure to release these buttons if you see the recovery mode screen with the “Connect to iTunes” screen.
- Then choose your iPhone in iTunes, and you will see a pop-up saying that your iPhone is in Recovery Mode. Here, you can either update or restore your iPhone.
How to put iPhone 12 into Recovery Mode
Follow the below steps to enter Recovery Mode on iPhone 12, iPhone 12 mini, iPhone 12 Pro, and iPhone 12 Pro Max:
- Update iTunes to the latest version.
- Connect your iPhone to your PC or Mac via Lightning to a USB cable.
- Note: If you are connecting your iPhone to the computer for the first time, click on ‘Trust’ in the Trust This Computer dialog box and follow the prompts.
- Once your iPhone is paired with the computer, press the Volume up button followed by the Volume down button and release.
- Press and continue to hold the Side button until you see the ‘Connect to computer’ screen on your iPhone. While on your computer, you would see the iPhone Recovery Mode message in iTunes, confirming that your iPhone has entered into Recovery Mode. The computer asks you to either Update or Restore your iPhone**.** Click on any based on your requirement.
If you choose Update, iTunes will update your iPhone 12 to the latest iOS release. This won’t lead to any loss of data.
If you select Restore: It will erase iPhone data completely and renew your entire iPhone.
How to put Recovery Mode on iPhone 13
Entering Recovery Mode on iPhone 13 and iPhone 13 Pro has the same steps as iPhone 12. To enter the Recovery Mode, connect your iPhone to your computer and do the following steps in quick succession.
- Press the Volume up button and release.
- Press the Volume down button and release.
- Press and continue to hold the side button until the ‘Connect to iTunes’ screen appears on iPhone.

How to put Recovery Mode on iPhone 14
To use recovery mode on iPhone 14 and iPhone 14 Pro, follows these steps:
- Connect your iPhone to your system with a Lightning cable.
- Now on iPhone, press and quickly release the Volume up, Volume down, and side buttons until you see the recovery mode screen.
- Select your iPhone in the Finder/iTunes window and choose to update or restore your iPhone.

How to exit Recovery Mode on iPhone
It’s easy to exit Recovery Mode on iPhone. Follow the below steps:
- Hold the Home button and Lock button to exit DFU mode on iPhone 6 and earlier versions until your device reboots.
- To exit DFU mode on iPhone 7/7 Plus, hold the Side and Volume Down buttons until the device reboots.
- To exit the Recovery Mode on iPhone 8 or later version, press and hold the Side button until the “Connect to iTunes” screen disappears, and then iPhone should reboot back into iOS.
How to put Recovery Mode on iPad
To enter Recovery Mode on the iPad, follow these steps:
- Connect your iPad to Windows or Mac system using a USB cable.
- For iPad with a Home button: Press and hold the Home button and the Top/Side button until your iPad enters recovery mode.
- For iPad without a Home button: Quickly press and release the Volume Up button, Volume Down button, and the Top button. Keep holding the Top button until the iPad enters recovery mode.

How to put iPhone into DFU mode ?
Follow the below steps to enter DFU Mode on iPhone and its various version:
- Connect iPhone to PC or Mac via USB cable. Note: If the ‘Trust This Computer’ dialog box appears, follow the prompts.
- Once your iPhone is paired with a computer, follow these steps:
How to Enter DFU Mode on an iPhone 8 and later versions
- Press the Volume up button, then Volume down button, and release.
- Quickly press and hold the Side button for about 5 seconds.
- Along with the Side button, press and hold the Volume down button.
- Release the Side button and continue to hold the Volume down button for about 10 seconds.
- Once you see the ‘Recovery Mode’ screen in iTunes on your computer, you have successfully entered the DFU mode. However, the iPhone screen remains black in DFU Mode.
How to Enter DFU Mode on an iPhone 7
- Press and hold the Power and the Volume down buttons for 8–10 seconds.
- Release the Power button and continue to hold the Volume down button.
- Release the Volume down button once your iPhone has entered recovery mode.
How to Enter DFU Mode on an iPhone 6S or Earlier Versions
- Press and hold the Power/Sleep and Home buttons together for 10 seconds.
- Release the Power/Sleep button, but continue holding the Home button.
- Release the Home button once you see iTunes/Finder has detected an iPhone in recovery mode message.
Note: If you see the Apple logo on your iPhone, try again and repeat the above steps carefully.
How to exit DFU Mode on iPhone ?
If you want to exit DFU Mode on iPhone and its variants, follow the below steps:
How to Exit DFU Mode on an iPhone 8 or Later versions
- Press the Volume Up button and quickly release.
- Press the Volume Down button and quickly release.
- Now, press and hold the Side button until the Apple logo appears on iPhone. This indicates your iPhone has exited DFU Mode. Your iPhone would boot to the ‘Lock’ screen in a few seconds. Now, enter your passcode and continue to use your iPhone.
How to Exit DFU Mode on an iPhone 7
Press and hold the Power or Sleep button and the Volume down button until you see the Apple Logo.
How to Exit DFU Mode on iPhone 6 or Earlier versions
Hold the Home button and the Power button of the iPhone simultaneously until Apple’s logo appears on the screen.
Conclusion
Whenever your iPhone and its variants show problems like being stuck at the Apple logo, won’t upgrade, restore, or respond, you can use Recovery Mode and DFU Mode functions to resolve the problem. But don’t forget to back up your iPhone data before using these functions.
However, in any unfortunate incident of data loss while performing the functions, trust Stellar Data Recovery for iPhone – a software that brings back lost data on your iPhone securely.
FAQ
1. Does DFU Mode delete iPhone data?
If you use DFU mode to install something or restore your device, all your iPhone’s data will be erased.
2. Can you enter the recovery mode if your iPhone is disabled?
An iPhone is disabled when a user enters an incorrect password too many times on the lock screen. You should be able to enter the recovery mode using the same steps mentioned above and restore your iPhone to regain access.
3. How to put the iPhone in recovery mode without a computer?
A computer is not necessary to enter the recovery mode on an iPhone. You only need to press the right buttons, depending on your iPhone model, to enter the recovery mode. However, to restore your iPhone – you will need a computer.
How to Activate Stellar Data Recovery for iPhone
If you want to recover and save the missing or deleted iPhone data, activate Stellar Data Recovery for iPhone on your computer.
The demo version of the software is only for evaluation purposes. To use its full functionality, purchase the software and then activate it.
The software can be activated using the Activation Key, which you receive via email after purchasing the software. It would help if you had an active Internet connection to activate Stellar Data Recovery for iPhone .
Steps to activate Stellar Data Recovery for iPhone
- Run the demo version of Stellar Data Recovery for iPhone software
- On the main interface, click the Activation icon
- The Activation window appears. Enter the Activation Key you received in your email after purchasing the software.

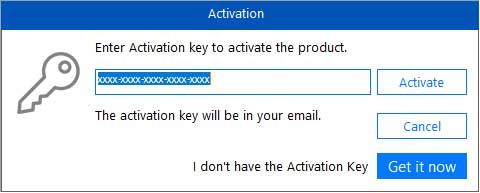
- Click Activate
- The software verifies the entered key. After successful verification, a message appears saying ‘Activation Completed Successfully’. Click OK.
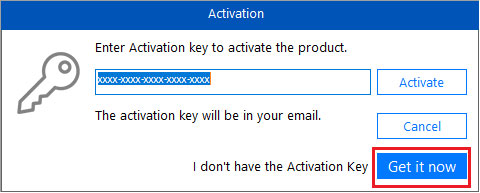
If you don’t have the Activation Key of Stellar Data Recovery for iPhone, here’s how to get it…
In case you don’t have an Activation Key, follow the below steps:
- Free download and install the software on your computer
- Click on the Activation icon on the home screen of the software
- Click Get it now
- The software directs you to the buy page. Next, click on Windows or Mac tab, as per your system.
- Click on Buy Now button to purchase the software
- Fill in your details as asked
- After purchasing the software within a few minutes, you will receive an Activation Key and the link to download the product on your email. Use that link and key to activate Stellar Data Recovery for iPhone as given in steps (1-6)
Note: If you didn’t receive the Activation Key at your registered email within a few minutes of purchasing the software, contact our customer support via mail, chat, or call.
Stellar Data Recovery for iPhone® Stellar Data Recovery for iPhone® is the best DIY software to recover missing or accidentally deleted Contacts, Messages, Calendar, Photos, Videos, Call History etc directly from iPhone or iPad.
How to Wipe iPhone Data Permanently?
Summary: Do you want to erase everything on your iPhone? But fear that it could be recovered. Learn about the best tool that wipes iPhone data permanently and makes it unrecoverable by any recovery software.

Your iPhone is a trove of personal data — photos, videos, passwords, ID proofs, bank details, chats, messages, contacts, and a lot more— which, naturally, you don’t want to fall into other hands. That’s why you prefer to delete all the information on your iPhone before selling it to others.
But several iPhone recovery software can easily restore deleted data from an old or discarded iPhone. So there’s always a fear that someone could recover your iPhone’s data and misuse it.
Here’s a solution — permanently wipe iPhone data beyond the scope of recovery by any software.
How do you permanently erase data from your iPhone?
Manual deletion is one of the ways to remove data. But it can be easily recovered by iPhone features like restoring ‘Recently Deleted’ or recovery software.
Then, Apple suggests resetting the content and settings of the iOS device. It’s effective as the deleted data is not accessible directly on your iPhone. But this also does not completely erase your data from iPhone storage.
So to wipe iPhones permanently, specialized erasure software should be used. The iPhone data erasure tool destroys all information on your storage by overwriting, thus rendering it unrecoverable.
Methods to erase everything on iPhone
- Reset content and settings on iPhone (data gets inaccessible but recoverable)
- Use iPhone data erasure software – Stellar Toolkit for iPhone (permanently wipes iPhone’s data, unrecoverable)
Method 1: Reset content and settings on iPhone
Apple provides a factory reset feature in iPhone with the ‘Erase All Content and Settings’ option. This method lets you bring your device to default settings by erasing iPhone data.
Apple’s factory reset will delete all settings, passcodes, photos, videos, notes, contacts, call history, messages, search history, app history, and other data on your iPhone.
However, erasing your iPhone with the ‘Erase All Content and Settings’ option does not delete your data permanently. All the personal data on iPhone is still recoverable with the help of advanced iPhone data recovery software.
Steps to Factory Reset iPhone:
- Open Settings on your iPhone.
- Tap and follow General > Reset.
- Tap on Erase All Content and Settings.
- A dialog box appears; click Erase Now.
- Enter your Passcode and your Apple ID password when prompted. This will wipe iPhone completely and turn off the device.
Now your device is ready to use as new without any personal photos, videos, or other information.
Note: Back up your iPhone data on iCloud or iTunes before performing a factory reset. Even when you want to sell the iPhone, the old data remains in iCloud and iTunes. And you can access it anytime on your computer or new iPhone.
Method 2: Erase data permanently using Stellar Toolkit for iPhone
When you want to delete iPhone data permanently beyond the scope of any recovery software, use an iPhone erasure tool – Stellar Toolkit for iPhone.
The factory reset option by Apple does leave a chance of iPhone data recovery by using the software. But, Stellar Toolkit for iPhone software permanently resets iPhone. The software erases iPhone data from the storage drive by overwriting and setting it to the original default settings. The software leaves no possibility of recovering data by any means.
You can quickly remove iPhone’s settings, photos, videos, audio, music, contacts, messages, chats, installed apps, call history, reminders, search history, and other data.
The software works with all iPhones and iPads. It can wipe off data from iPhone 15, 14, 14 Pro, 14 Pro Max, 13, 13 Pro, 13 Pro Max, 12, 12 Pro, 12 Pro Max, 11 Pro, 11, XS MAX, XS, XR, X, 8, 7, 7s, 6s, 6 Plus, 6, 5s, 5c, 5, 4s, and 4. It supports iOS 6.0 and up to iOS 16.x.
Stellar iPhone erasure lets you completely wipe data from an unlimited number of iPhones with the software.
Additionally, the Toolkit can also recover lost, or deleted data from iPhone, iCloud, and iTunes in various data lost cases such as water-damaged iPhones , broken iPhones , stuck at Apple logos , and so on.
Key benefits
- Wipes complete iPhone data permanently
- Erases data from multiple unique iPhones
- Easy-to-use
- Compatible with all iPhones and iPads
![]()
Steps to erase iPhone data permanently with software:
Step 1: Download and run Stellar Toolkit for iPhone on your computer.
Step 2: Select Erase Data.

Step 3: Erase the iPhone Data screen appears. Click Next.

Step 4: Plug your iPhone into the computer when prompted.

Step 5: Click Erase.
Step 6: An Erase Process dialog box appears. Select Yes to start the erasing process on iPhone. Next, you can view the process progress bar.

Step 7: Once the process finishes, the ‘Data Erase Completes’ message box appears. Click OK.
Your iPhone is now reset as new without any personal information, passwords, or settings.

When should you erase iPhone data with software?
Your data is sensitive and can be easily exploited by someone. So before giving away your iOS device to its next owner, it is better to wipe it off completely so that no one can recover it.
You can use iPhone erasure software when you are-
- Selling an old iPhone
- Exchanging an old iPhone with a new one
- Donating an iPhone to someone
- Fixing technical malfunctions in your iPhone
Final Words
Stellar Toolkit for iPhone comes to the rescue when you want to be sure about your iPhone data privacy.
If you have to use your iOS device as new, give it away, donate, or resell, you must use the erasure software to wipe iPhone data permanently. It’s 100% secure and easy to use.
![]()
A free trial is available for Stellar Toolkit for iPhone; you may try it yourself.
- Title: Forgot iPhone 12 mini Password? – Here are the Best Solutions | Stellar
- Author: Nova
- Created at : 2024-07-17 17:17:17
- Updated at : 2024-07-18 17:17:17
- Link: https://phone-solutions.techidaily.com/forgot-iphone-12-mini-password-here-are-the-best-solutions-stellar-by-stellar-data-recovery-ios-iphone-data-recovery/
- License: This work is licensed under CC BY-NC-SA 4.0.