
Forgot iPhone SE (2022) Password? – Here are the Best Solutions | Stellar
Forgot iPhone Password? – Here are the Best Solutions
Summary: Can’t remember your iPhone password? This post brings the best solutions to fix forgotten password issue and restore your data from the locked iPhone.
Setting up a password on your iPhone is a great way to keep unauthorized access at bay but what if you forget the password? On a positive note, you can still access or restore your iPhone Data and this blog highlights some best solutions for forgotten iPhone password.
Password enabled iPhone ensures that no one can access it without your permission and is a great way to stop prying eyes from accessing your personal data. But what if you itself forget the password? Isn’t that a problematic situation? Obviously, as you cannot unlock your iPhone and access the data. Further, if you enter the wrong password six times, then a message is displayed stating that the iPhone has been disabled.

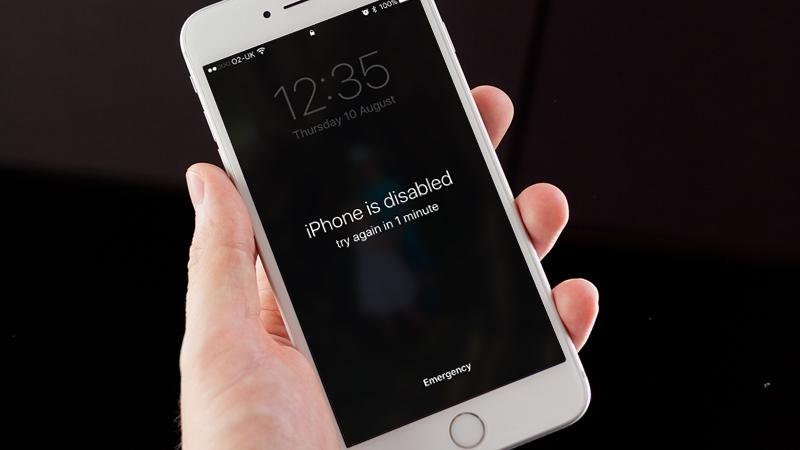 Figure 1. If you enter the wrong password six times in a row, then a message will be displayed stating that your iPhone has been disabled.
If you’re lucky then you might be able to unlock your iPhone and access the data stored on it else there is a probability that you may end up losing your data in the process of unlocking it.
Forgot iPhone passcode? What to do next?
Alright, I know it’s next to impossible that you will ever forget your passcode but we cannot overlook the fact that, yes there is a chance that you may forget it. The majority of us will say that we use fingerprint identity sensor (Touch ID) and hardly use a numeric passcode. Well, suppose your Touch ID stops working properly and to fix it you need to go to Settings < Touch ID & Passcode < Enter the Passcode.
Wait! What! You need to enter the passcode to get the Touch ID working again and you thought that you’d never need to remember the passcode. If you have a backup of your data, then all you have to do is simply reset your iPhone and restore your data from the backup. Unfortunately, you’ll only restore data that has been backed up and any new data added after that won’t be there. That said, let’s delve into some of the best solutions for forgotten iPhone password.
If you’ve forgotten the password, these options will help you out:
- Erase your iOS device with iTunes to remove the password
- Erase the passcode with iCloud
- Use Recovery mode if you’re unable to connect to either iCloud or iTunes
- Leverage an iPhone data recovery to recover deleted/lost data

Erase your iPhone with iTunes, restore files from it and remove the passcode
If you’ve synced your iPhone with iTunes, you can restore your files from it. Further, this will erase all the data and the passcode. To restore your data and remove the passcode, follow these steps:
i. Connect your iPhone to your computer and launch iTunes
ii. If you’re asked for the passcode, try another computer with which you’ve synced your iPhone, else proceed with either iCloud or Recovery mode
iii. Sync your iPhone with iTunes and make a backup of it
iv. On your iPhone set up the screen, choose Restore from iTunes backup
v. In iTunes select your iPhone and select the relevant backup
This process will restore all your data on iPhone. Now, configure a new passcode and never forget it.
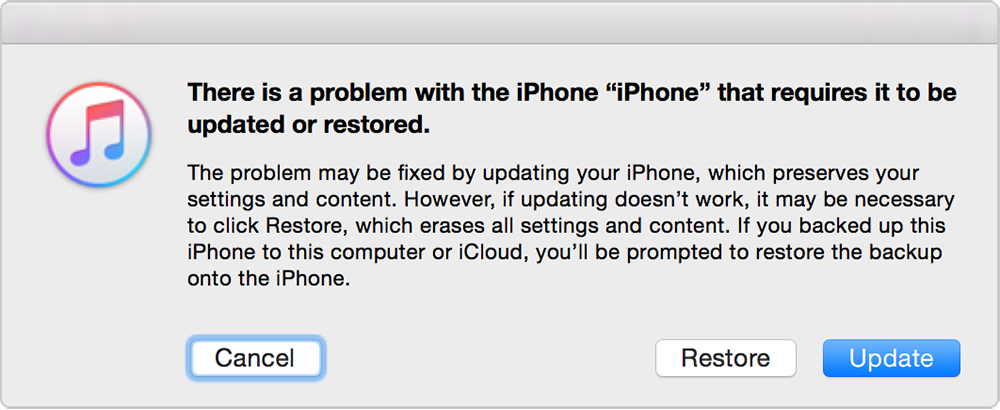
Figure 2 illustrates to erase the data & passcode and to restore your iPhone
Erase the passcode with iCloud
Follow these steps to erase the passcode of your iPhone with iCloud:
i. Go to iCloud.com and sign in with your valid Apple credentials to view the iCloud dashboard.
ii. At the top of the dashboard, select ‘All Devices’ and select your iPhone from the given list
iii. Click on ‘Erase’ to erase the passcode
iv. On the setup screen on your iPhone, choose the restore from a backup option to restore files from the iCloud backup
Important: You can erase your iPhone with Find My iPhone as long as it is connected to a Wi-Fi or cellular network.
Use Recovery mode to erase the passcode
If you’ve never synced your iPhone with iTunes or iCloud, then you need to erase the passcode in the Recovery mode. Follow these steps to erase the passcode:
i. Connect your iPhone to your system and force restart it. Different versions of iPhone have different settings; therefore, follow these settings depending on your iPhone
- iPhone 8/8 Plus: Press and release the Volume up button and then quickly press and release the Volume down button. Press and hold the Side button until the recovery mode screen appears
- iPhone 7/7 Plus: Press and keep holding both the Side and Volume down buttons until you see the recovery mode screen
- iPhone 6S and earlier: Press and keep holding the Home and the Side buttons until the recovery mode screen appears
ii. Finally, after restarting the iPhone, select Restore from the given options
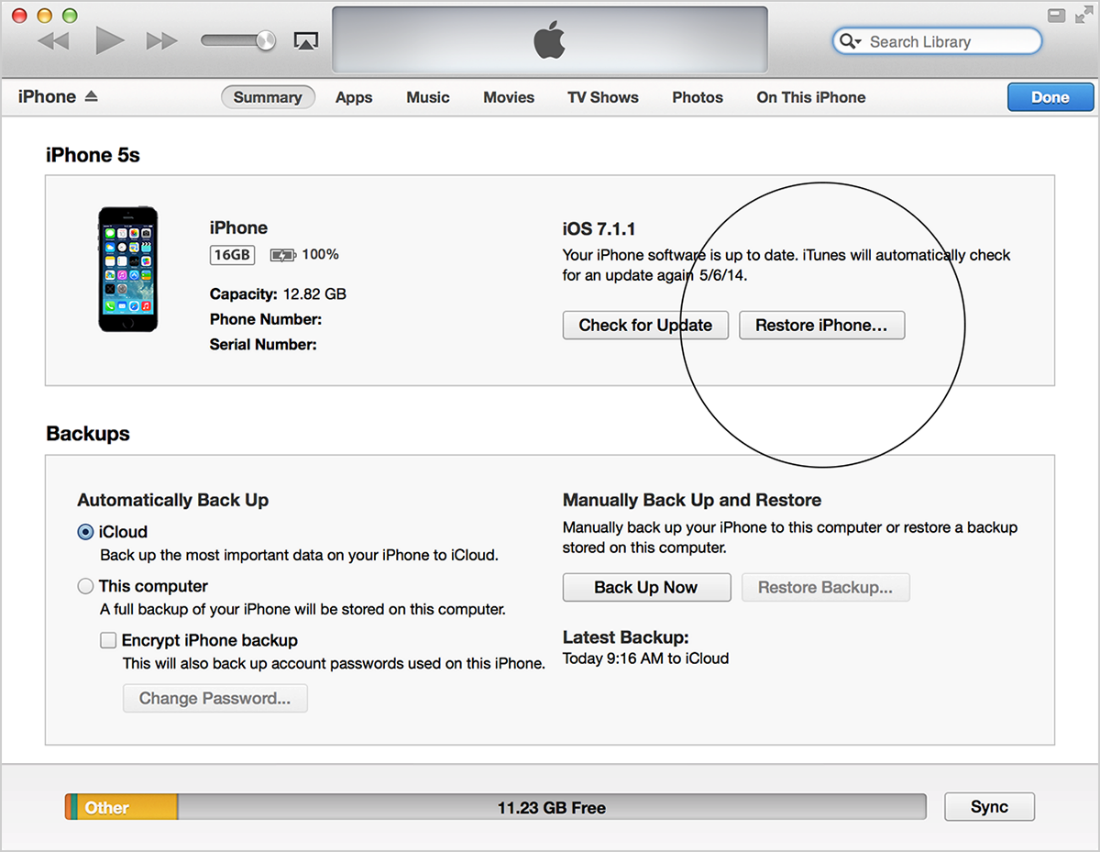
Figure 3 illustrates to restore iPhone via recovery mode
iii. Wait for the process to finish and then restore your files to your iPhone and set up a new passcode
Get more help
If due to any reason you lose your data stored on iPhone during the whole process, then you can utilize an iPhone data recovery software and recover all your lost data. Stellar Data Recovery for iPhone is a robust iPhone data recovery software which efficiently brings back all your lost data. Moreover, the software facilitates three recovery option namely:


- Recover from iPhone
- Recover from iTunes Backup
- Recover from iCloud backup
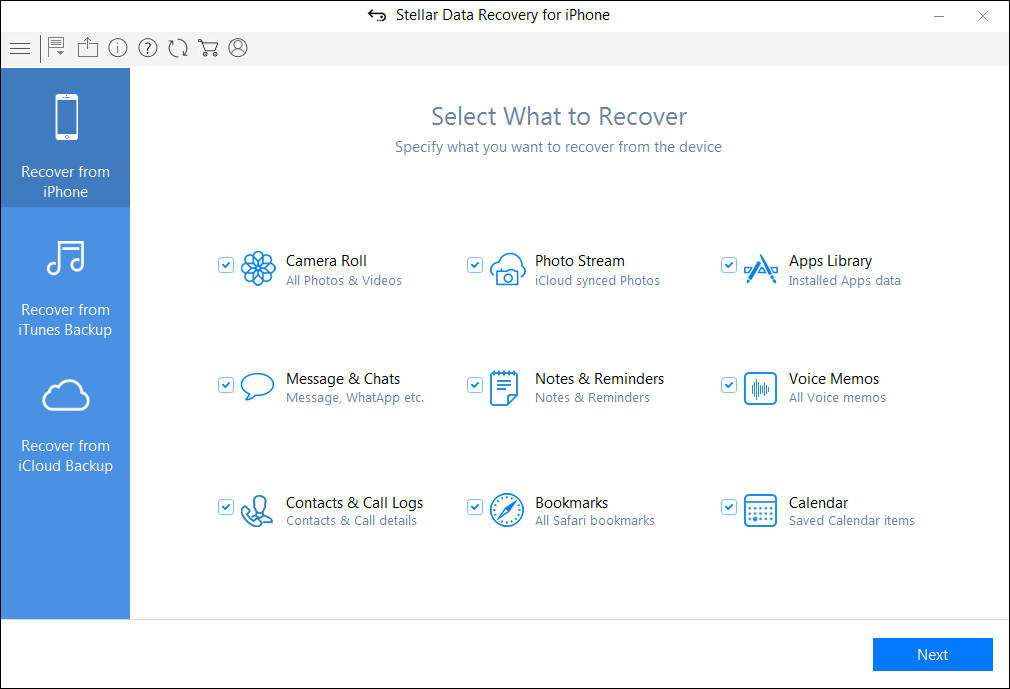
Figure 3 illustrates the home screen of Stellar Data Recovery for iPhone software
At Last
After restoring your iPhone , make sure that you never ever forget the passcode. The key is to create a strong passcode which is easy to remember. Further, if your iPhone gets stuck in recovery mode or due to any reason you’re unable to unlock your device, contact Apple support or visit the nearest service centre.
Top iPhone Message Recovery Software
iPhone is a valuable digital device, and so are the messages you store in it. Nonetheless, many users may accidentally delete them at once while deleting some unnecessary apps or data from their iPhones. If you are a victim of such an incident and looking for quick options to recover iPhone messages, this article is your ultimate saviour.
Do iPhone recovery programs work?
Yes! iPhone’s built-in recovery options can restore temporarily deleted or lost messages hidden in the operating system. Moreover, many iPhone-friendly tools and applications guarantee retrieval of lost messages without using backup options. Simply download and install the tool and play along to scan your iOS device.
What is the best message recovery software?
With a wide range of data recovery software available online, finding an ideal solution to recover lost messages would be challenging. Here’s some criteria for selecting the right tool:
- The software or tool can recover deleted messages even without backup.
- It can recover deleted messages on iPhone from iCloud or iTunes without affecting the existing data.
- The tool is virus-free, reliable, and safe to use.
- It is compatible with all iOS models, including iPhone 15, 14, 13, 12, 11, or XS.
- It can recover various iOS files like messages, photos, videos, contacts, WhatsApp, or FaceTime messages.
- The tool must offer professional technical support to address your queries while using the software.
Pro Tip: Stop using your iPhone as soon as you realize that a significant amount of data, including files, messages, photos, etc., are lost. Any operation on the device may overwrite the hidden or lost data, making it irretrievable.
Best 5 iPhone Message Recovery Software to Try
1. Stellar Data Recovery for iPhone
One of the most esteemed iPhone data recovery tools, Stellar Data Recovery for iPhone , is known for its incredibly intuitive GUI. It meets all the above-mentioned criteria that make it proficient at salvaging your lost iPhone messages, WhatsApp chats, FaceTime data, etc. Further, the tool can transfer your important messages from iPhone to personal computer, laptop, or Mac.

Besides data recovery from iPhone, iCloud, and iTunes, Stellar Data Recovery for iPhone gives you the option to selectively browse, preview, and recover data after scan. Moreover, it allows you to permanently erase unwanted data from your iPhone beyond recovery. All such advanced features make it a prestigious iPhone recovery message option. Read this KB to recover deleted data from iPhone via Stellar Data Recovery for iPhone.
Stellar Data Recovery for iPhone - Advantages
The tool can recover unlimited file formats on storage media, be it Safari bookmarks, notes, voice memos, and WhatsApp chat history, or general messages.
You can preview all the data recovered from your iPhone for free.
It is proficient at recovering deleted data from an encrypted backup.
The tool is easy-to-use and does deep scanning of an iPhone.
It can also perform recovery of lost data from iTunes and iCloud backup.
Disadvantages You cannot save the recovered messages or files without purchasing the software.
2. Dr. Fone for iOS
Dr. Fone for iOS is another famous iPhone message recovery application. It’s a professional tool that guides you on retrieving deleted messages on your iPhone while enabling recovery of diverse iOS files, including contacts, photos, voicemails, and SMS. The app has a preview function to help you view the deleted messages before recovery.
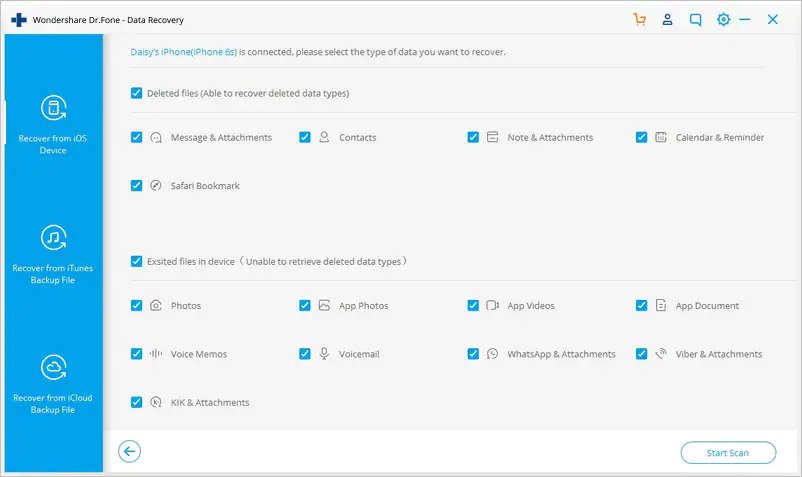
Dr. Fone for iOS - Advantages
- Swiftly recovers data from iTunes, iCloud, and iPhone
- Compatible with all iPhone models.
Disadvantages
- You can’t access advanced data recovery functionalities without using the upgraded version.
- The application is costly to upgrade.
3. EaseUS MobiSaver
EaseUS MobiSaver is an iPhone SMS recovery software that can scan your iOS device, iCloud backup, and iTunes backup to trace the lost message files. It not only recovers lost messages but also helps you retrieve data from your iPhone if your device turns inaccessible. The free version has certain limitations which can be overcome using the paid version.
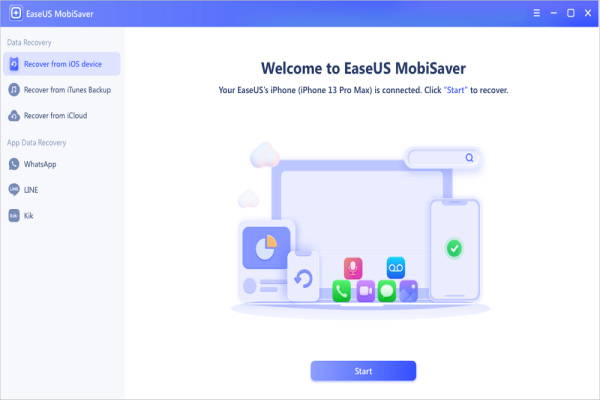
EaseUS MobiSaver – Advantages
- It is an absolutely free data recovery solution.
- It can recover messages from a water-damaged, broken, lost, or cracked iPhone.
- The app displays all the deleted files.
Disadvantages
- Its data recovery success rate is low compared with other professional software.
- Being a free tool, it can recover only a limited set of data files.
4. Syncios Data Recovery
This tool claims to bring back all deleted or lost data from iPhone, including audio files, SMS, documents, video files, and contacts. Syncios Data Recovery works for all iPhones, iPads, or even iPods. It is recommended to download the free trial version and see if your deleted messages can be recovered or not.
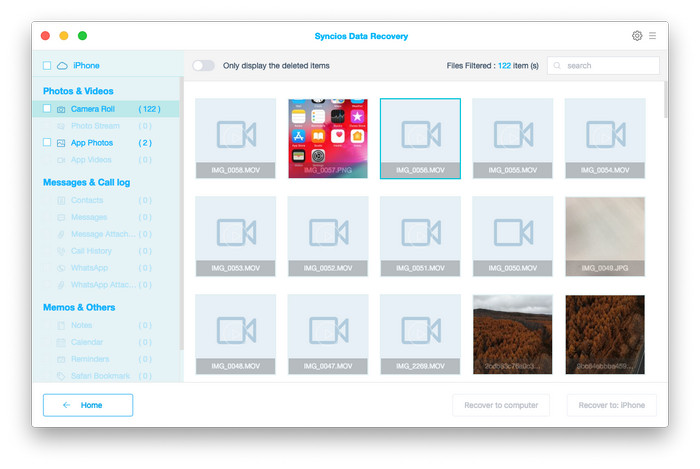
Syncios Data Recovery - Advantages
- The tool is compatible with all versions of the iPhone.
- You can reach out to their quality customer service via email or phone.
- The brand offers free technical support for a lifetime.
Disadvantages
- It takes a long time to retrieve deleted text messages from iPhone or lost data.
5. iMyFone D-Back
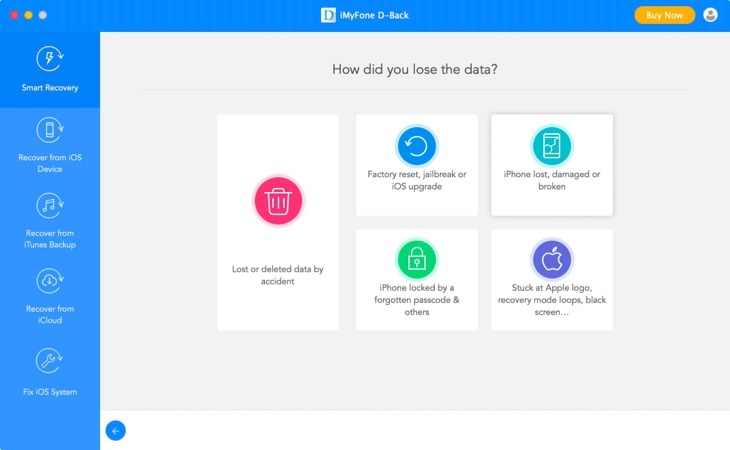
This tool enables you to recover the data in all iOS devices whose data have been lost or deleted accidentally. Renowned as iPhone text recovery app, iMyFone D-Back claims to recover all the lost SMS, WhatsApp texts, contacts, notes, call history, and photos. Further, the tool can easily and swiftly bring back iCloud, iTunes, and even iOS backup files. Its smooth preview function enables you to check and recover selective items only.
iMyFone D-Back - Advantages
- It can recover about 20+ varieties of files.
- The tool is free from viruses and malware.
- Besides iPhone, it is also compatible with almost all iPad versions.
Disadvantages
- Data recovery from iCloud remains a challenge.
- It cannot recover all kinds of lost data files.
The Bottom Line
iPhone data recovery tools are available in bulk. All are significantly different from each other in terms of functionality and proficiency. We cherry-picked some reputed tools for you to ease the pain of losing crucial messages from iPhone. There is no one-size-fits-all tool in the iPhone data recovery category. Therefore, we suggest you pick a reliable software, which is trusted and recommended by industry veterans, easy-to-use, and performs multiple functions at a reasonable cost. This article will give you a clear picture of which tool is the most suitable to overcome your iPhone messages recovery needs.
Guide to Completely Erase Data on iPhone to Avoid Privacy Leak
With growing instances of data leak and misuse, there’s a fear of digital data on iPhone landing in wrong hands. Personal photos, messages, videos, contacts, or sensitive information such as bank details, shopping apps ID etc., are at risk when selling, trading off, recycling or donating your iOS device.
So what can you do to keep your old iPhone data away from strangers’ eyes and make it 100% unrecoverable?
One solution is the commonly used Apple’s recommendation — erase iPhone data by choosing ‘erase all content and settings’ on your device. However, with professional hackers and sophisticated software available, erasing data by this method doesn’t guarantee data privacy.
Experts suggest using trusted iPhone erasure software that is 100 % safe. The software can make iPhone data unrecoverable beyond the reach of any tool.
Let’s understand in detail how to permanently erase data on iPhone by these techniques.
Clean iPhone by using ‘Erase All Content and Settings’
To clear all data from iPhone use the’Erase All Content and Settings’ option in the settings of your iOS device. It is like factory resetting your iPhone.
All the app data, settings, passwords, photos, videos, contacts, documents, messages, Calendar, chats, music, audio files etc., gets deleted after factory reset from iPhone.
However, don’t forget to first take the backup of your iPhone data in iCloud or iTunes.
Steps to erase iPhone via Settings:
- Go to Settings.
- Navigate to General > Reset> Erase All Content and Settings.
- Click Erase Now in the dialog box. Enter Passcode and Apple ID password, when prompted.
This will erase iPhone data turning the device off. When you power on the iPhone, you will see all its data is deleted including, photos videos, apps, contacts etc.
Permanently wipe iPhone to 0% recovery – Secure & tested method
Although deleting data via ‘Erase All Content and Settings’ on iPhone will make your device as clean as new, but it is not enough. Your iPhone data after factory reset is still recoverable by hackers. Thus, to protect privacy and prevent data leak by any means, it is essential to erase iPhone with the help of a professional iOS eraser software .
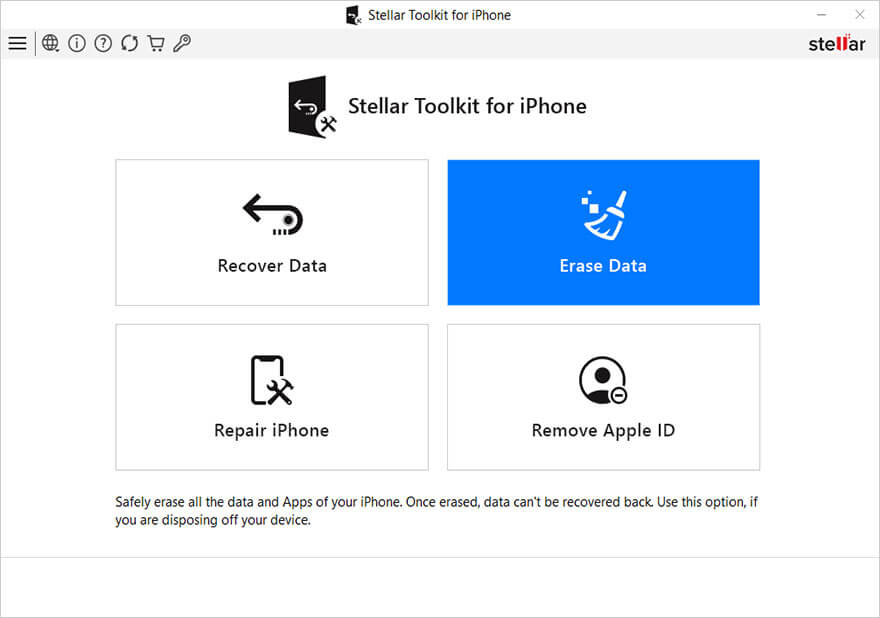
You can find several iOS cleaner software online but here we recommend Stellar Toolkit for iPhone. The efficient software is the best way to wipe iOS device before you sell , recycle, or donate.
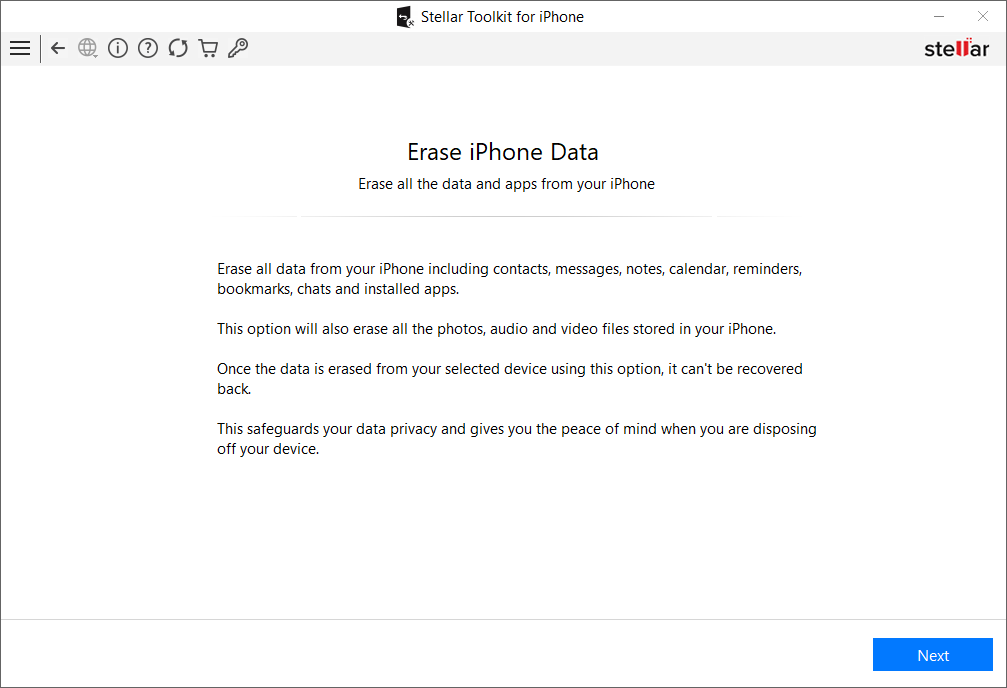
It removes your personal videos, pictures, contacts, notes, calendar, browsing history, call log, chats, messages, Instagram, WhatsApp, and other sensitive information saved on your iPhone. The secure DIY software supports the latest iOS 16 and below versions. You can erase all variants including iPhone 6, iPhone 7, iPhone 8, iPhone X, iPhone SE, iPhone 11, and above.
You can take the free trail and gage the software features and user-friendliness.
Step-by-step guide to erase iPhone data permanently:
Step 1: Download and launch Stellar Toolkit for iPhone on computer.
Step 2: Click on Erase Data module.
Step 3: On Erase iPhone Data screen, click **Next.
**
Step 4: As you see the Click Device to Select screen appears, connect your iPhone to computer.
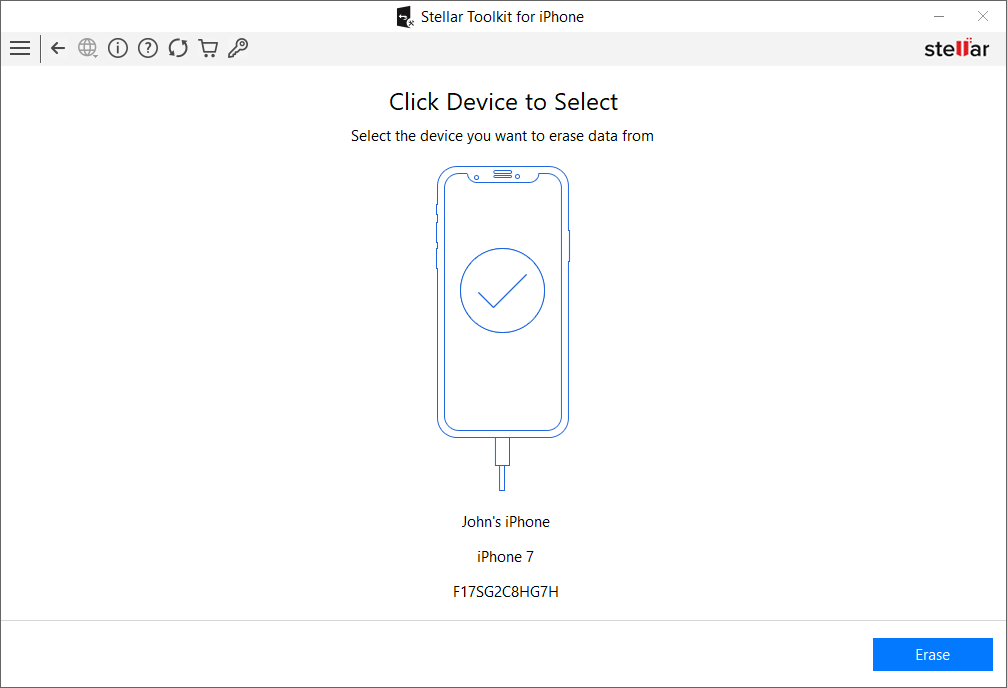
Step 5: Select Erase.
Step 6: In the Erase Process box, select Yes.
Step 7: Data Erase Complete message box appears that asks for confirmation before erasing the data. Click OK.
Wrapping Up
After erasing complete iPhone data by using the secure iPhone eraser software by Stellar, there’s no need to worry about personal data leak. The software algorithms ensure that even the most advanced iOS data recovery tool cannot retrieve your information.
![]()
Was this article helpful?
FAQs
How do you permanently erase data so that it cannot be recovered from iPhone?
Use the best iPhone data eraser tool to permanently wipe iPhone data. This is a assure way to prevent data leak and protect privacy.
7 Ways to Fix iTunes Error 9
Summary: The iTunes error 9 appears when iPhone update through iTunes gets failed. It’s annoying as the error doesn’t let you use your device further. Learn 7 quick methods to fix iTunes error 9 and update the device without any issue.
Trying to get the new iOS on your iPhone but facing iTunes Error 9?

The iTunes error 9 usually occurs while updating your iPhone via iTunes. The error annoyingly neither lets you update the iPhone nor do any activity on your device. Thus, it urgently requires a fix so that you can work on your iPhone and also update the device.
In this post, we will share with you 7 best possible ways to fix iTunes Error 9. But before that let’s know what is causing the iTunes error on trying to update your iPhone.
## **Why does iTunes Error 9 occur?**It is difficult to determine the exact reason of your iTunes Error 9. But it may be due to any of the reasons given below :
- USB port or cable is damaged
- You have jailbroken your iPhone
- Corrupt network settings
- Security software prevents access to Apple server
How to fix iTunes error 9?
Since it is usually, regarded as a hardware issue, you should begin with hardware-related workarounds and later move to other software troubleshooting methods.
Going by the order, try below methods to fix iTunes Error 9
- Check USB cable & port
- Restore iPhone with iTunes on another computer
- Force your device to restart
- Check Anti-Virus & Firewall on your computer
- Update iTunes to the latest version
- Use Recovery Mode to Fix iTunes Error 9
- Choose to update iPhone wirelessly

Solution 1: Check USB cable and port
Make sure your iPhone USB cable and port are properly connected and working fine. Do the below checks and fix:
- USB cable is not loosely connected to the computer
- You are using the USB cable that you got with your iPhone or another certified cable
- The USB port is not damaged. Try by shifting to another USB port
Solution 2: Restore iPhone with iTunes on another computer
iTunes error 9 is generally regarded as a hardware-related problem. Sometimes it is difficult to detect the issue. The easier way out is to restore iPhone using iTunes on another computer or laptop. If still the error persists, move on to the other workarounds.
Solution 3: Force restart your device
Apple suggests trying once force a restart of iPhone to fix iTunes error 9.
iPhone X, iPhone 8, & iPhone 8 Plus users: Press and quickly release the Volume Up button. Press and quickly release the Volume Down button. Then, press and hold the Side button until you see the Apple logo.
iPhone 7 & iPhone 7 Plus users: Press and hold both the Side and Volume Down buttons for at least 10 seconds, until you see the Apple logo.
Solution 4: Check Anti-Virus & Firewall on your computer
Antivirus or Firewalls in your computer may prevent iTunes to connect with Apple server. Check the security software settings, and tweak them if required to allow iTunes to access the network servers.
Solution 5: Update iTunes to the latest version
Updates usually bring in new features, fix existing bugs and make the application smarter. If the iTunes error 9 is due to outdated iTunes, installing the latest version may help to fix the error.
How to update iTunes to the latest version?
For Windows users: Launch iTunes on PC. On the menu bar, click Help > Check for Updates and follow the given instructions
For Mac users: Launch iTunes on Mac. On Menu bar go to iTunes > Check for Updates and follow the on-screen instructions.
After updating iTunes, reboot your computer and check if the iTunes error 9 is fixed.
Solution 6: Use Recovery Mode to fix iTunes Error 9


iPhone in Recovery Mode
All the above methods fail to fix iTunes error 9? As last resort choose Recovery Mode to restore iPhone in iTunes. Choosing this option means you will lose all your iPhone data. Thus, first take backup in iCloud or iTunes before applying this fix.
How to put your iPhone into Recovery Mode? (For iPhone 8, 8 Plus, & X users)
- Update your iTunes
- Press and release the Volume Up button and then the Volume Down button
- Press and hold the Side button till connect to iTunes screen appears
- Once the iPhone is in Recovery Mode, connect your computer with iPhone via USB cable. You will see the white Apple logo screen.
- When iTunes asks you to update or restore, click Update to reinstall iOS
Lost iPhone data after restoring iPhone in iTunes via Recovery Mode?
Losing iPhone data after update through Recovery mode is a panicky situation. It gets even more serious if you are unable to restore from iCloud or iTunes backup. In such situation, Stellar Data Recovery for iPhone comes as big relief**.** The software restores complete iPhone information from iPhone, iCloud and iTunes.
Stellar iPhone data recovery software quickly and safely restores all iPhone data including photos, videos, music, contacts, messages, Safari bookmarks, etc. It also recovers the lost WhatsApp, WeChat, Line, Viber, Tango, and Kik messages. The software is extremely easy to use. Simply launch it on your Mac or PC, connect your iPhone to the computer and follow the on-screen instructions.
Solution 7: Choose to update iPhone wirelessly

Select Software Update in Settings on iPhone
Alternatively update iPhone wirelessly, without using iTunes. Make sure you have a continuous Internet connection. Go to Settings > General > Software Update. If an update is available, tap on Download and Install.
Conclusion
Although iTunes Error 9 rarely occurs but is a frustrating situation as you are unable to do any other activity on your device.
You can sometimes easily fix the Error 9 by doing a simple check if your USB cable, port connection, and firewall settings are appropriate. Restarting the device and updating iTunes to the latest version can also resolve Error 9. As a last resort, update iOS in iTunes through Recovery Mode. Nevertheless, you can also choose to bypass iTunes and update your device wirelessly.
One of the above methods is surely going to help you out. Also do not forget to share with us in the comment box below, which of these methods helped you to fix iTunes Error 9.
- Title: Forgot iPhone SE (2022) Password? – Here are the Best Solutions | Stellar
- Author: Nova
- Created at : 2024-07-17 17:17:49
- Updated at : 2024-07-18 17:17:49
- Link: https://phone-solutions.techidaily.com/forgot-iphone-se-2022-password-here-are-the-best-solutions-stellar-by-stellar-data-recovery-ios-iphone-data-recovery/
- License: This work is licensed under CC BY-NC-SA 4.0.