
Get Rid of corrupt Excel 2019 File | Stellar
Get Rid of corrupt Excel File
Summary: What to do when an Excel file is corrupted? This is a common question that is often asked by Microsoft Excel users. If you too are seeking an answer to this question, read the blog to learn about a few manual workarounds and a specialized Excel file repair tool to resolve the Excel file corruption issue.

An Excel file gets corrupted due to various reasons such as a virus/malware attack, sudden system shutdown when the Excel file is still open, power failure while working with an Excel spreadsheet, etc.
When Microsoft Excel detects corruption in a workbook, it attempts to repair the workbook by starting ‘File Recovery mode’.
Tip! If the file recovery mode doesn’t start, you may use the manual repair process or an Excel repair tool, such as Stellar Repair for Excel to repair a corrupted Excel file. The software can help you quickly retrieve contents from a damaged, corrupt, or inaccessible Excel file and restore the file to its original state.
There even exist a few manual tips that can be used to recover data from damaged MS Office Excel files.
Workarounds to Use When an Excel File is Corrupted
Note: Before carrying out any of the repair and recovery workarounds, it is advised that you must save a backup copy of the damaged file. This is to prevent your files from turning completely inaccessible in case the methods fail to give desired results.
Workaround 1: Use the Open and Repair Method
If MS Excel cannot repair a corrupted workbook automatically, you can try to do it manually. To do so, perform the following:
- Open the corrupt file, like you normally open any file, by clicking File > Open.
- Browse and locate the folder containing the corrupted document.
- When the Open dialog box is displayed:
- Select the Excel document.
- Click on the arrow present to the right side of the Open button and select Open and Repair option.


Figure 1 – Open and Repair Feature
If this doesn’t help repair the broken Excel file or you encounter Open and Repair does not work issue, proceed with the next workaround.
Tip! Try an alternative solution, i.e. Stellar Repair for Excel software to repair and recover corrupt Excel files (.xlsx or .xls) when the ‘Open and Repair’ method won’t work.
Workaround 2: Restore an Excel File with a Shadow Copy
If you’re a Windows 7 or Vista user, you can try restoring the corrupted spreadsheet by using a shadow copy (or a previous version). [Shadow copy](https://en.wikipedia.org/wiki/Shadow_Copy#:~:text=Shadow%20Copy%20(also%20known%20as,the%20Volume%20Shadow%20Copy%20service .) is basically a snapshot (backup copy) of computer files or volumes. The snapshot may contain an older version of your Excel file that has become damaged now. To find out, do the following:
- Launch File Explorer, and right-click the folder in which the file is saved.
- Choose Properties.
- Look for and click the Previous Versions tab. This will display a list of entries under Folder versions or File versions, going back a few days or weeks.
- Double-click one with a date when the file was accessible and could be read. Then, try to open its older version. If it opens, save the older version with a new name and execute the procedure with new file/folder entries.

Figure 2 – Volume Shadow Copy
You would have to repeat the process until you reach the point where the file became damaged. With this, you will get a baseline version of the file, but data may still have been lost.
Workaround 3: Test your Assumptions
If you receive a message saying “Excel file corrupted and cannot be opened”, you would probably believe it. However, there could be other reasons besides corruption that may cause Excel to throw this error message.
Your Office suite, which Excel is a part of, maybe having some primary issues in it causing problems while opening one Excel document. So, try opening another Excel file to check if the problem exists with all the files or just one.
If other Excel documents work correctly, it means that only the particular document is corrupt. On the contrary, if the issue is with your Office suite, repairing the current Office installation may help fix the issue. For this, perform these steps:
- Go to Control Panel and click Uninstall the Program.
- Choose Office.
- Click Change, and hit the Repair button.
You can reinstall the entire Office package. Once reinstalled, try to open the file to check if the issue has been fixed and the Excel file repaired.


Figure 3 – MS Office Repair
Workaround 4: Use Excel File Repair Tool
If the above manual solutions fail, use Excel repair software to successfully repair your damaged Excel workbook and recover all its data. Essentially, the software rebuilds damaged Excel workbook data at a granular level to recover every single object & all the original properties of the workbook.
Suggested Read: How to repair corrupt Excel files using Stellar Repair for Excel?
Why Use Stellar Repair for Excel Software?
- Repairs severely corrupted XLSX and XLS files.
- Can handle corrupt Excel files of any size.
- Demo version allows previewing recoverable Excel file items for free.
- Supports Microsoft Excel 2019 and all lower versions.
- Compatible with Windows 10 and lower versions.
- Tested and recommended by Microsoft Excel MVPs.

Final Word
When an Excel file is corrupted, it won’t open at all or you won’t be able to access all the file data. Such a situation can lead to unnecessary halts, impacting work productivity.
There are manual workarounds that may help fix the corrupt Excel file and recover its data, such as the ones covered in this blog. However, these solutions might not work in severe corruption cases and may require technical assistance. Also, they may result in some data loss.
To overcome the limitations of manual workarounds, it is recommended to go for a professional Excel file repair tool such as Stellar Repair for Excel . It helps repair corrupt Excel (XLS or XLSX) files and restores all worksheet data, such as the table, chart, chart sheet, cell comment, sort and filter, image, formula, etc. in a few simple clicks. Moreover, the software provides a free preview of the recoverable data with its demo version. You can check the preview to evaluate how the software works.
Top 5 Ways to Fix Excel File Not Opening Error
Summary: MS Excel users sometimes face issues while using the MS Excel application. One such issue is the Excel file not opening error. In this post, we’ve mentioned the reasons that may result in this error and the ways to resolve it. Also, you’ll find about an Excel repair software that can help you repair corrupt Excel files.
Several Microsoft Excel users have reported encountering the ‘Excel file not opening’ error when opening their Excel file. There are several reasons that may cause this error. In this post, we’ll be discussing the reasons that may lead to the ‘Excel file not opening’ error and the top 5 ways to fix this error.
Why Does the ‘Excel File Not Opening’ Error Appear?
Following are some possible causes that may result in the ‘Excel file not opening’ error:
- There may be a problem with an add-in that is preventing you from opening the Excel files.
- There’s a chance that your Excel application is faulty.
- Your Excel program is unable to communicate with other programs or the operating system.
- The file association might have been broken. This is a common problem faced by users who have upgraded their Excel application or operating system.
- The file you’re trying to open is corrupted.
5 Ways to Fix Excel File Not Opening Error
Let’s explore the ways to resolve the Excel file not opening error:
1. Uncheck the Ignore DDE Checkbox
Dynamic Data Exchange (DDE)allows Excel to communicate with other programs. The Excel error may occur due to incorrect DDE settings. You need to ensure that the correct DDE configuration is enabled. Follow the steps provided below:
- Launch your MS Excel file.
- Go to File > Options.

- Now click on Advanced.

- Further, find the General option on the screen.

- Uncheck the option **‘Ignore other applications that use Dynamic Data Exchange (DDE)**’.
- Click OK to save the changes.
Parental Control Software
### 2\. Reset Excel File AssociationsWhen you launch your Excel file, the file association ensures that the Excel application is used to open the file. You can try to reset these associations and see if Excel opens after this. Proceed with the following steps to do so:
- Navigate to Start Menu and launch Control Panel.
- Now, navigate to Programs > Default Programs > Set Your Default Programs.

- A new window will open. Herein, find the Excel program in the list and select it. Now, select the option ‘Choose defaults for this program’. Click OK.

- A new window for ‘Set Program Associations’ will open.
- Check the box against the ‘Select All’ option.
- Further, click Save to reset the Excel File Associations settings.

3. Disable Add-Ins
Many people install third-party add-ins to enhance the application’s functionality. Sometimes, these add-ins can create an issue. Follow the below-mentioned steps to disable the problem creating add-ins:
- Launch MS Excel application.
- Navigate to File > Options > Add-ins.

- In the window that opens, go to the Manage option at the bottom.
- Herein, select the COM Add-ins option from the dropdown list. Click Go.

- In the COM Add-ins window, uncheck all the boxes to disable the add-ins. Click OK.

4. Repair MS Office Program
Sometimes the issue is not with your Excel file. Instead, the reason for the error can be a corrupt MS Office application. You can repair the program to fix the Excel file not opening error. Here are the steps:
- Press the Windows + R keys to launch the ‘Run’ dialog box.

- Enter the text ‘appwiz.cpl’ to launch the program and features window.

- Find the MS Office program in the list of applications.

- Right-click on it and select Change.

- In the new window, select the Quick Repair radio button. Click Repair.

- Follow the on-screen instructions to repair the Office application. Once the repair process is completed, you can try opening the Excel file to see if the problem is resolved.
5. Disable Hardware Graphics Acceleration
The hardware graphics acceleration assists in the system’s better performance, especially when you use MS Office applications, like MS Excel or Word. Sometimes, this causes the Excel file not opening issue. You can disable this option to try to resolve the issue. Here are the steps:
- Launch your MS Excel application.
- Navigate to File > Options > Advanced.
- Herein, go to the Display option.
- Uncheck the Disable hardware graphics acceleration checkbox. Click OK.


What If These Solutions Do Not Work?
If you have applied all the methods mentioned above and still cannot open your Excel file, there are chances that your file is corrupted. You can use a specialized Excel repair tool , such as Stellar Repair for Excel to repair the corrupted Excel file. This software has powerful algorithms that can scan and repair even severely corrupt Excel files, without any file size limitation. After repairing the file, it restores all the data, including tables, charts, rules, etc. to a new Excel, with 100% integrity.
To know how the software works, see the video below:

Conclusion
Before you proceed with resolving the Excel file not opening error, try to find out the root cause of this error. If you know the real reason, you can try the method right away. If the reason for the error is corruption in the Excel file, the best option is to repair the file using a professional Excel repair tool, such as Stellar Repair for Excel .

How to Fix the Unable to Record Macro Error in Excel?
Summary: You may encounter the “Unable to record macro” error in MS Excel when using Personal Macro Workbooks. In this post, we’ll discuss the possible causes behind this error and the ways to fix it. We’ll also mention a professional Excel repair tool that can help fix the error if it occurs due to corrupted workbook.
A personal macro workbook (Personal.xlsb file) is a hidden workbook in Excel that stores all macros in a single workbook. This allows you to automate processes while working in Excel. Sometimes, when recording macro codes in the personal macro workbook, you may get the message “Personal Macro Workbook in a startup folder must stay open for recording”. When you click on the OK button, it will show the “unable to record” error. This prevents you from recording the macros. Below, we’ll see the causes behind this error and discuss how to resolve this error.
Causes of Unable to Record Macro Error
You may be unable to record macros in Excel due to several reasons. Let’s take a look at the possible causes that can lead to this issue.
- The location of personal.xlsb file is changed.
- Personal.xlsb file is corrupted.
- Macros are disabled.
Methods to Fix the “Unable to Record Macro” Error in Excel
Here are some possible solutions that can help you resolve the unable to record macro error in Excel.
Method 1: Check the Path of XLStart Folder
You may be unable to record macros if the path of XLStart folder is incorrect. It is a folder where the Personal.xlsb file is stored by default. Follow these steps to find out the path of this folder:
- Open MS Excel. Go to File > Options.
- Click Trust Center > Trust Center Settings.

- In the Trust Center Settings window, click on Trusted Locations.

- Verify the path of the XLSTART folder and modify it if there is an issue.
- Once you are done, click on OK.
Method 2: Change Macro Security
The “Unable to record macro” error can occur if macros are disabled in the Macro Security settings. You can try changing the macro settings using the below steps:
- In MS Excel, go to File > Options > Trust Center.

- Under Trust Center, click on Trust Center Settings.

- Select “Enable all macros” and then click OK.
Method 3: Check Add-ins for Disabled Items
If there are any items in add-ins that are disabled, they may prevent Excel from functioning properly. You can check and enable the items in MS Excel using the below steps:
- Click File > Options.

- In Excel Options, click on the Add-ins option.
- Select Disabled Items from the Manage section and click on Go.

- The Disabled Items window is displayed.
- Click on the disabled item and then click Enable.
- Restart Excel for the changes to take place.
Method 4: Repair your Excel File
You may fail to record macros if there is corruption in the workbook. In such a case, you can use the “Open and Repair” utility in MS Excel to repair the corrupt workbook. To use this tool, follow these steps:
- Open your Excel application.
- Click File > Open.
- Browse to the location where the corrupted file is stored.
- In the Open dialog box, choose the corrupted workbook.

- From the Open dropdown list, click Open and Repair.

Excel will prompt you to repair the file or extract data from it. Click Repair to retrieve maximum data. If the Repair option fails, then click on the Extract Data option to recover the data without formulas and values.
If the Microsoft utility “Open and Repair” fails to repair the corrupted Excel workbook, then try a professional Excel repair tool such as Stellar Repair for Excel. It is an advanced tool that can easily repair severely corrupted Excel (XLSX and XLS) files. It can recover all the file items, including chart sheets, cell comments, tables, macros, formulas, etc. without impacting the properties and cell format of the Excel file.
Closure
You may receive the “unable to record” error in Excel while creating or storing macros in Personal Macro Workbooks. There are several reasons that can lead to this error. You can try the methods covered in this post to resolve the error. If the error appears due to corruption in workbook, then try to repair it using the Open and Repair utility. Alternatively, you can use Stellar Repair for Excel – a professional tool that can help you repair an Excel file with problematic macros. Also, it allows recovery of all the file components with complete integrity. The tool is compatible with Excel 2021, 2019, 2016, and older versions.
How to Fix Excel Formulas Not Working Properly | Step-by-Step Guide
Summary: Excel formulas sometimes fail to function correctly and even return an error. This article explains what you might be doing wrong that prevents Excel formulas from working properly and solutions to resolve the issue. If your formulas have disappeared from the Excel spreadsheet and you are having trouble recovering them, you can use an Excel repair tool to recover the formulas.
When working with Excel formulas, situations may arise when the formula doesn’t calculate or update automatically. Or, you may receive errors by clicking on a formula.
Problems Causing the ‘Excel Formulas not Working Properly’ Issue and Solutions
Let’s check out the possible reasons that cause Excel formulas to work properly and solutions to resolve the issue.
Problem 1 – Switching Automatic to Manual Calculation Mode
Automatic and manual are the two modes of calculation in Microsoft Excel.
By default, Excel is set to automatic calculation mode. Everything is recalculated automatically when any changes are made in a worksheet in this mode. You may switch from automatic to manual mode to disable the recalculation of formulas, particularly when working with a large Excel file with too many formulas.
Excel will not calculate automatically when set to manual calculation mode. And this may make you think that the Excel formula is not working properly.
Solution – Change Calculation Mode from Manual to Automatic
To do so, perform these steps:
- Click on the column with problematic formulas.
- Go to the Formulas tab, click the Calculation Options drop-down, and select Automatic.


Problem 2 – Missing or Mismatched Parentheses
It’s easy to miss or incorrectly place parentheses or include extra parentheses in a complex formula. If a parenthesis is missing or mismatched and you click Enter after entering a formula, Excel displays a message window suggesting to fix the issue (refer to the screenshot below).

Clicking ‘Yes’ might help fix the issue. But Excel might not fix the parentheses properly, as it tends to add the missing parentheses at the end of a formula which won’t always be the case.
Solution – Check for Visual Cues When Typing or Editing a Formula with Parentheses
When typing a formula or editing one, Excel provides visual cues to determine if there’s an issue with the parentheses inserted in a formula. Checking for these visual cues can help you fix missing/mismatched parentheses.
- Excel helps identify parenthesis pairs by highlighting them in different colors. For instance, the pair of parenthesis outside is black.
- Excel does not make the opening parentheses bold. So, if you’ve inserted the last closing parentheses in a formula, you can determine if your parentheses are mismatched.
- Excel helps identify parentheses pairs by highlighting and formatting them with the same color once you cross over them.
Problem 3 – Formatting Cells in an Excel Formula
When adding a number in an Excel formula, don’t add any decimal separator or special characters like $ or €. You may use a comma to separate a function’s argument in an Excel formula or use a currency sign like $ or € as part of cell references. Formatting the numbers may prevent the formula from functioning correctly.
Solution – Use Format Cells Option for Formatting
Use Format Cells instead of using a comma or currency signs for formatting a number in the formula. For instance, rather than entering a value of $10,000 in your formula, insert 10000, and click the ‘Ctrl+1’ keys together to open the Format Cells dialog box.

Problem 4 – Formatting Numbers as Text
Numbers are displayed as left-aligned in a sheet in a worksheet, and text formatted numbers are right-aligned in cells. Excel considers numbers formatted as text to be text strings. Thus, it leaves those numbers out of calculations. As a result, a formula won’t work as intended. For example, in the following screenshot, you can see that the SUM formula works correctly for normal numbers. But, when the SUM formula is applied to numbers formatted as text, the formula doesn’t return the correct value.

Sometimes, you may also see an apostrophe in the cells or green triangles in the top-left corner of all the cells when numbers in those cells are formatted as Text.
Solution – Do Not Format Numbers as Text
To fix the issue, do the following:
- Select the cells with numbers stored as text, right-click on them, and click Format Cells.
- From the Format Cells window, click on Number and then press OK.

Problem 5 – Double Quotes to Enclose Numbers
Avoid enclosing numbers in a formula in double-quotes, as the numbers are interpreted as a string value.
Meaning if you enter a formula like =IF(A1>B1, “1”), Excel will consider the output one as a string and not a number. So, you won’t be able to use 1’s in calculations.
Solution – Don’t Enclose Numbers in Double Quotes
Remove any double quotes around a number in your formula unless you want that number to be treated as text. For example, you can write the formula mentioned above as “1” =IF(A1>B1, 1).
Problem 6 – Extra Space at Beginning of the Formula
When entering a formula, you may end up adding an extra space before the equal (=) sign. You may also add an apostrophe (‘) in the formula at times. As a result, the calculation won’t be performed and may return an error. This usually happens when you use a formula copied from the web.
Solution – Remove Extra Space from the Formula
The fix to this issue is pretty simple. You need to look for extra space before the equal sign and remove it. Also, ensure there is an additional apostrophe added in the formula.
Other Things to Consider to Fix the ‘Excel Formulas not Working Properly’ Issue
- If your Excel formula is not showing the result as intended, see this blog .
- When you refer to other worksheets with spaces or any non-alphabetical character in their names, enclose the names in ‘single quotation marks’. For example, an external 5reference to cell A2 in a sheet named Data enclose the name in single quotes: ‘Data’!A1.
- You may see the formula instead of the result if you have accidentally clicked the ‘Show Formulas’ option. So, click on the problematic cell, click on the Formula tab, and then click Show Formulas.
- If you’re getting an error “Excel found a problem with one or more formula references in this worksheet”, find solutions to fix the error here .
Conclusion
This blog discussed some problems you might make causing an Excel formula to stop working properly. Read about these common problems and solutions to fix them. If a problem doesn’t apply in your case, move to the next one. If you cannot retrieve formulas in your Excel sheet, using an Excel file repair tool like Stellar Repair for Excel can help you restore all the formulas. It does so by repairing the Excel file (XLS/XLSX) and recovering all the components, including formulas.

Summary: Recovering your unsaved Excel file on Windows 10 with some of our tested methods can truly save you a lot of time, money, and effort. Here’s how to do it!
Microsoft provides a wide range of applications to its users that cater to different purposes. Out of all the MS Office applications, Excel is considered the most used native application by several companies and individuals to store and process crucial data. Excel can also be called a go-to data analysis tool that offers great reliability, ease of use, and multiple features. But unfortunately, it’s not immune to human errors and system errors.
What if you accidentally close the Excel file without saving your work or Excel crashes suddenly? Or worse! Your system crashes without any warning and when you reboot your system, you can’t find the unsaved Excel file.
There could be different situations where you may lose access to your unsaved Excel workbook. There is no need to be anxious, though! We’ve covered some easy-to-follow DIY methods in this post to help you recover unsaved Excel files quickly.
4 Ways to Recover Unsaved Excel File
Irrespective of the circumstances, you can recover unsaved Excel files on Windows 10 using the following methods.
Method 1: Use the Search Option
If you remember the name of the Excel file, try to find it using the Search option. Following these steps:
- Go to Windows Search Box and type the name of the file.
- If you find the file there, click Open or Open file location.

- If you click Open file location, it will take you to the exact location of the file, and you’ll be able to regain access to lost/unsaved Excel file easily.
Method 2: Use AutoRecover Feature
Microsoft Excel comes with a built-in AutoRecover feature that saves copies of all open Excel files at a user-definable fixed interval. You can recover the file if you forget to save it and accidentally close it or it closes automatically due to an unexpected system breakdown or power failure. You can follow the given steps to recover unsaved Excel files with the AutoRecover feature:
- Open a new Excel file and go to File > Options.
- Then go to Save > Save workbooks.
- Next, ensure that the ‘Save AutoRecover information every’ and ‘Keep the last autosaved version if I close without saving’ option is already selected.

- Now, copy the file path given against the AutoRecover file location.
- Open the File Explorer, paste the Menu Bar file path there, and hit Enter.
- The unsaved file will appear with the .xlb extension.
- Double-click the file and choose Excel from apps to open the .xlb file.

- Finally, save the file to the desired location.

Method 3: Use the ‘Recover Unsaved Workbooks’ Option
Another way that you can choose is the ‘Recover Unsaved Workbooks’ option. To regain access to your Excel file, follow the given steps:
- Open an Excel sheet and then go to File > Open.
- Now, scroll down and click Recover Unsaved Workbooks.

- The list of unsaved files will show in the Document Recovery pane.
- Locate the file you lost and double-click on it to open.
- Finally, right-click on the version of the file you want to restore and click Save As.

And, save the file to the desired location
Method 4: Restore File with Previous Versions Utility
This feature will help you recover unsaved Excel files when you’ve saved the workbook earlier, but you end up losing access to the file due to an Excel or system crash. It’d help you save the previously saved version of your Excel file. To do so, follow the given steps:
- Open an Excel file and navigate to File > Info > Manage Versions.

- It will show the previously saved versions. You can choose the one you want to restore and click Save/Save As to store the file with a different name.
Hopefully, this blog has helped you learn how to recover unsaved Excel files. You can try any of the above methods.
FAQ
1. How can I repair a corrupted workbook?
Whenever Excel detects a corrupted workbook while opening, it automatically starts running the File Recovery mode and repairing the file. If the File Recovery mode doesn’t start automatically, you can manually repair the corrupted workbook .
Fixed “Cannot Insert Object” Error in Excel | Step-by-Step Guide
Summary: The error “cannot insert object” in MS Excel can prevent you from modifying objects in the worksheet. This blog will discuss the primary reasons behind this error and the possible solutions to fix it. You will also learn about a professional Excel repair software that can help fix the error if it has occurred due to corruption in Excel file.
Many users have reported encountering the “cannot insert object” error while adding/embedding objects into the Excel file. It usually occurs when using Object Linking and Embedding (OLE) to add content (PDF, Microsoft documents) from external applications to worksheet. The error can also occur when using ActiveX control in Excel. Below, we’ll explain why you cannot insert object into Excel sheet and how to troubleshoot the issue.
Why the “Cannot Insert Object” Error Occurs?
- Macro Settings can prevent the insertion of objects into a workbook.
- The Excel file in which you are trying to add an element is corrupted.
- The object (you are inserting into the workbook) is damaged.
- Object size limitations.
- System’s insufficient memory might prevent new objects’ addition.
- Incompatible Excel file format.
- Add-ins controls are disabled.
- Incompatible or faulty Add-ins.
- Issue with Security Settings.
Methods to Fix the “Cannot Insert Object” Error in Excel
You may encounter the “Cannot insert object” error when trying to add an element stored on a network. It can occur due to issues with the file link, such as incorrect file location. In such a case, you can check the link by selecting the link to file option from the Insert tab.
Sometimes, the error can occur if the file in which you are trying to insert the object is locked and password-protected. In this case, you can unprotect the Excel file . If the issue still persists, then you can follow the below methods.
Method 1: Check and Change Restricted Security Settings
Excel provides security settings to protect your workbook. Sometimes, these settings can prevent inserting objects in the file. You can change the security settings to allow Excel to insert objects. To do so, follow these steps:
- Open your Excel application.
- Locate the File and then click Options.
- In Excel Options, click Trust Center.

- Click Trust Center Settings.
- In the Trust Center Settings window, select Protected View from the left pane.

- Under Protected View, unselect the below three options:
- Enable Protected View for files originating from the internet.
- Enable Protected View for files located in potentially unsafe locations.
- Enable Protected View for Outlook attachments.

- Click OK.
- Once you’re done with this, click on Macro Settings in the Trust Center window.
- Under Macro Settings, make sure “Disable all macros without notification” is not selected. If it is selected, then unselect it. After that, click OK.

- Restart Excel to apply the changes.
Method 2: Uninstall Microsoft Office Updates
You can also encounter the “Cannot insert object” error in Excel after installing MS Office updates. It might be due to the issues with the installed updates. To fix this, you can uninstall the recently installed Office updates. To uninstall the Office updates, follow these steps:
- Go to the system’s Control Panel.
- Click Programs and then click Program and Features.
- Search for “View Installed Updates” and click on the desired Office updates.
- Right-click on it and then click Uninstall.
- Follow the uninstallation steps on the screen.
- Once the process is complete, restart the system.
Method 3: Check Memory Usage
The “Cannot insert object” issue can also occur if your system is low on memory. You can check and close unnecessary processes and applications running in the background to free up memory. To do so, follow these steps:
- Press CTRL + ALT + DEL on the keyboard and click Task Manager.
- Click on the Processes tab and search for any unnecessary processes.
- Right-click on the process and then select End Task.
- Restart Excel to see if the issue is fixed.
Method 4: Check Excel File Size
If your Excel file size exceeds the prescribed limit, it can also lead to the “Cannot insert Excel object” error. So, check the Excel file size. You can reduce the file size by removing unnecessary objects, such as formulas or images.
Method 5: Check and Change Excel ActiveX Settings
You can get the “Excel cannot insert object” error if your Excel file contains macros, controls, and other interactive buttons. It usually occurs if the ActiveX Controls option is disabled. You can check and change the ActiveX Settings to fix the issue. Here are the steps:
- Open your Excel application.
- Navigate to File and then click Options.
- In Excel Options, click the Trust Center tab.
- In the Trust Center Settings, click ActiveX Settings.
- Under ActiveX Settings, make sure the “Enable all controls without restrictions and without prompting” option is selected.

- If the option is not selected, then select it and click OK.
- Restart the Excel and check if the error is fixed or not.

Method 6: Repair the Excel Workbook
The “Cannot insert object” error can occur if the object you are trying to insert is corrupted or the file in which you are inserting the object is damaged. If the issue has occurred due to a corrupted Excel file, then you can repair the file using the Open and Repair utility in MS Excel. To use this Microsoft-inbuilt utility, follow these steps:
- In the Excel application, go to the File tab and then click Open.
- Click Browse to choose the affected file.
- The Open dialog box is displayed. Click on the corrupted file.
- Click on the arrow next to the Open button and then click Open and Repair.
- Click on Repair.

- After repair, a message will appear (as shown in the below figure).

- Click Close.
If the Open and Repair utility fails to fix the issue, then try a professional Excel Repair software, like Stellar Repair for Excel. It is designed to repair severely corrupted Excel files. It can restore all the Excel file objects, such as tables, charts, formulas, etc. It helps fix all types of corruption related errors. The software is compatible with all versions of Excel.
Conclusion
You might encounter the “Cannot insert object” error when embedding or inserting objects in Excel. In this post, we have discussed the possible solutions to fix this error. We have also mentioned an Excel repair software that can help to easily repair the corrupted Excel file and recover all the data. You can download the Stellar Repair for Excel’s free demo version to preview the recoverable objects of the corrupted Excel file.
How to Resolve ‘Excel found unreadable content in filename.xlsx’ Error in MS Excel?
When opening an Excel spreadsheet in MS Office 2010/2007, you may get the following error message:
“Excel found unreadable content in ‘[filename].xlsx’. Do you want to recover the contents of this workbook? If you trust the source of this workbook, click Yes.”

On clicking ‘Yes’, you may face any of these scenarios:
Note: If you choose to click ‘No’, then open your MS Excel application and click file > Open. When the Open dialog box opens, browse and select the file showing the ‘Excel found unreadable content’ error and then choose ‘Open and Repair’ option. If this didn’t help, try using a third-party Excel repair tool to save time troubleshooting the issue and restoring the file with all its data intact.
Scenario 1: The following message may pop-up.
“Excel was able to open the file by repairing or removing the unreadable content. Excel recovered your formulas and cell values, but
. Click to view log file listing repairs errorxxx.xml.”
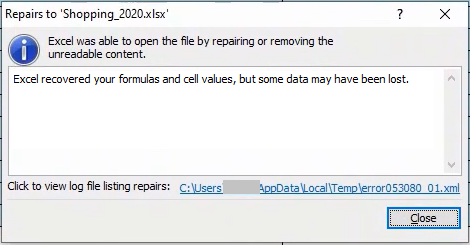
The message clearly states that your Excel file might open, but images may be lost and other such inconsistencies can crop up.
Scenario 2: The error is followed by another error message, like “The file is corrupt and cannot be opened“.
Watch our short video for a quick overview of the solutions to fix “Excel found unreadable content in filename.xlsx”
What Causes ‘Excel Unreadable Content’ Error?
You may encounter the ‘Excel file unreadable content’ error due to corruption of complete Excel file or corruption in certain areas (like Pivot Table, Formulas, Styles, or other objects) in the file. According to Microsoft, you may find it difficult to determine the root cause behind Excel file corruption. Corruption could occur in different scenarios, like power surge, a network glitch, copying and pasting corrupted data from another file, etc.
Also Read: How to recover data from corrupt or damaged Excel file 2010 & 2007?
Workarounds to Resolve the ‘Excel found unreadable content in filename.xls’ Error
There is no permanent solution to fix the ‘Excel found unreadable content’ error. But, following are some workarounds you can try to resolve the error.
Note: Before you try any of these workarounds, run Excel with administrator privileges and try opening the Excel file that is throwing the ‘unreadable content’ error. If this doesn’t fix the error, proceed with the workarounds below.
Workaround 1 – Try Opening the File in Excel 2003
Sometimes a problem in the current Excel version might prevent a file from opening. To resolve this error, try opening the problematic file in Excel 2003. If the file opens, save the data in a web page file format (.html) and then try opening the .html file in MS Excel 2010/2007. The detailed step-wise instructions are as follows:
- Open the .xls file in Excel 2003.
- When the file opens, click on File > Save.
- In the ‘Save As’ dialog box, choose Web Page (.html) as the ‘Save as type’ and then click ‘Save.’ Doing so will save everything from your .xls file, opened with 2003, in .html file format.
- Open the .html file in Excel 2010/2007. And then, save the file with .xlsx extension with a new name to avoid overwriting the original file.
Now, open the Excel 2010/2007 file and check if the error is fixed. If not, use the next workaround.
Workaround 2 – Make the Excel File ‘Read-only’
Try to open your ‘.xlsx’ file by making it ‘read-only’. Follow these steps:
- In Excel, click ‘File’ from the main menu.
- Select ‘Save’ for a new document or ‘Save As’ for a previously saved document in the screen that appears.
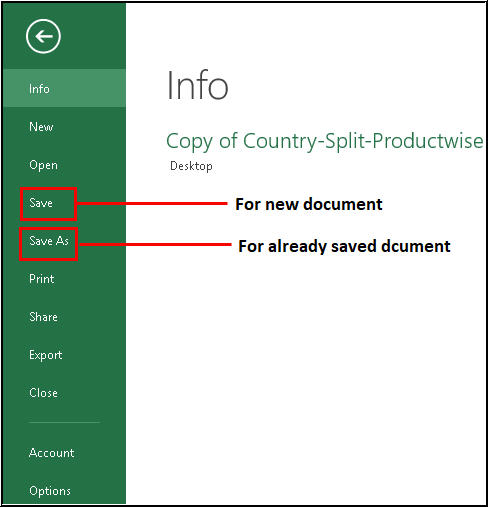
- From the ‘Save As’ dialog box, click Tools > General Options.

- Click on the ‘Read-only recommended’ checkbox to make the document read-only and then click ‘OK’.
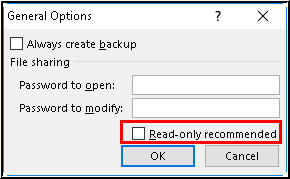
Now open a new ‘.xlsx’ file and copy everything from the corrupt Excel file to this new file. Finally, save this file and try to open it again.
### **Workaround 3 – Move Excel File to a New Folder**Some users have reported that they could open their Excel file, following the ‘Excel unreadable content’ error, by simply moving the file to a different folder and saving it under a new name. You can also move the affected file to a new folder and try opening it. If this didn’t help resolve the error, follow the next workaround.
Workaround 4 – Install Visual Basic Component
At times, it is seen that installing the ‘Visual Basic’ component of MS Office 2010 resolves the ‘Excel found unreadable content 2010’ error. To do so, follow these steps:
- Navigate to Control Panel > Programs and select Microsoft Office 2010.
- Click ‘Change’ and then select ‘Add or Remove Programs’.
- Next, click the ‘plus’ sign provided next to Office Shared Features.
- Click ‘Visual Basic for Applications’. After that, right-click and choose ‘Run from My Computer’ and hit the ‘Continue’ button.
- Reboot your system when this process finishes.
Now check if the issue has been resolved or not.
What Next?
If none of the workarounds mentioned above works for you, use a professional Excel repair software, such as Stellar Repair for Excel. The software repairs corrupt MS Excel sheets without modifying their original content and formatting. In addition, it can repair single or multiple Excel (XLS/XLSX) files in a few simple steps.

Steps to Repair Corrupt Excel File using Stellar Repair for Excel Software
Install and run Stellar Repair for Excel software.
From the software main interface window, click ‘Browse’ to select the corrupt file. If you are not aware of the corrupt Excel file location, click on the ‘Search’ button.
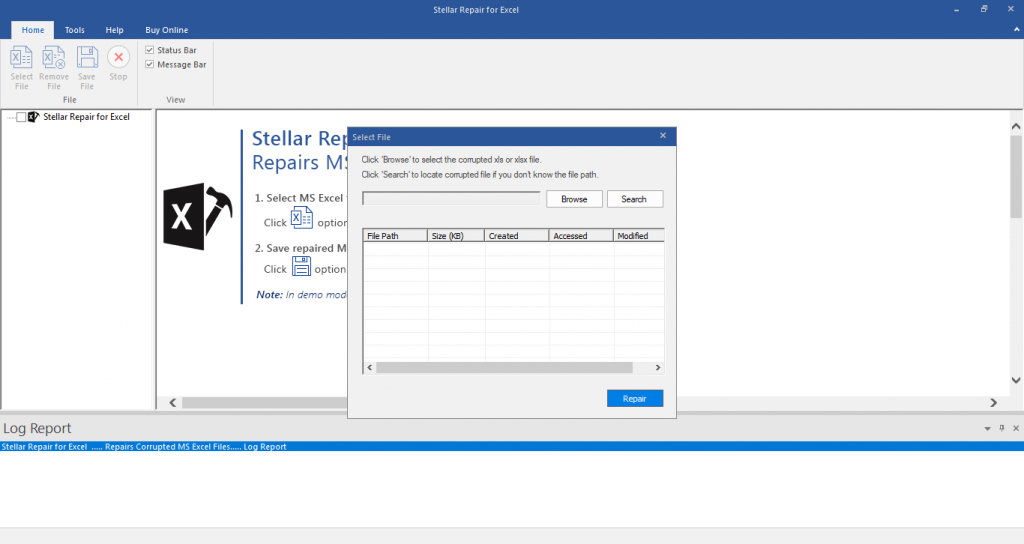
- Click on the ‘Repair’ button to scan and repair the selected file.

- A preview window will open with recoverable Excel file data. Once satisfied with the preview result, click on the ‘Save File’ button on the ‘File’ menu to start the repair process.
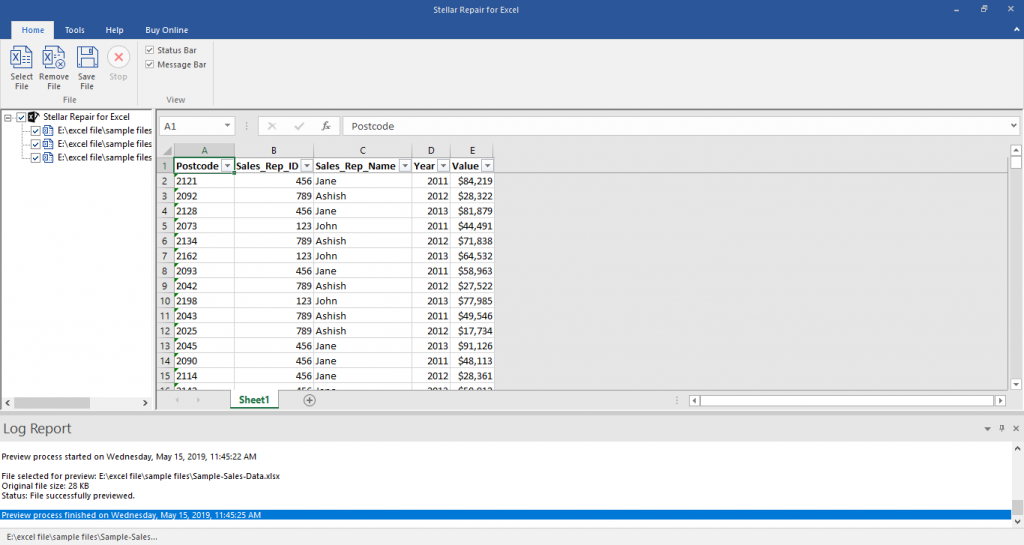
- Select the destination to save the file.
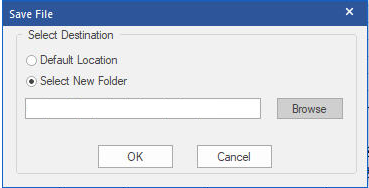
- Click ‘OK’ when the ‘Repaired file saved successfully’ message appears.
The repaired Excel file will get saved at the selected location.
- Title: Get Rid of corrupt Excel 2019 File | Stellar
- Author: Nova
- Created at : 2024-07-17 17:22:44
- Updated at : 2024-07-18 17:22:44
- Link: https://phone-solutions.techidaily.com/get-rid-of-corrupt-excel-2019-file-stellar-by-stellar-guide/
- License: This work is licensed under CC BY-NC-SA 4.0.