
Guide to Completely Erase Data on iPhone 13 Pro Max to Avoid Privacy Leak | Stellar
Guide to Completely Erase Data on iPhone to Avoid Privacy Leak
With growing instances of data leak and misuse, there’s a fear of digital data on iPhone landing in wrong hands. Personal photos, messages, videos, contacts, or sensitive information such as bank details, shopping apps ID etc., are at risk when selling, trading off, recycling or donating your iOS device.
So what can you do to keep your old iPhone data away from strangers’ eyes and make it 100% unrecoverable?
One solution is the commonly used Apple’s recommendation — erase iPhone data by choosing ‘erase all content and settings’ on your device. However, with professional hackers and sophisticated software available, erasing data by this method doesn’t guarantee data privacy.
Experts suggest using trusted iPhone erasure software that is 100 % safe. The software can make iPhone data unrecoverable beyond the reach of any tool.
Let’s understand in detail how to permanently erase data on iPhone by these techniques.

Clean iPhone by using ‘Erase All Content and Settings’
To clear all data from iPhone use the’Erase All Content and Settings’ option in the settings of your iOS device. It is like factory resetting your iPhone.
All the app data, settings, passwords, photos, videos, contacts, documents, messages, Calendar, chats, music, audio files etc., gets deleted after factory reset from iPhone.
However, don’t forget to first take the backup of your iPhone data in iCloud or iTunes.
Steps to erase iPhone via Settings:
- Go to Settings.
- Navigate to General > Reset> Erase All Content and Settings.
- Click Erase Now in the dialog box. Enter Passcode and Apple ID password, when prompted.
This will erase iPhone data turning the device off. When you power on the iPhone, you will see all its data is deleted including, photos videos, apps, contacts etc.
Permanently wipe iPhone to 0% recovery – Secure & tested method
Although deleting data via ‘Erase All Content and Settings’ on iPhone will make your device as clean as new, but it is not enough. Your iPhone data after factory reset is still recoverable by hackers. Thus, to protect privacy and prevent data leak by any means, it is essential to erase iPhone with the help of a professional iOS eraser software .
You can find several iOS cleaner software online but here we recommend Stellar Toolkit for iPhone. The efficient software is the best way to wipe iOS device before you sell , recycle, or donate.
It removes your personal videos, pictures, contacts, notes, calendar, browsing history, call log, chats, messages, Instagram, WhatsApp, and other sensitive information saved on your iPhone. The secure DIY software supports the latest iOS 16 and below versions. You can erase all variants including iPhone 6, iPhone 7, iPhone 8, iPhone X, iPhone SE, iPhone 11, and above.
You can take the free trail and gage the software features and user-friendliness.
Step-by-step guide to erase iPhone data permanently:
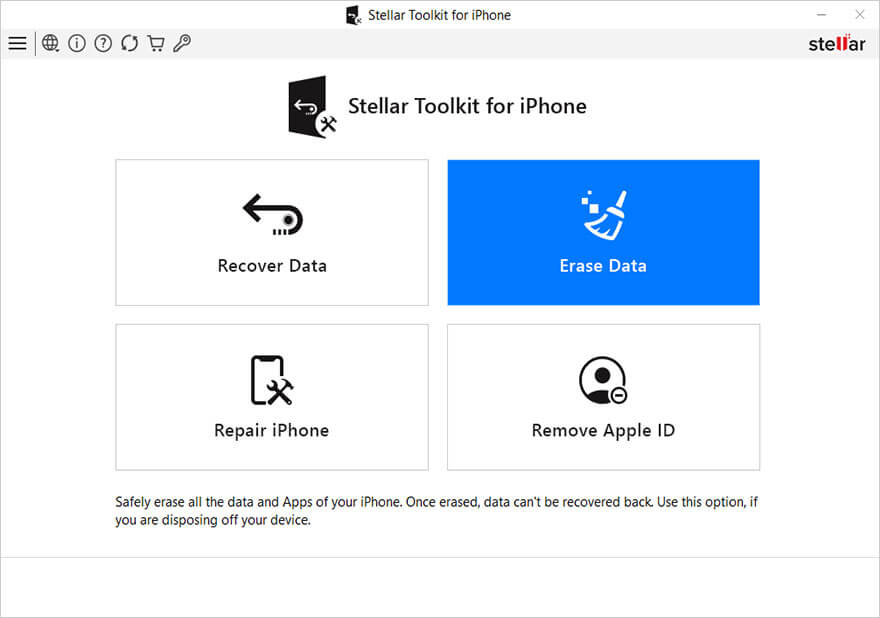
Step 1: Download and launch Stellar Toolkit for iPhone on computer.
Step 2: Click on Erase Data module.
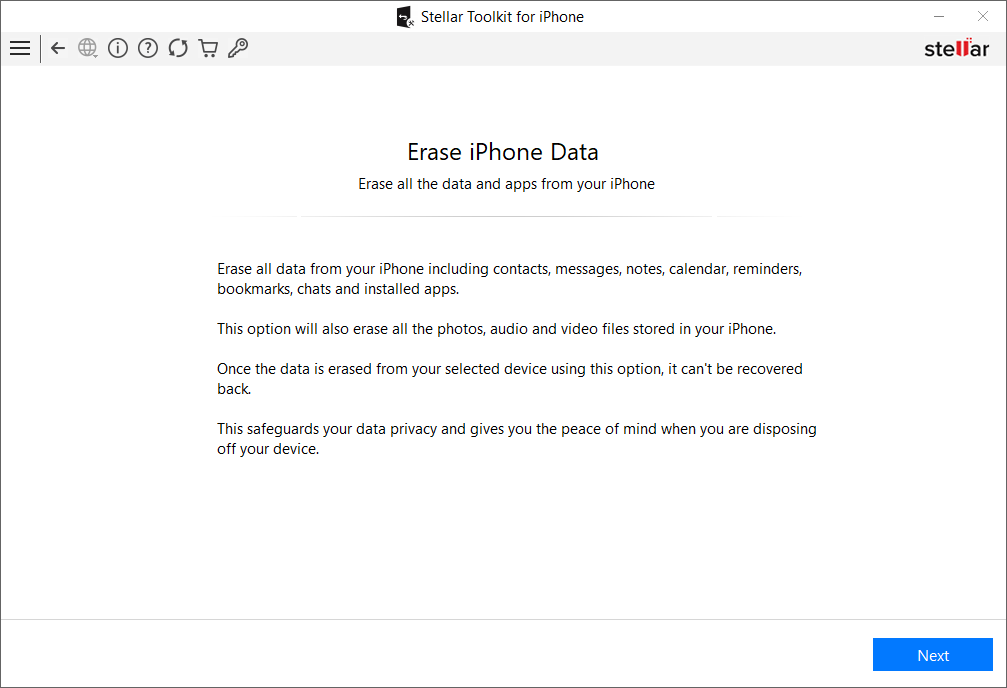
Step 3: On Erase iPhone Data screen, click **Next.
**
Step 4: As you see the Click Device to Select screen appears, connect your iPhone to computer.
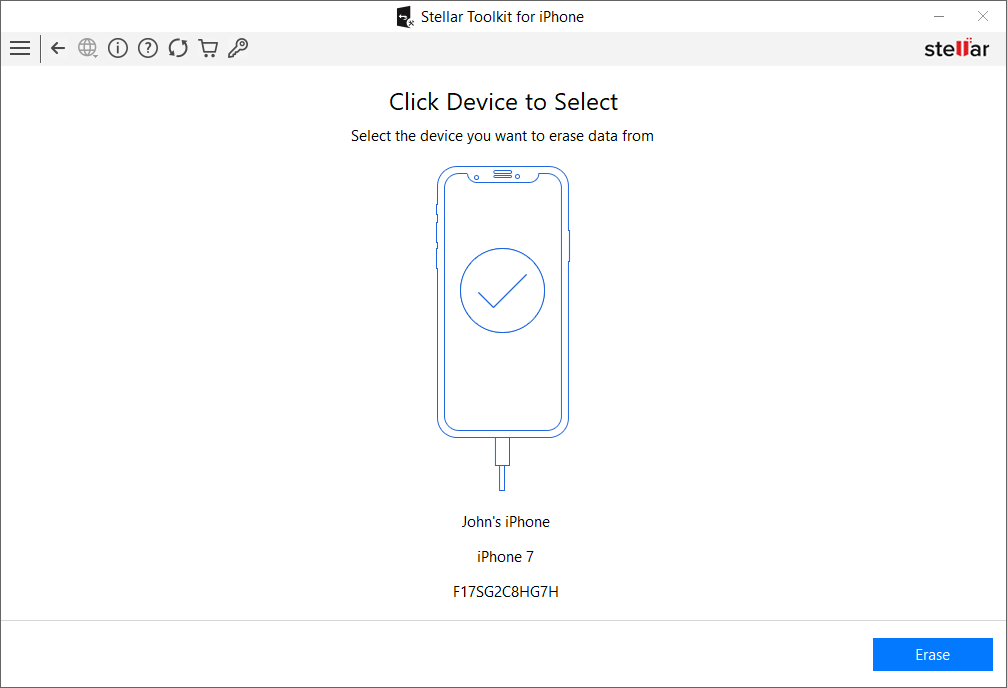
Step 5: Select Erase.
Step 6: In the Erase Process box, select Yes.
Step 7: Data Erase Complete message box appears that asks for confirmation before erasing the data. Click OK.
Wrapping Up
After erasing complete iPhone data by using the secure iPhone eraser software by Stellar, there’s no need to worry about personal data leak. The software algorithms ensure that even the most advanced iOS data recovery tool cannot retrieve your information.
![]()
Was this article helpful?
FAQs
How do you permanently erase data so that it cannot be recovered from iPhone?
Use the best iPhone data eraser tool to permanently wipe iPhone data. This is a assure way to prevent data leak and protect privacy.
The 5 Best Methods to Track a Lost or Stolen iPhone
Summary: Lost your iPhone? Don’t worry, here we tell you how to track lost or stolen iPhone using various techniques. Also, learn how to erase your iPhone data permanently to prevent it from reaching in wrong hands or misuse, using Stellar Data Recovery for iPhone.
|
Q. I cannot live without my iPhone. It was stolen yesterday and can’t recall where I lost it. It has been switched off. Can I track the location of my iPhone? Is there any way to track lost iPhones?
| A. Don’t panic. Log in to ‘Find My iPhone’ via iCloud.com and set it to ‘Lost Mode’. To know what else you can do now to track the iPhone location, read this post. |
|---|
Losing an iPhone (and for that matter any smartphone) is tormenting. Besides the upfront costs, there’s an incredible amount of personal data at stake. Today, smartphones not only store personal photos, videos, and music libraries but might also contain an incredible amount of sensitive information in the form of browsing history, social data, app traces, etc. So the apprehension of exploitation and misuse of the data stored in a stolen or lost iPhone is but real.
So, as soon as you discover that your iPhone has been stolen or lost, first, try to track the location of your missing device and lock it.
How to track a lost or stolen iPhone?
Try out the following methods
- Use Find My iPhone
- Track through Apple’s Family Sharing
- Use Google Timeline
- Try Google Photos
- Use location-tracking apps

Method 1: Use Find My iPhone
If Find My iPhone is enabled on your stolen iPhone, you can do the following:
- Locate your mobile phone
- Protect your iPhone data by choosing Lost Mode or erasing the data remotely

How to use Find My iPhone when the phone is missing
- Sign in to icloud.com on your computer.
- Click on the Find My iPhone link at the bottom.
- On the Find My iPhone’s map interface, select your lost iPhone via the All Devices drop-down menu. The app starts tracking your iPhone location on the map.
As you see the location of your device you can choose to do the following
- Play sound (if your iPhone is nearby, you can trace it with sound)
- Activate ‘Lost Mode’ (this locks your device and still tracks it)
What does Lost Mode do to your device?
- Remotely locks your device
- Displays a message with your phone number on the missing iPhone’s Lock Screen
- Keeps track of your device location.
- Erase iPhone remotely (with this action you won’t be able to track your iPhone but data is prevented from slipping into the wrong hands)
How to erase iPhone data remotely?
Choosing to erase the iPhone remotely deletes the complete data from it.
Note: Always remember to copy important photos, videos, music, and other data on iCloud backup before remotely erasing the iPhone.
Use a trusted and safe data recovery solution such as Stellar Data Recovery for iPhone to restore lost files from iCloud. The software allows the recovery of specific data rather than recovering the entire data.
Method 2: Track iPhone through Family Sharing

If you have set up Family Sharing, use it to track your iPhone. Family Sharing helps the members to know each one’s device location. Ask another member in the Family Sharing group to trace your iPhone via the Find My iPhone app. The member can also sign into iCloud.com to locate the missing iPhone.
|
Is your missing iPhone switched off or offline?
If the missing iPhone is switched off or showing offline in Family Sharing, you can still activate Lost Mode or remotely erase its data via Find My iPhone.
Note: The iPhone’s last known location remains only for one day. In case your device is offline for over 24 hours, you cannot trace its last location.
|
| — |
What to do when ‘Find My iPhone’ is NOT enabled or the missing iPhone is offline for more than one day?
- Change your Apple ID passwords to prevent anyone from accessing your data.
- Change your social media and other Internet account passwords like Gmail, Twitter, Facebook, Instagram, etc.
- Report the device as missing to the authorities.
- Report your network carrier to disable the services like calls, messages, or data use.
If you have turned on Location Services and Location History on your iPhone, Google’s Timeline will record all the locations of your device.
When an iPhone goes missing, access the location information on a map and find the last location. Remember, Google Timeline records the location only when the iPhone is switched on with an internet connection.
How to see the last location of a lost iPhone in Google Timeline
- Visit <com/maps/timeline> on your computer.
- Sign in to your Google account.
- Click Today or select Date.
- Scroll down to see the last reported location of your iPhone.
Along with the location, note the time when your phone was last connected to Google. Taking clues from the location and time information, you can find your lost iPhone. If needed, take the help of cops.
Method 4: Take location clue from Google Photos
If anyone has captured a photo from your lost iPhone and you have the Google Photos location-sharing option enabled, then luck is on your side.
Visit <photos.google.com/>. Check, if any new photos were uploaded and view their upload location.
Method 5: Location tracking apps
If you have installed any location-tracking app such as GPS Location Tracker, CocoSpy Cell Phone Tracker, or iTrack on your missing device, use it to track the lost or stolen iPhone. These apps share the real-time location of your device on your computer or other connected devices.
Conclusion
Apple’s Find My iPhone feature is the best way to track the location of a stolen or missing device. If Find My iPhone is not enabled you can try Google Timeline or Google Photos. Other than these methods, third-party apps can also help track a lost iPhone, but only if you have installed them before the phone was lost.
Nevertheless, ensure that you copy the iCloud backup of the stolen iPhone before taking any of the above steps.
A smarter way is to filter out the data that you want to keep, with the help of Stellar Data Recovery for iPhone.
Is this post helpful? Share your experience in the comments below, how you managed to track and get back your stolen iPhone.
Why Stellar Data Recovery for iPhone takes time in scanning my iPhone?
Stellar Data Recovery for iPhone thoroughly scans your iOS device, computer, and iCloud to retrieve every bit of data. However, the scanning time of the software depends upon the following:
- The amount of data in your iOS device: Greater the amount of data on your iPhone more time it will take to scan.
- The size of RAM on your iPhone: Greater the RAM more will be the scanning time. For instance, the software will take more time to thoroughly scan an iPhone 12 with 6GB RAM compared to iPhone 11 that has 4GB RAM.
- RAM of your computer: The recommended system requirement of Stellar Data Recovery for iPhone is 8GB. Although it can scan and recover from 4GB RAM computer, but you may experience slow speed.
How to Delete All Photos from iPhone Beyond Scope of Recovery?
Summary: Learn how to delete all photos from your iPhone beyond the scope of recovery with this comprehensive guide. We’ve also mentioned an iPhone eraser software that securely erases your photos for good and safeguards your privacy.

Are you planning to sell or discard your iPhone? If yes, it’s important to ensure that your personal data, such as photos and videos, etc. is deleted and cannot be recovered even by a professional data recovery tool. To protect your privacy and prevent unauthorized access to your deleted iPhone photos, make sure your iPhone is wiped clean of all your previous photos before you sell, donate, or discard it.
In this blog, we will talk about different ways to delete photos from iPhones beyond the scope of recovery.
## **How to Delete All Photos from iPhone?**Before deleting all photos from the iPhone, it’s important to take a backup of all photos to avoid any accidental data loss situation. There are various ways to back up your iPhone photos:
1. iCloud
Use iCloud to back up all your photos automatically. To sync iCloud with Photos –
- Go to Settings > [your name] > iCloud > Photos, and turn on iCloud Photos.

Your photos will be backed up to iCloud automatically if your device has enough storage space and is connected to Wi-Fi.
2. iTunes:
You can even use iTunes to back up your iPhone photos. To do this,
- Connect your iPhone to your system.
- Launch iTunes and then select your device.
- Click Summary > “Back Up Now” to create a backup of all your data, including photos.

Once you have backed up all your photos, proceed forward with deleting them from your iPhone.

Method 1: Delete Images From Photos and Recently Deleted Folder
Photos app saves images shot from iPhone as well as those received on chats. You can delete all the photos from your iPhone via the Photos app. Here’s how to do it.
- Open the Photos app on your iPhone.
- Go to the Library tab, tap All Photos, and then tap Select.
- Select one or multiple photos you want to delete.
- Tap on the Trash icon and then confirm to delete the photos.

When you delete a photo from the iPhone, it’s not deleted permanently. Instead, it is moved to the Recently Deleted folder, where the deleted photos stay for 30 days before being permanently deleted.
To permanently delete photos from the Recently Deleted folder, follow these steps:
- Open the Photos app > Albums.
- Scroll down, then tap on Recently Deleted.
- Next, tap Select and choose the photos that you want to delete permanently.
- Tap Delete and then confirm to delete the photos.

Remember, if iCloud sync is enabled, photos deleted from iPhone will be deleted on iCloud. That is why if you want to delete photos from your iPhone but not on iCloud, make sure iCloud sync is disabled for Photos.
Method 2: Factory Reset Your iPhone
Apple’s brilliant feature of the ‘Erase All Content and Settings’ option brings your device to default settings by erasing all your iPhone data, etc.
The factory reset will delete all the settings, photos, audio, videos, messages, notes, call history, search history, app history, passcodes, and any other data on your iPhone.
However, remember erasing your iPhone data with the ‘Erase All Content and Settings’ doesn’t delete your data permanently. It means that all your iPhone data including photos are still recoverable with the help of robust iPhone data recovery software .
Steps to Factory Reset iPhone
- Open Settings on your iPhone.
- Go to General and tap on Transfer or Reset iPhone.
- Click on the Erase All Content and Settings options.
- Click Continue and enter your iPhone passcode.
- Next, click Erase iPhone. This will fully wipe your device clean.

Note: Don’t forget to back up your iPhone data on iCloud or iTunes before initiating the factory reset. Because this backed-up data can be accessed on your computer or new iPhone.
Stellar Eraser for iPhone is the best way to delete permanently erase all photos as well as other data of the iPhone. The software erases all your photos, contacts, videos, chats, iMessage, browser search history, third-party apps data, and more from your iPhone.
The Stellar iPhone Eraser tool is the best way to clean or delete iPhone data. This tool deletes iPhone data permanently making it impossible to recover it from any software. It is the best data erasure tool for iOS devices before you exchange, sell, recycle, or give them away.
The software works with all iPhones and iPad versions, such as iPhone 14 to lower versions till iPhone 4 and supports iOS versions from iOS 6.0 to iOS 16.
![]()
Steps- How to Delete All Photos From iPhone via Stellar Eraser for iPhone
- Download and install Stellar Eraser for iPhone on your Windows and Mac systems.
- Launch the software and click on the Erase Data option.


- In the next Erase iPhone Data screen, click Next.

- Connect your iPhone to the system when prompted and click Erase.

- Click Yes to start the process of erasure.

- Click OK, once all the data is successfully erased.

All the data including photos and videos get permanently erased from iPhone beyond the scope of recovery.
Conclusion
Deleting all photos from your iPhone beyond the scope of recovery is crucial to protect your privacy and prevent unauthorized access to your personal data. By following the methods above, you can ensure that all your photos are deleted permanently from your iPhone. However, the best way to delete all photos from iPhone is by using Stellar Eraser for iPhone. The software will help you erase photos and other data from your iPhone so that it is impossible to recover it using any data recovery software.
![]()
FAQ
1. How to Delete Photos from iCloud?
To delete Photos from iCloud, follow these steps:
- Open Settings > tap on your Apple ID > iCloud.
- Then tap Manage Storage and select Photos.
- Next tap Disable and Delete. It will disable your photos from being saved on your iCloud account.
2. How to delete apps on iPhone permanently?
If you want to delete apps on your iPhone for managing the storage space then you directly remove it from Home Screen or delete it from App Library.
3. How to delete documents and data on iPhone?
Documents and Data folder may contain browsing history, cookies, cache, temporary files, database files and other information specific to the app. You can delete them easily by following this detailed guide .
- Title: Guide to Completely Erase Data on iPhone 13 Pro Max to Avoid Privacy Leak | Stellar
- Author: Nova
- Created at : 2024-07-17 17:26:17
- Updated at : 2024-07-18 17:26:17
- Link: https://phone-solutions.techidaily.com/guide-to-completely-erase-data-on-iphone-13-pro-max-to-avoid-privacy-leak-stellar-by-stellar-data-recovery-ios-iphone-data-recovery/
- License: This work is licensed under CC BY-NC-SA 4.0.