
Guide to Completely Erase Data on iPhone 14 Pro to Avoid Privacy Leak | Stellar
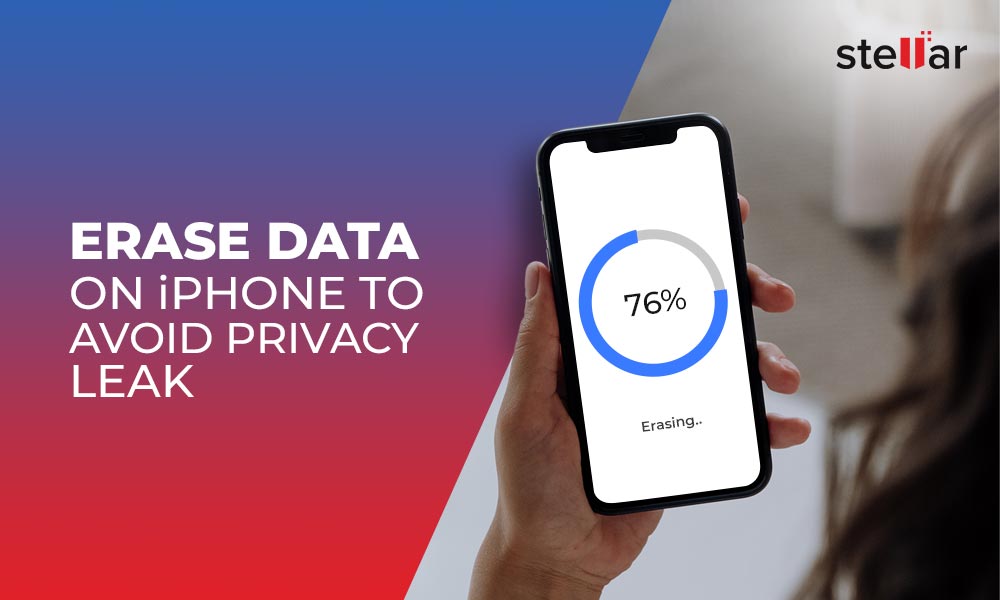
Guide to Completely Erase Data on iPhone to Avoid Privacy Leak
With growing instances of data leak and misuse, there’s a fear of digital data on iPhone landing in wrong hands. Personal photos, messages, videos, contacts, or sensitive information such as bank details, shopping apps ID etc., are at risk when selling, trading off, recycling or donating your iOS device.
So what can you do to keep your old iPhone data away from strangers’ eyes and make it 100% unrecoverable?
One solution is the commonly used Apple’s recommendation — erase iPhone data by choosing ‘erase all content and settings’ on your device. However, with professional hackers and sophisticated software available, erasing data by this method doesn’t guarantee data privacy.
Experts suggest using trusted iPhone erasure software that is 100 % safe. The software can make iPhone data unrecoverable beyond the reach of any tool.
Let’s understand in detail how to permanently erase data on iPhone by these techniques.

Clean iPhone by using ‘Erase All Content and Settings’
To clear all data from iPhone use the’Erase All Content and Settings’ option in the settings of your iOS device. It is like factory resetting your iPhone.
All the app data, settings, passwords, photos, videos, contacts, documents, messages, Calendar, chats, music, audio files etc., gets deleted after factory reset from iPhone.
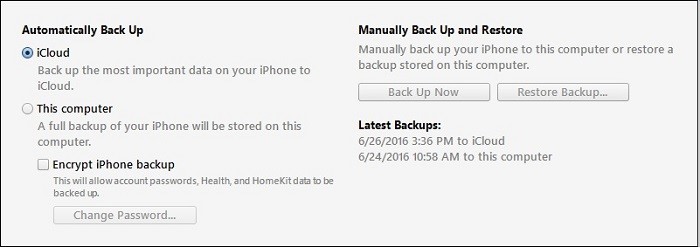
However, don’t forget to first take the backup of your iPhone data in iCloud or iTunes.
Steps to erase iPhone via Settings:
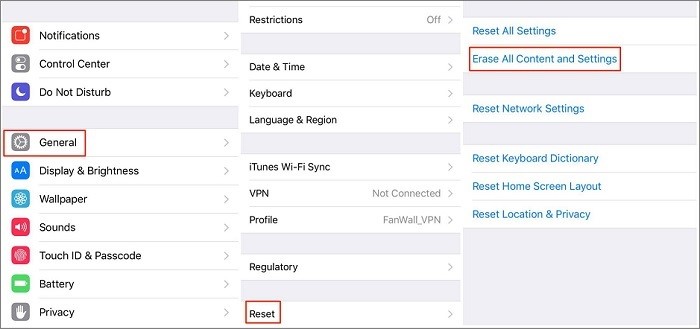
- Go to Settings.
- Navigate to General > Reset> Erase All Content and Settings.
- Click Erase Now in the dialog box. Enter Passcode and Apple ID password, when prompted.
This will erase iPhone data turning the device off. When you power on the iPhone, you will see all its data is deleted including, photos videos, apps, contacts etc.
## Permanently wipe iPhone to 0% recovery – Secure & tested methodAlthough deleting data via ‘Erase All Content and Settings’ on iPhone will make your device as clean as new, but it is not enough. Your iPhone data after factory reset is still recoverable by hackers. Thus, to protect privacy and prevent data leak by any means, it is essential to erase iPhone with the help of a professional iOS eraser software .
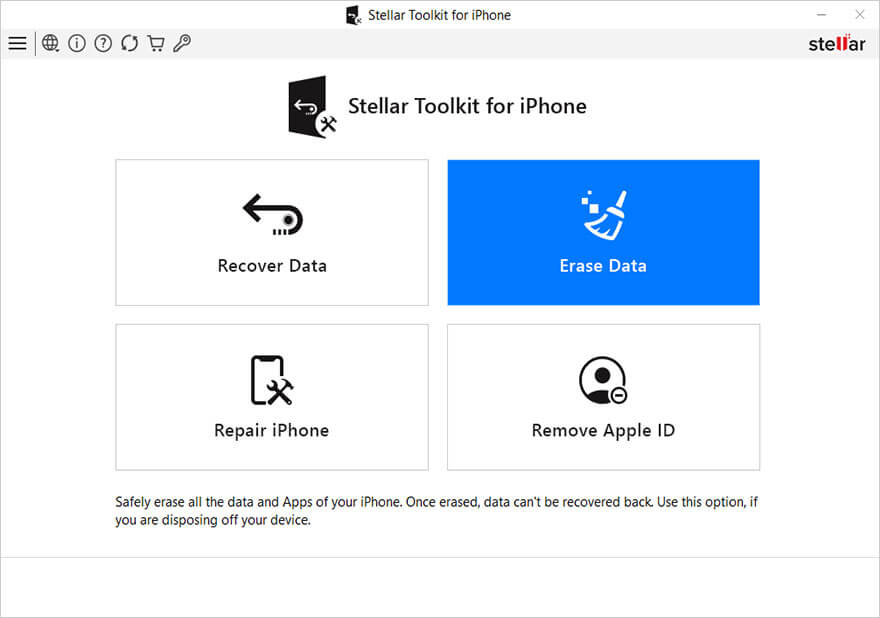
You can find several iOS cleaner software online but here we recommend Stellar Toolkit for iPhone. The efficient software is the best way to wipe iOS device before you sell , recycle, or donate.
It removes your personal videos, pictures, contacts, notes, calendar, browsing history, call log, chats, messages, Instagram, WhatsApp, and other sensitive information saved on your iPhone. The secure DIY software supports the latest iOS 16 and below versions. You can erase all variants including iPhone 6, iPhone 7, iPhone 8, iPhone X, iPhone SE, iPhone 11, and above.
You can take the free trail and gage the software features and user-friendliness.
Step-by-step guide to erase iPhone data permanently:
Step 1: Download and launch Stellar Toolkit for iPhone on computer.
Step 2: Click on Erase Data module.
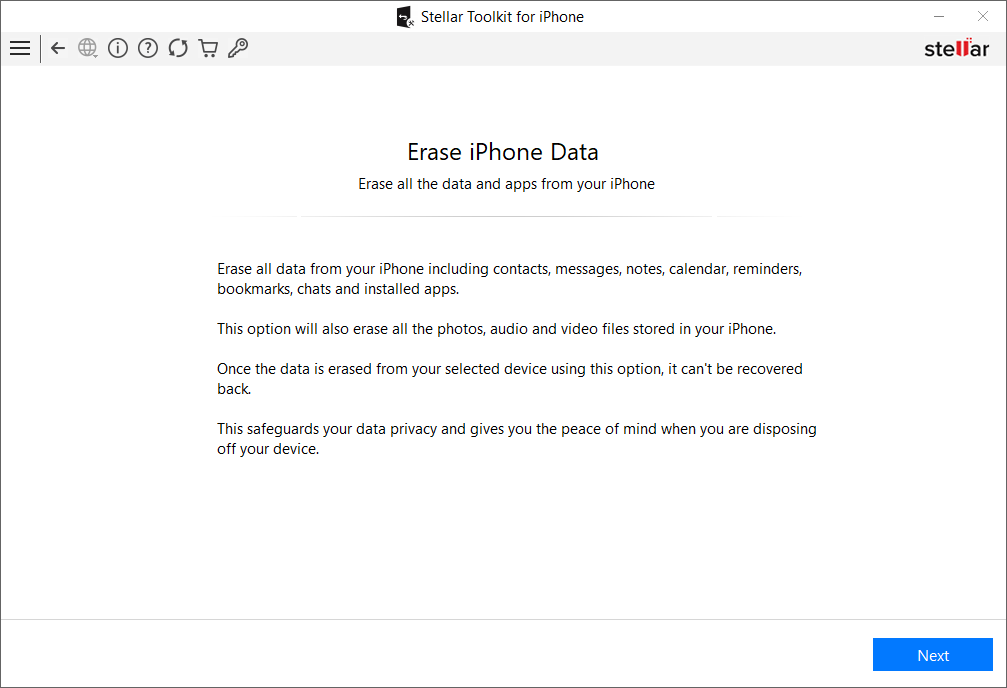
Step 3: On Erase iPhone Data screen, click **Next.
**
Step 4: As you see the Click Device to Select screen appears, connect your iPhone to computer.
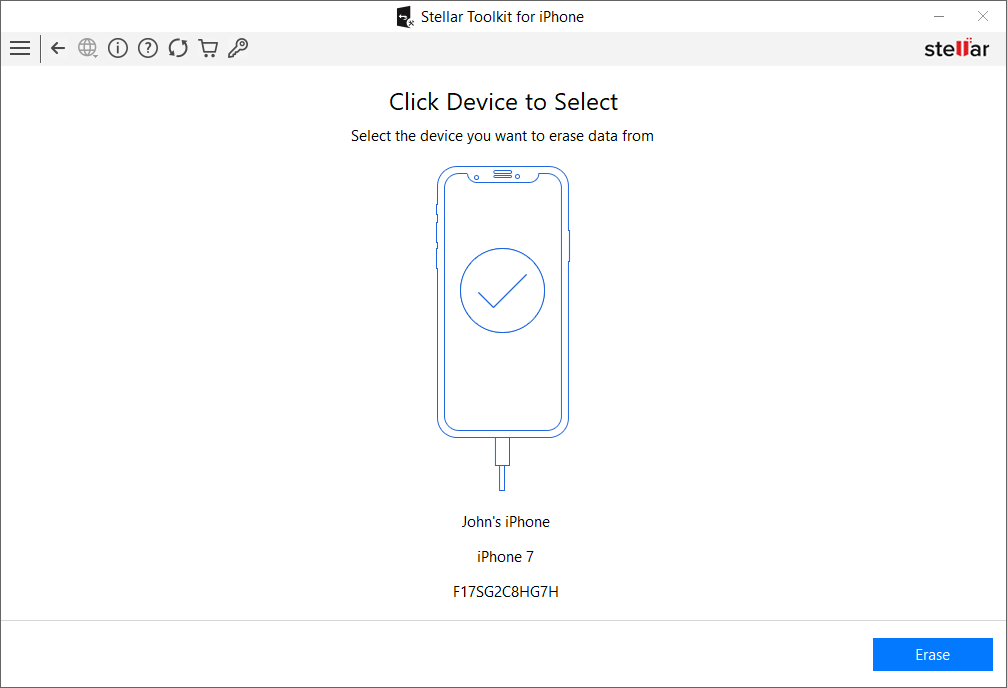
Step 5: Select Erase.
Step 6: In the Erase Process box, select Yes.
Step 7: Data Erase Complete message box appears that asks for confirmation before erasing the data. Click OK.
Wrapping Up
After erasing complete iPhone data by using the secure iPhone eraser software by Stellar, there’s no need to worry about personal data leak. The software algorithms ensure that even the most advanced iOS data recovery tool cannot retrieve your information.
![]()
Was this article helpful?
FAQs
How do you permanently erase data so that it cannot be recovered from iPhone?
Use the best iPhone data eraser tool to permanently wipe iPhone data. This is a assure way to prevent data leak and protect privacy.
How to Fix & Retrieve Pictures/Videos From a Water Damaged iPhone That Won’t Turn on
Summary: Spilled water on your iPhone? This article guides you in detail, how to fix water-damaged iPhone and do’s to avoid further damage. Also learn ways to recover lost photos and videos when your iPhone is not turning on due to the damage.
| Q. I accidentally dropped my iPhone in swimming pool and now it does not turn on anymore. How can I fix my water damaged phone? Is there any way I can rec__over photos and videos from my water damaged iPhone
A. To fix a water damaged iPhone, try to dry it completely while to recover your lost photos and videos you have two options:
- Recover from Apple iCloud and iTunes backup
- If, backup files are not accessible or deleted, recover using third-party software
|
| — |
This article guides you in detail, how to fix such water-damaged iPhone and recover lost photos and videos when the device is not turning on.
The damage caused by water or any other liquid on iPhones is unpredictable. Your iPhone may or may not turn on and there is a high possibility of losing your data including photos and videos on it.
Even if your iPhone is under the one-year warranty, Apple does not cover liquid damages to iPhone. So now you are in a crazy situation of double loss, of owning a faulty device and losing precious photos and videos stored in it.
First, a piece of advice: Stay calm. Before trying to retrieve lost photos through any method follow the essential dos and don’ts to fix your iPhone and avoid further loss.
DOs fo****r Water Damaged iPhone
- **Try drying
**Remove excess water off the iPhone by rubbing it dry on a towel. Gently shake it to clear the water in the sockets and ports of the phone. - **Do not plug it in or turn it on
**Do not plug or turn on the wet iPhone as this can cause a short circuit. Even if it turns on, it will stop working forever after sometime. If the iPhone is in Power on or Sleep Mode, switch it off completely and leave it to dry for at least two days. - **Remove the SIM card
**Take out the SIM card from the iPhone to avoid damage to key components and rub it dry on a clean cotton cloth. - **Dry with silica gel sachets
**Use silica gel packets to dry your wet iPhone and leave it for at least 48 hours.
DON’Ts for Water Damaged iPhone
- Do not press any buttons of wet iPhone
- Do not try to switch on your iPhone to avoid short circuit
- Do not use a hairdryer or other drying tools to dry your phone
- Do not place your iPhone in raw rice to avoid foreign particles entering inside

How to Recover Data from Water Damaged iPhone
After doing above essential hacks, once you power on your water damaged iPhone, there are two possibilities, either your phone starts working but you have lost your data or iPhone does not switch on at all!
Do not panic, as in either case, you can recover your lost photos and videos from a water damaged iPhone via two methods
Method 1: Recover from **iCloud and iTunes backup
**Apple has this remarkable feature in which all iPhone data is automatically saved in iCloud and iTunes backup. You just you need to sign in to iCloud or iTunes through your Apple ID on the new iOS device. Next, select and transfer the desired files to the new device from the list of available backups in iCloud/iTunes.
_**Method 2: Recover from third-party application
**_In case you are unable to restore photos from the iCloud and iTunes backup files or have deleted your desired files from the backup, opt for a third-party application to recover photos or videos from your water damaged iPhone.
From a plethora of iPhone data recovery software available in the market, experts recommend to pick only the trusted and secure data recovery tool, specially designed for the iOS device.
**Use iPhone Data Recovery Software by Stellar
**One of the commonly used third-party data recovery software is Stellar Data Recovery for iPhone. The easy-to-use interface and 100% safe download makes it a popular choice among iPhone users.
If your iPhone is synchronized with iCloud and iTunes backup, you can retrieve lost photos and videos from water damaged iPhone using Stellar Data Recovery for iPhone. In the situation when your iPhone is not detected by the system or do not switch on at all, after it is damaged due to water, the software offers two ways to recover photos and videos:
- Recovery from iCloud Backup
- Recovery from iTunes Backup
**Step-by-step: Recovery from iCloud Backup

Step 1: Install and Run Stellar Data Recovery for iPhone and select “Recover from iCloud Backup**” from the main menu.
Figure 1: Illustrates the main screen
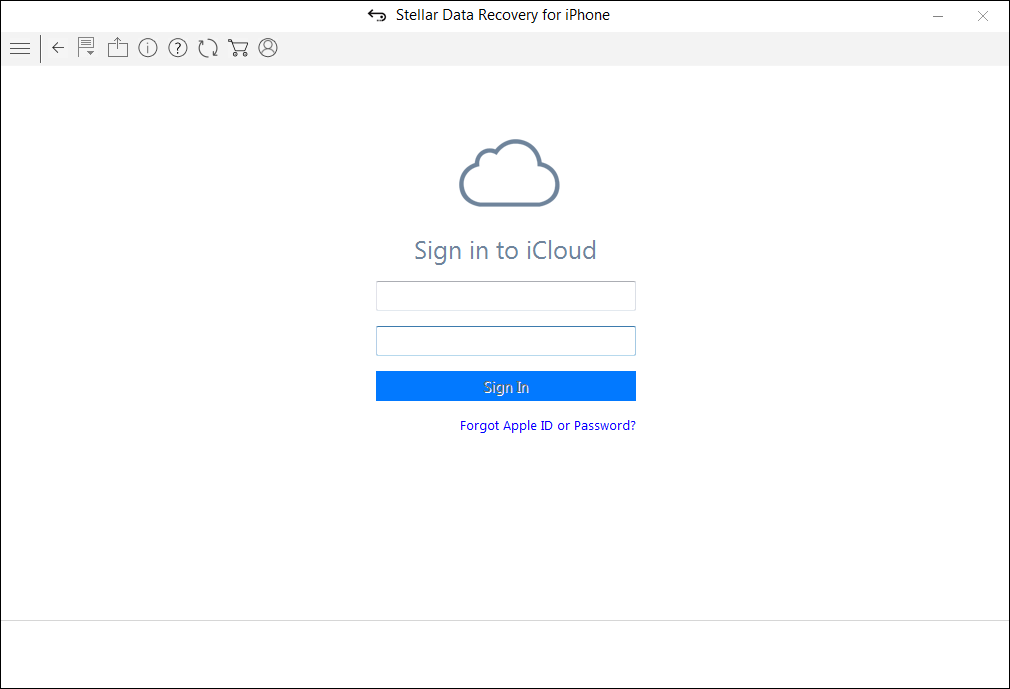
Step 2: Enter the Apple ID and password to sign in to iCloud.
 Figure 2: Illustrates the credential screen
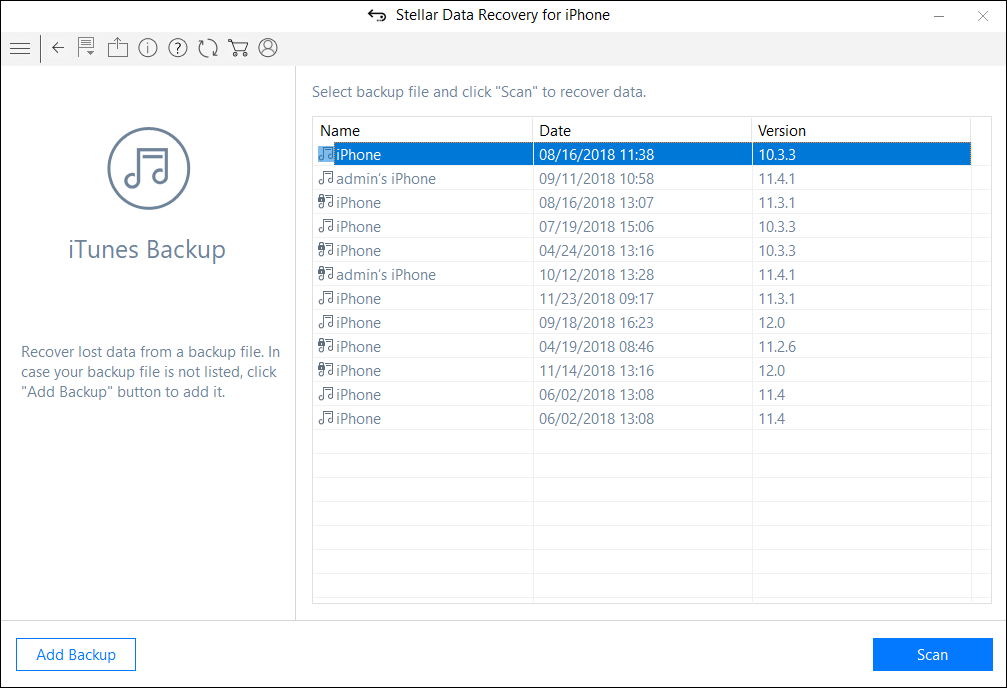
Step 3: After entering the credentials, the software displays the list of all backup files. Select the desired files and click Scan
Figure 4: Illustrates backup files list
Step 4: Preview the selected files and press Save. You can save recovered photos or videos at the desired location.

Figure 5: Illustrates the preview of the files
Step-by-step: Recovery from iTunes Backup
Step 1: Select “Recover from iTunes Backup” option on the main screen
Step 2: The software displays all iTunes backup files. From the Tree view, select the file categories from which you want to recover photos/videos. it will list all files under that category.

Figure 6: Illustrates the backup files list
Step 3: Preview the existing and/or deleted files

Figure 7: Illustrates the Preview of files under the selected category
Step 4: Click ‘Save’ to recover the file. You can either choose to save all or a few files by selecting the checkboxes.
_  Figure 8: Illustrates the file saving process_
**Conclusion
**The safest way to _rec_over lost photos and videos from water damaged iPhone is through a secure third-party tool.
The easy-to-use interface along with scanning and recovery precision makes iPhone Photo Recovery Software by Stellar most sought by iPhone users. It comes as a blessing, especially when the iTunes and iCloud backup files become inaccessible or unreadable.
Try the Free Demo Version of the software to recover your lost and deleted pictures/videos in Mac or in Windows.
iPhone Data Recovery – An Infographic to Conquer iPhone Data Loss

DID YOU KNOW?
- More than 70% of people choose to upgrade to iOS 16 within a few days of release
- Analysis shows that about 20,000+ users experience data loss due to update failures and other related problems
TOP 5 CAUSES OF DATA LOSS
- iOS Update
- Accidental Deletion of Data
- Jailbreak failure
- iOS Restore
- Hardware or System Malfunction
WHAT ABOUT RECOVERING iOS DATA AFTER DATA LOSS?
iPhone Data Recovery software helps you in such situations. Data exists in the internal memory of your iPhone even after deletion until it is overwritten by new data. Its advanced algorithm and internal underlying technology helps recover all deleted data from your iOS device, be it your iPhone or your iPad.
WHAT YOU CAN RECOVER?
- Recovers Deleted Photos from your iPhone – In just 3 steps you can recover your memorable photos from Camera Roll, Voice Memo, Photo Stream, etc.
- Recovers deleted text messages from your iPhone – It not only recovers your text messages but also recovers your WhatsApp messages along with its attachments
- Recovers deleted contacts from your iPhone – It retrieves your lost or deleted contacts from your iPhone, iTunes, or iCloud backup files
- Recovers Safari Bookmarks – It easily recovers bookmarks from the Safari browser which you may have deleted accidentally
- Recovers deleted data from iCloud backup files – It also recovers and restores data from your damaged iPhone through iCloud backup files
- Recovers deleted data from encrypted iTunes backup files – In case any of your backup files gets accidentally deleted, the software enables you to access the data by removing encryption.
How To Recover Whatsapp Chat History From iPhone
Summary: Losing the WhatsApp chat history from iPhone can be annoying. It may contain important details, photos, videos, and audio recordings. This post brings easy and quick methods to recover lost or deleted WhatsApp chat on iPhone using Stellar Data Recovery for iPhone.


With social media engulfing our lives, it becomes all the more important to keep track of people close to us through various social media apps, not only personally but professionally as well.
Messaging apps such as WhatsApp gives you total access to chat and share data with your family, friends, and even with your business or work colleagues 24*7. Each day, billions of people all over the globe, chat and share videos, audio, photos, etc. over this one messaging app. Therefore, it contains information that is of great value.
But it is important to know that this app is not fail-safe. Sometimes due to some technical issues, WhatsApp chats and other valuable information gets erased from the phone and chances of recovery are slim. If you are an iPhone user, it is a common scenario that due to tech issues such as jail breaking or when you upgrade your iPhone, your data as well as your WhatsApp chats may get erased from the iPhone.
Losing the chat history which also contains your priceless photos, videos, and audio can be quite frustrating! Hence, recovery becomes imperative! So in order to help you recover the data lost from your iPhone including your WhatsApp chats, we suggest the following steps that can help restore your chat history.
Recover Deleted Messages from WhatsApp Chat iCloud Backup
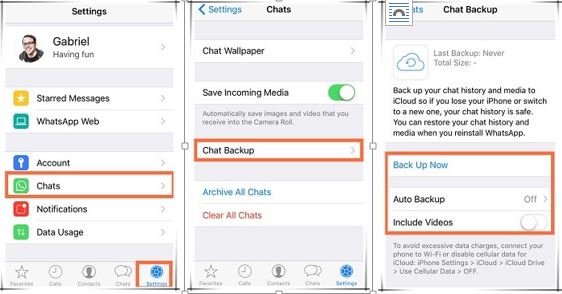
1- First of all, make sure that you have created a backup of all your WhatsApp chats and data on iCloud. In order to check that, go to the WhatsApp settings and check it on the Chat Backup present in the Chats.
2- Next, uninstall the existing WhatsApp and then reinstall it again from the app store and log in with your number. When you log in, a dialogue box will appear asking you to backup the chats: click on the confirm button to proceed.
Recover Deleted WhatsApp Messages Without Backup
1- Download and install iPhone Data Recovery Software by Stellar on your computer and then register the product using the product key.

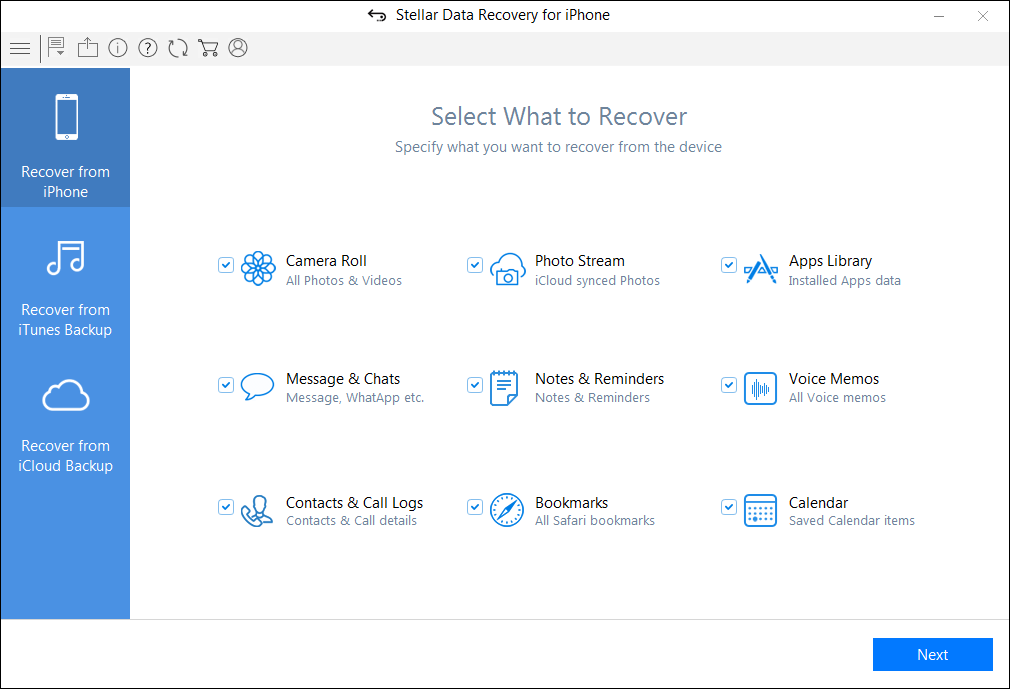
2- Now after connecting the iPhone, click on Recover from iPhone option. Select the file type you want to recover and click “Next”. The scan will initiate thereafter.
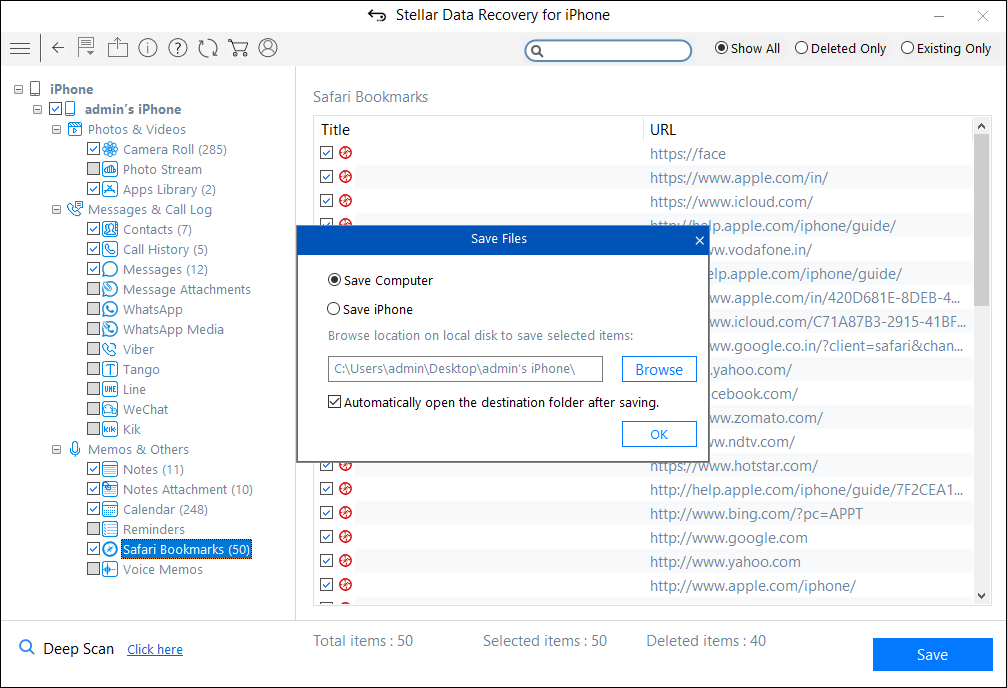
3- Select Only Show Deleted option on the top to focus only on the deleted data. Then select the conversations you want to save. Then click Save.
4- Choose the desired location on your computer where you want to save the files or you can save it directly to your iPhone. Then click OK.
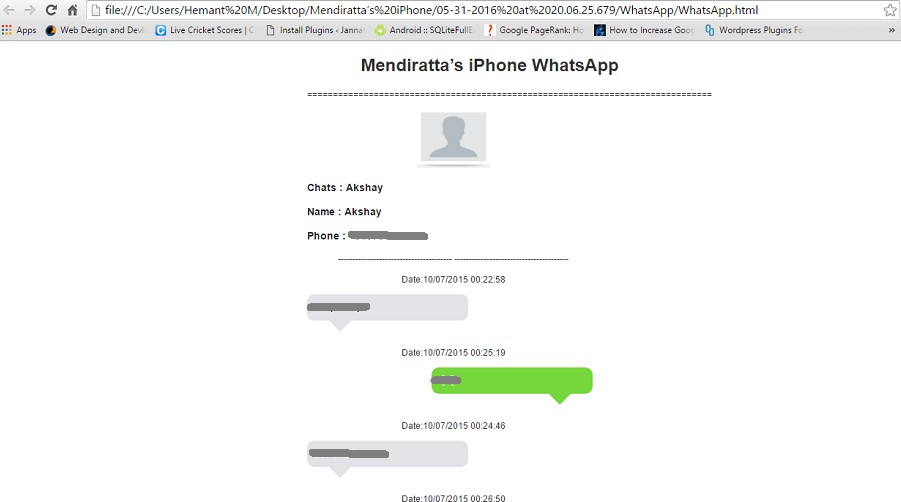
After a wait of 5-10 minutes, the lost data will be saved within form of a HTML page which can be opened using any browser.
Restore Deleted WhatsApp Messages from iTunes Backup
If you have backed up your WhatsApp chats and files in the iTunes app of the iPhone, then you can easily get back all your chats and files easily from it by following the below steps—
1- Open the iTunes app on your computer and then connect your iPhone into it. Next, click on the iPhone icon and then select restore backup. Then select the backup file that contains the WhatsApp messages and then select the recover option.
If you face any difficulty to recover your data from iTunes backup then use Stellar Data Recovery for iPhone to recover lost or deleted Contacts, Call history, Voice Memo, Messages, Notes, Reminders, Calendar, Safari Bookmarks from iOS device iTunes backup file.

Restore Deleted WhatsApp Messages from iCloud Backup
Just like iTunes, you can even back up your files and WhatsApp chats on iCloud present in your iPhone. However, before getting started, make sure that the data and chats are securely backed up in the app from which you have to recover.
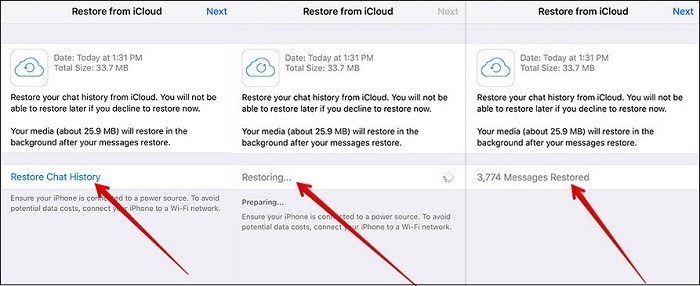
1- The first step contains erasing of all the content and settings present in the iPhone. This can be done by going to the general setting present in the iPhone.
2- A setup screen will be displayed. Follow the steps to get to the apps and data, then select on restore from iCloud backup from it.
3- Select the files and data that you wish to backup and then click on the restore button and let the system restore all the backed up data into your phone.
If you face any difficulty to recover your data from iCloud backup then use Stellar Data Recovery for iPhone to recover lost or deleted Contacts, Call history, Voice Memo, Messages, Notes, Reminders, Calendar, Safari Bookmarks from iOS device iCloud backup file.
Conclusion
Losing chats and other data from WhatsApp may lead to a situation of despair. Therefore, to ease you off your worries, the above simple steps will help restore all your chats as well as your lost photos, audio, and videos from your iPhone.
- Title: Guide to Completely Erase Data on iPhone 14 Pro to Avoid Privacy Leak | Stellar
- Author: Nova
- Created at : 2024-07-17 17:26:23
- Updated at : 2024-07-18 17:26:23
- Link: https://phone-solutions.techidaily.com/guide-to-completely-erase-data-on-iphone-14-pro-to-avoid-privacy-leak-stellar-by-stellar-data-recovery-ios-iphone-data-recovery/
- License: This work is licensed under CC BY-NC-SA 4.0.