
How Do I Restore Excel 2000 File ? | Stellar
How Do I Restore Excel File ?
Excel (XLS/XLSX) file corruption is a common issue that may arise due to problems, such as abrupt system shutdown, system crash, malware or virus intrusion, unsupported add-in, etc. However, MS Excel comes with a recovery feature that allows users to recover or restore Excel files lost or corrupted when the MS Excel quits unexpectedly or computer crashes due to hardware or software-related issues.
But sometimes, the restored version of the Excel file may not contain all the data or changes you made recently. In such cases, you are left with the option to repair the damaged or corrupt Excel file with the help of an Excel repair software, such as Stellar Repair for Excel .

Solutions to Restore Excel File
Below we have discussed various solutions to repair, recover, and restore unsaved, lost, corrupt, or inaccessible Excel files with the help of MS Excel options and Excel repair software.
NOTE: Some of these methods work only if you had enabled or configured certain required settings or options before corruption or losing the Excel file.

1. Restore Lost or Unsaved Excel File via ‘Recover Unsaved Workbooks’ Option
The Recover Unsaved Workbooks option allows you to restore the Excel file that you forgot to save before closing MS Excel or it stopped working. The steps are as follows:
- Navigate to ‘_File > Open._’
- Scroll to the bottom and click on ‘Recover Unsaved Workbooks.’ This opens a File Explorer browser window.

- Now look for the Excel file that you lost and then double-click on it to open and restore the Excel file.
- Once the file is open, click on File > Save As and save it to your desired location.
However, this option works only if you had enabled and set up the ‘Save AutoRecover information every X minutes_’ option and enabled the ‘_Keep the last AutoRecovered version if I close without saving’ option.
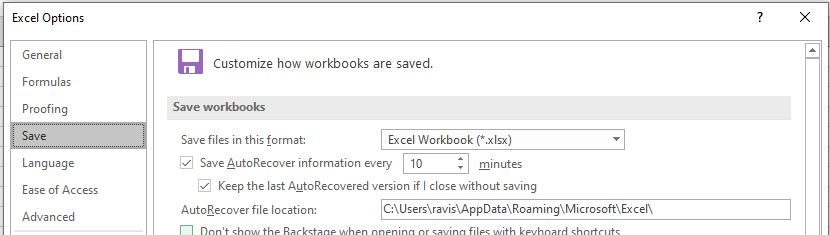
Also, this may not restore the most recent copy of your Excel file, but it will surely save your time that went into creating and editing the workbook.
2. Repair and Restore Corrupt or Inaccessible Excel File
If the Excel file you are trying to open or access is corrupt, MS Excel will display an error message. When MS Excel detects corruption, it starts ‘File Recovery Mode’ to repair the Excel workbook.
However, if it doesn’t start automatically, you can manually repair minor corruption error and restore the Excel file by following these steps:
- Navigate to File > Open and then navigate to the corrupt or damaged Excel file location.
- Select the file and then click on the arrow beside the ‘Open’ button to choose the ‘Open and Repair…’ option.
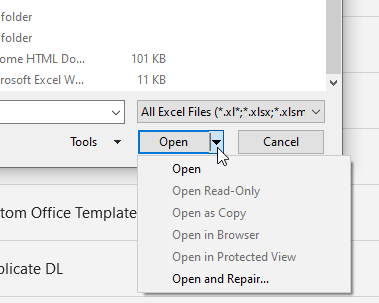
- Now click ‘Repair’ if you want to recover maximum data from a corrupt or inaccessible Excel workbook and restore it to a new Excel file.

If the ‘Repair’ option fails, use the Extract Data option that extracts values, data, and formulas from the Excel workbook.
3. Revert Excel File to Last Saved Version
When an Excel file gets corrupt or damaged while working, you may revert the Excel file to the last saved version. This allows you to restore the Excel file version that isn’t corrupt or damaged. The steps are as follows,
- Click File > Open.
- Double-click the name of the workbook that you have opened in Excel.
- Click Yes to reopen the workbook.
The workbook opens without any changes you’ve made that might have caused the workbook to become corrupted.
4. Use Excel Repair Software to Restore Excel File
If the corrupt or damaged Excel file isn’t repaired by using MS Excel options or you lost data after restoring the unsaved version or after reverting to the last version, you can rely on an Excel repair software, such as Stellar Repair for Excel.
The software repairs Excel files with 100% integrity and restores the Excel data, such as table, Pivot tables, charts, etc., while preserving the workbook properties and formatting. The software is safe as it doesn’t alter or make changes to the original Excel file and saves the repaired data to a new Excel workbook at your desired location.
It supports Excel files (XLS and XLSX), created in MS Excel 2019, 2016, or older versions. It resolves Excel corruption errors, such as Unable to open Excel file, in a few clicks.
To repair a corrupt or inaccessible Excel workbook by using Stellar Repair for Excel software, follow these 3 simple steps,
- Select the corrupt or damaged Excel workbook file (XLS/XLSX).
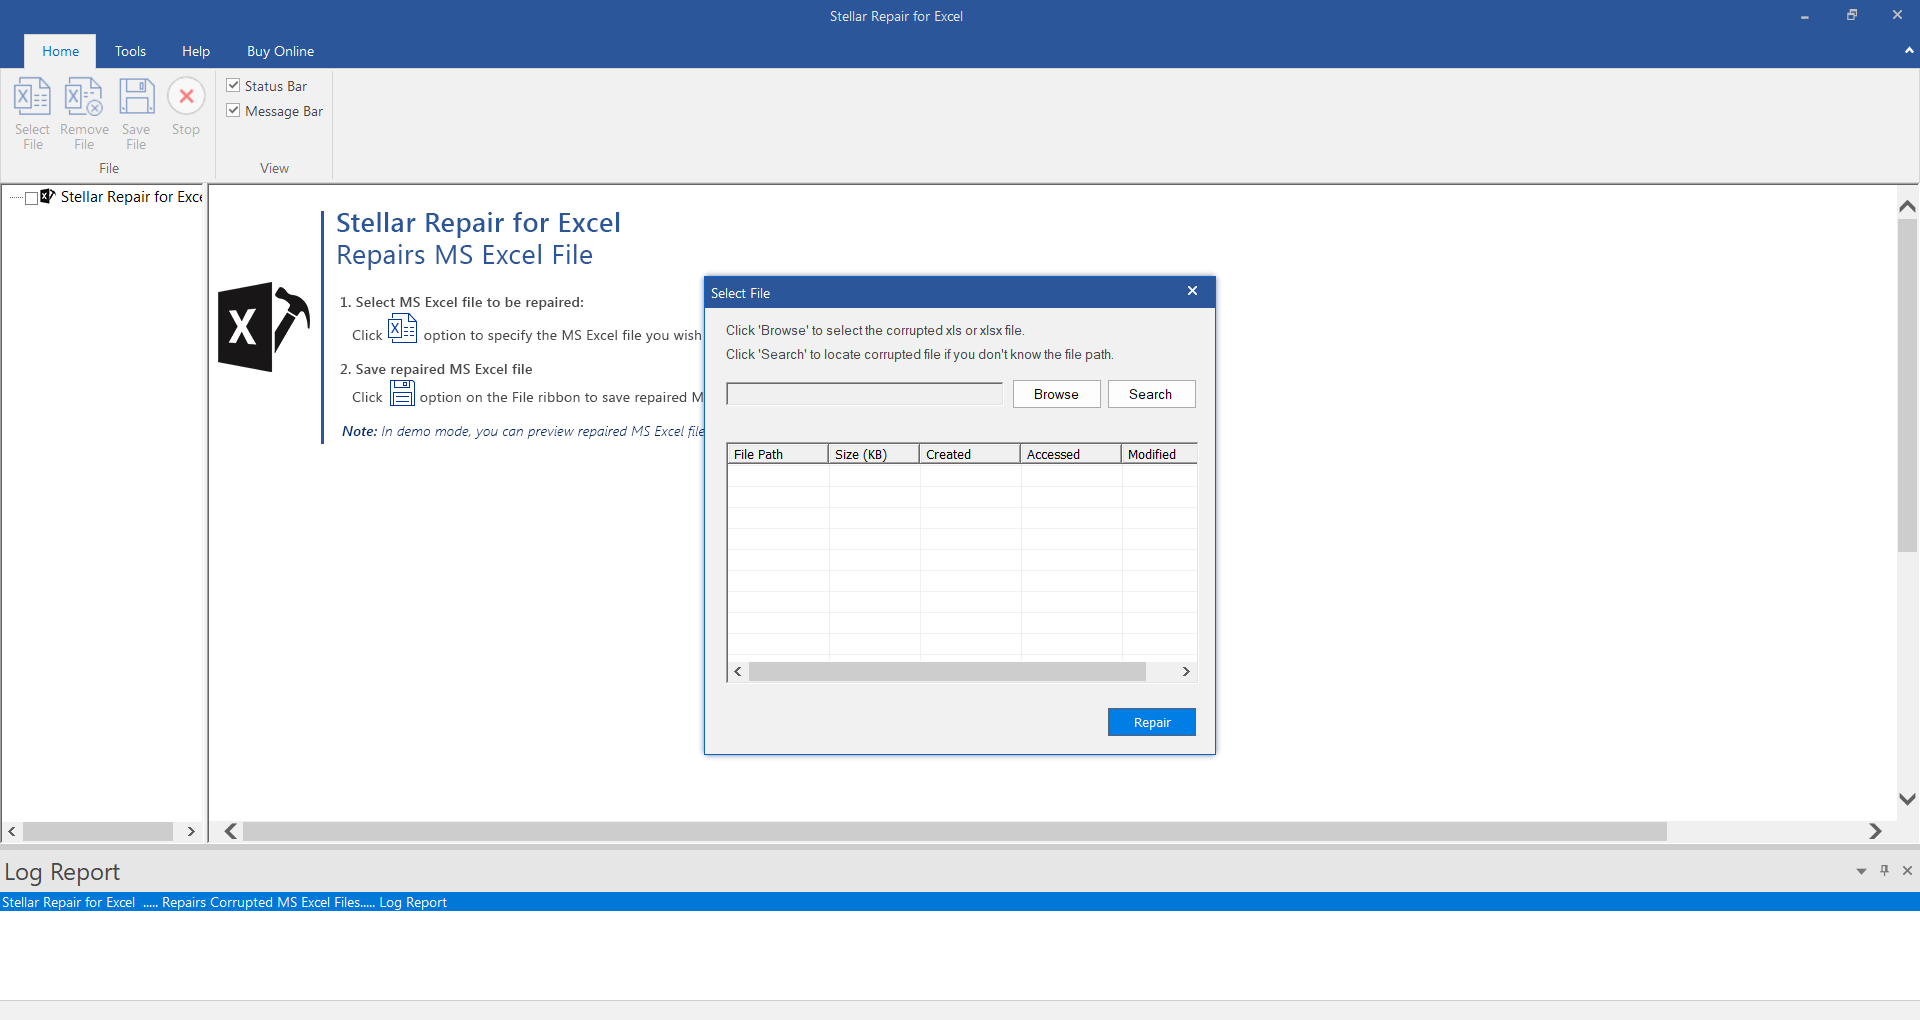
- Repair and then preview the Excel workbook.
- Save the workbook at default or your desired location.
Once saved, you can open and start editing or working on the Excel sheet. Make sure to enable AutoRecovery and AutoSave options to avoid data loss due to corruption.
Conclusion
In this article, we discussed methods and solutions to restore Excel file when it gets damaged or corrupt due to various issues. Although Excel can help you recover or restore Excel file after corruption, it can resolve only minor corruption errors. Thus, it may fail if the Excel file corruption is severe. In such cases, an Excel repair software, such as Stellar Repair for Excel, comes in handy. It resolves Excel corruption, repairs tables, charts, chart sheets, Pivot table, etc., and restores them to a new Excel sheet with 100% consistency.
Ways to Fix the “Failed to Parse the Corrupted Excel File” Error
Summary: While parsing an Excel file, you may experience the “Failed to parse the corrupted Excel file” error. It usually occurs if the Excel file is corrupt. This blog covers some easy fixes to fix this Excel error. It also mentions an advanced Excel repair tool that can help fix the issue by repairing the corrupted file.

You may encounter the “Failed to parse the corrupted Excel file” error when parsing (extracting or converting) the data in an Excel file. This error usually occurs if the Excel file is corrupted – either completely or partially (some of its objects, like formulas, macros, and values are corrupt). However, there are various other reasons that may lead to this Excel error. Let’s know the possible causes behind the “Failed to parse the corrupted Excel file” error and how to fix it.
Causes of the “Failed to parse the corrupted Excel file” Error
This error could occur due to any of the following causes:
- Damaged or corrupted macros
- Excel document is closed suddenly
- Issues with Excel application installation
- Virus or malware attack
- Hardware failure
- Bad sectors on the hard drive
Ways to Fix the “Failed to parse the corrupted Excel file” Error
Here are some possible ways to fix this error and recover the Excel file.

Method 1: Try to Save the File in a Different Format
Sometimes, the error can occur if the file format is not compatible with your Excel version. You can try saving the file to a different format. To do this, follow the below steps:
- Open the Excel file.
- Click on the File option and then select Save As.
- Click on Browse option and then click Save as Type.

- Select the desired Excel file format and click Save.
Parental Control Software
### **Method 2: Revert to the Previously Saved Version of the Excel File**You can try reverting to the previously saved version of the Excel file. Here’s how:
- Open your Excel application.
- Navigate to File > Info > Manage Workbook.

- Click Recover unsaved workbooks.

- Click on the Restore option you see at the top of the file.
Method 3: Set the Calculation Option to Manual
When the calculation mode is set to automatic, Excel automatically recalculates all the formulas in the file even if you make a minor change. It can take time to load the file and stop you from parsing data in your Excel file. You can change the calculation option to manual so that Excel only recalculates when you explicitly tell the application to do it. Here are the steps:
- Open your Excel application.
- Navigate to File and then click Options.
- In Excel Options, select Formulas.
- Under Workbook Calculation, select Manual and click OK.

Method 4: Use Open and Repair Utility
You can try repairing the corrupted Excel file with Excel’s inbuilt tool – Open and Repair . To use the tool, follow the steps cited below:
- In Excel, go to the File tab and then click Open.
- Click Browse to select the corrupted file.
- The Open dialog box will appear. Click on the corrupted file.
- Click on the arrow next to the Open button and then click Open and Repair.
- You will see a dialog box with three buttons Repair, Extract Data, and Cancel.

- Click on the Repair button to recover as much of your work as possible.
- After repair, a message will appear (as shown in the below figure).

- Click Close.
What If None of the Above Methods Works?
The above methods may fail to work if the Excel file is severely damaged. In such a case, we recommend using an efficient Excel repair tool , such as Stellar Repair for Excel. It can quickly repair corrupted Excel (.XLS/.XLSX) files. It can recover all the objects from the file, including charts, tables, formulas, etc. You can download the free trial version of the tool to preview the recoverable data.
Conclusion
Above, we have discussed some tried and tested methods to fix the “Failed to parse the corrupted Excel file” error. If the Excel file is severely damaged or corrupted, you can try repairing it using a third-party Excel repair software, like Stellar Repair for Excel . It can repair multiple Excel files without affecting the original formatting. The tool is compatible with all Excel versions.
Easy Steps to Make Excel Hyperlinks Working
Summary: This blog discusses why hyperlinks won’t work in Excel and solutions to fix it. If nothing works, try using Stellar Repair for Excel software to recover your workbook with hyperlinks and all the data intact.
Hyperlinks in your Excel file could be references to a file’s location on the computer or a location within the same worksheet. Or, hyperlinks might be pointing to a URL. Sometimes, the hyperlinks won’t work and any of the following errors may pop up on your screen on clicking a hyperlink:
‘Cannot open the specified file.’

‘This operation has been canceled due to restrictions in effect on this computer. Please contact your system administrator.’

Causes of ‘hyperlinks not working in Excel’ problem, and solutions thereof
Here are some of the possible causes behind the ‘hyperlinks not working’ issue and solutions to fix it:
Cause 1 – Change in the name of the hyperlinked file
If the file name that appears in the hyperlink text is different than the actual file name, it will prevent the hyperlink from working.
Solution – Link to the renamed file
Ensure that the links in the Excel file are updated and points to the renamed file. For this, right-click the hyperlink and select ‘Edit the hyperlink’. Next, in the hyperlink address, replace the current filename with the renamed one in the hyperlink address.
Cause 2 – File name has a pound (#) sign
When you create a hyperlink for a file in Excel, you cannot use a pound character (#) in the file name that appears in the hyperlink. That is because the pound sign is not accepted in hyperlinks and may lead to the ‘Cannot open the specified file’ error.
Note: While you can use a pound character in a file name, it cannot be used in hyperlinks in an MS Office document.
Solution – Rename the file name and remove the pound sign
Open the file that contains the ‘#’ sign and rename it by following these steps.
- Right-click the cell containing the hyperlink that is not working, and click Edit Hyperlink.
- From the Address box, copy the address of the file you are linking to.
- Go to the location where the file is stored, right-click on the file, and click Rename.
- Remove the ‘#’ character from the name of the file.
- Go back to the Excel file, right-click on the problematic hyperlink, and choose Edit Hyperlink. Next, browse and select the renamed file.
- The renamed file without the pound sign will be added in the Address box.
- Click OK.
Now try opening the hyperlink.
Cause 3 – Sudden system shutdown causes abrupt closing of Excel
There may be a discrepancy in the data in hyperlinks when a system shut down suddenly, without properly closing the Excel file. And so, when trying to open a link, it won’t open.
Solution – Enable the option to save hyperlinks
There is an inbuilt option in Excel to update hyperlinks every time the workbook is saved. Follow these steps to enable that option:
Note: The steps may vary based on the Excel version you are using.
For Excel 2013, 2016, or 2019:
- Open Excel Workbook -> Go to File->Options->Advanced
- Scroll down to find the General tab and click on Web Options
- Web Options Window pops-up
- In the Web Options Window, go to Files Tab and select the ‘Update Links on save‘ checkbox
- Click on OK button and your option is saved
The steps are also explained in the image below:

For Excel 2007:
- Click the Office button
- Select Excel Options, then follow Step 1) to Step 5), as mentioned above and get the Excel Hyperlinks to work again.
Still unable to open hyperlinks in Excel?
If you fail to make Excel hyperlinks work using the above-discussed solutions, use an Excel repair tool to fix the hyperlinks issue. Download the Stellar Repair for Excel to repair an XLS/XLSX file and restore the hyperlinks.


See the working of the tool here:
The tool recovers all components of the Excel file including tables, charts, chart sheets, cell comments, images, formulas, and more. You can repair multiple worksheets and fix all dysfunctional Excel hyperlinks across multiple worksheets in a single workbook. Click on the workbook, select all worksheets and start repairing

Conclusion
Carefully read the possible causes behind the ‘Excel Hyperlinks not working’ issue to understand what resulted in the issue in the first place. If nothing helps, use Stellar Repair for Excel to restore the hyperlinks and save the result in a new Excel file, without interfering with worksheet properties and cell formatting.
Best Excel Repair Software till Date - Try Now
Summary: In this blog, we overview and conclude Stellar Repair for Excel as Best Excel Repair software till date – based on its distinctive features and capabilities. Also, you’ll get to know what makes it the top Excel repair software from the perspective of recognized review websites, tech community forums, and users. In addition, you’ll find the simple and step-wise process of repairing Excel by using the software.
Corruption in Excel files can hamper workflow, bringing productivity to a halt. And what can be more concerning is that you may lose sensitive data if the corrupt or damaged file is not repaired on time. An Excel file may get corrupted due to various reasons.
Common Reasons Behind Excel File Corruption
- Abrupt system shutdown
- Human errors such as accidental deletion, formatting, or overwriting an Excel workbook
- Damaged Excel installation
- Hardware failure
- Virus infection or malware attack
- Bad sectors on the hard drive on which Excel files reside
- Large-sized Excel file
Regardless of the reason, manually troubleshooting corruption errors in an Excel file can drain time, resources and may even cause data loss. However, using a third-party professional tool such as Stellar Repair for Excel can save you the manual efforts and time in repairing Excel files, keeping the original data intact.
What Makes Stellar Repair for Excel the Best Software?
While there is no dearth of Excel file repair tools, Stellar Repair for Excel software has garnered considerable interest and positive reviews by MVPs . The software has remarkable features that make it the Excel file repair specialist.

Key Features of Stellar Repair for Excel Software
Though the software encompasses several great features and a simple-to-use and intuitive user interface, some of the key features that make it the best Excel repair software are:
- Restores Excel (XLS / XLSX) File in Original, Intact State
The software repairs corrupt Excel files and restores all the data in the original format. Also, it helps restore the original properties of cell formatting of the workbook.
- Capability to Resolve all Excel Related Errors
Most errors that crop up unexpectedly while working with Excel files are the result of damages caused due to human errors, virus infection, power surges, etc. The software can help you easily fix corrupted Excel files to get rid of errors such as “Excel is not responding ”, “Excel found unreadable content in name.xls ”, “Excel cannot open the file filename.xlsx”, etc.
- Real-Time Pre-Recovery Preview
It provides users with the opportunity to preview recoverable Excel file items before saving them. This helps users estimate how much data they will be able to salvage by using the tool, thus helping them make an informed decision about investing in the software.
Besides these features, some other aspects that make the software a recommended choice for Excel repair are as follows:
- 100% Secure****: Downloading and installing this software is 100% safe and secure, since Norton antivirus security comes installed with it.
- Tested by MVPs****: Stellar Repair for Excel software is tried and tested by credible MVPs.
- Allows Testing before Purchase: The software’s demo version lets you understand the tool and its advantages before buying it.
- Stellar is Microsoft Gold Partner****: The software’s vendor, Stellar Data Recovery, is a certified Gold partner for Microsoft.
Stellar Repair for Excel – The Most Recommended Software
Check out the user ratings and reviews to understand why Stellar Repair for Excel ranks as the top Excel file repair software, and why you should choose it over its competitors:
- Capterra – 4/5
A user has shared how effectively the Stellar Repair for Excel software repaired and restored the corrupted Excel file.


- g2.com – 4.5/5
The Excel Repair software got a rating of 4.5/5 on g2.com based on the positive reviews of the users.

- Softpedia – 3.5/5
Softpedia gave the product a rating of 3.5/5 and reported it as 100% clean (meaning without malware).
Support and Compatibility
Stellar Repair for Excel software supports the latest MS Excel versions 2019, 2016, 2013, and lower versions. It can operate smoothly on Windows 11, 10, 8.1, 8, 7, and earlier operating systems.
System Requirements
Stellar Repair for Excel requires a minimum Pentium Class Processor with 2 GB minimum memory and 250 MB of free storage drive space.

How to Use Stellar Repair for Excel Software to Repair Excel Files?
Follow these steps for repairing damaged or corrupt Excel files:
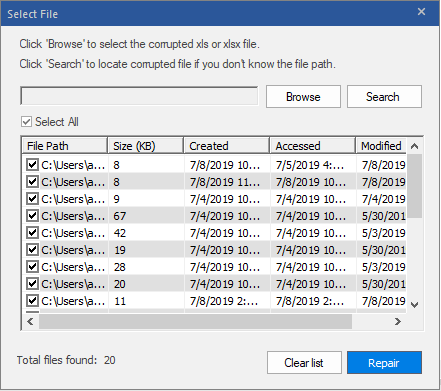
- Run the software and from the main software screen, select the corrupt Excel files you want to repair by clicking Browse or Search.

- Once the file is selected, click Repair to begin repairing the corrupt file.

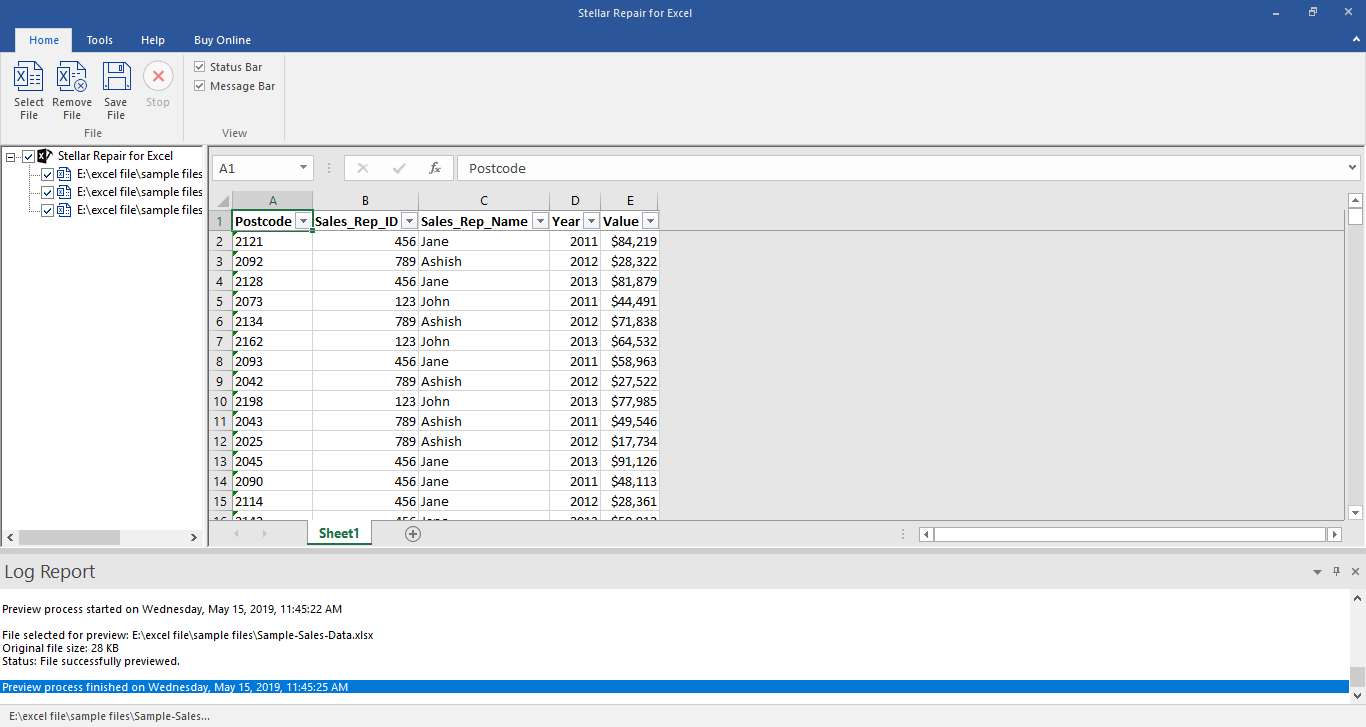
- When the scanning finishes, all recoverable data is displayed in the left-pane of the preview window. Click on any item to preview its content in the right-pane.

- For saving the file, click the Save File button on the Home menu.
- When prompted, select a target location to save the repaired file and click OK.

The repaired Excel file will now get saved in the selected target location.
Concluding Lines
Stellar Repair for Excel software empowers users to repair Excel (.XLS/.XLSX) files and restore worksheet data in the event of file corruption and data loss. More importantly, the software performs granular-level recovery to restore the complete file items while preserving worksheet properties and visual representation.
Data Disappears in Excel - How to get it back
Summary: You may face the issue of ‘Excel spreadsheet data disappeared’ after changing Excel file properties and formatting rows and columns. This blog discusses the possible reasons for data disappearance and the solutions to fix the issue. Also, it mentions an Excel file repair tool to retrieve the data from the file. Sometimes, while editing or formatting a cell in an Excel spreadsheet, the data may go missing or disappear. Let’s discuss in detail the reasons that may cause the ‘Excel data disappeared’ issue along with the solutions.
Probable Reasons for Data Disappearing in MS Excel and Solutions Thereof
Reason 1 – Unsaved Data
While entering data in an Excel spreadsheet, it is important to save the data at frequent intervals. Doing so prevents any unsaved data from disappearing if you lose power or accidentally click ‘No’ when prompted to save the file. Unfortunately, such a situation is quite common as users often close the file without saving the recently made changes to a spreadsheet.
Solution – Use the ‘AutoSave’ Feature
With the AutoSave feature enabled in Excel, data won’t be lost in the event of power failure or abruptly closing the Excel program. By default, Excel automatically saves the information in a spreadsheet after every 10 minutes. You can reduce the limit to a few seconds to reduce the chances of Excel file data lost after being saved.

Reason 2 – Changing Excel Format
You can save an Excel file in various formats, like spreadsheet, text, webpage, and more. However, at times, saving the spreadsheet in a different format may lead to missing data. For example, when you save a workbook to a text file format, all formulas and calculations applied to the data will be lost.
Solution – Adjust a Spreadsheet for the Changed Format
If you’re changing the format of a spreadsheet, make space for the rows and columns. Also, remove all calculations before saving the file.
Note: If the sheet is shared on multiple computers, then save the file in compatibility mode.
Reason 3 – Merging Cells
You can combine two or more cells data to make one large cell. This technique is primarily used to fit the text of a title in a sheet. If there is data in two or more cells, then only the data in the top-left cell is displayed and the data in all other cells is deleted. If the other merged cells have been populated with data after merging, the data is not featured and it does not appear even after remerging the cells.
Solution – Merge Cells inside One Column
To merge cells without data loss, combine all the cells you want to merge within a column and do the following:
- Select the cells to be combined.
- Ensure that column width is wide enough to fit the contents of a cell.
- In the spreadsheet, under the Editing group, click ‘Fill,’ and then click ‘Justify.’

- Under Alignment, click on the ‘Merge & Center’ option to center align the text. Or, click on ‘Merge Cells’.
Note: This solution works for text only. You cannot use it to merge formulas or any numerical values. If you need to combine two or more cells with formula into a single cell, try using the Excel CONCAT function .
Reason 4 – Cell Formatting
Cells and text in the cells can be displayed in different colors to make the spreadsheet simple to create and infer. You may experience data loss when you try to modify the data or change the color or size of the data. Though the information may exist, the data may show an error due to the following reasons:
- White-colored text will not show in a white-colored cell
- Large font-sized data may not appear in small-sized cell
- Calculations may show (#VALUE) error after cell-formatting
Solution – Check and Clear Formatting
Make sure to use dark-colored text on a white-colored cell. Also, resize the cell to fit the text size. Check if numbers in a cell are entered as text. If so, you need to apply a number format to the text-formatted numbers. Read more about it, from here .
What Else You Can Do to Resolve the ‘Excel Data Disappeared’ Issue?
If you can’t recover the missing Excel file data, try to repair or extract the data from the file using the built-in Excel repair tool. Follow the below steps to use the tool:
- Open MS Excel, click File > Open > Computer > Browse.
- On the ‘Open’ window, select the file you want to repair and then click on the Open dropdown.
- Select Open and Repair.

Use the ‘Repair’ option to repair the file and recover as much data as you can from the repaired file. If this doesn’t work, use the ‘Extract’ option to recover the data.
If you fail to retrieve the disappeared data from that file using the above-listed steps, opt for an Excel repair tool , like Stellar Repair for Excel. This software has a proven track record of repairing corrupt or damaged Excel files and recover all the data.

The software helps:
- Fix all corruption errors. It helps in getting back the data which has disappeared.
- Repair a single as well as multiple Excel files.
- Recover all components of XLS/XLSX files – tables, chart sheet, cell comment, image and more.
- Preserve the worksheet properties and cell formatting.
- Support the latest Excel 2019 and earlier versions.
The Excel repair software repairs the Excel file in these simple steps:
- Launch and open the software.
- Select the corrupt Excel file by using the ‘Browse’ option. If the file location is not available, then find the Excel file using the ‘Search’ option.

- Click ‘Repair’ to scan the corrupt file.
- Once the repair process is complete, verify the components of Excel file and check if the available preview shows complete data that disappeared from Excel.
- Save file at default location or preferred location.
The Excel file with all the restored data will be saved at the selected location.
Conclusion
It is better to repair the affected Excel file than suffer the loss when data or text disappears in Excel. A professional software ensures that users get back all the data in the form of a new Excel file. Stellar Repair for Excel software repairs the corrupt file without modifying the original content and file format. The software’s easy-to-use user interface lets you perform the functions without formal software training and technical expertise.

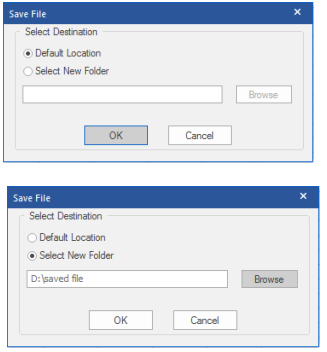
How to Repair Multiple Excel Files by Using Stellar
With Stellar Repair for Excel, it is quite easy and simple to repair multiple MS Excel (XLS and XLSX) files that are damaged. This is because the software has a self-explanatory interface and hence is a Do-it-yourself software. Nonetheless, when using this software to repair multiple Excel files, you would have to add all of the files into the software by following a few pre-defined steps. Follow the steps mentioned below:
- Launch Stellar Repair for Excel software.
- Under Home menu, click Select file
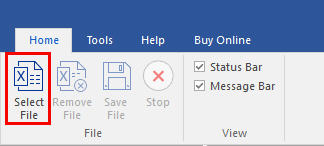
- Click Browse and select corrupt Excel files. Select the checkbox to repair multiple files.
- Click Repair
- The software provides the preview facility. You can check the it on left pane.
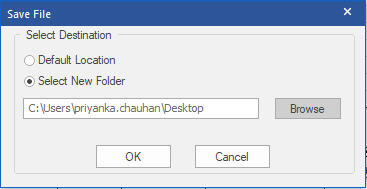
- Save the repired filr ether Default location or Select New Folder radio button.
Stellar Repair for Excel Stellar Repair for Excel is the best choice for repairing corrupt or damaged Excel (.XLS/.XLSX) files. This Excel recovery software restores everything from corrupt file to a new blank Excel file.
How to Fix ‘Sharing Violation Error’ when Saving Excel?
Summary: You may encounter the sharing violation error in Excel when you repeatedly save changes in a workbook. The error can occur due to different reasons. In this blog, we will discuss the possible reasons behind this sharing violation error and some effective solutions to fix it. If the issue has occurred due to corruption in Excel file, you can try the advanced Excel repair tool mentioned in the post to repair the corrupted file.
It is not uncommon to encounter errors while working with Excel application. One common error that Excel users face is the sharing violation error that occurs while saving an Excel spreadsheet. The complete error message says, “Your changes could not be saved to file because of a sharing violation.” When this error occurs, users won’t be able to save the changes in the file. So, it is important to fix this issue as soon as possible. But before fixing the error, let’s find out the causes behind this error.
Causes of Excel Sharing Violation Error
This error may pop up due to the below reasons:
- The file you are trying to save is corrupted.
- The Excel file is not in the trusted location.
- Sharing Wizard is disabled.
- You do not have permission to modify the Excel file.
- The Excel file is not permitted to get indexed.
Methods to Fix the Sharing Violation Error in Excel
You can move the affected Excel file to a new folder and save it with a different name. Then, see if it fixes the error. If it doesn’t help, you can try the below methods.
Method 1: Check and Change the Excel File Properties
You can get the sharing violation error in Excel if the file attribute options, such as “File is ready for archiving” and “Allow this file to have contents indexed in addition to file properties” are disabled. You can check the File Properties and enable these options to fix the issue. Here are the steps:
- Right-click on any Excel file and select Properties.

- In the Properties window, click on the Advanced option.

- In the Advanced Attributes window, select the below options under File attributes:
- File is ready for archiving.
- Allow this file to have contents indexed in addition to file properties.

- Click OK.
Note: If these options are already selected, then unselect and re-select them.
Method 2: Enable Sharing Wizard Option
The error “Your changes could not be saved to file because of a sharing violation” can also occur if the sharing wizard option is disabled on your system. You can check and enable the sharing wizard option using these steps:
- Go to your system’s Documents folder.
- Click View > Options > Change folders and search options.

- In the Folder Options window, click View.

- Under the View section, search for the “Use Sharing Wizard” option in the Advanced Settings.

- If the Use Sharing Wizard option is unselected, select it and then click OK.
Method 3: Move the Excel File to a Trusted Location
You can encounter the sharing violation error if the file you are trying to save is not in the trusted location. You can try moving the file to a trusted location by following these steps:
- In Excel, go to File and then click Options.
- Click Trust Center and then click Trust Center Settings.

- In the Trust Center window, click Trusted Locations and then click Add new location.

- In the Add new location window, select Browse to locate and choose the folder, and then click OK.
Method 4: Open Excel in Safe Mode
Incompatible add-ins can create issues in the Excel file. To check if the sharing violation issue has occurred due to add-ins, open Excel in safe mode. To do so, follow these steps:
- Open the Run window using Windows + R.

- Type excel /safe and click on OK.
- Open the affected file and then try to save the changes.
- If you are able to save the changes without any error, then it indicates add-ins are causing the issue. To fix this, you can remove the recently downloaded add-ins (if any).
Method 5: Repair the Excel File
Corruption in Excel file can also create issue while saving the changes. In such a case, you can repair the corrupted Excel file using the inbuilt utility in Excel, named Open and Repair. Follow these steps to use this utility:
- In Excel, navigate to File > Open > Browse.
- In the Open dialog box, click on the affected Excel file.
- Click the arrow next to the Open button and select Open and Repair from the dropdown.
- Click on the Repair option to recover as much data from the file as possible.
If the above utility fails to fix the corrupt Excel file, then you can use a more powerful Excel repair tool , such as Stellar Repair for Excel. This Excel repair tool can repair even severely corrupted or damaged Excel files (xls, .xlsx, .xltm, .xltx, and .xlsm). This tool can recover all the data from the corrupted Excel file, including images, chart sheets, formulas, etc., without changing the original format. It can help in fixing common corruption-related errors in Excel. You can download the software’s demo version to scan the corrupt file.
To Conclude
Above, we have discussed some effective methods to fix the sharing violation error in Excel. This error may also occur if you try to save the Excel file in an incompatible format. So, check the format and try saving the file in a compatible format. If the error occurs due to Excel file corruption, you can repair corrupt Excel file using the Open and Repair tool. If nothing works, then download a third-party Excel repair tool, such as Stellar Repair for Excel. It is an advanced tool that can fix severely corrupted Excel files. You can install this repair tool on any Windows system.
- Title: How Do I Restore Excel 2000 File ? | Stellar
- Author: Nova
- Created at : 2024-07-17 17:31:11
- Updated at : 2024-07-18 17:31:11
- Link: https://phone-solutions.techidaily.com/how-do-i-restore-excel-2000-file-stellar-by-stellar-guide/
- License: This work is licensed under CC BY-NC-SA 4.0.