
How to Activate Stellar Data Recovery for iPhone 15 Pro | Stellar
How to Activate Stellar Data Recovery for iPhone
If you want to recover and save the missing or deleted iPhone data, activate Stellar Data Recovery for iPhone on your computer.
The demo version of the software is only for evaluation purposes. To use its full functionality, purchase the software and then activate it.
The software can be activated using the Activation Key, which you receive via email after purchasing the software. It would help if you had an active Internet connection to activate Stellar Data Recovery for iPhone .
Steps to activate Stellar Data Recovery for iPhone
- Run the demo version of Stellar Data Recovery for iPhone software
- On the main interface, click the Activation icon

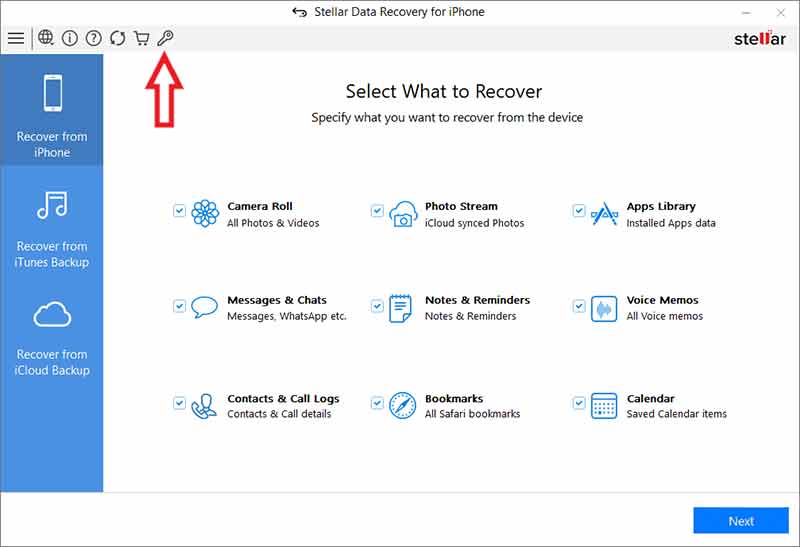
- The Activation window appears. Enter the Activation Key you received in your email after purchasing the software.
- Click Activate
- The software verifies the entered key. After successful verification, a message appears saying ‘Activation Completed Successfully’. Click OK.
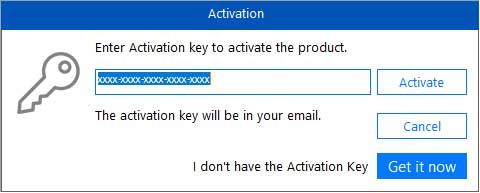
If you don’t have the Activation Key of Stellar Data Recovery for iPhone, here’s how to get it…
In case you don’t have an Activation Key, follow the below steps:
- Free download and install the software on your computer
- Click on the Activation icon on the home screen of the software
- Click Get it now

- The software directs you to the buy page. Next, click on Windows or Mac tab, as per your system.
- Click on Buy Now button to purchase the software
- Fill in your details as asked
- After purchasing the software within a few minutes, you will receive an Activation Key and the link to download the product on your email. Use that link and key to activate Stellar Data Recovery for iPhone as given in steps (1-6)
Note: If you didn’t receive the Activation Key at your registered email within a few minutes of purchasing the software, contact our customer support via mail, chat, or call.
Stellar Data Recovery for iPhone® Stellar Data Recovery for iPhone® is the best DIY software to recover missing or accidentally deleted Contacts, Messages, Calendar, Photos, Videos, Call History etc directly from iPhone or iPad.
7 Ways to Fix iTunes Error 9
Summary: The iTunes error 9 appears when iPhone update through iTunes gets failed. It’s annoying as the error doesn’t let you use your device further. Learn 7 quick methods to fix iTunes error 9 and update the device without any issue.
Trying to get the new iOS on your iPhone but facing iTunes Error 9?

The iTunes error 9 usually occurs while updating your iPhone via iTunes. The error annoyingly neither lets you update the iPhone nor do any activity on your device. Thus, it urgently requires a fix so that you can work on your iPhone and also update the device.
In this post, we will share with you 7 best possible ways to fix iTunes Error 9. But before that let’s know what is causing the iTunes error on trying to update your iPhone.
Why does iTunes Error 9 occur?
It is difficult to determine the exact reason of your iTunes Error 9. But it may be due to any of the reasons given below :
- USB port or cable is damaged
- You have jailbroken your iPhone
- Corrupt network settings
- Security software prevents access to Apple server
How to fix iTunes error 9?
Since it is usually, regarded as a hardware issue, you should begin with hardware-related workarounds and later move to other software troubleshooting methods.
Going by the order, try below methods to fix iTunes Error 9
- Check USB cable & port
- Restore iPhone with iTunes on another computer
- Force your device to restart
- Check Anti-Virus & Firewall on your computer
- Update iTunes to the latest version
- Use Recovery Mode to Fix iTunes Error 9
- Choose to update iPhone wirelessly
Solution 1: Check USB cable and port
Make sure your iPhone USB cable and port are properly connected and working fine. Do the below checks and fix:
- USB cable is not loosely connected to the computer
- You are using the USB cable that you got with your iPhone or another certified cable
- The USB port is not damaged. Try by shifting to another USB port
Solution 2: Restore iPhone with iTunes on another computer
iTunes error 9 is generally regarded as a hardware-related problem. Sometimes it is difficult to detect the issue. The easier way out is to restore iPhone using iTunes on another computer or laptop. If still the error persists, move on to the other workarounds.
Solution 3: Force restart your device
Apple suggests trying once force a restart of iPhone to fix iTunes error 9.
iPhone X, iPhone 8, & iPhone 8 Plus users: Press and quickly release the Volume Up button. Press and quickly release the Volume Down button. Then, press and hold the Side button until you see the Apple logo.
iPhone 7 & iPhone 7 Plus users: Press and hold both the Side and Volume Down buttons for at least 10 seconds, until you see the Apple logo.
Solution 4: Check Anti-Virus & Firewall on your computer
Antivirus or Firewalls in your computer may prevent iTunes to connect with Apple server. Check the security software settings, and tweak them if required to allow iTunes to access the network servers.
Solution 5: Update iTunes to the latest version
Updates usually bring in new features, fix existing bugs and make the application smarter. If the iTunes error 9 is due to outdated iTunes, installing the latest version may help to fix the error.
How to update iTunes to the latest version?
For Windows users: Launch iTunes on PC. On the menu bar, click Help > Check for Updates and follow the given instructions
For Mac users: Launch iTunes on Mac. On Menu bar go to iTunes > Check for Updates and follow the on-screen instructions.
After updating iTunes, reboot your computer and check if the iTunes error 9 is fixed.
Solution 6: Use Recovery Mode to fix iTunes Error 9


iPhone in Recovery Mode
All the above methods fail to fix iTunes error 9? As last resort choose Recovery Mode to restore iPhone in iTunes. Choosing this option means you will lose all your iPhone data. Thus, first take backup in iCloud or iTunes before applying this fix.
How to put your iPhone into Recovery Mode? (For iPhone 8, 8 Plus, & X users)
- Update your iTunes
- Press and release the Volume Up button and then the Volume Down button
- Press and hold the Side button till connect to iTunes screen appears
- Once the iPhone is in Recovery Mode, connect your computer with iPhone via USB cable. You will see the white Apple logo screen.
- When iTunes asks you to update or restore, click Update to reinstall iOS
Lost iPhone data after restoring iPhone in iTunes via Recovery Mode?
Losing iPhone data after update through Recovery mode is a panicky situation. It gets even more serious if you are unable to restore from iCloud or iTunes backup. In such situation, Stellar Data Recovery for iPhone comes as big relief**.** The software restores complete iPhone information from iPhone, iCloud and iTunes.
Stellar iPhone data recovery software quickly and safely restores all iPhone data including photos, videos, music, contacts, messages, Safari bookmarks, etc. It also recovers the lost WhatsApp, WeChat, Line, Viber, Tango, and Kik messages. The software is extremely easy to use. Simply launch it on your Mac or PC, connect your iPhone to the computer and follow the on-screen instructions.


Solution 7: Choose to update iPhone wirelessly

Select Software Update in Settings on iPhone
Alternatively update iPhone wirelessly, without using iTunes. Make sure you have a continuous Internet connection. Go to Settings > General > Software Update. If an update is available, tap on Download and Install.

Conclusion
Although iTunes Error 9 rarely occurs but is a frustrating situation as you are unable to do any other activity on your device.
You can sometimes easily fix the Error 9 by doing a simple check if your USB cable, port connection, and firewall settings are appropriate. Restarting the device and updating iTunes to the latest version can also resolve Error 9. As a last resort, update iOS in iTunes through Recovery Mode. Nevertheless, you can also choose to bypass iTunes and update your device wirelessly.
One of the above methods is surely going to help you out. Also do not forget to share with us in the comment box below, which of these methods helped you to fix iTunes Error 9.
How to Recover deleted pictures on iPhone? 5 Best Solutions
For many iPhone users, photos are the most important data stored on their device – so losing those photos can be a disaster.
However, even if you accidentally deleted some or all of your pictures on iPhone, you can get them back.
We’ll discuss how to recover deleted photos on your iPhone with or without backup.
How to Recover Deleted Pictures on iPhone?
There are five best solutions to recover deleted pictures on iPhone. Use the solution that fits your needs and helps you recover your lost pictures.
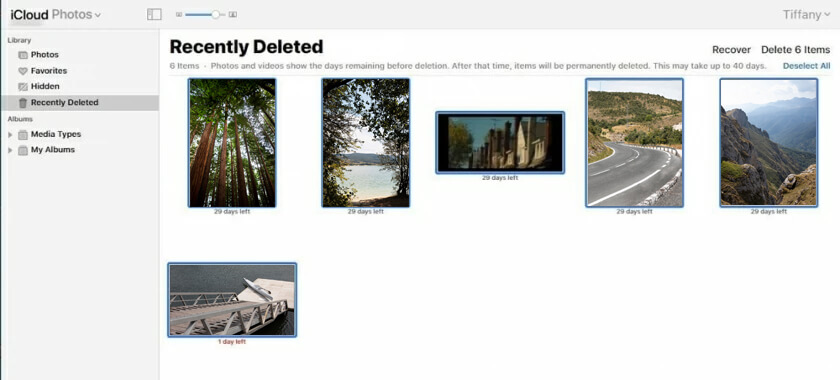
1. Recover Deleted Pictures on iPhone from Recently Deleted Albums
Pictures taken with the iPhone Camera application are saved by default in the Photos application. If a photo or video is deleted, it’s moved to the Recently Deleted folder in the Photos app. This folder is the same as your computer’s Recycle Bin and retains the deleted photos for 30 days. Once this period expires, your photos are permanently deleted from this folder. Perform these steps if you want to recover recently deleted photos on your iPhone:
- Open the Photos app.
- Tap on Albums at the bottom.

- Scroll down to find the Recently Deleted folder.
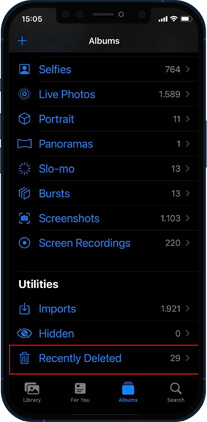
- Tap on the Select option at the top-right corner of the screen.

- Select the deleted photos you want to recover on your iPhone.

- Now, tap Recover, and the pictures will be returned to their original iPhone albums.
Note – If you want to restore all the deleted photos from your Recently Deleted folder, tap on the Recover All button.
How to Recover Deleted Pictures on iPhone From a Backup?
If your photos are not in the Recently Deleted folder, you might get them back by restoring your iPhone from a previous backup. There are three ways to restore deleted photos on iPhone – iCloud website, iTunes backup, or Finder.
When recovering photos from your iPhone from backup, pay attention to the date of creation of your backups. Use the most recent backup but don’t delete all older backups. It’s always good to have multiple backups if something goes wrong.
2. Recover Photos on iPhone using iCloud via the iCloud website
Apple’s iCloud Backup helps you recover deleted photos from your iPhone to your system. For iCloud to automatically back up all your pictures and videos, you must first set up and enable iCloud Photos on your device. Here’s how to enable iCloud Photos to Backup all your photos:
- Open the Settings app on your iPhone.
- Tap iCloud and then go to Photos.
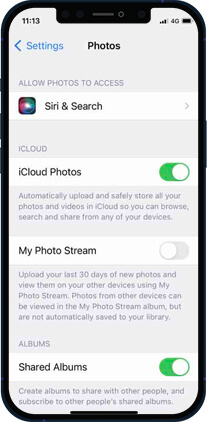
- Toggle on iCloud Photos to enable it.
To restore photos from iCloud, follow these steps:
- Go to the iCloud Website and log in with your Apple credentials.

- Once logged in, select ‘Photos’ from the app list.
- Go to Recently Deleted Album, select the photos you wish to restore, and click Recover.

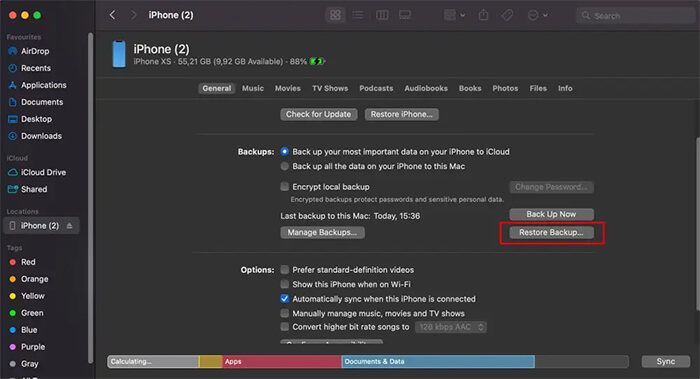
3. Recover Photos on iPhone using iTunes
Many iPhone users use iTunes backup to recover their deleted photos and videos. This Apple’s proprietary tool syncs your iPhone files to your PC or Mac. Follow the steps to recover deleted photos from iTunes backup:
- Connect your iPhone to your Mac system with macOS Mojave or an earlier version.
- Click on the iPhone icon at the upper-left corner of your iTunes window.

- Click the Summary tab in the left pane.
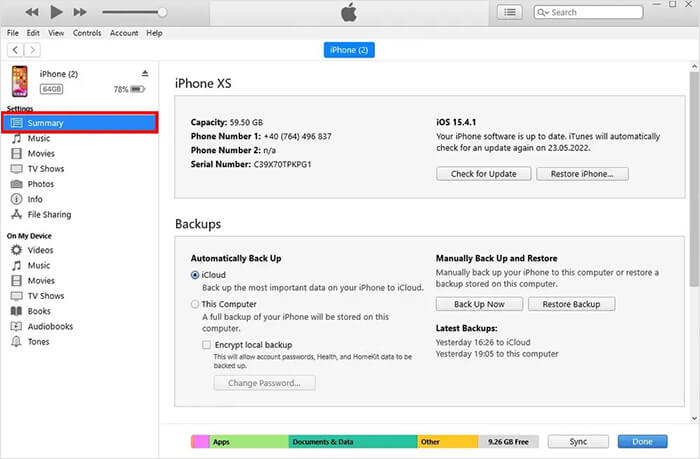
- Now in the Backups section, click on Restore Backup.
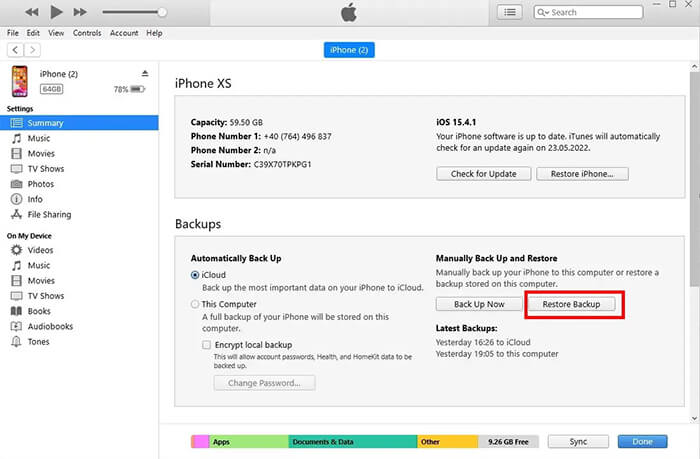
- Select the backup you want your phone to use.
Note - macOS Mojave is the last version of Apple’s OS to ship with iTunes. In macOS Catalina and newer version, iTunes is split into different apps: Podcasts, Books, TV, and Music. Moreover, Finder is used to manage and sync content on your iPhone, iPad, and iPod touch.
- Once the restoration process is complete, check the Photos app to see if the deleted photos were recovered. If not, try repeating the process and return to the most recent backup or choose an older backup.
4. Recover Deleted Pictures on iPhone using Finder
To restore the pictures on iPhone using Finder in macOS Catalina 10.15 or above, follow these steps:
- Open Finder on your Mac with macOS Catalina 10.15 or above.
- Connect your iPhone to your Mac system.
- Select your iPhone from the location lists on the left.
- Navigate to the General tab and click Restore Backup.
- Select the backup date you like to use for restoring.
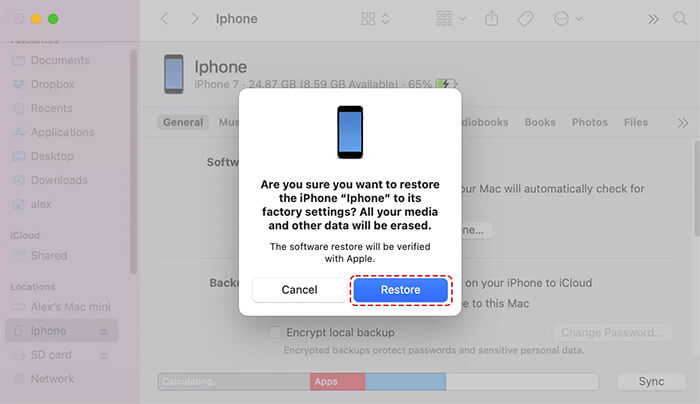
- Click the Restore button to confirm.
How to Recover Pictures on iPhone without Backup?
What to do if there is no iPhone backup or you cannot restore pictures using iCloud or iTunes? Use iPhone data recovery software to restore lost iPhone pictures.
Stellar Data Recovery for iPhone can find and restore deleted/lost pictures, videos, chat messages, audio, contacts, etc., from your iPhone/iPad/iPod touch. This software is easy to use when restoring deleted photos, and you can operate it even if you don’t have technical knowledge. Follow the steps to discover how to use software to recover deleted photos:
- Connect your iPhone to your computer.
- Download Stellar Data Recovery for iPhone on your PC or Mac.


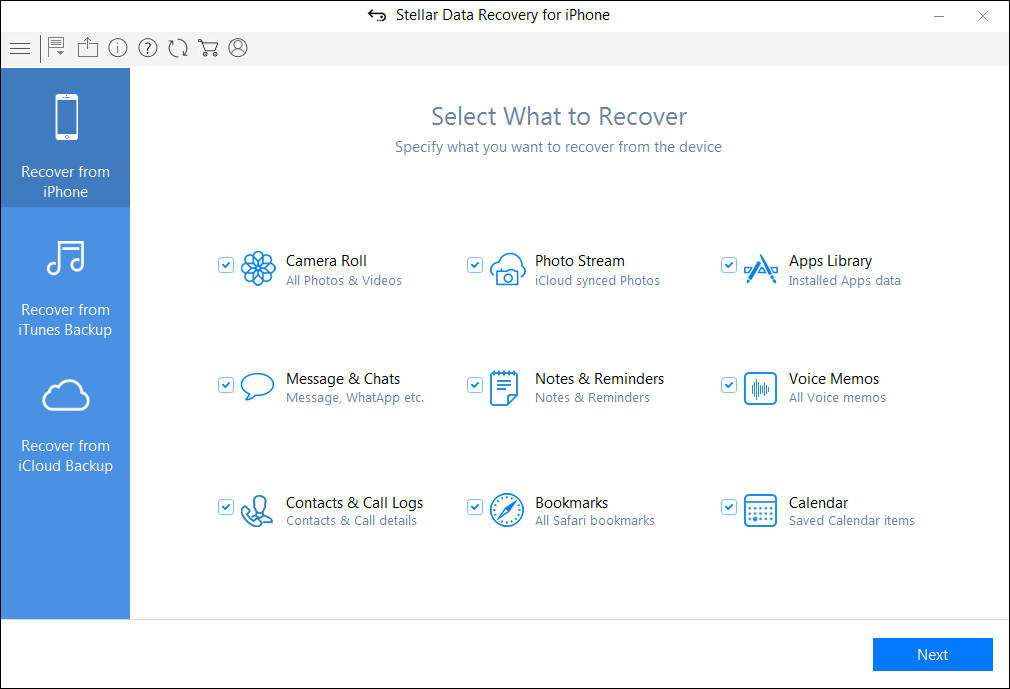
- Select Recover from iPhone on the main screen of the software.
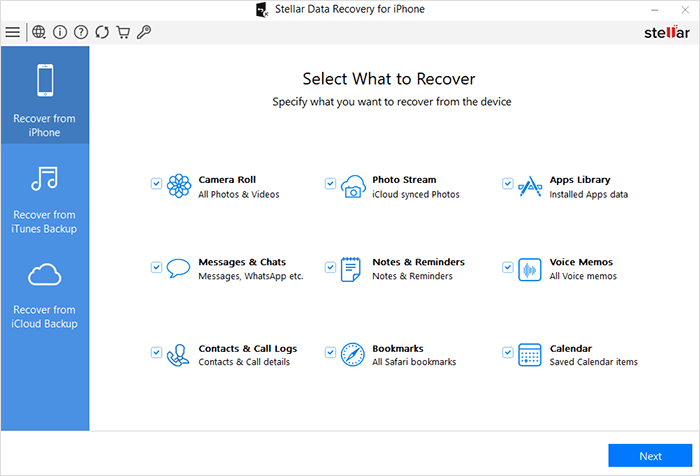
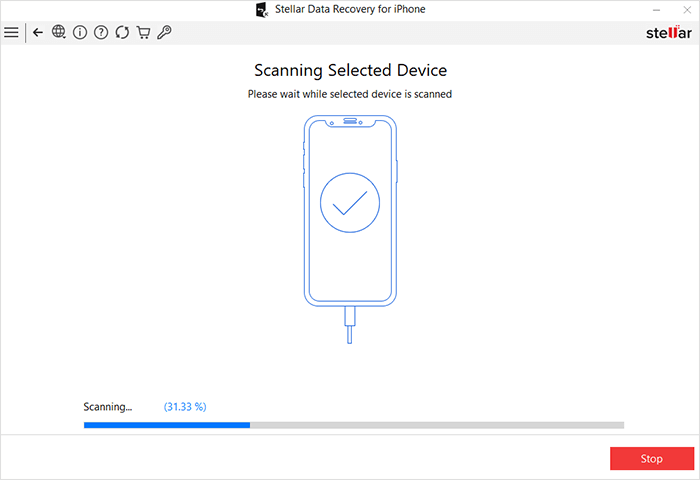
- Select the data type and click Next. The scanning process will start.

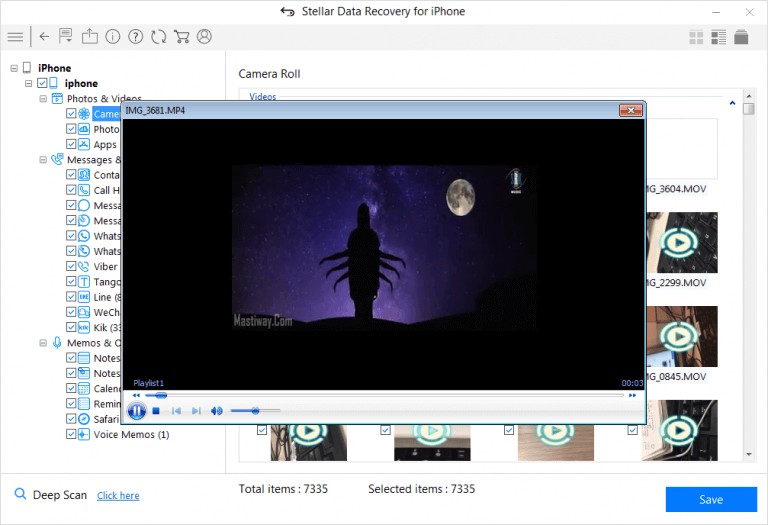
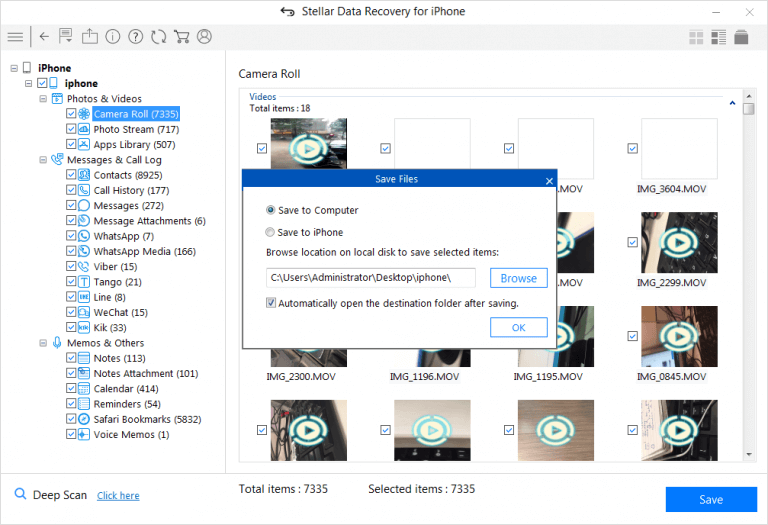
- Once the scanning is completed, preview the data. Select the recovered data you want to restore and click Save.
- Choose the destination to save the recovered data.
Conclusion
The data loss issues in Apple can be resolved easily through multiple backup solutions — iTunes, iCloud, and iCloud.com. However, these native backup recovery solutions fall short when you need to recover specific data, though you can easily recover deleted photos in your iPhone from these backup options. However, you will also end up replacing every existing data on your device!
Stellar Data Recovery for iPhone fills this gap quite efficiently. It recovers your deleted photos in water damage, jailbreak, factory reset, Black Screen of Death, etc. In addition, this software has an exceptionally high data recovery success rate, making it an essential utility for iPhone users.
How to find lost iPhone Backup files on Windows PC?
Summary: You have to restore iPhone data. But you cannot find backup files saved on your Windows PC or the backup files are unreadable. This post guides you to find iPhone backup on Windows PC and methods to restore it on your device.
You may get into a terrible iPhone data loss situation after a factory reset, stolen iPhone, jailbreak or physical damage to your device, etc. Backup is your only resort. But another shocker is waiting for you. You cannot find iPhone backup files once saved on your Windows PC.
Your backup files are not readable, and you have no clue how to access them.
In such a situation, keep calm and do not worry. If you have ever saved your iPhone backup on a Windows computer and are now unable to locate or access it, this post guides you to find an iPhone backup on a PC and how to restore it on your device.
Where are iPhone backups stored on Windows PC?
iPhone backups are safe copies of your complete device information. iTunes saves iPhone backup in the Users folder on a Windows computer. These backup files are not in a readable format. You can copy them but should never try to move files to a different drive, edit, rename or extract content. All such activities can ruin the backup files. However, you can make copies of your backup or delete backup that you do not require anymore.
Steps to find iPhone backup files on Windows PC:
- In the Search bar, enter %appdata% or %USERPROFILE% (if you downloaded iTunes from the Microsoft Store)
- Press Return
- Double-click these folders: Apple Computer > MobileSync > Backup
You can also locate iPhone backup in Windows 7, 8, 10 or 11 by following Users > (username) > AppData > Roaming > Apple Computer > MobileSync > Backup.
Cannot locate iPhone backup on Windows PC? Find and Restore data with iPhone data recovery software.
If you cannot find your iPhone backup data on your PC or cannot access the backup files, take refuge in third-party software – Stellar Data Recovery for iPhone.
How can Stellar Data Recovery for iPhone help you?
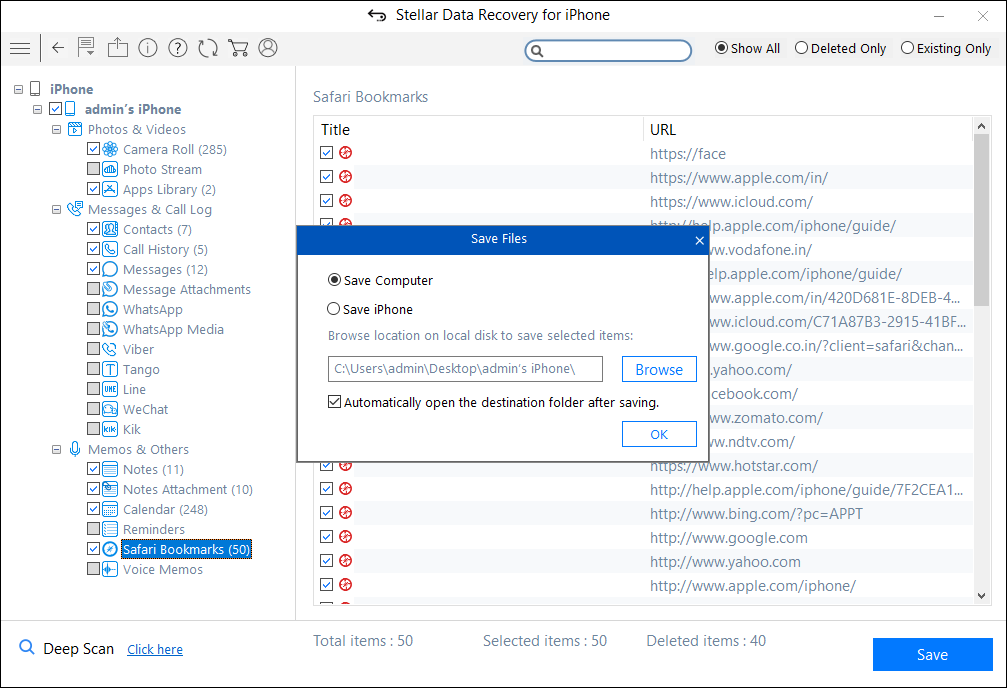
You can find, access, and restore lost iPhone backup files with Stellar Data Recovery for iPhone. It is a secure tool that efficiently scans the computer to find your iPhone backup. The recovered iPhone backup files are in readable form, and you can either save them on your PC or iPhone.
When you can use the Stellar iPhone data recovery solution
- You are unable to locate your iPhone backup files
- Your backup files are either lost or deleted.
- You cannot access iPhone backup files on Windows PC
- Not able to restore backup on your old/new iPhone
How can Stellar Data Recovery for iPhone recover lost backup files from PC?
The iPhone Data Recovery Tool by Stellar is a do-it-yourself software that quickly recovers complete iPhone data in a readable form from your Windows PC.
You can recover all your lost photos, videos, contacts, messages, Safari bookmarks, Call history, Reminders, Voice memos, Notes, WhatsApp, Kik, WeChat, Viber messages, etc.
It also offers a Deep Scan if your desired iPhone information is not recovered after the first scan. A deep scan does a comprehensive scan of the selected device or backup to recover every bit of lost or deleted backup information.
Benefits of Stellar iPhone Data Recovery
- Recovery of deleted or lost backup files
- Recovers data in a readable format
- Option to restore only that data from backup which you want to be in your iPhone
- Allows to save recovered backup on computer or iPhone
Step-by-step recovery of lost iPhone backup on Windows PC with Stellar Data Recovery for iPhone
Step 1: Connect your iPhone to your computer and launch the software.
Step 2: On the home screen, select Recover from iPhone. The scanning process begins.
Step 3: After scanning, all the files on your iPhone are listed.

If you do not see the required files in the list, choose Deep Scan. It will scan for the backup stored on your computer system.
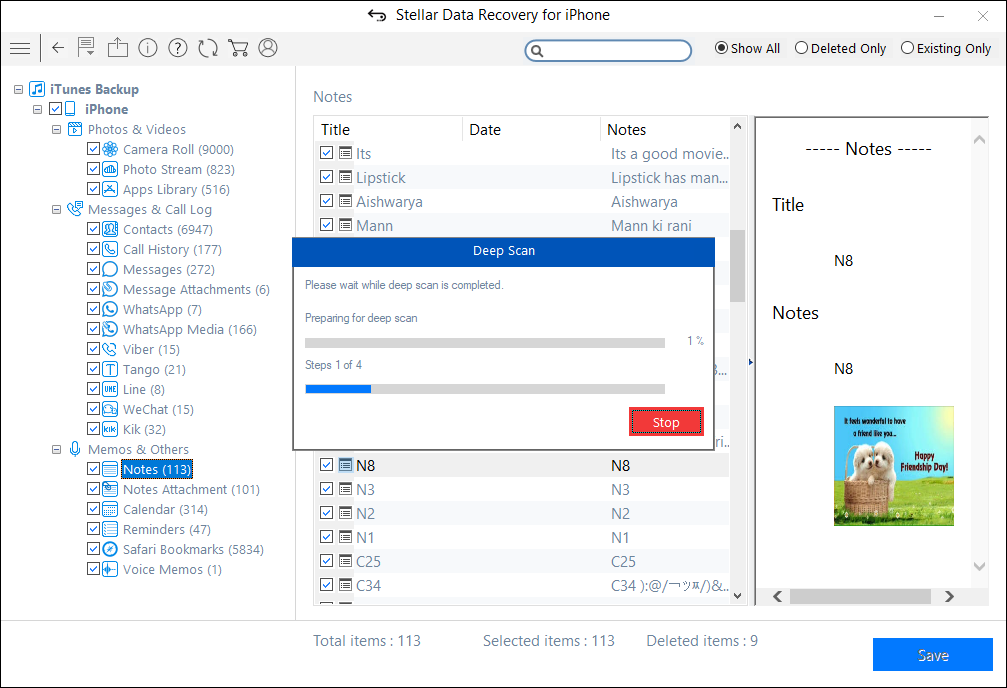
Step 4: Select and save the recovered iPhone data at your desired location. You can save it on your iPhone if you want to restore backup data on your device or save it on your computer.
Wrapping Up
Losing iPhone data after factory reset, jailbreak, being stuck in a boot loop or physical damage, etc., can get messier when you cannot find or retrieve information from iPhone backup files saved on your computer. Stellar Data Recovery for iPhone significantly relieves such data loss situations.
This iPhone utility not only finds the lost iPhone backup files on Windows PC, but it also makes them readable and allows you to save/restore them to your iPhone or computer. Moreover, it lets you selectively transfer iPhone data on your iPhone rather than complete a backup.
You can download the free trial version to evaluate its performance. It is undoubtedly not going to disappoint you.
- Title: How to Activate Stellar Data Recovery for iPhone 15 Pro | Stellar
- Author: Nova
- Created at : 2024-07-17 17:35:28
- Updated at : 2024-07-18 17:35:28
- Link: https://phone-solutions.techidaily.com/how-to-activate-stellar-data-recovery-for-iphone-15-pro-stellar-by-stellar-data-recovery-ios-iphone-data-recovery/
- License: This work is licensed under CC BY-NC-SA 4.0.