In 2024, How to use Snapchat Location Spoofer to Protect Your Privacy On Nokia C32? | Dr.fone
How to use Snapchat Location Spoofer to Protect Your Privacy On Nokia C32?
People are very happy about Snapchat’s new Snap map feature. It lets you update your location on a map, so that you can know who else (in your friends circle) is in the same concert or attending the same seminar. Whenever you add a post to your stories, your bitmoji appears on the geo-tagged location on the map.

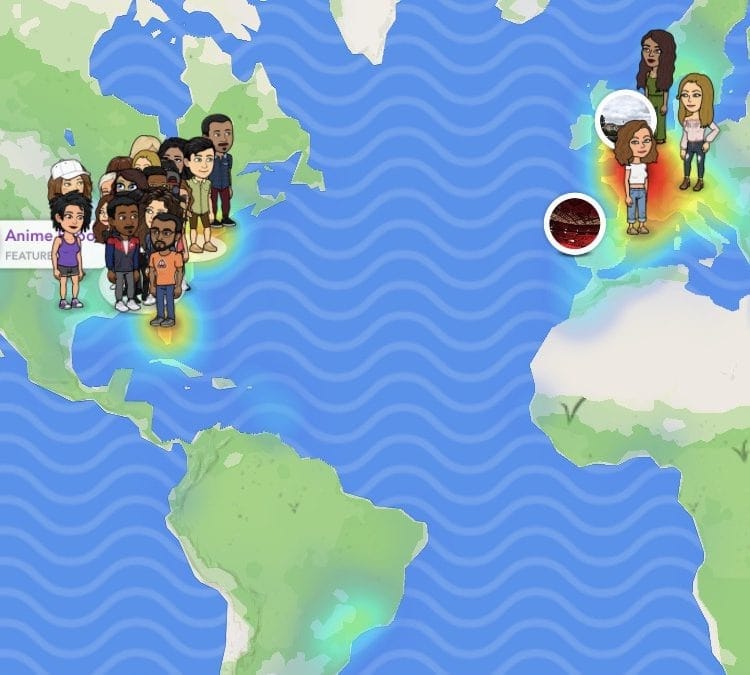
This feature was good news for people who were wondering how to share location on snapchat with their friends. But there is more to this than your eyes are seeing. Even when you don’t upload any posts to the stories, snapchat is still revealing your location to all your friends, whether you want it or not. Everytime you open the app, your location is being compromised. You just need to agree to share your location once, and Snapchat takes it as an invite to share your location every single time you send a snap or simply open the app to look at others’ snaps.
This is very dangerous when you have unknown people on your snap friends list. You must have accidentally accepted requests from people who have similar names to your friends? You don’t really know the identity of the person unless they snap their faces to you. In the worst case scenario, you can also have an obsessed stalker who was just waiting for this chance to track you down. The possibilities are endless. So, how to hide your snapchat location from the others on the internet? Our guide will teach you exactly that!

Part 1: Can we Hide Location on Snapchat?
The first thing that comes to our mind whenever we think about fake gps location snapchat is a VPN. But keeping these virtual network apps and spoofing apps aside, is it possible to hide our location by taking advantage of the existing settings on the app?
Yes, Absolutely!
There are a few tricks that you can use to hide your location from your friends or anyone who you have on your Snap List.
Ghost Mode: The word ‘Ghost’ was never this sweet. The snapchat fake location saves a lot of trouble. However, if there is no location at all, that is a huge advantage too! You can literally disappear off of the map when you activate the Ghost mode on Snapchat. Instead of a snapchat spoof, you are completely removing your traces from the Snapmap. This is how you enable this very useful setting -
Step 1: If you are someone who maintains the snap streak regularly, then it is no problem for you to track down the camera screen. Open the camera screen on your phone.
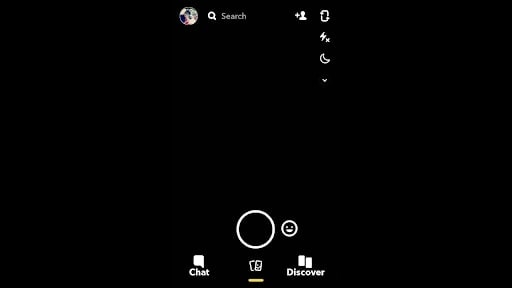
Step 2: On the top-left corner, you will find your bitmoji that will lead you to your Snap profile. Click on your bitmoji.
![]()
Step 3: The profile page will appear. Scroll to the bottom and you will find the Snapmap option there. Right below it will be a small arrow pointing to the right. Instead of clicking on the map, tap on thi arrow.
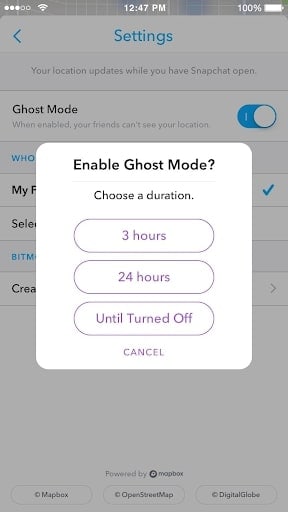
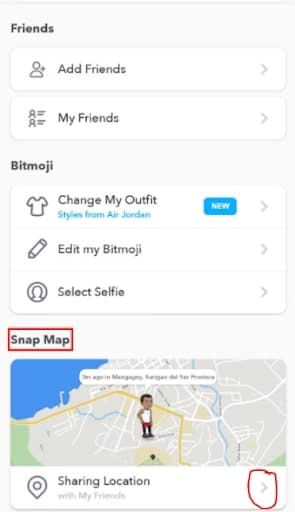Step 4: The Map and ‘My Location’ settings will open. There you will find the Ghost Mode. Enable the setting and you will see a dialogue box asking you to choose the duration of the Ghost Mode. Depending on what you want, choose your location.
If you still don’t trust this Ghost mode, the next trick will be very useful for you. Not just Snapchat, any app won’t be able to track down your exact location when you follow it.
Turn Off GPS Permissions on your phone
If you completely turn off the GPS Permissions on your phone, then no app can access your location even if you are connected to the internet. This might hinder the performance of a few apps but that is the risk that you must take to safeguard your privacy. The procedure to Turn off the GPS will differ from Android to iPhone. We have listed the most easy ways to turn off the location services on your phones.
Android
The easiest method is to go with the Notification tray that is present on top of the Android device. That is, when you look at your Android screen, you will see the notification tray on the top.
Step 1: Swipe down the notification tray and you will find several options. One of them is the ‘Location’ icon.
Step 2: The ‘Location’ icon is shaped like a geo-coordinate pin and remains in grey color when switched off and Blue color when turned on. Tap on the icon to on/off.

iPhone
To turn off the Location on your iPhone device,
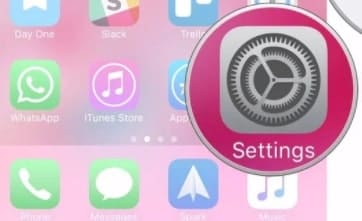
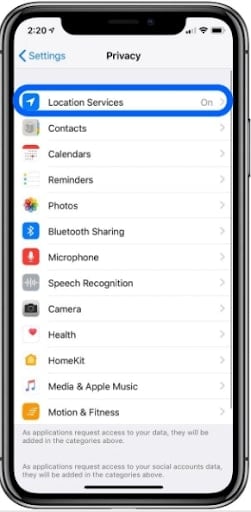
Step 1: Go to the ‘Settings’ option from your iPhone device’s Menu.
Step 2: Search for the ‘Privacy’ option and tap on it.
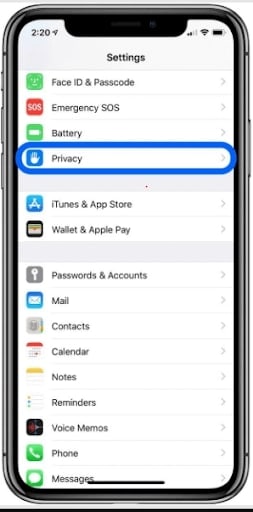
Step 3: In the next page that appears, you will find the ‘Location Services’. If we are not wrong, it is usually the first option on the page that opens up.
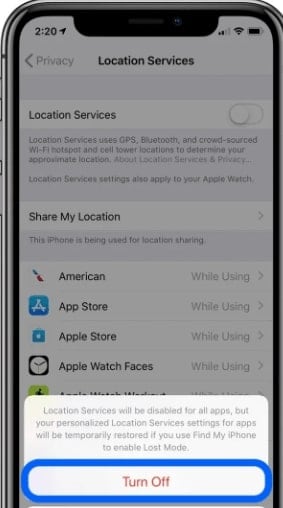
Step 4: Shift the toggle and turn off the Location Services. If you want, you can also disable location services individually for Snapchat only.
These are the simple ways in which you can prevent snapchat from spying on your location. You must be knowing how to send location on snapchat through chats - even this won’t be possible once you completely turn off the GPS of your devices.
Part 2: How to Spoof Location on Snapchat
If you are wondering how to fake location on snapchat, then the Snapchat location spoofer is one of the best options. You won’t find a specific software designed exclusively for Snapchat but Wondershare’s Dr. Fone Virtual Location spoofer will help you hide your real location on social media apps. This is how you use the application.
Dr. Fone - Virtual Location (iOS)
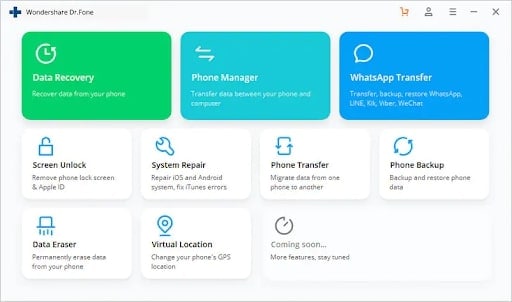
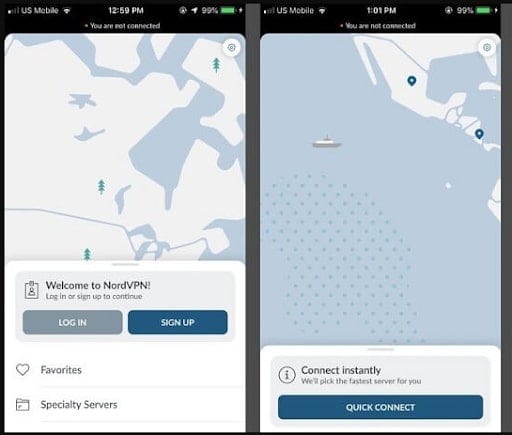
Step 1: Download the Dr.Fone Virtual Location Spoofer on your PC and launch it. You will find several options on the page. Go for ‘Virtual Location’.
Step 2: Now connect Your Nokia C32 to your PC and go with the ‘Get Started’ option.

Step 3: The world map with your current location will show up on the page. The ‘Teleport mode’ is the third icon on the top-right corner of the page. Click on it and enter your new location in the search box.

Step 4: Once you’ve decided with your final virtual location to fake gps for snapchat, then click on ‘Move Here’. New location will update in your phone and Snapchat will detect it too.

One of the advantages of using a location spoofer is that - your new location will reflect in all social media applications. Even your regular apps will detect the change and note it. So, it becomes hard to know if the change is fake or real.
VPN Service - NordVPN
The Virtual private Network services hide your IP, mask your identity and since you will be changing your server, they spoof location on snapchat too. NordVPN is one of the most hailed VPNs and this is how you use it -
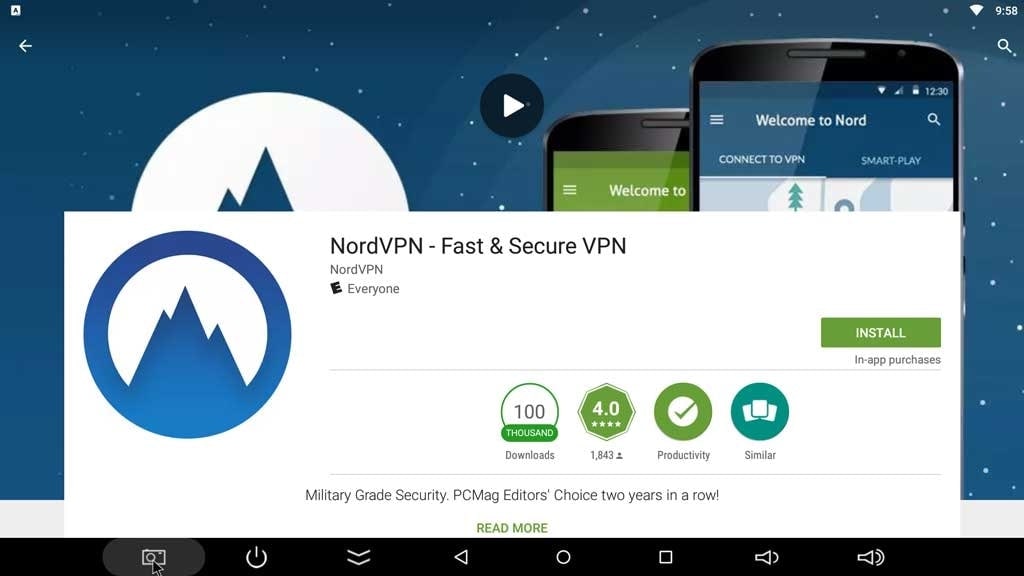
Step 1: Download NordVPN either from Google or App store.
Step 2: You need to sign up and the app quickly connects you to a nearby server. This is the Quick connect option.
Step 3: However, you can change your location too. Go to the ‘More options’ and then choose Servers. Under this, go for All Countries to view the choices you have. Choose one and that server will be activated.
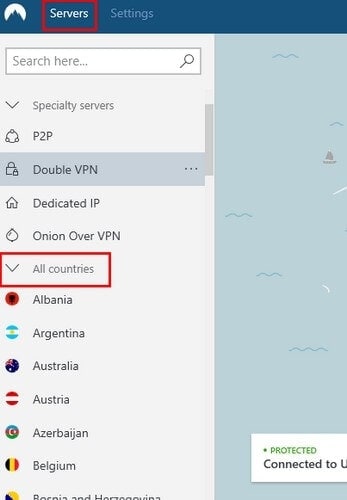
So, the location of this new server will reflect on your snapchat snapmap too.
Part 3: Frequently Asked Questions
Q1. Can you get someone’s Location from Snapchat?
A - Yes, people can easily know your location through Snapchat. The new Snapmap feature makes it all the more easy. The snapmap shows your bitmoji’s location anywhere in the world, as long as your phone’s GPS is ON and you have the snapchat app open. So, people can zoom in and know your exact coordinates and even your house-no and residential details.
Q2. Is Snapchat Location ever wrong?
A - Snapchat tries to provide the accurate location most of the time. It uses your geo-coordinates that it detects when you Switch ON the GPS on your phone. It tracks the location in which your snap is taken and if you are on snapmap and sharing your location, it can provide the exact details of the place you are in. However, there is no authentic report that says that Snapchat shows 100% accurate location or if it can go wrong sometimes.
Q3. How do you tell if someone is hiding their location from you on snapchat?
A - They will disappear off of the world map. Literally! So, whenever someone is hiding their location from you, it means they’ve either activated the Ghost Mode or they turned off the Location services of their phone. As a result, you will not find their bitmoji on the snapmap even if they are actively using the app. But if they’ve employed a Location spoofer, it is hard to say if the location is real or not.
Part 4: Conclusion
Now that you have learnt how to fake location on snapchat map, understand that these methods have their own hierarchy of success. While the location spoofer stands at the top-spot, using a VPN is the next best thing. If you want to rely on in-built features, know that they aren’t always successful. Make the right choice and keep your location a secret for your own privacy.
Thinking About Changing Your Netflix Region Without a VPN On Nokia C32?
Netflix is easily one of the most popular streaming apps available today. It offers a huge library of movies, TV shows, documentaries, and more. However, the content you want to watch on Netflix depends on the country where you live.
The traditional method of circumventing region-locked content on Netflix is simply utilizing a VPN. You can also change Netflix country restrictions without it, but it will require a bit of work. If you’re interested to know how to change the Netflix region without a VPN, follow our quick article below to learn more.
Part 1: Netflix and Geo-Restrictions
Netflix offers subscribers a wide range of content, but their library varies per region due to licensing and copyright agreements. The service price sometimes costs less in other countries, which is why using VPNs to save money on subscriptions are highly popular.
Using VPNs and other methods to change your region is not illegal, but it violates Netflix’s Terms of Use. If you’re caught using VPNs or other means to bypass their geo-restrictions, Netflix can suspend or terminate your account. This is why you should always take caution when navigating the streaming giant’s Terms of Use.
Part 2: Will Netflix Ban My Account If I Use a VPN?
If you’re wondering if Netflix bans accounts that use VPN, the answer is “No, they don’t”. On the other hand, Netflix will block access to content if it detects that you’re connected to VPN. If this happens, simply turn off your VPN or try connecting to different servers on your VPN and retry.

Part 3: Can You Change Your Netflix Region Without a VPN?
There are multiple ways to change your location on Netflix without a VPN, whether you’re on your computer, iPhone, or Android. You can use a smart DNS service, a Proxy Server, or a Tor browser to connect to a country you want to access. Follow our guide below to change country on Netflix now without a VPN.
Method 1: Using a Smart DNS
Utilizing Smart DNS to change country on Netflix without VPN actually works in the same way. This is because Smart DNS re-routes your connection through a server in a different country. Keep in mind that Smart DNS is still a service and will require a subscription from a Smart DNS provider.
Step 1: Find and select a DNS Server address from different online DNS providers. In this example, you’ll see using SurfShark .
Step 2: Register your IP address on your selected provider and obtain the appropriate DNS Server Address on your account.
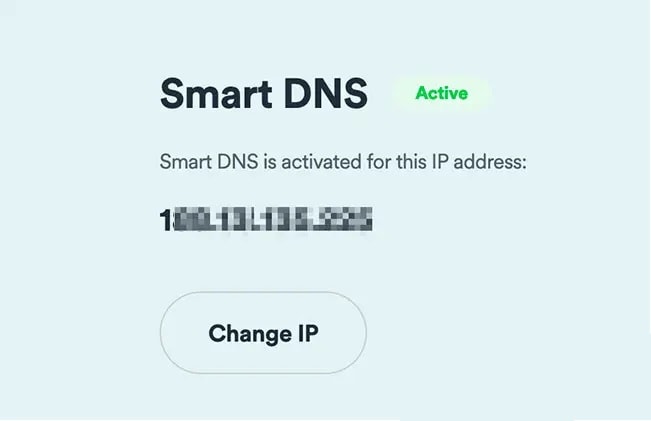
Step 3: Open Networking settings on your computer, iPhone, PlayStation, or Xbox and find DNS Settings (the image below is an example for the Windows system).
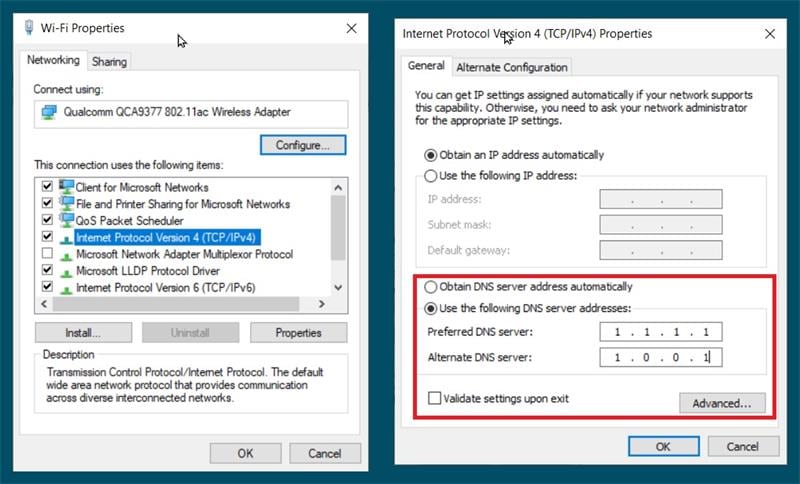
Step 4: Input your DNS Server address. Click Ok once done and restart your computer. The DNS address should activate once you reconnect to the internet.
Pros
- DNS servers are faster than a usual internet connection, so you can enjoy streaming at high connection speeds.
- DNS Servers don’t encrypt your traffic or hide your IP address.
Cons
- DNS doesn’t carry your information, as the server side will only see the IP address where the query came from, which hackers can manipulate.
Method 2: Using a Proxy Server
Proxy Servers work the same as VPNs as it routes traffic to a third-party server. However, like DNS, Proxy Servers don’t encrypt data but can mask your IP address. Here are the steps to watch NetFlix with a Proxy Server.
Step 1: Search for Proxy Settings on your computer.
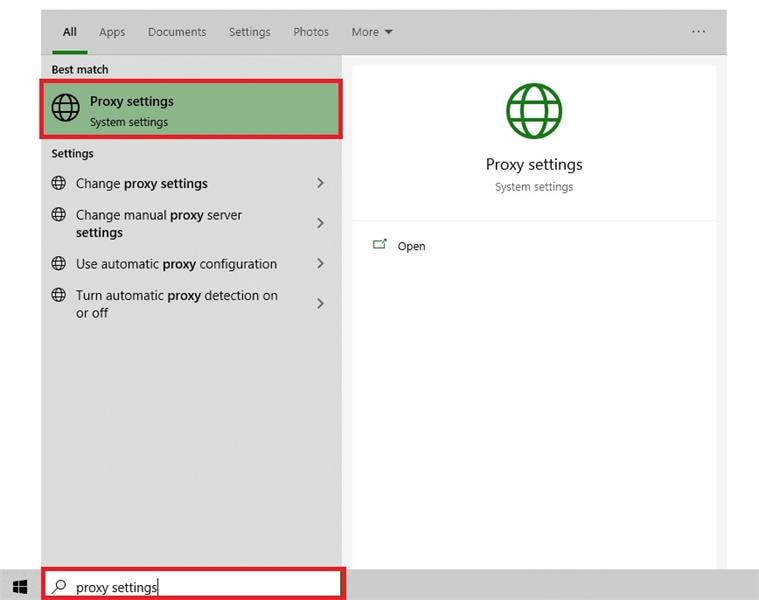
Step 2: Choose between Automatic or Manual proxy setup.
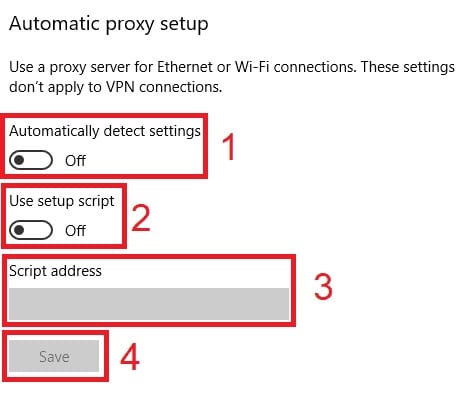
Step 3A: For Automatic proxy setup, turn on Automatically detect settings and Use setup script. Afterward, enter the Script address and click Save.

Step 3B: For Manual proxy setup, click Use a proxy server. Input Address and Port numbers. Click Save afterward.

Note
To change Proxy on mobile phones, change your phone’s proxy settings. Your Netflix app will automatically copy your phone’s proxy settings if done correctly.
Pros
- Proxy Servers mask your IP address retaining anonymity.
- Proxies improve web browsing performance, especially when downloading large files.
Cons
- Proxy Servers don’t encrypt data.
Method 3: Using a Tor Browser
For the unfamiliar, Tor is an open-source network that encrypts your connection while stopping trackers from following your activity. Here are the steps to start using Tor Browser to watch Netflix without a VPN.
Step 1: Download and install Tor Browser.
Step 2: Launch Tor Browser and click Connect.
Step 3: Go to Netflix.com and log in to your account.
Note
Tor Browser is available across all major platforms, including Windows, macOS, Linux, and Android.
Pros
- Tor is completely free to use.
- Your browsing history automatically gets deleted.
Cons
- You can’t control the region you have access to, so your Netflix content is not guaranteed to have what you’re looking for.

Conclusion
Changing your Netflix region with or without a VPN certainly has its perks. This is because you can watch your favorite series unavailable to your country to maximize your streaming access. Choosing a country with a lower subscription price also saves you money.
While it’s not illegal to change your Netflix region, it does violate the streaming giant’s Terms of Use. You should always research and know the pros and cons when circumventing Netflix’s terms so your account doesn’t get suspended or terminated.
Dr.Fone - Virtual Location
1-Click Location Changer for both iOS and Android
- Teleport from one location to another across the world from the comfort of your home.
- With just a few selections on your computer, you can make members of your circle believe you’re anywhere you want.
- Stimulate and imitate movement and set the speed and stops you take along the way.
- Compatible with both iOS and Android systems.
- Work with location-based apps, like Pokemon Go , Snapchat , Instagram , Facebook , etc.
3981454 people have downloaded it
How to Share Location in Messenger On Nokia C32?
We usually host a gathering once in a while and invite our friends to come over. Most of us are already used to organizing such activities because we’ve been doing that for a long time now. However, we cannot deny that it’s much easier nowadays than years ago. Why so? Simply because the communication channels available today at our disposal are more digital and more capable. For instance, Facebook Messenger now allows users to share their whereabouts in a snap of a finger. Yes. That feature is called Live Location.
The Live Location feature on Messenger works beyond sending the address or coordinates of your exact location. It basically visualizes your whereabouts by means of an interactive map and updates the details from time to time. That means the receiver can view not only your position but also your movements. Is that helpful? Absolutely yes. It’s indeed a game-changer in today’s already convenient world. Is it highly recommended? With proper handling and adequate caution, Messenger’s Live Location can definitely do more good than harm to the users.
In this article, we will delve into the highlights and benefits of Facebook Messenger’s location-sharing features. We will also provide some tutorials on how to share Live Location on Messenger. Continue reading below to learn more.
Part 1. Everything You Should Know About Messenger’s Live Location
Facebook is well aware that sharing location details is essential to its users. That’s why developers have come up with a brilliant idea and rolled out Live Location on Messenger. It basically works like other location-sharing features. However, Live Location provides more precise and thorough location information. It’s in map form, where you can view the exact location and track the movements of the sender. You’ll continue to see updates for as long as the sharing is not halted on the other end. To navigate it properly, try to read tutorials on how to share Live Location on Messenger.

What if you wish to send a particular address from another location? There is no problem with that. Messenger allows users to search for a specific place, trace it on the map, and share the details. The receiver can view it in map form and get directions if necessary. See? It’s very easy and convenient. No need to type in long addresses just to share a particular location with your friend. You just have to find it precisely on the map and send the information afterward.
Convenience is just one thing. Messenger’s location-sharing feature has a lot more to offer to users. One of which is the accuracy of the shared location information. Since the details are automatically generated through GPS, you can be sure that it is correct and definite. If you go out and track it down the neighborhood, you can certainly find the location in no time. Just make sure that the location services on your smartphone are activated so you can view your progress in real time. Also, stay vigilant while you’re out and keep yourself safe from any harm. Remember that safety remains a priority and comes above convenience.
How to Grant Facebook Messenger the Permission to Access Your Location?
Facebook Messenger’s location-sharing feature will not work without the necessary access. That’s why you should first configure the permission settings on your mobile device to avoid unwanted disruptions. Don’t worry. It’s indeed a piece of cake. Check out the tutorial provided below.
- 1: Go to Settings.
- Step 2: Click Apps.

- Step 3: Find and click Messenger.

- Step 4: Click Permissions.

- Step 5: Click Location.

- Step 6: Select Allow Only While Using the App. If you’re quite conservative regarding this matter, click Ask Every Time instead. After that, Facebook Messenger will have access to your location information.

Part 2. How to Share My Location on Messenger?
How do I share my location on Messenger? As mentioned earlier, it’s very easy to use Facebook Messenger for location sharing. All it takes is just a few clicks on the platform. No need to manually type in the address or sketch the landmarks. Messenger does the rest of the work for you. In actuality, there are three ways to share your location on Messenger. Any of them can be of great help to you, depending on your current situation. Do you want to try them now? Check out the tutorials below.
Method 1: Share location on Facebook Messenger via Live Location
How to share my location on Messenger? Well, the first option you can try is through Live Location. It works best if you wish to tell somebody where exactly you are and give updates from time to time. Don’t worry. Although it looks complicated at a glance, in reality, it’s actually not rocket science. It only takes a few seconds to complete. Below is a tutorial on how to share Live Location on Messenger in easy steps.
- Step 1: Open the Facebook Messenger application on your mobile device.
- Step 2: Browse through your conversation feed and find the contact with whom you wish to share your Live Location. Click on it.
- Step 3: Click the More (+) icon at the bottom-left corner of the screen.

- Step 4: Right after, click Location.

- Step 5: Click Start Sharing Live Location. Immediately, your current location details will be available and forwarded to the intended receiver. Live Location lasts for 60 minutes at maximum. If you wish to terminate it, simply click Stop Sharing Live Location.

Method 2: Share location on Facebook Messenger via Pinned Location
Let’s say there is a specific place you want to visit with your friend. Is there a way to share the address of the venue without you being there at the moment? Fortunately, it is possible. Apart from sharing your current location in real-time via Live Location, you can also send pinned locations on Messenger. You just need to search for it and then redirect the details to your friend. Yes. It’s just as simple as that. Do you want to try it on your smartphone? If so, follow the guide below.
- Step 1: Launch the Facebook Messenger application on your mobile device.
- Step 2: Scroll through your conversations and find the receiver from the list. Click on it.
- Step 3: On the text field, click the More (+) icon at the bottom-left corner.
- Step 4: Then, click Location.
- Step 5: Locate the search bar above the interactive map and type in the location you want to share.

- Step 6: Choose one from the suggested results and then click on it. The details will then be forwarded immediately to the intended receiver.
Method 3: Share location on Facebook Messenger via Google Maps location
How do I share my location in Messenger if I cannot find it on the map provided? Yes. That happens sometimes. There are certain places that are untraceable on the messaging platform. As a result, it doesn’t appear on the map when you try to search for it. But don’t sweat it. If you experience the same issue, you can instead use Google Maps to share location details. How to do it? Check out the tutorial provided below.
- Step 1: Launch the Google Maps application on your mobile device.
- Step 2: Click on the Search bar at the top and then type in the location.

- Step 3: Choose one from the suggestions and then tap on it. Make sure that it is exactly what you’re looking for.

- Step 4: Access the menu bar below the map and then click Share.

- Step 5: From there, click Chats or the Facebook Messenger logo.
- Step 6: Find the receiver from the provided list and then click the Send button next to its name.

NOTE: Of course, you can only send pinned locations via Google Maps. The Facebook Messenger’s Live Location is available within the platform only.
BONUS TIP: Protect Your Privacy With Wondershare Dr.Fone
There’s no denying that the location-sharing feature of Facebook Messenger is useful to many of us. It always comes in very handy whenever we need to meet people somewhere or invite them to our places. However, we should not become too complacent and let our guard down. Sharing sensitive information like whereabouts always comes with risk, regardless of the platform and the intention. Therefore, make it a habit to protect your privacy at all costs. In this regard, Wondershare Dr.Fone has something special to offer. Its Virtual Location feature, capable of modifying and simulating your location records, can be of great help for you. Don’t worry. It’s very easy to use. Here’s a short guide for you.
- Step 1: Download Wondershare Dr.Fone from its official website. Right after, install it on your computer.
- Step 2: Launch the newly installed software on your desktop. Once it fully loads up, connect your smartphone using a data cable. Follow the on-screen instructions and perform the steps accordingly to ensure the connection between the two devices is stable enough to handle the succeeding operations.
- Step 3: Navigate to the left-side panel and then click Toolbox. On the main dashboard, click Virtual Location. Is it your first time using this feature? If so, allow Wondershare Dr.Fone to download additional resources. Don’t sweat it. It will only take a few minutes to complete.
- Step 4: Once the downloading process has concluded, Wondershare Dr.Fone - Virtual Location will automatically open on a separate window. From there, go to the top-right menu bar and then click Teleport Mode. It is the first icon that appears in the row.

- Step 5: Head over to the top-left corner and enter your desired location into the search bar. Choose one from the suggested results. After that, click the Enter icon.
- Step 6: The details regarding your chosen location will be displayed on the computer screen. Review the information and make sure that it is the specific location you’re looking for. Once confirmed, click Move Here to proceed.
- Step 7: Immediately, the location settings on your smartphone will be changed according to the inputs you have provided to Wondershare Dr.Fone. You can verify it by checking the current location registered on your Maps app. After confirming that your mobile device is now showing a different location, you can now start browsing without worrying about your location’s privacy.

NOTE: Resort to Wondershare Dr.Fone - Virtual Location if your internet browsing does not require you to provide your real address. If you wish to restore your original location settings, simply close the Wondershare Dr.Fone application and restart your smartphone.
Conclusion
Gone are the days when you had to write invitation cards manually and deliver them one by one. Nowadays, all you need to do is go online and use Messenger’s location-sharing feature. Have you already tried it? If not, you should take it into consideration and use it on your next agenda. Refer to the tutorial above on how to share Live Location on Messenger. It can certainly help you get started. How do I share my location on Messenger without physically being there? That’s simple. Use Messenger or Google Maps’s pinned location. Furthermore, download Wondershare Dr.Fone on your computer. Its Virtual Location feature, capable of modifying your location settings, can provide protection for your privacy. Just connect your Nokia C32 to the computer and set it up from there.
- Title: In 2024, How to use Snapchat Location Spoofer to Protect Your Privacy On Nokia C32? | Dr.fone
- Author: Nova
- Created at : 2024-07-17 18:01:05
- Updated at : 2024-07-18 18:01:05
- Link: https://phone-solutions.techidaily.com/in-2024-how-to-use-snapchat-location-spoofer-to-protect-your-privacy-on-nokia-c32-drfone-by-drfone-virtual-android/
- License: This work is licensed under CC BY-NC-SA 4.0.