
In 2024, How To Use Special Features - Virtual Location On Motorola Moto G14? | Dr.fone
How To Use Special Features - Virtual Location On Motorola Moto G14?
Wondershare Dr.Fone - Virtual Location comes with multiple unique features that can be used to enhance the flow of spoofing location. With all these amazing features, you can easily change your iOS location without blinking an eye. Rather than making things complicated, Dr.Fone makes it easy for you to manage operations when you perform actions like changing Android locations.

Part 1: Circle Route (For Multi-Stop Route)
The circle route feature is under the multi-stop route mode. When your starting point is close to the ending point, a pop-up asks if you want to set up a circle route. Click Yes to create a circular path on the map.

Part 2: Realistic Mode (For One-Stop Route and Multi-Stop Route)
This particular feature makes the simulation look realistic with the ability to fluctuate the speed of the simulation. If you wish to turn on realistic mode for the one-stop or multi-stop route, look for the respective checkmark option in the panel on the left.

Part 3: Fluctuation Mode (For Teleport Mode)
Whenever you are teleporting your smartphone device to another location, you can try using the fluctuation mode feature offered against it. As you activate Teleport Mode from the top-right section and search for a location, you will discover the Fluctuation Mode toggle in the confirmation tab. Turn on the toggle to slightly switch the location from the selected point to show realistic motion.

Part 4: Cooldown Timer (For Teleport Mode and Jump Teleport Mode)
While teleporting the location of your smartphone to different places for playing games like Pokemon Go, you are bound to activate a cooldown timer within your location-changing app to show realistic movement. By locating the Cooldown Timer on the right pane of icons, activate it, and this feature will automatically calculate the cooling time by measuring the distance between your destination and the starting point.

It is recommended not to start the movement until the cooldown time is completed to avoid unnecessary bans. Moreover, you can also activate the Auto jump after cooldown in the Jump teleport mode after turning on the Cooldown Timer.
This option will automatically jump you to the next destination once the timer ends. It is helpful for games like Pokemon Go, where the game servers can detect frequent jumps with no cooldown time.
### Part 5: Import/Export GPX FileYou can also import and export specific navigated locations from Dr.Fone in the form of GPX files. While you can export GPX files for keeping a record of your location, you can also import such files for inserting specific locations to simulate or teleport to. Find out how you can import and export GPX files with this location-changing application:
Step 1Export the GPX File
If you have defined a proper location to simulate at a particular instant using Dr.Fone - Virtual Location, you can have this location exported by clicking the Export icon on the top of the left panel. This will open a window where you can set the location for saving the GPX file.

Step 2Import a GPX File
For importing a GPX file on the platform, click the Import button on the right pane. As this opens a window, select the GPX file you wish to import to the platform.


Step 3Wait for the File to be Read
Wait for a moment until Dr.Fone - Virtual Location recognizes the specific locations within the GPX file and displays them on the map.

Part 6: Historical Records
If you want to use a similar track record on your smartphone again, you can access the historical records saved on the platform for easy access.
Step 1Open Historical Records
Click the Historical Records button on the right pane to access the entire history involving the connected smartphone and the location spoofing platform.

Step 2Access Any Location from the History
Select the Go button adjacent to any particular historical record to re-launch a similar simulation for the Motorola Moto G14 device. You can also click Clear All to delete all historical records.

Part 7: Favorite List
You can also set up favorite locations within the platform to define quick accessibility to your favorite locations. To do that, you have to follow the guidelines shown next:
Step 1Favorite Specific Locations
While setting up locations in Jump Teleport Mode, One-Stop Route, or Multi-Stop Route, you can tap on the Favorite icon adjacent to every marked location or favorite an entire route with the Favorite icon on the top of the left panel.

Step 2Access your Favorite Section
To look for your favorite locations, look for the Favorite icon on the right pane to open a list containing all locations you have marked. You can choose the Move option to automatically move into a particular location in no time.

How To Teleport Your GPS Location On Motorola Moto G14?
While playing games like Pokemon Go, you are in desperate need of finding more Pokémon. If so, changing your location is a necessity that needs to be figured out. For that, teleporting the GPS location of the Motorola Moto G14 device is the optimal solution. To carry this out, Wondershare Dr.Fone - Virtual Location provides a perfect system for fake locations.
Part 1: Teleport to Anywhere in the World (Teleport Mode)
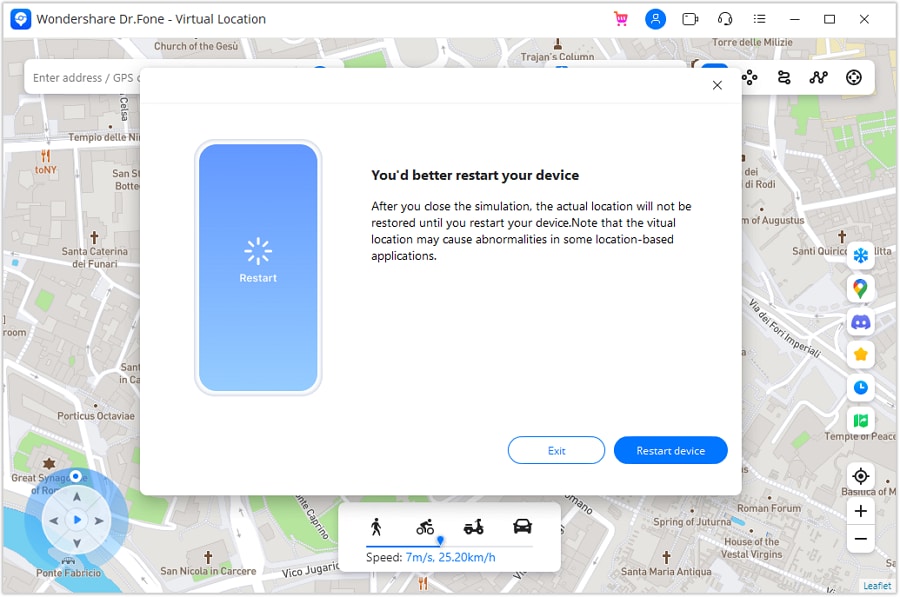
Note: Once you teleport or move to a virtual place, you can restore to the actual location by restarting the Motorola Moto G14 device. You will see a prompt that reminds you to restart your device to restore the location of the connected device when you close the Virtual Location. Click Restart Device and close the program.
* Dr.Fone Mac version still has the old interface, but it does not affect the use of Dr.Fone function, we will update it as soon as possible.
The Teleport Mode offered in Virtual Location is a great way to change the location of iOS/Android devices. If you wish to show a different location to someone else, the best way is to use this mode on Virtual Location. This can be done by following the steps described below:
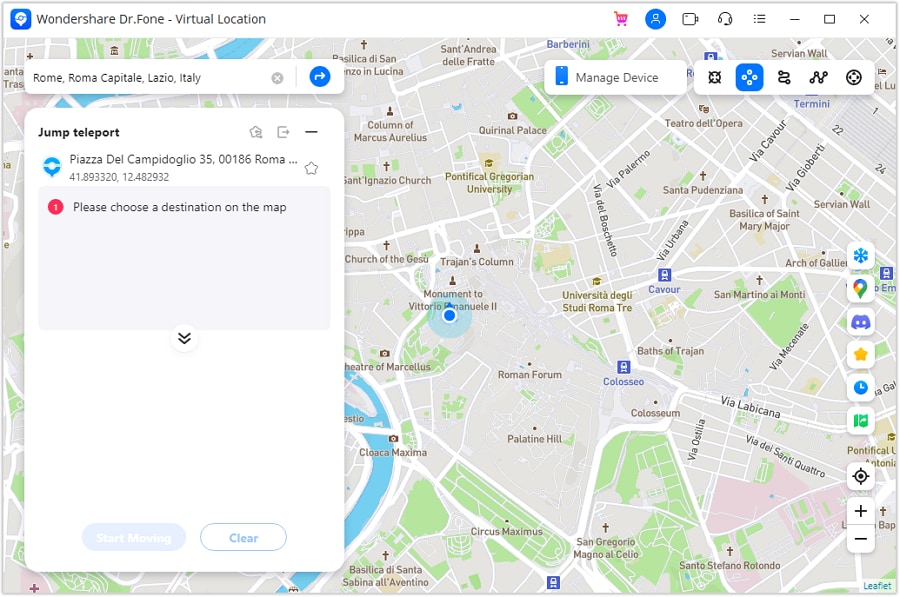
Step 1Activate Teleport Mode
Once you have connected your smartphone, continue to select the Teleport Mode option from the top-right section. The particular icon is represented by the first icon from the left in that section.

Step 2Add Location To Teleport
After activating Teleport Mode, click the search bar on the top-left to type in the location where you want to shift. After adding the location, hit Enter to proceed.

Note: If you can’t find your current location when searching spots on the map, you can click the Current Virtual Location icon on the right sidebar to show your current virtual location.
Step 3Confirm the Location For Teleporting
You will be directed to the particular, and the map will display it for confirmation. If you are willing to teleport to this specific location, click Move Here.

Step 4Location Successfully Changed On Computer
The location of the smartphone will be instantly changed to the selected location and will be displayed on the map.

Step 5Location Changed On the Smartphone
Open your smartphone and access its maps application. Look into the current location of the Motorola Moto G14 device and verify it to be the same as the changed location on the computer.

Part 2: Instantaneous Movement Between Multiple Points (Jump Teleport Mode)
Wondershare Dr.Fone - Virtual Location also allows the movement of the smartphone device between multiple places with the Jump Teleport Mode. If you want to make your location spoofing look realistic, the steps below will be beneficial:
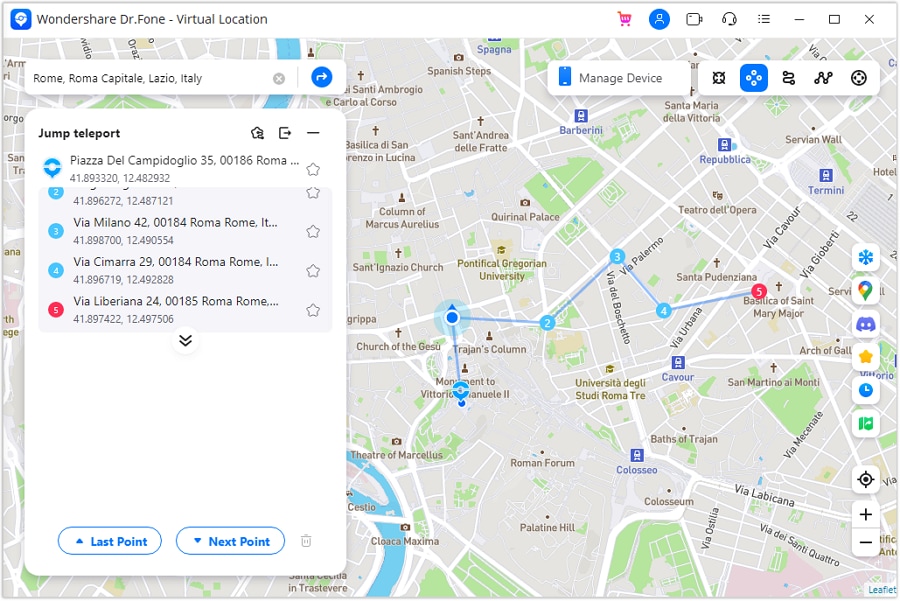
Step 1Activate Jump Teleport Mode
You will have to first access the Jump Teleport Mode option from the second icon from the left in the top-right section. This can be done after teleporting the location of the smartphone device.
Step 2Set Spots to Jump Teleport
Continue to select the spots you want to pass one by one on the map by simply tapping on them with your mouse. After selecting multiple spots, click the Start Moving button at the bottom of the left panel to start the movement.

Step 3Change Location Between Set Spots
As prescribed, you can propagate amongst the set spots with the Jump Teleport Mode. Use the Next Point and Last Point buttons to shift your location.
Ultimate Guide to Free PPTP VPN For Beginners On Motorola Moto G14
PPTP, which stands for Point to Point Tunneling Protocol is one of the oldest and most trusted ways of implementing a VPN. It was developed by Microsoft and uses a GRE tunnel with a TCP control channel to bypass various geo-based restrictions. Since free PPTP VPN has been around for years now and is pretty easy to setup, it is quite popular as well. Read on and learn the basics of PPTP VPN free with a free PPTP VPN list as well.
Part 1: What is PPTP VPN?
The free VPN PPTP was earlier introduced by Windows, but was later adopted by all the other platforms like Linux, macOS, iOS, Android, etc. Even though the layer of encryption in free PPTP VPN is not as secure as other protocols, it makes it pretty fast. Due to this, the PPTP VPN is widely used to bypass location-based restrictions.
- The free VPN PPTP supplies data into packets and send them through a tunnel to attain a secure communication.
- Data is encrypted and its authenticity is kept intact. Due to this, the free PPTP VPN is extensively used in public networks as well.
- It supports the 128-bit Point to Point encryption.
- It is quite easy to setup PPTP free VPN (only the server address, username, and password are needed).
- Even though PPTP is secure and pretty fast, it is not as safe as other protocols (that support 256-bit encryption). It is believed that the government is now able to crack it.
- The tunneling is of two types in PPTP – Voluntary and Compulsory. Voluntary tunneling is initiated from the client’s end while compulsory tunneling is initiated from the server’s end. Compulsory tunneling should be supported by the router.

By attaining a free VPN PPTP server, you can easily connect to it. For instance, if you wish to connect to Singapore, you would need free PPTP VPN Singapore host IP. We have provided a free PPTP VPN list in the next section.
Part 2: Free PPTP VPN Server List
To make things easier for you to connect to a free PPTP VPN server, we have come up with a working and free PPTP VPN list right here. This includes free PPTP VPN Singapore, Canada, UK, USA, and other countries.
| Server | Username | Password | Country | |
| 1. | us1.vpnbook.com | vpnbook | 88wxtet | USA |
| 2. | us2.vpnbook.com | vpnbook | 88wxtet | USA |
| 3. | ca1.vpnbook.com | vpnbook | 88wxtet | Canada |
| 4. | de233.vpnbook.com | vpnbook | 88wxtet | Germany |
| 5. | fr1.vpnbook.com | vpnbook | 88wxtet | France |
| 6. | it.vpnjantit.com | vpnjantit.com | i0ryj | Italy |
| 7. | sg1.vpnjantit.com | vpnjantit.com | i0ryj | Singapore |
| 8. | sg2.vpnjantit.com | vpnjantit.com | i0ryj | Singapore |
| 9. | sg3.vpnjantit.com | vpnjantit.com | i0ryj | Singapore |
| 10. | usa1.vpnjantit.com | vpnjantit.com | i0ryj | USA |
| 11. | gr.vpnjantit.com | vpnjantit.com | i0ryj | Germany |
| 12. | uk.realfreevpn.com | realfreevpn | 25570 | UK |
| 13. | de.realfreevpn.com | realfreevpn | 93937 | Germany |
| 14. | fr.realfreevpn.com | realfreevpn | 76216 | France |
| 15. | us1.superfreevpn.com | free | 1596 | USA (Miami) |
| 16. | us2.superfreevpn.com | free | 2737 | USA (Chicago) |
| 17. | uk.superfreevpn.com | free | 7833 | UK (London) |
| 18. | ca.superfreevpn.com | free | 1251 | Canada (Montreal) |
| 19. | nl.superfreevpn.com | free | 2988 | Netherlands (Brabant) |
| 20. | us.websitevpn.com | websitevpn.com | freevpn | USA |
| 21. | uk.websitevpn.com | websitevpn.com | freevpn | UK |
| 22. | ca.justfreevpn.com | justfreevpn | Canada Free VPN Account | Canada |
| 23. | uspptp.hotfreevpn.com | free | 1234 | USA |
| 24. | 51.15.151.165 | pptp | ykDJYnCIirN | France |
| 25. | 128.199.221.154 | contassh | abcd1234 | Singapore |
| 26. | 128.199.96.14 | contassh | abcd1234 | Singapore |
| 27. | 188.166.6.170 | contassh | abcd1234 | Netherlands |
| 28. | 188.166.155.99 | contassh | abcd1234 | Netherlands |
| 29. | 138.68.140.197 | contassh | abcd1234 | UK |
| 30. | 138.68.64.68 | contassh | abcd1234 | UK |
| 31. | 159.203.111.101 | contassh | abcd1234 | USA |
| 32. | 139.59.244.147 | sshagan | abcd1234 | Singapore |
| 33. | 139.59.237.15 | sshagan | abcd1234 | Singapore |
| 34. | 128.199.214.71 | sshagan | abcd1234 | Singapore |
| 35. | 178.62.38.164 | sshagan | abcd1234 | UK |
| 36. | 46.101.79.161 | sshagan | abcd1234 | UK |
| 37. | 192.241.184.169 | sshagan | abcd1234 | USA |
| 38. | 192.241.179.120 | sshagan | abcd1234 | USA |
| 39. | 162.243.33.71 | sshagan | abcd1234 | USA |
| 40. | 162.243.15.104 | sshagan | abcd1234 | USA |
Part 3: How to Setup Free PPTP VPN on Your Computer?
After getting to know about so many free PPTP VPN Singapore, USA, Canada, UK, and other countries, you can easily learn how to set up a PPTP VPN free. The process is quite simple and can be implemented in all the leading versions of Windows (and other operating systems). Though, there could be a slight change in the overall interface of the OS you are using. To set up free VPN PPT, follow these steps:
1. To start with, launch Control Panel and go to the Network and Sharing Center.
2. From here, you need to select the “Set up a new connection or network” option to start the process.

3. This will launch a new wizard that can be used to setup a PPTP VPN free. Out of all the provided options, select the “Connect to a workplace” option.

4. On the next window, you would be given an option to either dial directly or use a VPN. Click on the “Use my Internet Connection (VPN)” option to continue.

5. Great! Now, you need to provide information related to the host and server. You can refer the free PPTP VPN list we have provided in the previous section and pick the server (and hostname) of your choice.
6. As you would proceed to the next window, you need to provide the username and password of the PPTP VPN free you are using. The same can be obtained from our free PPTP VPN list.
7. In the end, just click on the “Create” button to use your VPN. It will be listed under the available networks.
8. Sometimes, we have to change Network Settings to make it work. To do this, just select the VPN you have created and visit its Properties.


9. Go to the Security tab and make sure the type of VPN is listed as PPTP (Point to Point Tunneling Protocol). Also, the data encryption option should be “Optional Encryption (Connect even if no encryption)” and the option for “Challenge Handshake Authentication Protocol (CHAP)” should be selected for “Allow these protocols”.
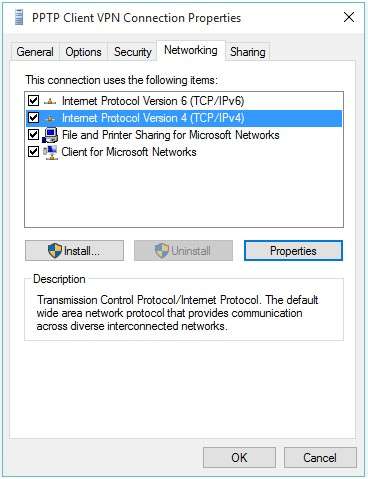
10. Furthermore, you can go to the General tab to make sure the server is specified correctly.
11. Once it is done, you can save these changes and exit the interface. Now, go to the list of available networks and connect to the free PPTP VPN you have created.

That’s it! By following these steps, you would be able to create a free PPTP VPN Singapore, USA, UK, Canada, Germany, or any other location. Simply give this tutorial a try and pick the preferred option from our free PPTP VPN list. If you also have a suggestion for a free VPN PPTP that you want to add to your list, then let us know about it in the comments below.
Part 4: An Easier Alternative to Setup VPN
You may find that there is a steep learning curve ahead to master PPTP VPN setup. In addition, the ways to set up PPTP VPN are quite different for various devices and PCs.
Is there an easier alternative to setup VPN?
Yes. There are quite a few easy-to-use VPN services available in the market, among which, NordVPN is one considered reliable by many users.
Some of its advantages are as follows:
- Supports VPN access on PCs and phones (even browser plugins available).
- Intuitive interface and easy operations.
- Offers 24/7 customer service.
- As low as about 3 USD per month.
Dr.Fone - Virtual Location
1-Click Location Changer for both iOS and Android
- Teleport from one location to another across the world from the comfort of your home.
- With just a few selections on your computer, you can make members of your circle believe you’re anywhere you want.
- Stimulate and imitate movement and set the speed and stops you take along the way.
- Compatible with both iOS and Android systems.
- Work with location-based apps, like Pokemon Go , Snapchat , Instagram , Facebook , etc.
3981454 people have downloaded it
- Title: In 2024, How To Use Special Features - Virtual Location On Motorola Moto G14? | Dr.fone
- Author: Nova
- Created at : 2024-07-17 18:09:07
- Updated at : 2024-07-18 18:09:07
- Link: https://phone-solutions.techidaily.com/in-2024-how-to-use-special-features-virtual-location-on-motorola-moto-g14-drfone-by-drfone-virtual-android/
- License: This work is licensed under CC BY-NC-SA 4.0.