
In 2024, Life360 Circle Everything You Need to Know On Tecno Spark 10C | Dr.fone
Life360 Circle: Everything You Need to Know On Tecno Spark 10C
In order to keep in touch with the persons that matter most to you, you may use circles to create private groups. There are a lot of different situations in which the Circle is useful. Please make sure everything is where it should be. Since Check-Ins, Location Sharing, and Messaging are all exclusive to each Circle, no one who does not need to view a particular piece of information will. You’ve got the upper hand here. You have complete control over who is and isn’t included in your Circle. Privacy is something we take very seriously.
Paying for a Life360 package gives you access to all the Circles. To ensure that everyone in your Circle is able to take advantage of the perks that come with a Life360 Membership, each paid plan for Life360 includes all members in your Circle.
Part 1: What Is Life360 Circle?
Life360 is a family safety service that offers a variety of services. Its primary focus is to enable families to communicate and stay in touch with each other.
For parents who want to monitor their children from a distance, Life360 is a valuable tool. It is a mapping system that allows your family members to know exactly where you or anybody else in the Family Circle, where Life 360 circle is located at any specified instant, regardless of whether they are in your house or elsewhere.
Since the technology was introduced in 2014, we can safely say that it is no longer considered revolutionary. But, aside from that, some people want to know more than simply where they are, such as how fast they’re going when driving.
Part 2: How Life360 Circle Works?
Life360 has been hailed as an essential tool when it comes to parents and careers. With the help of the Life360 Circle function, the mobile application will track your current position in a ring. Those inside that zone may gain insights about where their kid is heading and track any incoming calls or texts from those who may be concerned about their well-being.
As an added feature, the people concerned may determine whether automatic warnings would appear when someone gets to his location without monitoring him further than only displaying where he paused.
The app will notify you as soon as your beloved person comes or departs from a designated place. You may monitor their speed and position as they drive. In addition, the platform makes it simple to give them instructions by just pressing on their image with life360 circle names.
Part 3: What Is The Meaning Of Circle Colors In Life360?
Using the app, you may have observed colorful circles/bubbles. In addition, Life360 tells you about different issues depending on the Circle’s color. The app’s primary colors are purple, orange, and green.
It’s important to know what each color symbolizes before establishing its function. For example, what does the green dot on life360 mean? Members with green rings are more visible. The green dot shows whether driver monitoring is turned on. These also show where everyone in the group is and what they’ve been up to.
The purple Circle shows a Bluetooth-connected gadget. You may check a member’s recent location history using purple dots in the app. For example, to open Day Breakdown, click the purple dots.
The orange Circle denotes a criminal complaint. Instead of a recent crime location, this is a warning that a family member may be in a crime hotspot.
Part 4: What happens when you join a Circle on Life360?
As soon as you’ve set up your Circle, no one else will be on it. Select “Add a New Member” from the drop-down menu at the bottom of the page, and then forward the recipient a text or email with an invitation key. It will provide instructions to help them acquire the app and join your Circle.
After downloading the app, you’ll receive an alert that they have joined your Circle. You’ll be able to monitor their activities from then on.
Part 5: How to Fake Your Circle Location on Life360
Dr.Fone - Virtual Location
1-Click Location Changer for both iOS and Android
- Teleport from one location to another across the world from the comfort of your home.
- With just a few selections on your computer, you can make members of your circle believe you’re anywhere you want.
- Stimulate and imitate movement and set the speed and stops you take along the way.
- Compatible with both iOS and Android systems.
- Work with location-based apps, like Pokemon Go , Snapchat , Instagram , Facebook , etc.
3981454 people have downloaded it
Dr.Fone - Virtual Location is the finest choice for learning how to fool Life360 on iOS (iOS). Changing your iOS location while protecting your privacy is easy with this app.
With simply the push of a button, the Dr.Fone - Virtual Location location switcher software may let you fool others into thinking they are in a different place than you really are. iOS and Android users can get it. A virtual private network (VPN) may also be used for location faking. However, any place will be able to tell whether you’re using a location spoofer since it’s so obvious. That’s why this program has so many special features.
The gadget is entirely safe to use and has a superb record for doing its job well. As a result, you shouldn’t obsess about your performance or your level of achievement. Step-by- Here are the step instructions for faking your location with Dr.Fone – Virtual Location (iOS).
Step 1: Download and install Dr.Fone – Virtual Location on your computer.

Step 2: Now would be an excellent time to take your iPhone and connect it to the pc. Upon successful connection, press the “Get Started” icon.

Step 3: Following that, you’ll see an area map. You’ll be able to know where you are right now if you use this feature. The “Center On” symbol may be found in the bottom right of the screen if the location isn’t appropriately shown.

Step 4: The three life360 symbols at the upper right of the screen are visible. Activating the Teleport Mode requires you to tap on the third icon. Click “Go” when ready to go to your desired location.

Step 5: When you input a new location, the application monitors and assesses it. A new box will immediately emerge at the location where the distance is specified. Choosing “Move Here” will cause your current location to be updated to reflect the new place you’ve picked.

Part 6: How to Delete/Leave a Life360 Circle?
Getting rid of a Circle is a cinch! To begin, you need to:
- Log in as an Admin account and exclude everyone from the Circle.
- After everyone else in the Circle has departed, the person who is now in the center should also exit the Circle.
- It will be removed when nobody remains in the Circle since there is no use in having it otherwise.
Conclusion
Life360 has become one of the most popular applications on the App Store. It’s designed to help people stay connected with friends and family. However, if you’re interested in learning how to fake your location on Life360, we recommend using Dr.Fone - Virtual Location . It’s a more safe and effective way to get around the restrictions that Life360 puts in place.
How To Teleport Your GPS Location On Tecno Spark 10C?
While playing games like Pokemon Go, you are in desperate need of finding more Pokémon. If so, changing your location is a necessity that needs to be figured out. For that, teleporting the GPS location of the Tecno Spark 10C device is the optimal solution. To carry this out, Wondershare Dr.Fone - Virtual Location provides a perfect system for fake locations.
Part 1: Teleport to Anywhere in the World (Teleport Mode)
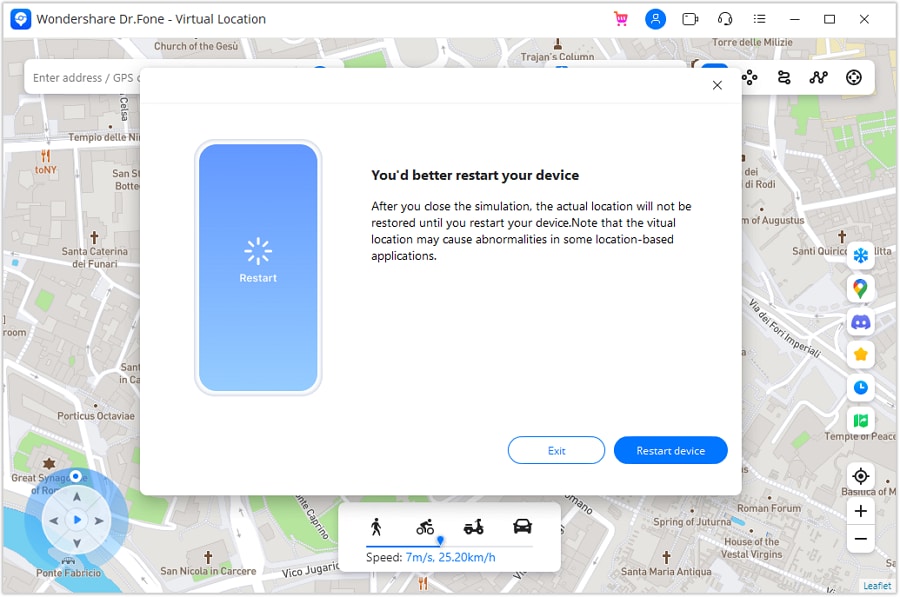
Note: Once you teleport or move to a virtual place, you can restore to the actual location by restarting the Tecno Spark 10C device. You will see a prompt that reminds you to restart your device to restore the location of the connected device when you close the Virtual Location. Click Restart Device and close the program.
* Dr.Fone Mac version still has the old interface, but it does not affect the use of Dr.Fone function, we will update it as soon as possible.
The Teleport Mode offered in Virtual Location is a great way to change the location of iOS/Android devices. If you wish to show a different location to someone else, the best way is to use this mode on Virtual Location. This can be done by following the steps described below:
Step 1Activate Teleport Mode
Once you have connected your smartphone, continue to select the Teleport Mode option from the top-right section. The particular icon is represented by the first icon from the left in that section.
Step 2Add Location To Teleport
After activating Teleport Mode, click the search bar on the top-left to type in the location where you want to shift. After adding the location, hit Enter to proceed.
Note: If you can’t find your current location when searching spots on the map, you can click the Current Virtual Location icon on the right sidebar to show your current virtual location.
Step 3Confirm the Location For Teleporting
You will be directed to the particular, and the map will display it for confirmation. If you are willing to teleport to this specific location, click Move Here.
Step 4Location Successfully Changed On Computer
The location of the smartphone will be instantly changed to the selected location and will be displayed on the map.

Step 5Location Changed On the Smartphone
Open your smartphone and access its maps application. Look into the current location of the Tecno Spark 10C device and verify it to be the same as the changed location on the computer.

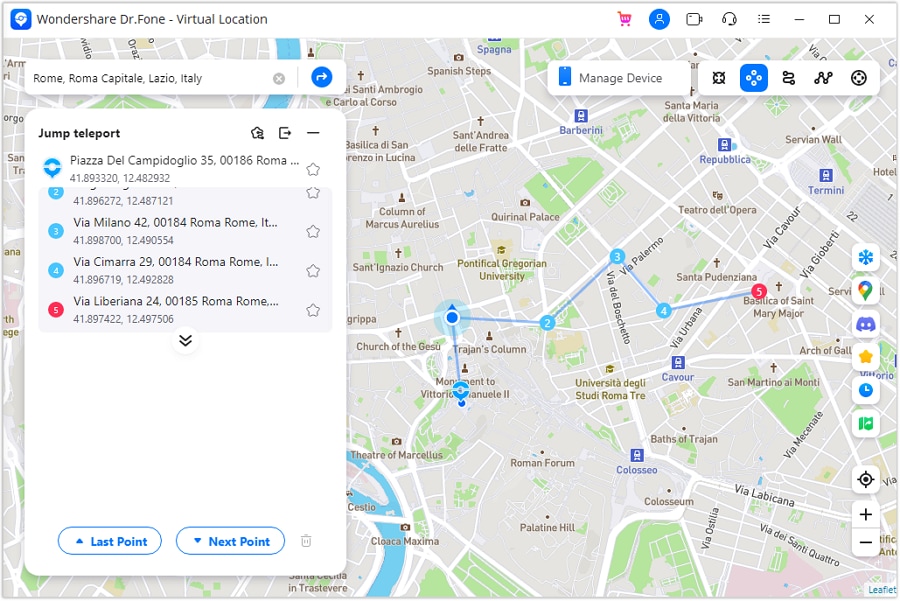
Part 2: Instantaneous Movement Between Multiple Points (Jump Teleport Mode)
Wondershare Dr.Fone - Virtual Location also allows the movement of the smartphone device between multiple places with the Jump Teleport Mode. If you want to make your location spoofing look realistic, the steps below will be beneficial:
Step 1Activate Jump Teleport Mode
You will have to first access the Jump Teleport Mode option from the second icon from the left in the top-right section. This can be done after teleporting the location of the smartphone device.
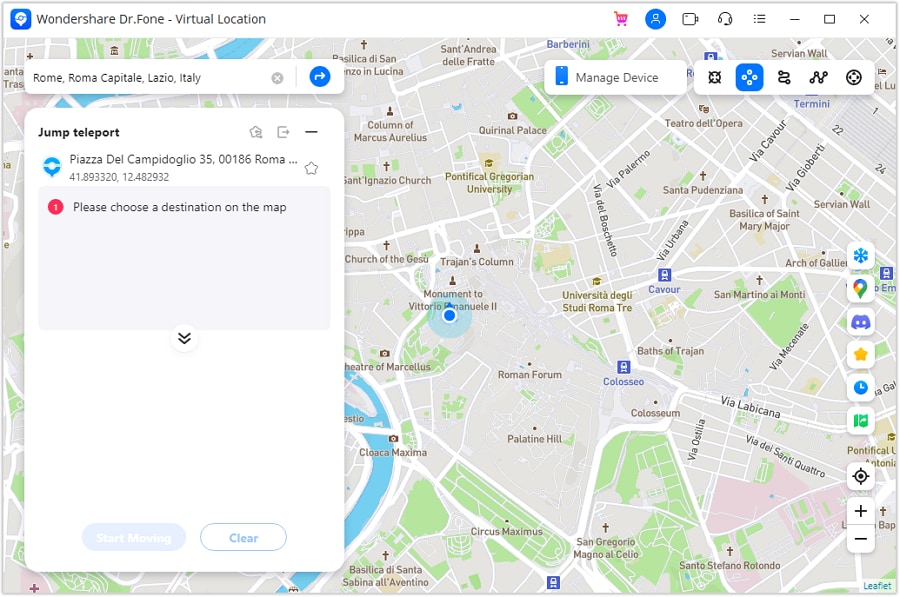
Step 2Set Spots to Jump Teleport
Continue to select the spots you want to pass one by one on the map by simply tapping on them with your mouse. After selecting multiple spots, click the Start Moving button at the bottom of the left panel to start the movement.

Step 3Change Location Between Set Spots
As prescribed, you can propagate amongst the set spots with the Jump Teleport Mode. Use the Next Point and Last Point buttons to shift your location.
How To Simulate GPS Movement With Location Spoofer On Tecno Spark 10C?
When you are playing location-based games like Pokemon Go, you might need to simulate GPS movement to catch more Pokemon. To do this, you can use the GPS movement feature of Wondershare Dr.Fone - Virtual Location . This feature allows you to simulate GPS movement between two or multiple spots on the map. Here’s how you can do it:
Part 1: Simulate Movement Along a Route (One-Stop Route)
You can set up a one-stop route when mocking locations fake with Dr.Fone - Virtual Location. This particular feature helps users to set up looping or round trips within a specific location. To perform the steps for simulating movement, look ahead for a better understanding:
Step 1Access One-Stop Route Function
Once you launch Wondershare Dr.Fone - Virtual Location and connect your smartphone successfully, proceed to select the One-Stop Route function from the top-right section. The function is represented by the third icon from the left in the section. While you have already teleported to another location or are using your current location, you can tap anywhere on the map to set your destination location.

Step 2Define Simulation Parameters
Enter a number to define how many times you want to go back and forth, and select whether you want a Round trip or a Loop trip. Drag the slider on the speed option to set how fast you want to walk. Proceed to click Move Here on the bottom to start the movement simulation.

Step 3Start Simulation Movement
The respective simulation starts, and you can see your position is moving on the map with the speed you set. If you wish to hold the simulation, click Pause or tap Clear to revert to your original state.

Part 2: Simulate Movement Along a Route (Multi-Stop Route)
You can try the multi-stop mode if you want to pass by multiple places along a route on the map. Learn how it is done when you are trying to **spoof location on Android/**iOS:
Step 1Start Multi-Stop Route and Set Parameters
Activate the Multi-Stop Route mode from the top-right section next to the One-Stop Route mode. After activating the mode, set multiple spots on the map by clicking your required place. Define the number of trips and speed. Click Start Moving to initiate the process.
Note: Select the spots along a specific road to prevent the game developer from thinking you are cheating.

Step 2View Multi-Stop Route Movement
As the simulation starts, click Pause at any instance where you want to stop the simulation. You can also Clear all settings if required.

Part 3: Use Joystick for More Flexible GPS Control (Joystick Movement)
Dr.Fone has integrated the joystick feature into the Virtual Location program to spare 90% of the labor for GPS control. You can always find the joystick on the lower left part in teleport mode. And you can also click the joystick button in the upper right (the 5th one) to use the joystick feature.
The joystick, like one-stop route or multi-stop route modes, aims to facilitate GPS movement on the map. But what’s better? The joystick lets you move on the map by changing directions in real time. Here are the two main scenes where you will definitely love the joystick.
- Automatic GPS movement: Click the Start button in the middle, and the automatic movement starts. Then just change the directions as you like by 1) clicking the left or right arrows, 2) dragging the spot around the circle, 3) pressing keys A and D on the keyboard, or 4) pressing keys Left and Right on the keyboard.
- Manual GPS movement: Move forward by constantly clicking the Up arrow in the program and long-pressing the key W or Up on the keyboard. Reverse by constantly clicking the Down arrow, or long-pressing the key S or Down on the keyboard. You can also tweak the directions using the four ways above before moving forward or reverse.
Also read:
- [Updated] Limits of Video Data Storage on Modern Drives - A Closer Look at 64/128GB
- 7 Proven Fixes for When Your iPhone's Auto-Brightness Won't Work
- 投资钓金不需诡计:确保真正的优惠 - U兄解说 | YL数据科学
- Explore The Premier 3D Blu-Ray Systems of Today
- Fixing Issues: Solve the Problem of 'Slime Rancher 2' Crashes on Your PC
- In 2024, 8 Solutions to Fix Find My Friends Location Not Available On Vivo G2 | Dr.fone
- In 2024, How To Change Your SIM PIN Code on Your Infinix Note 30 Phone
- In 2024, Prevent Cross-Site Tracking on Tecno Phantom V Flip and Browser | Dr.fone
- In 2024, Spoofing Life360 How to Do it on Motorola Edge 2023? | Dr.fone
- In 2024, Ultimate Guide to Free PPTP VPN For Beginners On Xiaomi Redmi Note 13 Pro+ 5G | Dr.fone
- In 2024, What are Location Permissions Life360 On Vivo Y36? | Dr.fone
- In 2024, What is Fake GPS Location Pro and Is It Good On Realme Narzo 60x 5G? | Dr.fone
- In 2024, What is Fake GPS Location Pro and Is It Good On Realme Narzo N53? | Dr.fone
- In 2024, Will the iPogo Get You Banned and How to Solve It On Realme V30T | Dr.fone
- In 2024, Wondering the Best Alternative to Hola On Motorola Moto G13? Here Is the Answer | Dr.fone
- Kostenlose Und Schnelle Methode Zum Herunterladen Von YouTube-Videos Auf Einem Mac
- Notable Book Trailers Showcasing Stories for 2024
- Title: In 2024, Life360 Circle Everything You Need to Know On Tecno Spark 10C | Dr.fone
- Author: Nova
- Created at : 2025-01-24 18:44:33
- Updated at : 2025-01-30 23:09:25
- Link: https://phone-solutions.techidaily.com/in-2024-life360-circle-everything-you-need-to-know-on-tecno-spark-10c-drfone-by-drfone-virtual-android/
- License: This work is licensed under CC BY-NC-SA 4.0.