
In 2024, Life360 Circle Everything You Need to Know On Vivo Y200 | Dr.fone
Life360 Circle: Everything You Need to Know On Vivo Y200
In order to keep in touch with the persons that matter most to you, you may use circles to create private groups. There are a lot of different situations in which the Circle is useful. Please make sure everything is where it should be. Since Check-Ins, Location Sharing, and Messaging are all exclusive to each Circle, no one who does not need to view a particular piece of information will. You’ve got the upper hand here. You have complete control over who is and isn’t included in your Circle. Privacy is something we take very seriously.
Paying for a Life360 package gives you access to all the Circles. To ensure that everyone in your Circle is able to take advantage of the perks that come with a Life360 Membership, each paid plan for Life360 includes all members in your Circle.
Part 1: What Is Life360 Circle?
Life360 is a family safety service that offers a variety of services. Its primary focus is to enable families to communicate and stay in touch with each other.
For parents who want to monitor their children from a distance, Life360 is a valuable tool. It is a mapping system that allows your family members to know exactly where you or anybody else in the Family Circle, where Life 360 circle is located at any specified instant, regardless of whether they are in your house or elsewhere.
Since the technology was introduced in 2014, we can safely say that it is no longer considered revolutionary. But, aside from that, some people want to know more than simply where they are, such as how fast they’re going when driving.
Part 2: How Life360 Circle Works?
Life360 has been hailed as an essential tool when it comes to parents and careers. With the help of the Life360 Circle function, the mobile application will track your current position in a ring. Those inside that zone may gain insights about where their kid is heading and track any incoming calls or texts from those who may be concerned about their well-being.
As an added feature, the people concerned may determine whether automatic warnings would appear when someone gets to his location without monitoring him further than only displaying where he paused.
The app will notify you as soon as your beloved person comes or departs from a designated place. You may monitor their speed and position as they drive. In addition, the platform makes it simple to give them instructions by just pressing on their image with life360 circle names.
Part 3: What Is The Meaning Of Circle Colors In Life360?
Using the app, you may have observed colorful circles/bubbles. In addition, Life360 tells you about different issues depending on the Circle’s color. The app’s primary colors are purple, orange, and green.
It’s important to know what each color symbolizes before establishing its function. For example, what does the green dot on life360 mean? Members with green rings are more visible. The green dot shows whether driver monitoring is turned on. These also show where everyone in the group is and what they’ve been up to.
The purple Circle shows a Bluetooth-connected gadget. You may check a member’s recent location history using purple dots in the app. For example, to open Day Breakdown, click the purple dots.
The orange Circle denotes a criminal complaint. Instead of a recent crime location, this is a warning that a family member may be in a crime hotspot.
Part 4: What happens when you join a Circle on Life360?
As soon as you’ve set up your Circle, no one else will be on it. Select “Add a New Member” from the drop-down menu at the bottom of the page, and then forward the recipient a text or email with an invitation key. It will provide instructions to help them acquire the app and join your Circle.
After downloading the app, you’ll receive an alert that they have joined your Circle. You’ll be able to monitor their activities from then on.
Part 5: How to Fake Your Circle Location on Life360
Dr.Fone - Virtual Location
1-Click Location Changer for both iOS and Android
- Teleport from one location to another across the world from the comfort of your home.
- With just a few selections on your computer, you can make members of your circle believe you’re anywhere you want.
- Stimulate and imitate movement and set the speed and stops you take along the way.
- Compatible with both iOS and Android systems.
- Work with location-based apps, like Pokemon Go , Snapchat , Instagram , Facebook , etc.
3981454 people have downloaded it
Dr.Fone - Virtual Location is the finest choice for learning how to fool Life360 on iOS (iOS). Changing your iOS location while protecting your privacy is easy with this app.
With simply the push of a button, the Dr.Fone - Virtual Location location switcher software may let you fool others into thinking they are in a different place than you really are. iOS and Android users can get it. A virtual private network (VPN) may also be used for location faking. However, any place will be able to tell whether you’re using a location spoofer since it’s so obvious. That’s why this program has so many special features.
The gadget is entirely safe to use and has a superb record for doing its job well. As a result, you shouldn’t obsess about your performance or your level of achievement. Step-by- Here are the step instructions for faking your location with Dr.Fone – Virtual Location (iOS).
Step 1: Download and install Dr.Fone – Virtual Location on your computer.

Step 2: Now would be an excellent time to take your iPhone and connect it to the pc. Upon successful connection, press the “Get Started” icon.

Step 3: Following that, you’ll see an area map. You’ll be able to know where you are right now if you use this feature. The “Center On” symbol may be found in the bottom right of the screen if the location isn’t appropriately shown.

Step 4: The three life360 symbols at the upper right of the screen are visible. Activating the Teleport Mode requires you to tap on the third icon. Click “Go” when ready to go to your desired location.

Step 5: When you input a new location, the application monitors and assesses it. A new box will immediately emerge at the location where the distance is specified. Choosing “Move Here” will cause your current location to be updated to reflect the new place you’ve picked.

Part 6: How to Delete/Leave a Life360 Circle?
Getting rid of a Circle is a cinch! To begin, you need to:
- Log in as an Admin account and exclude everyone from the Circle.
- After everyone else in the Circle has departed, the person who is now in the center should also exit the Circle.
- It will be removed when nobody remains in the Circle since there is no use in having it otherwise.
Conclusion
Life360 has become one of the most popular applications on the App Store. It’s designed to help people stay connected with friends and family. However, if you’re interested in learning how to fake your location on Life360, we recommend using Dr.Fone - Virtual Location . It’s a more safe and effective way to get around the restrictions that Life360 puts in place.
5 Hassle-Free Solutions to Fake Location on Find My Friends Of Vivo Y200
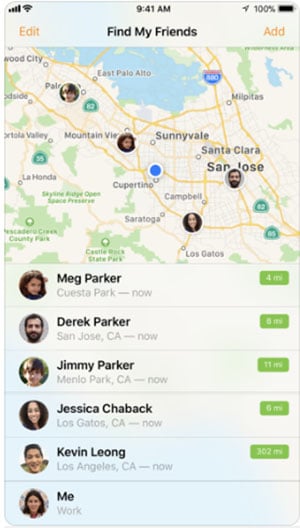
Find My Friends is an app developed for Android and iOS devices. You can say it as a location-sharing application. This app can be used to share the location of each other among the friends. When your contacts install the app on their device, the application makes everyone eligible to share their location with you and you can too share the location with your friends.
It is helpful if you are having a hang out plan with your friends. And if you friend is on the way, he or she can share their location. Or it is a great way to catch if someone is lying about their location.
Part 1: About Find My Friends app
When location sharing is enabled in the Vivo Y200 device, the map will show the current locations. The Find My Friends app also has an inbuilt chat option where you can contact your friend and interact about with them. It also automatically informs you when your friend reaches at the target location, leave a location etc. You can customize and configure the alerts as per your choice.
How it is different in iOS 13
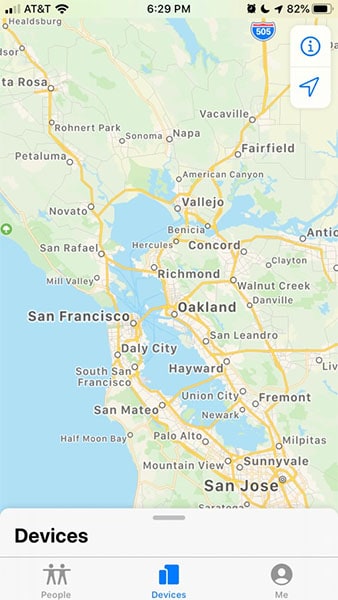
You can find yourself confused if you are using iOS 13 and looking for Find My Friends app. You may not be able to find it on your device running on iOS 13. To your information, Apple has decided to combine the Find My iPhone and Find My Friends app into one. And they have named it as “Find My”. This new named app has everything what Find My Friends and Find My iPhone has. When you’ll open it, you will find the “People” tab on the bottom. Using this, you can get your friends as you used to get before.
Part 2: What Are the Against Voices of the Find My Friends App?
Look at some of the things we feel not beneficial about Find My Friends.
- No doubt you can have great advantage of an app that can tell you location of your friends, fiancée or spouse. However, the app is not free. You need to pay a small amount of 99 cents to use this.
- Another thing that might bother you is that there are a lot of people who will be knowing where you exactly are. And this could be a little annoying.
- Also, it is possible to get unnecessary requests from the unknown people. This can also be bothersome.
- Apart from this, the app if in wrong hands like an abuser can be used for wrong purposes and harmful for their partners.
- Not to forget, hackers are everywhere and the app is prone to get accessed by any of them.
In such cases, the need of hiding or faking Find My Friends location rises. This is because we are sharing some ways to fake location on Find My Friends on your iOS and Android.
Part 3: 4 Solutions to Fake Find My Friends Location on iOS
We know how important it is to trick your device deceiving with the location. You might be curious now to learn the methods that can meet the objective of yours. Let us begin with the section that introduces you four ways to fake Find My Friends location.
3.1 Use virtual location tool to fake Find My Friends location on iOS
One of the useful ways to learn faking location on Find My Friends is using a professional tool like dr.fone – Virtual Location (iOS) . This tool helps you to teleport your iOS device’s GPS anywhere. Also, with this, you can get your speed of movement customized easily. It is one of the trusted tools you can use. Here are the steps to be followed to fake location on Find My Friends.
Step 1: Follow the Installation Process
From the main page of dr.fone – Virtual Location (iOS), download it. After this, install the tool on your system and then launch it. Now, click on “Virtual Location” option.
Step 2: Set up Phone’s Connection
Now, take your iPhone and keep it connected with the system. After this is done, click on the “Get Started” button to move ahead.
Step 3: Look for Location
After following the second step, all you need is to look for your actual location. To make this happen, click on the “Center On” icon given at lower right of screen.
Step 4: Enable Teleport Mode
In this step, you should activate the teleport mode. This will be done by clicking the third icon in the upper right of the screen. You can now input the place you want to teleport.
Step 5: Fake Find My Friends Location
Now, the program will get your location and click on “Move Here” that comes in the next dialog box. The location will be changed now. You can see that in your iPhone and its location-based app.
3.2 Use a burner iPhone to fake location in Find My Friends
Using a burner can also be a good option to take help of when your goal is to fake GPS on Find My Friends. It is nothing but a secondary device where the Find My Friends app can be downloaded and used it to swindle the people you want. This will allow you to keep more privacy as no one will be able to peep into your matter or location.
- All you need is to log out of Find My Friends app on your main phone.
- Install the app on your burner phone and log in it with the same account as your iPhone.
- That is it! You can now plainly leave your burner phone on the location you want. In other words, you can create your own story. Simply put the Vivo Y200 device where you want the others to think about your visit.
In spite of the fact that this way is helpful, there could be some shortcomings associated with it. Firstly, your friend might try to connect with your through Find My Friends app’s chat feature. And since you have kept your burner device somewhere else and you don’t have it right now, you can miss the chat. This may make your friends a little doubtful.
Secondly, it could be perplexed and draining at the same time to keep checking that the entire settings are accurately set up.
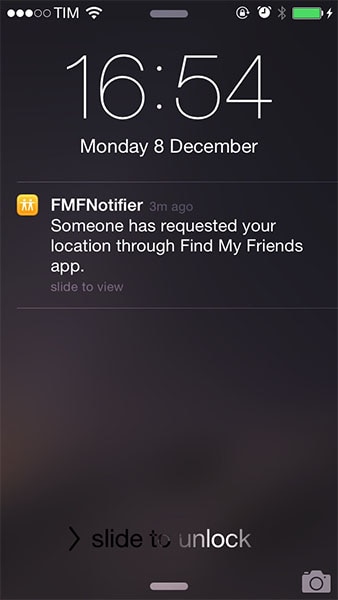
3.3 Use FMFNotifier to help you on Find My Friends
If still you wonder how to fake your location on Find My Friends, FMFNotifier can help you. Before you use this, let us inform you that this application can run on a jailbroken iPhone. So, if you have a device that is old and you don’t mind jailbreaking it, you are good to go with this app to fake Find My Friends location. Moreover, you will need Cydia to get this app. Cydia can be said as the App Store alternative. It is a platform for installation of software or apps on jailbroken iOS devices. The apps that are not authorized by Apple can be found on Cydia’s package manager.
If you have done jailbreaking, you can have FMFNotifier. Jailbreaking will be worthy as FMFNotifier contains many great features.
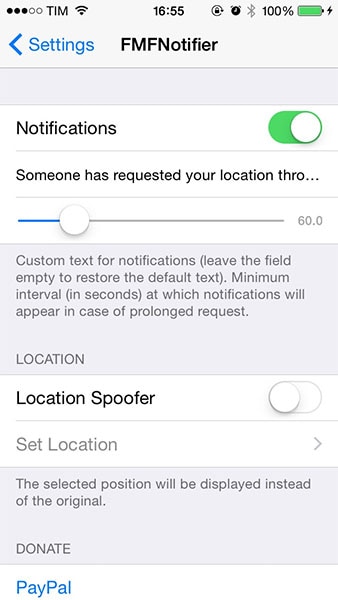
- One of the amazing things about this app to fake Find My Friends location is it sends you the notification each time when someone want to track your location. Whenever your friend attempts to ping your location, it will notify you as “Someone has requested your location through Find My Friends app”. And this is the moment where you can fake your location on Find My Friends. You can right away set a fake location when you know someone requires your location.
- Secondly, you can do configurations from the Settings app easily. Like, you can customize the text of the notification. Besides, the app allows you to set and save several false locations preset.
Guide on How to Use FMFNotifier
Step 1: Firstly, open Cydia and go to Sources.
Step 2: Look for FMFNotifier package which can be available on BigBoss repo.
Step 3: Lastly, install the package. Now, you can go to “Settings” on your device. Go to FMFNotifier and configure the settings as you want to fake location on Find My Friends.
3.4 Use AntiTracker to protect your location privacy
When privacy is everything for you, you cannot tolerate anyone peeping into your life, especially your location. Find My Friends lets people doing that. You can take help of AntiTracker which is another jailbreak tweak. With this, you will be helped by faking location on Find My Friends. Like the above app, this will also notify you when someone is going to know your location through Find My Friends.
You will get the notification no matter your screen is locked or not. A notification that is “You’re being tracked” along with the Find My Friends icon will appear when someone tries to track you.
![]()
Guide on How to Use AntiTracker
Step 1: It is available free on Cydia’s Bigboss repo to download. S, go to CYdia and look for AntiTracker.
Step 2: Download the package and the app icon will be added on your Home screen of iPhone. You can now configure the tweak from Settings. The settings allow you to:
- Turn on and off tweak whenever you want
- Hide the location
- Select the sound that will play when the notification comes
- Select the message to be appeared in notification
- Have a look on the location request logs i.e. each time when the location is pinged
![]()
Part 4: How to Fake Find My Friends location on Android
If you want to fake Find My Friends location on Android, you can easily configure Android devices to do it. For this, you can take help of an Android spoofer app. There are plenty of them available in Play Store. We will be using “Fake GPS GO Location Spoofer Free”. This is how to fake location on Find My Friends on Android.
Step 1: To use this, you don’t need to jailbreak or root your device until your Android is running on 6 and higher versions.
Step 2: Go to Play Store and search for the app. Install it after downloading.
When you install it rightly, this is how to do a little twisting to set it up with Find My Friends.
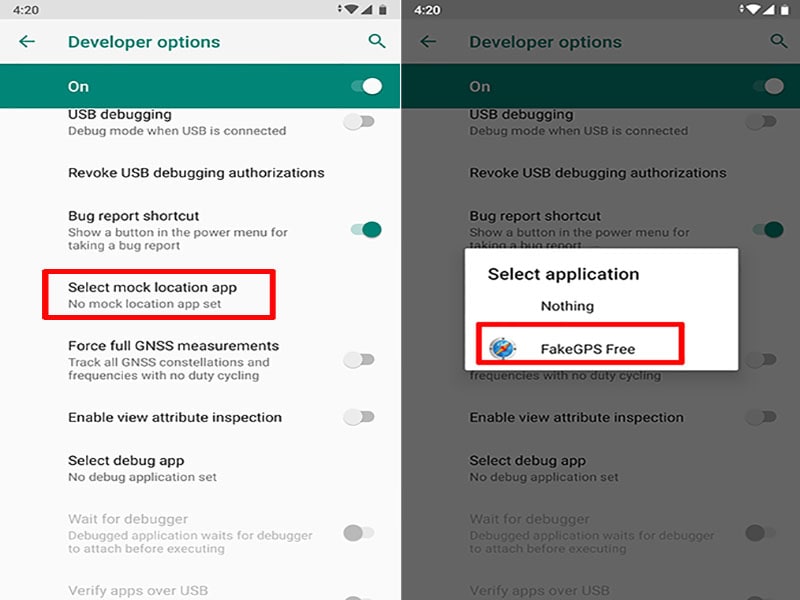
Step 1: To spoof people about the location, enable the developer settings in the first place. Simply head to “Settings” for this and go to “About Phone”.
Step 2: In the “Software Info”, you will see a build number. Tap on it nearly 6-7 times. The Developers options will be enabled now. This step is important because it will alter the security settings in your phone. As a result, tricking about the location will become easier.
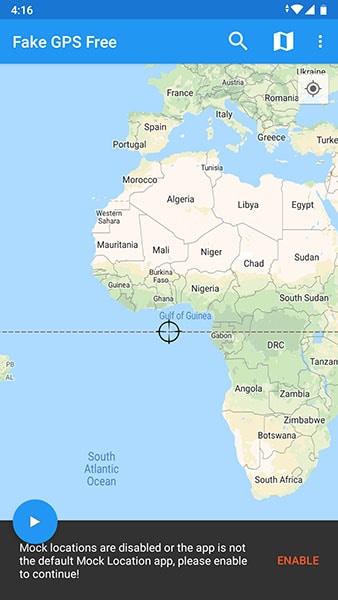
Step 3: When developer options are enabled, launch the app. You will see an “ENABLE” option at the bottom. Tap on it to turn on mock locations feature.
Step 4: Under the Developer options page, click on “Select mock location app”. Now, select “FakeGPS Free” from the list.
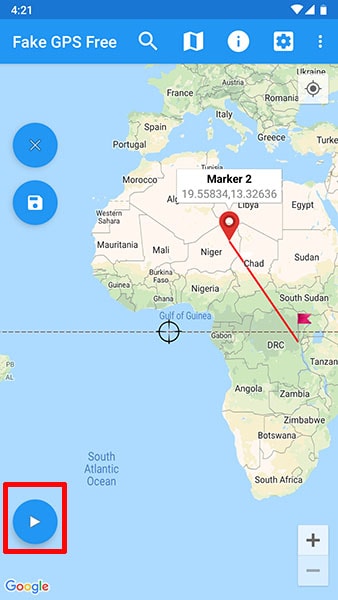
Step 5: Return to Fake GPS Free and long press the two spots on map to set the route. Take help of the play button given at the bottom. This will enable the location spoofing. You will see, “Fake location engaged…”. This will show your fake location on Find My Friends app.
How to Change Google Play Location On Vivo Y200
Google Account has unlimited advantages as it provides quick access to multiple platforms like Google Drive, Google Calendar, and Google Play Store. By accessing these platforms, users can increase their functionality to ease their daily tasks. For example, Google Play Store offers tons of apps and tools in every category that millions of people install on their devices.
However, some featured apps on the Play Store are restricted region-wise, and some users cannot download them. This article will guide you on how to change the country in Play Store to access all the apps.
Part 1: What Should We Know Before Changing Google Account Location?
By changing the country on Google Play Store, you can install some unavailable apps in your region. You can quickly enjoy the applications and services on your phone by simply changing the country’s location. Before knowing how to change location on Google, you should know some essential aspects.
Warnings About Changing your Location
- Often, users are deprived of some services and features apps if they are not available in the newly chosen region.
- Changing the Google Play Store location is easy, but you can only change the settings once a year. This depicts that you can change the location settings of your Google Account after 365 days.
- After changing the country’s location, you won’t be able to utilize the previous Google Play balance of the old country.
- Once you have changed your country’s server location in settings, the Google Play Store takes 48 hours to change the location.
Part 2: How to Change Google Account Location?
This section will offer easy ways to change play store country and location on Google in every circumstance. By doing so, you can easily install restricted applications in your region.
How to Change Location on Google on Android
Situation 1: How to Change Country in Google Play Store on Android
Through your Vivo Y200s, you can change the location on both Google Play Store and Google Account easily. To know more details about how to change the country in Google Play Store, read the following guidelines:
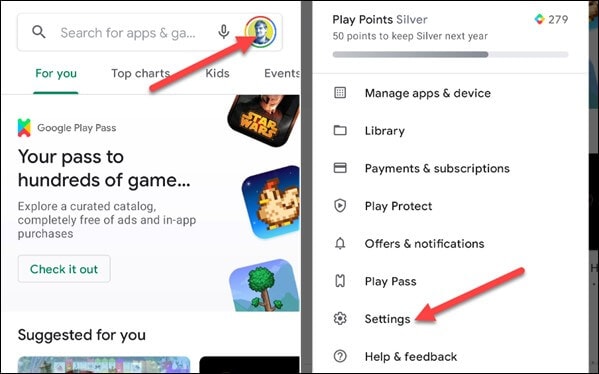
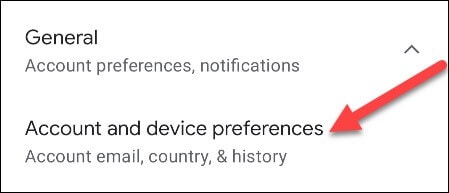
Step 1: Open your Google Play Store from your Vivo Y200. Navigate to the profile icon from the corner and select “Settings” from the displayed menu.
Step 2: Tap on the “General” section to locate the option of “Account and Device Preferences.” Afterward, find the “Country and Profiles” option by scrolling down. From there, you can see your current country location.
Step 3: Now click on “Switch to the Country Play Store” to change the location. For verification, click on “Continue” when a pop-up message appears on your screen asking if you want to change the location.

Step 4: Now, you will be automatically assisted in changing the payment methods of the new country. However, if you don’t come across the option to change the country, either you have already changed the country location within a year or your IP address is not synchronized with your new country.
Situation 2: How to Change Google Account Location on Android
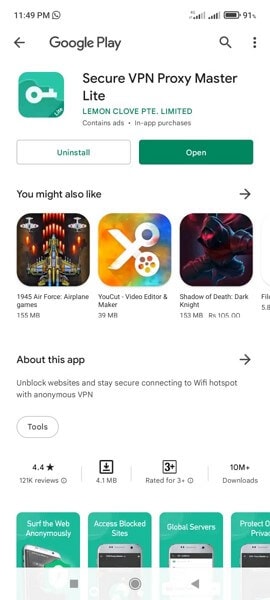
In this particular situation, you don’t have to change the Play Store country; instead, you can only change the Google location on your Vivo Y200. We will recommend the VPN Proxy Master Lite , which works effortlessly to change Google‘s location. This tool flawlessly hides your IP address so that you can easily use any country’s location to access all the applications and services. Moreover, it’s highly secured and well-protected so that no virus can harm your Vivo Y200.
To use this powerful VPN tool, we have jotted down some basic steps through which you can change the location on your phone easily:
Step 1: Start installing VPN Proxy Master Lite on your Vivo Y200 from your Google Play Store. Once this app is successfully installed, open this app to proceed.
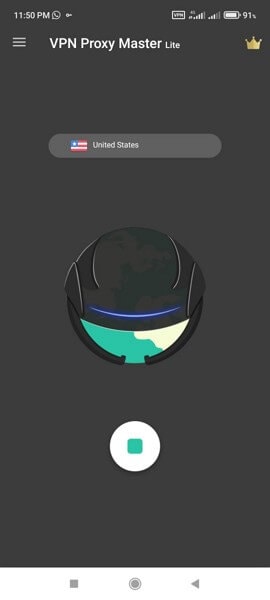
Step 2: After opening this app, tap on the country’s name list displayed above the picture of Earth. Tap on that list to view all the available countries.

Step 3: Select any country from the displayed list by tapping on it. Meanwhile, make sure that your phone is connected to a strong internet connection. This tool will automatically change your Google location by tapping on the country’s name.
How to Change Location on Computer
Situation 1: How to Change Country in Google Play Store on Computer
In this situation, we will help you change the country’s location on your Google Play Store through your computer. Just follow the below-given steps.
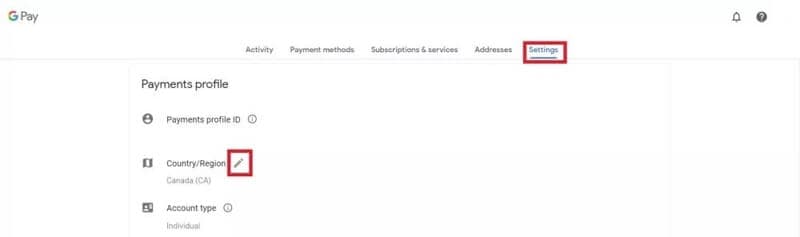
Step 1: Start by navigating to your PC’s browser and then open Google Play . Once done, click on the “Settings” displayed on top of your screen.
Step 2: After opening the settings menu, go to “Payments and Profile” and locate the option of “Country/Region.” Proceed by tapping the edit icon next to it.
Step 3: To connect with the new country’s location, tap on the option “Create a new profile.” Afterward, you can see the on-screen instructions on your computer, so follow them to complete the process. Once done, Google Play will change the location after 48 hours, and you can search for the applications you want to install.

Situation 2: How to Change Google Account Location on Computer
If you want to change Google location on your computer without changing country on Google Play Store, use ExpressVPN by downloading it. This tool is a well-trusted platform and offers an instant way to change Google location easily. In addition, you can rely on its platform to connect with more than 94 countries worldwide by changing the location anytime you want.
Moreover, the process is fast and fully secured to protect your computer from unwanted bugs. To change the location using ExpressVPN, the steps are:
Step 1: Begin launching ExpressVPN on your computer and open its interface. Once done, turn on the VPN button and tap on the “Location Bar” to change the location.
Step 2: You can explore regions by either navigating to the “Recommended” or “All Locations” tab. Select the location you want to change with from the displayed list.
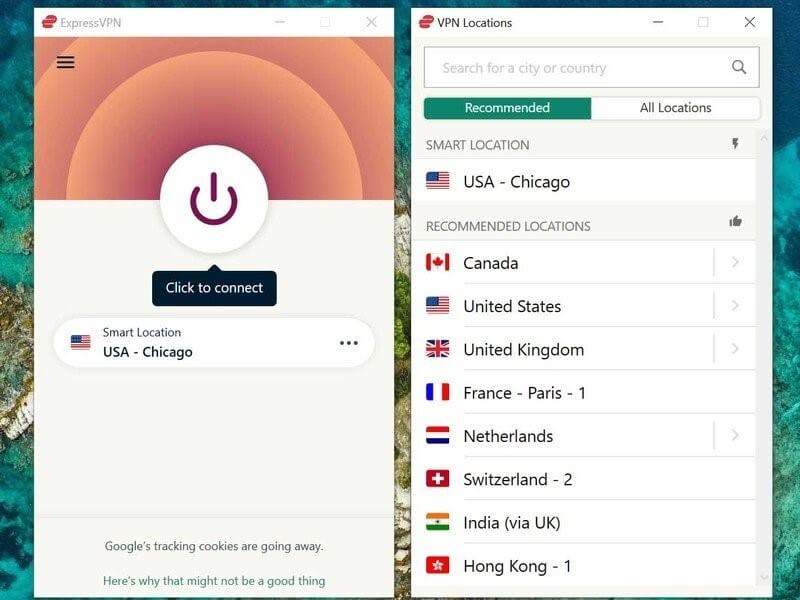
Step 3: After clicking on any country’s location, your computer’s Google Account location will be automatically changed.
Part 3: The Most Effective Way to Fake Location on iOS and Android
We have mentioned methods to change Play Store country manually and through VPN, but they still have a few limitations. Once you change the country’s location on Google Play manually, the Play Store requires 48 hours to accept this modification. Moreover, you can only change the country’s server location once a year. With VPN, many country servers are unreachable, and some servers can be reached only through a paid version. This makes the process expensive and time taking.
To avoid these hurdles and chaos, we recommend you to use Dr.Fone – Virtual Location to fake your location on both Android and iOS devices. This tool works in every situation and allows users to travel the globe through their phones free of cost. You can also travel with an exact GPS location just with a single click. Hence, this tool will work amazingly in faking your location without requiring you to change Google Play country’s location.
Dr.Fone - Virtual Location
1-Click Location Changer for both iOS and Android
- Teleport from one location to another across the world from the comfort of your home.
- Fake location on your phone with a few clicks.
- Support most mainstreaming apps and geo-based games, including Pokemon Go, Snapchat, Tinder, and so on.
- Compatible with both iOS and Android systems.
3981454 people have downloaded it
To change country Google Play using Dr.Fone - Virtual Location, here are the steps:
Step 1: Choose Virtual Location Feature
Begin with launching the tool of Dr.Fone on your computer. Open its interface and tap on the “Virtual Location” option from the home page.
Step 2: Connect your Phone
Now connect your smartphone to the phone with the help of a USB cable. Once done, click on “Get Started” to proceed further.
Step 3: Find your Current Location
After connecting your phone, you will be able to see your current location on the new window. If not, tap on the “Center On” icon displayed on the right side to find your current location.
Step 4: Enable Teleport Mode
Tap on the first icon displayed on the top right to enable the teleport mode. Now enter the location you want to navigate the search box and click on “Go” to continue.
Step 5: Change Location
A notification will pop up for confirmation once you have entered a new location. Tap on “Move here” to proceed. Once done, your new location will be set on your smartphone automatically. Now head back to Google Play Store and search for the applications you want to access.
 safe & secure
Conclusion
There are plenty of ways to execute Google One change location across various platforms to execute Google One change location. For example, people usually change Play Store country to access restricted applications in their region. This article will offer a detailed guide for changing Google location through manual and VPN means. However, to avoid any hassle, we recommend Dr.Fone - Virtual Location to change the location of your smartphone and Google Play instantly and conveniently.
Also read:
- [New] In 2024, Add Meaning with Texts The Ultimate TikTok Guide
- [New] The Future of Content Navigating Video Landscapes on FB
- [Updated] 2024 Approved Open Source Templates Galore Boosting Your Biz Presentations
- 2024 Approved DynamicVidXP Reviews and Rating
- 2024 Approved Top Picks for Kids & First-Time Fliers Easy Drone Models
- Duwelijksbevalling: Twee Wegenslagen Voor Het Uitmaken Van Overschrijdelijke Daten Aan Exterieure Hardware
- Guide 2024 : Sélectionner Les Meilleurs GPU Pour Votre Projet De Montage Vidéo - Top 6 Recommandations
- In 2024, Dose Life360 Notify Me When Someone Checks My Location On Samsung Galaxy S21 FE 5G (2023)? | Dr.fone
- In 2024, Read This Guide to Find a Reliable Alternative to Fake GPS On OnePlus Nord CE 3 Lite 5G | Dr.fone
- In 2024, Read This Guide to Find a Reliable Alternative to Fake GPS On Realme C67 5G | Dr.fone
- In 2024, Spoofing Life360 How to Do it on Poco M6 Pro 4G? | Dr.fone
- In 2024, The Best 8 VPN Hardware Devices Reviewed On Motorola Moto E13 | Dr.fone
- In 2024, Thinking About Changing Your Netflix Region Without a VPN On Nokia C02? | Dr.fone
- In 2024, Ultimate Guide to Free PPTP VPN For Beginners On Samsung Galaxy A24 | Dr.fone
- The Faux Fabric of Fiction: Spotting AI-Spun Stories
- Title: In 2024, Life360 Circle Everything You Need to Know On Vivo Y200 | Dr.fone
- Author: Nova
- Created at : 2025-01-25 18:02:42
- Updated at : 2025-01-31 00:39:57
- Link: https://phone-solutions.techidaily.com/in-2024-life360-circle-everything-you-need-to-know-on-vivo-y200-drfone-by-drfone-virtual-android/
- License: This work is licensed under CC BY-NC-SA 4.0.