
In 2024, Will the iPogo Get You Banned and How to Solve It On Poco F5 5G | Dr.fone
Will the iPogo Get You Banned and How to Solve It On Poco F5 5G
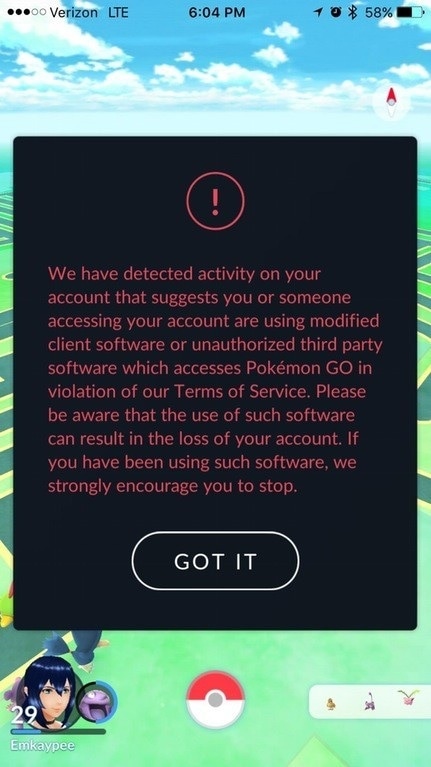
Pokemon Go has graced one of the most popular mobile games right from the day it was launched. It requires players to move around one place to the other in reality to capture Pokémon. But if you don’t want to go out of his way and search for Pokémon then iPogo is a tool for you. It is a location spoofer that can change the location of your device. It allows you to move from one place to another with just one-tap. As it is a cheat tool, you might want to know can iPogo get you banned? There are chances of getting an iPogo ban, but they are relatively high depending on how you use the tool.
Part 1: How does the iPogo work for pokemon
iPogo comes with tons of add-on features that can be used to boost your Pokémon collection 10 folds. But it does that by breaking many rules and regulations created by Niantic. Here are some features of iPogo for Pokemon Go that are not by the books:
- Play from anywhere, anytime:
iPogo allows users to play Pokemon go anytime from anywhere in the world. All you will require is a decent internet connection, and you are good to go. And this is something that Niantic strongly opposes.
- Spoofing:
Niantic has arranged several ban waves once a week for players who were found cheating. The humorous thing to note here is that most of such players were caught spoofing. And this app lets you do exactly that. This also had a stimulating effect on the iPogo ban rates.
- It works like a Go-Plus
This app works like a virtual go-plus, enabling your device to change its location via switching servers. But that doesn’t assure any safety from the likes of Niantic.
- Third-party software
This app also works as a third-party software as it runs in the background while you are playing the game. Sometimes Niantic can detect that as well, and you might have to face an iPogo ban.
Part 2: What’s the rate of iPogo ban

Players mostly use iPogo for location spoofing, which is very common in Pokémon go. Niantic releases various patch notes to stop players from spoofing and catch those who are doing it. In Pokémon Go players, are banned on a 3-Strike basis.
If you are using iPogo as a location spoofer, kindly note that it is perilous to do that. If you receive the 1st strike as an iPogo ban, I strongly suggest you never use iPogo again because Niantic will keep a close watch on you. So if your question is, can iPogo get me banned? Then yes, it definitely can.
Part 3: How to avoid getting banned by Pokemon Go while using a fake GPS tool?
Using a fake GPS tool in Pokemon Go is against the game’s terms of service and can result in a ban. However, if you want to avoid getting banned, here are some tips to help you avoid getting banned while faking Pokemon Go GPS :
Avoid suspicious behavior: Niantic monitors player activities for any unusual or suspicious behavior. Avoid sudden changes in your location, and jumping between distant places within a short period, as these actions can raise red flags and increase the risk of a ban.
Be aware of detection methods: Niantic employs various detection methods to identify players who are using fake GPS tools or engaging in spoofing activities. These methods can include analyzing movement patterns, comparing location data with known landmarks, or detecting inconsistencies in player behavior. It’s important to understand that detection methods can evolve, and it’s difficult to completely avoid detection.
Stay informed: Keep yourself updated with Pokémon Go’s terms of service and any changes or announcements made by Niantic. They may introduce new measures to combat cheating, and being aware of these updates can help you avoid unintentional violations.
Use a trusted tool: When using a fake GPS tool for Pokémon Go, it is crucial to choose a reliable and trusted app. Avoid using any random or unverified GPS spoofing apps. There is a reliable is recommended in the following part. Read on!
Part 4: Better safe tool to iPogo?
We have provided many answers to your question, “Can iPogo get you banned?”. But we know knowing it can get you banned is not enough. Because many players don’t even know which tool they should use, that will not lead to a ban. Don’t grieve, we are here to help with a brilliant virtual location changer for iOS, which is “Dr.Fone - Virtual Location (iOS/Android) .”
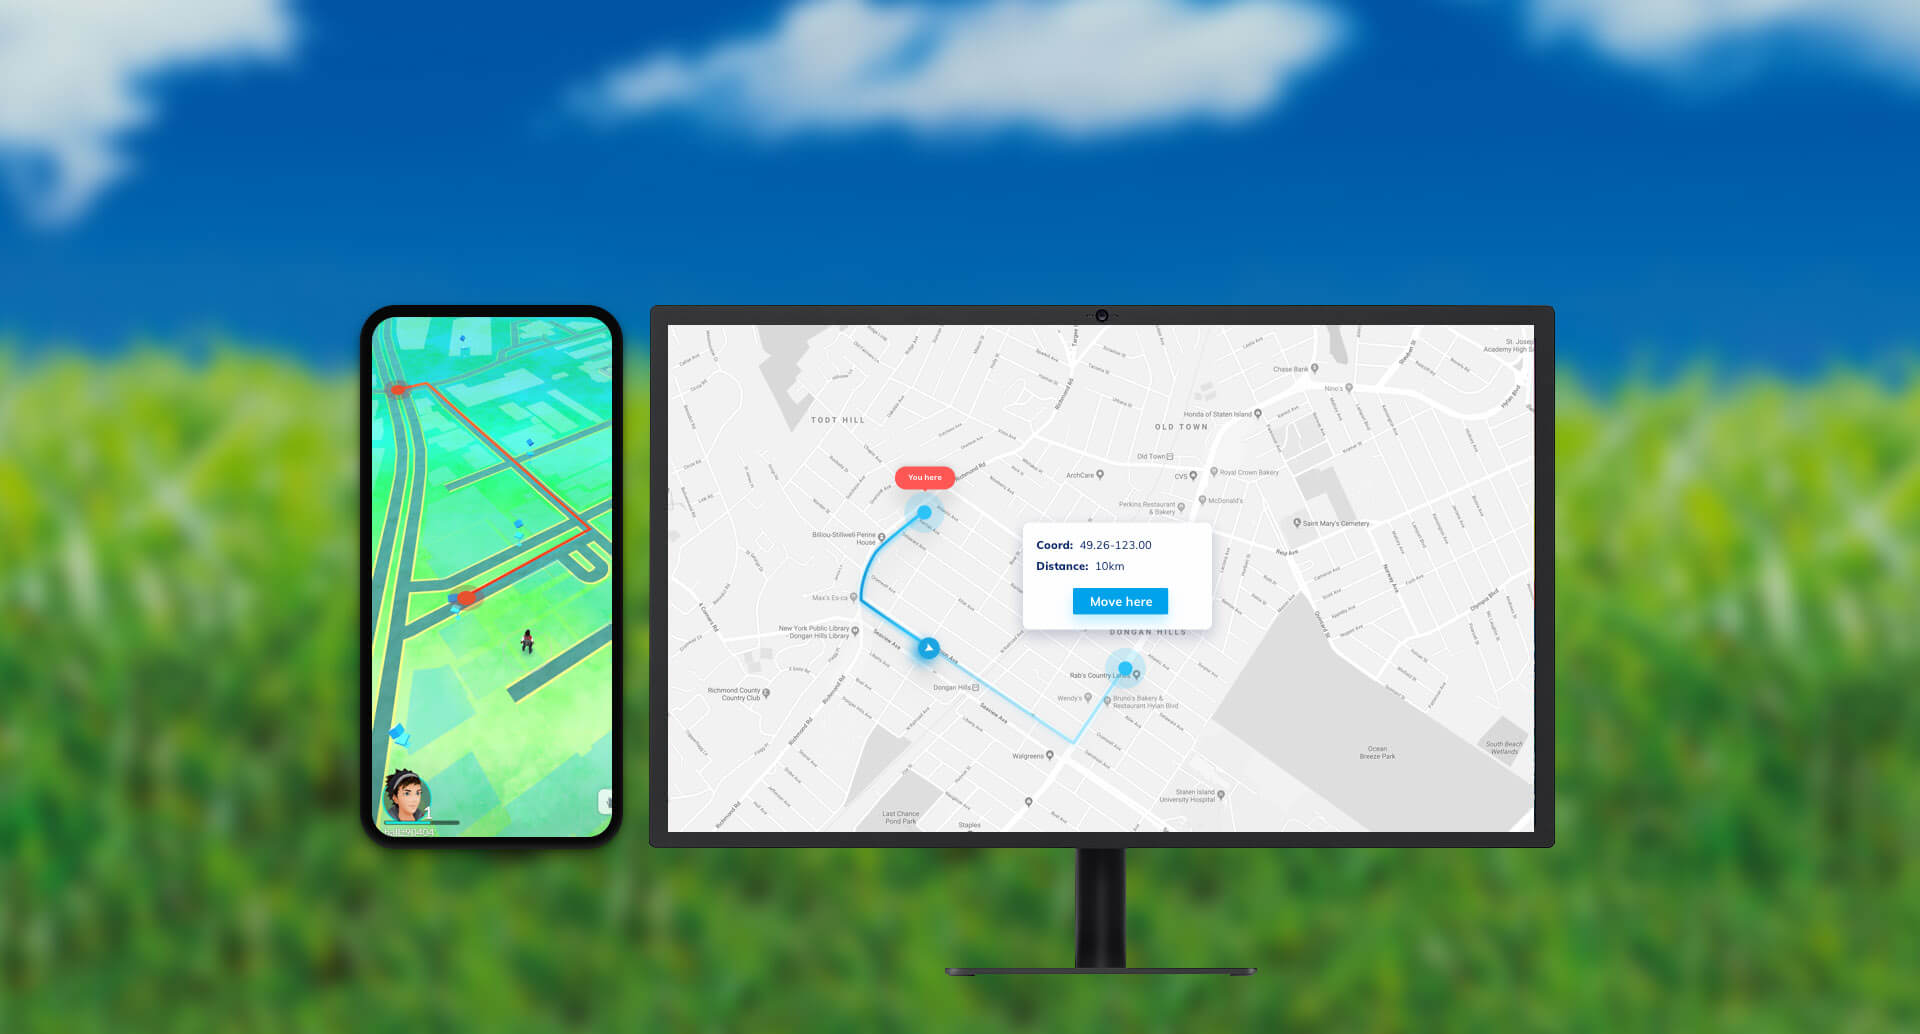
Using this tool, you can change the location of your iPhone with just one click. You can use it to trick Niantic or any other location-based app. This app uses a virtual GPS location that makes every location-based app think that you have moved from one place to another. That is not all; you even set the speed of mocking location.
Confusing? Let us clarify, so every location spoofer provides static location change, which means you will instantly pop-up at the place you chose. But, with Dr. Fone, you can choose between walking, cycling, or driving to that particular spot. This is a perfect option to make the game think you are moving at a normal speed.
This app offers many other features like Joystick & keyboard control, easy location changing, etc. This will also save you from avoiding the iPogo ban. You can use this tool with other apps as well. Below are some amazing uses of Dr. Fone Location Changer.
- You can use it to change location on dating apps or other location-based apps.
- WhatsApp location spoofing is also supported.
- Change GPS and play Pokemon Go without going out.
- Easy to use GPS fake, which can teleport you anywhere you want.
- It simulates a more authentic gaming experience with the help of realistic mode, fluctuation mode, and cooldown timer feature, decreasing the risk of detection.
Step-by-step guide for using Wondershare Dr. Fone to Teleport Anywhere
Dr. Fone’s virtual location is the best spoofing tool that you can use for playing Pokemon Go. It can quickly teleport your Pokemon trainer from one place to another. Below is a step-by-step guide you follow to perform that:
Step 1: Get the Program Installed and Launched
Download and install the tool on your computer. Once the installation is successful, run the program. From the option available click on “Virtual Location”.

Step 2: Connect iPhone to PC
Wait for a few seconds; in the meantime, connect your iPhone to the computer using the original lightening cord. Once it’s connected, click on “Get Started.”

Step 3: Check the Location
A new window will pop-up where you will see your current location. If the location is not accurate, click on “Center On” present in the lower-right corner.

Step 4: Activate Teleport Mode
Now click on the 1st icon on the upper right corner, which will enable you to teleport. After that, you will be compelled to enter the name of the location you want to move to.

Step 5: Confirm the Location
Confirm the exact location on the pop-up that appears now and click on “Move here.”

Step 6: Check Location on the deivce
After this, you have successfully changed your location. You can cross-check this by pressing the “Center on” icon.

To be certain, you can also check the location on your iPhone. Just open maps on your device, and you will see your selected location.

Conclusion
Can iPogo get you banned? Yes, it can, and it eventually will. It would help if you understood why can iPogo get you banned and why you should not use that application for location spoofing. We also provided you with a perfect solution to avoid iPogo ban using Wondershare’s Dr.Fone - Virtual Location . We also provided a step-by-step guide to use Dr. Fone for teleporting and changing your iPhone’s GPS location. That was all for this article; if you have any queries related to this article, you can comment below. We will make sure you get the necessary assistance for the same.
How to Watch Hulu Outside US On Poco F5 5G
With over 40 million subscribers, Hulu is among the most widely used streaming platform having an impressive collection of films, TV series, and content from popular platforms like NBC, CBS, ABC, and more. The huge content list of Hulu is served only available for the US and this can be disappointing for the people residing in other countries or for the ones who are traveling outside the US.
But with the advancement of technology, there is a way out for everything and Hulu streaming outside the US is not an exception. So, if you are not in the US and wish to have access to the extensive library of Hulu from anywhere in the world, there are ways you can trick Hulu to change its location to the US.
So, if you too are keen to try to change your location for tricking Hulu, we have drafted a detailed guide for the same. Keep reading!
Part 1: The Three Most Popular VPN providers to fake Hulu Location
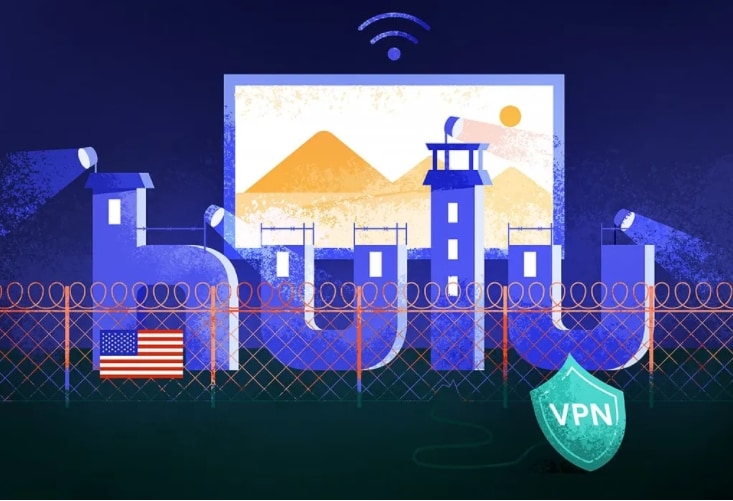
The local Internet Service Provider provides an IP address by which Hulu identifies and tracks your location. So, if a VPN can be used to get an IP address of the US by connecting it to an American Server that will trick Hulu, and the platform will identify your location within the US and will provide access to all its content library.
So, to change the location, you would need a strong VPN provider, and below we have shortlisted the best ones.
1. ExpressVPN
This is one of the most popularly used VPNs with support to an array of features including the option to change the location for accessing Hulu.

Key features
- Provides more than 300 American Servers with unlimited bandwidth to access Hulu from anywhere in the world.
- Enjoy HD content without any issues of buffering.
- Streaming supported overall major devices like iOS, Android, PC, Mac, and Linux.
- Hulu content can also be enjoyed on SmartTV, Apple TV, gaming consoles, and Roku as the VPN support DNS MediaStreamer.
- Allows using 5 devices on a single account.
- Support 24X 7 live chat assists.
- 30-days money-back guarantee.
Pros
- Fast speed
- In-built DNS and IPv6 leak protection
- Smart DNS tool
- 14 US cities and 3 Japanese location severs
Cons
- More expensive than other VPN providers
2. Surfshark
It is another top-ranking VPN that can let you access Hulu and is compatible with almost all popular streaming devices.

Key Features
- The VPN has more than 3200 servers across the globe with over 500 in the US.
- Unlimited devices can be connected to a single account.
- All streaming devices are compatible.
- Allows tricking location for various streaming services including Hulu, BBC Player, Netflix, and more.
- Offer high-speed connection along with unlimited bandwidth.
- Support 24/4 live chat.
Pros
- Affordable price tag
- Safe & private connection
- Smooth user experience
Cons
- Weak social media connection
- New to industry, unstable for sometime
3. NordVPN
Using this popular VPN, Hulu and other streaming sites can be easily accessed without any issues of privacy, security, malware, or ads.

Key Features
- Offers more than 1900 US servers for blocking Hulu and other sites.
- SmartPlay DNS allows streaming Hulu content over Android, iOS, SmartTV, Roku, and other devices.
- Allows connecting 6 devices on a single account.
- Offers 30-day money-back guarantee.
- HD quality streaming.
Pros
- Affordable price tag
- Useful Smart DNS feature
- IP and DNS leak protection
Cons
- Speed Slower than ExpressVPN
- Only one Japan server location
- Unable to pay by PayPal
How to change Hulu Location via Using VPNs
Above we have listed the top VPN providers that can be used for changing Hulu locations. In the majority of the cases, the following guidelines will help you take a VPN to change Hulu location, the basic steps for the process are listed below.
- Step 1. First of all, subscribe to a VPN provider.
- Step 2. Next, download the VPN app on the Poco F5 5G device that you will be using to watch the Hulu content.
- Step 3. Open the app and then connect with the US server that will trick the location of Hulu.
- Step 4. Finally, go to the Hulu app and start streaming the content of your choice.
Note:
If you are looking for a tool that can let you spoof your GPS location on your iOS and Android devices, Dr.Fone - Virtual Location by Wondershare is the best software. Using this tool, you can easily teleport to any place in the world and that too without any complicated technical steps. With Dr.Fone - Virtual Location, you can trick and set any fake location for your Facebook, Instagram, and other social networking apps.
Dr.Fone - Virtual Location
1-Click Location Changer for both iOS and Android
- Teleport GPS location to anywhere with one click.
- Simulate GPS movement along a route as you draw.
- Joystick to simulate GPS movement flexibly.
- Compatible with both iOS and Android systems.
- Work with location-based apps, like Pokemon Go , Snapchat , Instagram , Facebook , etc.
3981454 people have downloaded it
Part 2: Urgent FAQ about Fake Location on Hulu
Q1. How to Fix a VPN Not Working with Hulu?
At times, even after connecting with a VPN, it may not work with Hulu and the user might get a message saying “you appear to be using an anonymous proxy tool”. The easiest and the simplest solution to this problem is by disconnecting from the present server and trying with a new one.
You can also clear the cache on your system and restart to again try connecting Hulu with
VPN. Some of the other solutions that might work include taking the help of the VPN support team, checking for IP and DNS leaks, disabling IPv6, or using a different VPN protocol.
Q2. How to Bypass Hulu Error Codes?
While connecting Hulu using a VPN, you may encounter several errors like errors 16, 400, 406, and others with each of them having different issues like connection, account, server, and more. Depending on the type of type and meaning of the error, you can try bypassing and fixing it.
For Hulu errors 3 and 5 that are regarding connection issues, you can try to restart the streaming device and also restart your router. For error 16 that shows invalid region issues, you need to use a VPN that can help you bypass the region blocks of Hulu. Some of the other possible ways to fix different code error issues include reinstalling or updating the Hulu app, checking the internet connection, removing the Poco F5 5G device from the account, and adding it again.
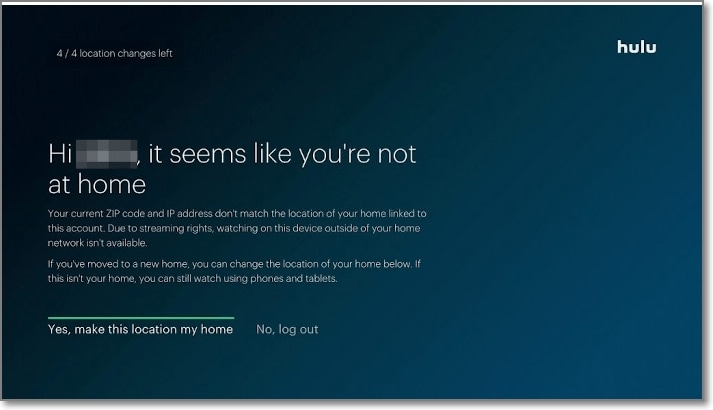
Q3. How to fix the Hulu Home Location Errors?
Hulu allows watching live TV on the local US channels including CBS, and others. The channels that you will be allowed to watch will be determined by the IP address and the GPS location that was detected at the time of first sign-up and this is called the – Hulu home location. The home location will apply to all the Poco F5 5G devices that will be associated with the Hulu + Live TV account.
Even while traveling the home location content will be visible but if you stay away from your home location for a period of 30 days, an error will appear. In a year, you can change the home location for4 times, and for this GPS will be used with the IP address.
So, even if you change your IP address using a VPN, you cannot change the GPS location and an error will appear.
To bypass these errors, there are 2 ways by which may help you remove home location errors:
Method 1. Install a VPN on your home router
Before you sign-up for a Hulu account, you can set up a VPN on your router and set a location as desired. Also, use a streaming device like Roku, and others that do not require GPS for watching the Hulu content. While using this method, ensure not to change your VPN server frequently else it will alert Hulu.
Method 2. Get a VPN with a GPS spoofer
Another way is by spoofing the GPS location and for this, you can use Surfshark’s GPS spoofer on its Android app that is named “GPS override”. This app will help you to align the GPS location as per the selected VPN server. First, use the app to change the IP address and the GPS, and then the Home Location can be updated in the settings so that it can match with the proxy location.
Final Words
To watch Hulu outside the US, use a premium VPN service provider that can set a proxy location for your device. For spoofing GPS on your mobile devices,Dr.Fone - Virtual Location, works as an excellent tool.
 safe & secure
How to Share Location in Messenger On Poco F5 5G?
We usually host a gathering once in a while and invite our friends to come over. Most of us are already used to organizing such activities because we’ve been doing that for a long time now. However, we cannot deny that it’s much easier nowadays than years ago. Why so? Simply because the communication channels available today at our disposal are more digital and more capable. For instance, Facebook Messenger now allows users to share their whereabouts in a snap of a finger. Yes. That feature is called Live Location.
The Live Location feature on Messenger works beyond sending the address or coordinates of your exact location. It basically visualizes your whereabouts by means of an interactive map and updates the details from time to time. That means the receiver can view not only your position but also your movements. Is that helpful? Absolutely yes. It’s indeed a game-changer in today’s already convenient world. Is it highly recommended? With proper handling and adequate caution, Messenger’s Live Location can definitely do more good than harm to the users.
In this article, we will delve into the highlights and benefits of Facebook Messenger’s location-sharing features. We will also provide some tutorials on how to share Live Location on Messenger. Continue reading below to learn more.
Part 1. Everything You Should Know About Messenger’s Live Location
Facebook is well aware that sharing location details is essential to its users. That’s why developers have come up with a brilliant idea and rolled out Live Location on Messenger. It basically works like other location-sharing features. However, Live Location provides more precise and thorough location information. It’s in map form, where you can view the exact location and track the movements of the sender. You’ll continue to see updates for as long as the sharing is not halted on the other end. To navigate it properly, try to read tutorials on how to share Live Location on Messenger.

What if you wish to send a particular address from another location? There is no problem with that. Messenger allows users to search for a specific place, trace it on the map, and share the details. The receiver can view it in map form and get directions if necessary. See? It’s very easy and convenient. No need to type in long addresses just to share a particular location with your friend. You just have to find it precisely on the map and send the information afterward.
Convenience is just one thing. Messenger’s location-sharing feature has a lot more to offer to users. One of which is the accuracy of the shared location information. Since the details are automatically generated through GPS, you can be sure that it is correct and definite. If you go out and track it down the neighborhood, you can certainly find the location in no time. Just make sure that the location services on your smartphone are activated so you can view your progress in real time. Also, stay vigilant while you’re out and keep yourself safe from any harm. Remember that safety remains a priority and comes above convenience.
How to Grant Facebook Messenger the Permission to Access Your Location?
Facebook Messenger’s location-sharing feature will not work without the necessary access. That’s why you should first configure the permission settings on your mobile device to avoid unwanted disruptions. Don’t worry. It’s indeed a piece of cake. Check out the tutorial provided below.
- 1: Go to Settings.
- Step 2: Click Apps.

- Step 3: Find and click Messenger.

- Step 4: Click Permissions.

- Step 5: Click Location.

- Step 6: Select Allow Only While Using the App. If you’re quite conservative regarding this matter, click Ask Every Time instead. After that, Facebook Messenger will have access to your location information.

Part 2. How to Share My Location on Messenger?
How do I share my location on Messenger? As mentioned earlier, it’s very easy to use Facebook Messenger for location sharing. All it takes is just a few clicks on the platform. No need to manually type in the address or sketch the landmarks. Messenger does the rest of the work for you. In actuality, there are three ways to share your location on Messenger. Any of them can be of great help to you, depending on your current situation. Do you want to try them now? Check out the tutorials below.
Method 1: Share location on Facebook Messenger via Live Location
How to share my location on Messenger? Well, the first option you can try is through Live Location. It works best if you wish to tell somebody where exactly you are and give updates from time to time. Don’t worry. Although it looks complicated at a glance, in reality, it’s actually not rocket science. It only takes a few seconds to complete. Below is a tutorial on how to share Live Location on Messenger in easy steps.
- Step 1: Open the Facebook Messenger application on your mobile device.
- Step 2: Browse through your conversation feed and find the contact with whom you wish to share your Live Location. Click on it.
- Step 3: Click the More (+) icon at the bottom-left corner of the screen.

- Step 4: Right after, click Location.

- Step 5: Click Start Sharing Live Location. Immediately, your current location details will be available and forwarded to the intended receiver. Live Location lasts for 60 minutes at maximum. If you wish to terminate it, simply click Stop Sharing Live Location.

Method 2: Share location on Facebook Messenger via Pinned Location
Let’s say there is a specific place you want to visit with your friend. Is there a way to share the address of the venue without you being there at the moment? Fortunately, it is possible. Apart from sharing your current location in real-time via Live Location, you can also send pinned locations on Messenger. You just need to search for it and then redirect the details to your friend. Yes. It’s just as simple as that. Do you want to try it on your smartphone? If so, follow the guide below.
- Step 1: Launch the Facebook Messenger application on your mobile device.
- Step 2: Scroll through your conversations and find the receiver from the list. Click on it.
- Step 3: On the text field, click the More (+) icon at the bottom-left corner.
- Step 4: Then, click Location.
- Step 5: Locate the search bar above the interactive map and type in the location you want to share.

- Step 6: Choose one from the suggested results and then click on it. The details will then be forwarded immediately to the intended receiver.
Method 3: Share location on Facebook Messenger via Google Maps location
How do I share my location in Messenger if I cannot find it on the map provided? Yes. That happens sometimes. There are certain places that are untraceable on the messaging platform. As a result, it doesn’t appear on the map when you try to search for it. But don’t sweat it. If you experience the same issue, you can instead use Google Maps to share location details. How to do it? Check out the tutorial provided below.
- Step 1: Launch the Google Maps application on your mobile device.
- Step 2: Click on the Search bar at the top and then type in the location.

- Step 3: Choose one from the suggestions and then tap on it. Make sure that it is exactly what you’re looking for.

- Step 4: Access the menu bar below the map and then click Share.

- Step 5: From there, click Chats or the Facebook Messenger logo.
- Step 6: Find the receiver from the provided list and then click the Send button next to its name.

NOTE: Of course, you can only send pinned locations via Google Maps. The Facebook Messenger’s Live Location is available within the platform only.
BONUS TIP: Protect Your Privacy With Wondershare Dr.Fone
There’s no denying that the location-sharing feature of Facebook Messenger is useful to many of us. It always comes in very handy whenever we need to meet people somewhere or invite them to our places. However, we should not become too complacent and let our guard down. Sharing sensitive information like whereabouts always comes with risk, regardless of the platform and the intention. Therefore, make it a habit to protect your privacy at all costs. In this regard, Wondershare Dr.Fone has something special to offer. Its Virtual Location feature, capable of modifying and simulating your location records, can be of great help for you. Don’t worry. It’s very easy to use. Here’s a short guide for you.
- Step 1: Download Wondershare Dr.Fone from its official website. Right after, install it on your computer.
- Step 2: Launch the newly installed software on your desktop. Once it fully loads up, connect your smartphone using a data cable. Follow the on-screen instructions and perform the steps accordingly to ensure the connection between the two devices is stable enough to handle the succeeding operations.
- Step 3: Navigate to the left-side panel and then click Toolbox. On the main dashboard, click Virtual Location. Is it your first time using this feature? If so, allow Wondershare Dr.Fone to download additional resources. Don’t sweat it. It will only take a few minutes to complete.
- Step 4: Once the downloading process has concluded, Wondershare Dr.Fone - Virtual Location will automatically open on a separate window. From there, go to the top-right menu bar and then click Teleport Mode. It is the first icon that appears in the row.
- Step 5: Head over to the top-left corner and enter your desired location into the search bar. Choose one from the suggested results. After that, click the Enter icon.
- Step 6: The details regarding your chosen location will be displayed on the computer screen. Review the information and make sure that it is the specific location you’re looking for. Once confirmed, click Move Here to proceed.
- Step 7: Immediately, the location settings on your smartphone will be changed according to the inputs you have provided to Wondershare Dr.Fone. You can verify it by checking the current location registered on your Maps app. After confirming that your mobile device is now showing a different location, you can now start browsing without worrying about your location’s privacy.
NOTE: Resort to Wondershare Dr.Fone - Virtual Location if your internet browsing does not require you to provide your real address. If you wish to restore your original location settings, simply close the Wondershare Dr.Fone application and restart your smartphone.
Conclusion
Gone are the days when you had to write invitation cards manually and deliver them one by one. Nowadays, all you need to do is go online and use Messenger’s location-sharing feature. Have you already tried it? If not, you should take it into consideration and use it on your next agenda. Refer to the tutorial above on how to share Live Location on Messenger. It can certainly help you get started. How do I share my location on Messenger without physically being there? That’s simple. Use Messenger or Google Maps’s pinned location. Furthermore, download Wondershare Dr.Fone on your computer. Its Virtual Location feature, capable of modifying your location settings, can provide protection for your privacy. Just connect your Poco F5 5G to the computer and set it up from there.
Also read:
- 2024 Approved Unveiling Hidden Secrets for Advanced Win10 Users
- Comment Résoudre Le Problème De 'La Commande Attrib' Qui N'Est Plus Actif?
- Explore a Collection of Stunning Hyundai Ioniq Wallpaper Graphics – Officially Curated by YL Software Experts
- In 2024, Photo Fusion at Home & Online Synergy Guide
- In 2024, Prank Your Friends! Easy Ways to Fake and Share Google Maps Location On Vivo Y100i Power 5G | Dr.fone
- In 2024, Thinking About Changing Your Netflix Region Without a VPN On Oppo A78 5G? | Dr.fone
- In 2024, Ultimate Guide to Free PPTP VPN For Beginners On Vivo Y27s | Dr.fone
- In 2024, What is Fake GPS Location Pro and Is It Good On Lava Blaze 2 5G? | Dr.fone
- In 2024, What is Geo-Blocking and How to Bypass it On Sony Xperia 5 V? | Dr.fone
- Insights on the Next-Gen Apple Domestic Aide: Price Predictions & Arrival Dates
- Is It Worth the Investment: HTC Vive XR Elite Headset Pre-Orders - A Deep Dive [ZDNet]
- Top 5 Infinix Zero 5G 2023 Turbo Bypass FRP Tools for PC That Actually Work
- Title: In 2024, Will the iPogo Get You Banned and How to Solve It On Poco F5 5G | Dr.fone
- Author: Nova
- Created at : 2025-01-02 18:19:58
- Updated at : 2025-01-05 06:39:13
- Link: https://phone-solutions.techidaily.com/in-2024-will-the-ipogo-get-you-banned-and-how-to-solve-it-on-poco-f5-5g-drfone-by-drfone-virtual-android/
- License: This work is licensed under CC BY-NC-SA 4.0.